


目录
前言
使用过Spring Boot的同学,都应该对starter不陌生,starter可以看过是一个个组件,用于提供不同的功能。Spring官方提供了很多starter,对应于不同的应用场景,以下为部分实现:

在我们需要某种功能的时候,只需要简单地导入一个starter就可以直接使用。那么为什么只要导入starter就能使用这些功能呢,Spring Boot是如何做到的?下边就通过自己实现一个starter来捋一捋这其中的流程。
在这篇文章 源码分析——Spring Boot是如何实现自动配置的 中
,我简单分析了下Spring Boot自动配置的相关原理。简单总结就是:
- 通过
@EnableAutoConfiguration注解开启自动配置(@SpringBootApplication注解默认已包含) - 自动加载类路径下
META-INF/spring.factories文件,读取以EnableAutoConfiguration的全限定类名对应的值,作为候选配置类。这里默认给出了很多组件的自动配置类。 - 自动配置类可能会再导入一些依赖(比如
@Import),或者给出一些配置条件,并且会通过@Bean注解把该组件所包含的组件注入到spring容器中以供使用。 - 自动配置类还可能会绑定xxxProperties配置文件类,该类又会和应用程序中的
application.properties中的指定前缀绑定。第3步注入组件的时候,组件可能还会获取配置文件类中的内容,所以用户可以在application.properties修改指定配置,来制定自己的个性化服务。
其实starter的实现也是基于Spring Boot的自动配置来实现的,下边就参考官方文档(Creating Your Own Starter)来自己动手实现一个starter。
starter的有关规范
结构
一步步参考官方文档来:

首先可以看到,规范的starter包含两个model,一个autoconfigure,提供自动配置代码,一个starter,会加载 autoconfigure,并提供启动所需的所有依赖。
这里我的理解是 莫非还是为了解耦?starter只管启动,具体的配置啥的都交给autoconfigure,这里就看自己的理解了。
命名
接下来是命名,这里就不截取官方文档的原文了,大概意思就是:
- 以
spring-boot开头的是官方的starter,非官方的最好不要用这个开头,比如前边看到的spring-boot-starter-aop等等,都是以此开头的。 - 自定义的starter可以以一个功能单词开头,后边跟上
-spring-boot-starter,比如常见的mybatis-spring-boot-starter、druid-spring-boot-starter。
这里是一些基本的规范,其它的规范到具体应用再说。
自定义starter
新建项目
接下来按照规范,一步步来创建自己的starter。首先创建一个空的Project。用以承载starter和autoconfigure两个model。


这里命名不重要,只要具体的模块按照规范命名即可。
新建starter模块
接下来在当前Project下新建model,这里我选择先创建starter:

创建maven工程

这里GroupId和ArtifactId相当于是Maven项目的三维坐标(一般还有个版本号)。当你把自己的项目发布到maven仓库后,他人若想使用你的项目,就通过这两个坐标来引入。其中GroupId类似代表企业,一般是域名反写,ArtifactId一般是具体的项目名,对于starter而言,规范就是xxx-spring-boot-starter,比如mybatis和druid的starter:
<dependency>
    <groupId>org.mybatis.spring.boot</groupId>
    <artifactId>mybatis-spring-boot-starter</artifactId>
    <version>2.1.2</version>
</dependency>

<dependency>
    <groupId>com.alibaba</groupId>
    <artifactId>druid-spring-boot-starter</artifactId>
    <version>1.1.22</version>
</dependency>
这里我新建一个myservice的starter,做如下命名:


新建autoconfigure模块
建好后,我们再去新建autoconfigure这个model,这里因为是要借助Spring Boot做自动配置,就可以直接使用Spring Initializer来创建。

这里依然按照规范,ArtifactId为myservice-spring-boot-autoconfigure

然后什么都不导入,直接一路next,finish。
配置autoconfigure模块
pom依赖
修改pom文件,删除无关依赖:
<?xml version="1.0" encoding="UTF-8"?>
<project xmlns="http://maven.apache.org/POM/4.0.0" xmlns:xsi="http://www.w3.org/2001/XMLSchema-instance"
		 xsi:schemaLocation="http://maven.apache.org/POM/4.0.0 https://maven.apache.org/xsd/maven-4.0.0.xsd">
	<modelVersion>4.0.0</modelVersion>
	<parent>
		<groupId>org.springframework.boot</groupId>
		<artifactId>spring-boot-starter-parent</artifactId>
		<version>2.2.6.RELEASE</version>
		<relativePath/> <!-- lookup parent from repository -->
	</parent>
	<groupId>cn.novalue.starter</groupId>
	<artifactId>myservice-spring-boot-autoconfigure</artifactId>
	<version>0.0.1-SNAPSHOT</version>
	<name>myservice-spring-boot-autoconfigure</name>
	<description>Demo project for Spring Boot</description>

	<properties>
		<java.version>1.8</java.version>
	</properties>

	<dependencies>
		<dependency>
			<groupId>org.springframework.boot</groupId>
			<artifactId>spring-boot-starter</artifactId>
		</dependency>
	</dependencies>

</project>
这里 spring-boot-starter的依赖是一定要有的,官方文档说了,starter模块要直接或者间接导入该模块,这里就把它放到autoconfigure模块下了。当然这里的依赖放置可能并不是很规范,只是为了学习罢了。
Either way, your starter must reference the core Spring Boot starter (spring-boot-starter) directly or indirectly (i.e. no need to add it if your starter relies on another starter). If a project is created with only your custom starter, Spring Boot’s core features will be honoured by the presence of the core starter.
由于我们这个模块只管配置,那么把启动类也删除了,test文件夹也删除,配置文件application.properties也可以删除了。
xxxProperties配置
按照开头的自动配置描述,新建一个MyProperties配置类。
@ConfigurationProperties(prefix = "myservice")
public class MyProperties {
    private String prefix;
    private String suffix;

    public String getPrefix() {
        return prefix;
    }

    public String getSuffix() {
        return suffix;
    }

    public void setPrefix(String prefix) {
        this.prefix = prefix;
    }

    public void setSuffix(String suffix) {
        this.suffix = suffix;
    }
}
这里注解 @ConfigurationProperties 表示这是一个配置文件,其中的属性字段可以在application.properties中指定。prefix = "myservice"表示匹配 myservice前缀。例如这里,我们将来使用的时候就可以通过配置myservice.prefix=xxx来配置前缀。
服务提供类
然后我们新建个MyService服务类,表示我们这个starter可以提供的服务。
public class MyService {

    private MyProperties myProperties;

    public MyService(MyProperties myProperties) {
        this.myProperties = myProperties;
    }

    public String addPrefix(String s) {
        return this.myProperties.getPrefix() + "-" + s;
    }
}
这里把配置文件作为构造方法参数传递进去,然后在具体服务中使用,这里只简单的提供一个添加前缀的服务。
自动配置
最后一步,就是编写一个自动配置类,绑定我们的配置文件、并将我们的服务注入到spring容器。如下:
// 必须,指明这是一个配置类
@Configuration
// 可选,表示在web应用中才配置
@ConditionalOnWebApplication
// 必须,绑定我们的配置文件类
@EnableConfigurationProperties(MyProperties.class)
// 可选,表示可以在配置文件中,通过myservice.enable来设置是否配置该类
// 如果没有指明,则默认为true,即表示配置,如果指明为false,就不配置了
@ConditionalOnProperty(prefix = "myservice", value = "enable", matchIfMissing = true)
public class MyServiceAutoConfiguration {

	// 注入配置文件
    @Autowired
    MyProperties myProperties;
	// 用@Bean将MyService注入到Spring容器中,并把配置文件传进去,以供MyService使用
    @Bean
    public MyService myService() {
        return new MyService(myProperties);
    }
}
这里关于自动配置有很多相关的注解,提供了更细粒度的配置控制,比如@Conditionalxxx系列,表示在满足什么条件下才配置。或者@AutoConfigureOrder指定顺序等等,可根据具体需求选择配置。

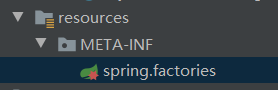
META-INF/spring.factories
在前边说过,Spring Boot的自动配置会自动加载类路径下META-INF/spring.factories文件,并将以类EnableAutoConfiguration的全限定类名对应的值作为候选配置类。所以这里还需要新建该文件。
# Auto Configure
org.springframework.boot.autoconfigure.EnableAutoConfiguration=\
cn.novalue.starter.MyServiceAutoConfiguration
这样,Spring Boot就能自动扫描到我们这个配置类并加载了。
打包构建
编写完后,将两个模块打包发布到maven仓库。因为导入的时候是从maven仓库查找的。这里说一点,我们默认打包发布是发布在我们本地的maven仓库的,所以只能本地使用。如果想要将自己的服务公开出去,可以查找发布到maven中心仓库的方法。
IDEA可以很简单地执行打包操作:


以此打包好autoconfigure模块和starter模块。
到此,自定义starter就算完成了,下边测试一下。
测试
可以新建个Spring Boot的maven项目测试,这里我省事,就还在原Project下新建model测试了,效果一样的。

因为我们写的自动配置有个@ConditionalOnWebApplication,表示在Web应用程序下才配置,所以这里要勾选Spring Web。

新建完成后,在pom.xml中导入我们的starter依赖
		<dependency>
			<groupId>cn.novalue.starter</groupId>
			<artifactId>myservice-spring-boot-starter</artifactId>
			<version>1.0-SNAPSHOT</version>
		</dependency>
作为测试,可以在application.properties文件中,做自定义配置,比如设置前缀:
myservice.prefix=this is prefix
新建一个TestController,注入我们的MyService:
@RestController
public class TestController {
    @Autowired
    private MyService myService;

    @GetMapping("/test")
    public String test() {
        return myService.addPrefix("test MyService");
    }
}
这里调用myService.addPrefix。启动项目,浏览器输入http://localhost:8080/test:
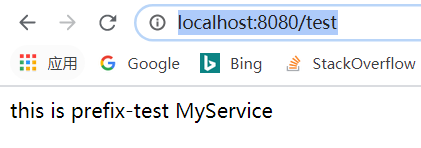
说明我们确实可以使用myService的服务,并且可以自定义前缀。
总结
总结自定义starter的主要流程和注意事项:
- 规范是定义一个
starter模块和autoconfigure模块,starter模块依赖autoconfigure模块,并提供启动所需的依赖。starter模块不提供服务。 - 在命名上,一般是
前缀-spring-boot-starter和前缀-spring-boot-autoconfigure,比如mybatis-spring-boot-starter。 - 可以编写xxxProperties配置文件,按照自己的需求,提供可自定义的配置选项。
autoconfigure模块中编写自己的服务类,可以导入配置文件并使用其中的配置。- 自动配置类要标注
@Configuration注解,用@EnableConfigurationProperties绑定配置文件,可按照自己的需求,给出自动配置的条件、时机、顺序等。用@Bean把自己所要暴露的服务类提供出来,让其注入到Spring容器中。 - 新建
META-INF/spring.factories文件,把自己的配置类全类名绑定到Spring Boot自动配置类的全类名上。如下所示:
# Auto Configure
org.springframework.boot.autoconfigure.EnableAutoConfiguration=\
cn.novalue.starter.MyServiceAutoConfiguration
- 打包发布两个模块。


 1047
1047


 被折叠的 条评论
为什么被折叠?
被折叠的 条评论
为什么被折叠?
 到【灌水乐园】发言


