


转载自http://www.krizna.com/centos/setup-network-centos-7/
Setup network on centos 7
let’s start, Type “nmcli d” command in your terminal for quick identification of Ethernet cards installed in your machine.

Here we have 2 interfaces named “enp0s17” and “enp0s18” . it might be different in your case ( Eg: em1 or p4p1 ).
GUI Mode
Recommended for beginners
Step 1 » Type this command “nmtui” to open Network manager and press enter after choosing ” Edit a connection” ( Use TAB for choosing options ) .

Step 2 » Now you can see all network interfaces, choose one and click “Edit“.

» DHCP configuration
Step 3 » For DHCP,
1. Choose “Automatic” in IPv4 CONFIGURATION.
2. Choose Automatic Connect check box.
3. Press OK and quit Network manager.

Now Restart network service by typing below command.
systemctl restart networkNow your server will get IP Address from DHCP .
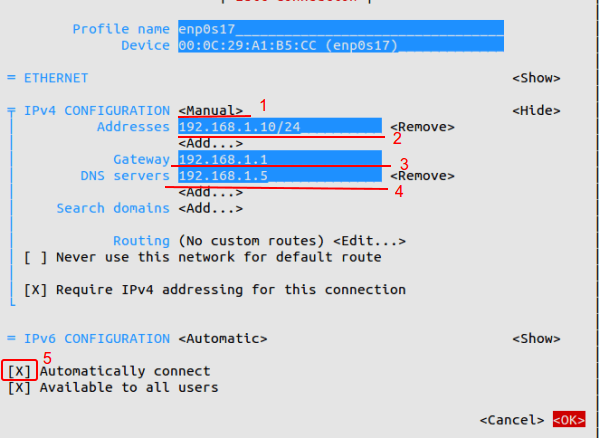
» Static configuration
1. Choose “ Manual ” in IPv4 CONFIGURATION.
2. Add IP Address with Subnet , Gateway and DNS server ( Refer below image ).
3. Choose Automatic Connect check box.
4. Press OK and quit Network manager.
Now Restart network service by typing below command.
systemctl restart network
That’s it, Interface will have static IP.
Command Mode
Step 1 » Network interface config files are located in /etc/sysconfig/network-scripts/ directory. Open ifcfg-enp0s17 file ( For interface enp0s17 ) and you can see the content like below.
[root@krizna ~]# vi /etc/sysconfig/network-scripts/ifcfg-enp0s17
 TYPE=Ethernet
 BOOTPROTO=none
 DEFROUTE=yes
 IPV4_FAILURE_FATAL=no
 IPV6INIT=yes
 IPV6_AUTOCONF=yes
 IPV6_DEFROUTE=yes
 IPV6_FAILURE_FATAL=no
 NAME=enp0s17
 UUID=7f1aff2d-b154-4436-9497-e3a4dedddcef
 ONBOOT=no
 HWADDR=00:0C:29:A1:B5:D6
 PEERDNS=yes
 PEERROUTES=yes
 IPV6_PEERDNS=yes
 IPV6_PEERROUTES=yes
» DHCP configuration
Step 2 » For DHCP
Find the below lines in config File.
BOOTPROTO=noneand replace with
ONBOOT=no
BOOTPROTO=dhcpNow Restart network service by typing below command.
ONBOOT=yes
systemctl restart networkNow your server will get IP Address from DHCP
» Static configuration
Step 3 » For Static IP.
Find the below lines in config File.
BOOTPROTO=noneand replace with
ONBOOT=no
BOOTPROTO=staticAnd add the below lines at the end of the file.
ONBOOT=yes
IPADDR=172.27.0.32File will look like below after changes.
NETMASK=255.255.255.0
GATEWAY=172.27.0.1
DNS1=172.27.0.5
TYPE=Ethernet
 BOOTPROTO=static
 DEFROUTE=yes
 IPV4_FAILURE_FATAL=no
 IPV6INIT=yes
 IPV6_AUTOCONF=yes
 IPV6_DEFROUTE=yes
 IPV6_FAILURE_FATAL=no
 NAME=enp0s17
 UUID=f0c5b37d-299a-43cb-b74b-618bb252d129
 ONBOOT=yes
 HWADDR=00:0C:29:A1:B5:CC
 IPV6_PEERDNS=yes
 IPV6_PEERROUTES=yes
 IPADDR=192.168.1.10
 NETMASK=255.255.255.0
 GATEWAY=192.168.1.1
 DNS1=192.168.1.5
Now Restart network service by typing below command.
systemctl restart networkNow Interface will have static IP.
Additionally you can use /etc/sysconfig/network file for hostname and DNS .
HOSTNAME=server.krizna.com
 DNS1=192.168.1.5
 DNS2=8.8.8.8
 SEARCH=krizna.com
Have a nice day


 2871
2871


 被折叠的 条评论
为什么被折叠?
被折叠的 条评论
为什么被折叠?
 到【灌水乐园】发言


