


布局负责给控件安排位置,不同的布局提供不同的安排方式。
常用的布局有一下几个:LinearLayout、TableLayout、FrameLayout、RelativeLayout、AbsoluteLayout。
LinearLayout
LinearLayout(线性布局)应该是最简单最常用的布局,提供简单纵向或横向排列控件。
垂直布局时每行只有一个元素,多个元素会依次向下排列;水平布局时,只有一行,每个元素依次向右排列。
水平布局:
<?xml version="1.0" encoding="utf-8"?>
<LinearLayout xmlns:android="http://schemas.android.com/apk/res/android"
    xmlns:tools="http://schemas.android.com/tools"
    android:layout_width="match_parent"
    android:layout_height="match_parent"
    android:paddingBottom="@dimen/activity_vertical_margin"
    android:paddingLeft="@dimen/activity_horizontal_margin"
    android:paddingRight="@dimen/activity_horizontal_margin"
    android:paddingTop="@dimen/activity_vertical_margin"
    android:orientation="horizontal"
    tools:context="com.example.yifanz.layout.MainActivity">

    <Button
        android:layout_width="wrap_content"
        android:layout_height="wrap_content"
        android:text="bt1"
        android:id="@+id/button" />

    <Button
        android:layout_width="wrap_content"
        android:layout_height="wrap_content"
        android:text="bt2"
        android:id="@+id/button2" />

    <Button
        android:layout_width="wrap_content"
        android:layout_height="wrap_content"
        android:text="bt3"
        android:id="@+id/button3" />

</LinearLayout>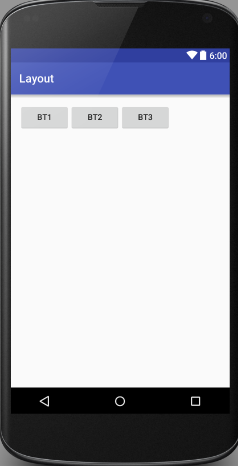
垂直布局:
<?xml version="1.0" encoding="utf-8"?>
<LinearLayout xmlns:android="http://schemas.android.com/apk/res/android"
    xmlns:tools="http://schemas.android.com/tools"
    android:layout_width="match_parent"
    android:layout_height="match_parent"
    android:paddingBottom="@dimen/activity_vertical_margin"
    android:paddingLeft="@dimen/activity_horizontal_margin"
    android:paddingRight="@dimen/activity_horizontal_margin"
    android:paddingTop="@dimen/activity_vertical_margin"
    android:orientation="vertical"
    tools:context="com.example.yifanz.layout.MainActivity">

    <Button
        android:layout_width="wrap_content"
        android:layout_height="wrap_content"
        android:text="bt1"
        android:id="@+id/button" />

    <Button
        android:layout_width="wrap_content"
        android:layout_height="wrap_content"
        android:text="bt2"
        android:id="@+id/button2" />

    <Button
        android:layout_width="wrap_content"
        android:layout_height="wrap_content"
        android:text="bt3"
        android:id="@+id/button3" />

</LinearLayout>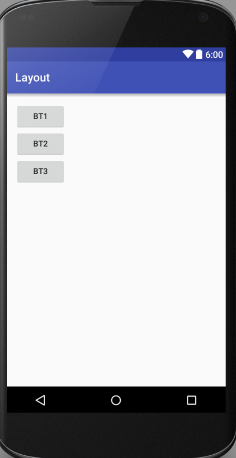
TableLayout
表格布局。以行和列的形式对控件进行管理,每行为一个TableRow对象
<TableLayout xmlns:android="http://schemas.android.com/apk/res/android"
    xmlns:tools="http://schemas.android.com/tools"
    android:layout_width="fill_parent"
    android:layout_height="match_parent"
    android:paddingBottom="@dimen/activity_vertical_margin"
    android:paddingLeft="@dimen/activity_horizontal_margin"
    android:paddingRight="@dimen/activity_horizontal_margin"
    android:paddingTop="@dimen/activity_vertical_margin"
    tools:context="com.example.yifanz.layout.Main2Activity">

    <TableRow>

        <TextView
            android:text="User"
            android:textStyle="bold"
            android:gravity="right"
            android:padding="3dip"
            android:layout_column="0" />

        <EditText android:id="@+id/username"
            android:text=""
            android:padding="3dip"
            android:scrollHorizontally="true"
            android:layout_column="2" />
    </TableRow>


    <TableRow
        android:layout_width="match_parent"
        android:layout_height="match_parent">

    </TableRow>

    <TableRow>
        <TextView
            android:text="Password"
            android:textStyle="bold"
            android:gravity="right"
            android:padding="3dip"
            android:layout_column="0"/>

        <EditText android:id="@+id/password"
            android:text="Password"
            android:password="true"
            android:padding="3dip"
            android:scrollHorizontally="true"
            android:layout_column="2" />

    </TableRow>


    <TableRow>


        <Button android:id="@+id/cancel"
            android:text="Cancel"
            android:layout_column="0"
            android:layout_span="1" />

        <Button android:id="@+id/login"
            android:text="Login"
            android:layout_column="2"
            android:layout_span="4"
            android:layout_width="match_parent"/>

    </TableRow>

    <TableRow
        android:layout_width="match_parent"
        android:layout_height="match_parent">

    </TableRow>

</TableLayout>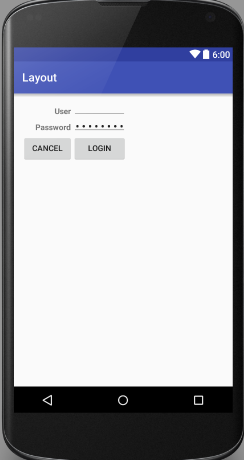


 235
235

 被折叠的 条评论
为什么被折叠?
被折叠的 条评论
为什么被折叠?
 到【灌水乐园】发言


