


版权声明:欢迎转载与交流。https://blog.csdn.net/one2more/article/details/90215526
一、前言
在Linux系统中,我们可以通过一些设置来让电脑定时提醒我们该做什么事了;或者我们提前设置好告诉电脑几点钟做什么。这种就叫做定时任务。而在日常的使用中遇到一些需要执行的事情或任务,我们也可以通过命令来告诉电脑在特定时间把一些特定的工作给做一下。
以上的这些情景在Linux中,我们可以通过crontab和at这两个工具来实现这些功能。
二、crontab周期性定时任务
crond服务用来定期检查系统是否有要执行的工作,如果有要执行的工作便会自动执行该任务。
cron是Linux下的定时执行工具,可以在无需人工干预的情况下运行作业。
三、crond服务的相关操作
1、关闭/停止crond服务
[root@localhost ~]# systemctl stop crond
2、开启crond服务
[root@localhost ~]# systemctl start crond
3、重启crond服务
[root@localhost ~]# systemctl restart crond
4、查看crond服务开启状态,为running(开启状态)
[root@localhost ~]# systemctl status crond
● crond.service - Command Scheduler
   Loaded: loaded (/usr/lib/systemd/system/crond.service; enabled; vendor preset: enabled)
   Active: active (`running`) since 三 2019-05-15 09:40:48 CST; 4h 13min ago
 Main PID: 579 (crond)
   CGroup: /system.slice/crond.service
           └─579 /usr/sbin/crond -n
5月 15 09:40:48 localhost.localdomain systemd[1]: Started Command Scheduler.
5月 15 09:40:48 localhost.localdomain systemd[1]: Starting Command Scheduler...
5月 15 09:40:49 localhost.localdomain crond[579]: (CRON) INFO (RANDOM_DELAY will be scaled with factor 46% if used.)
5月 15 09:40:50 localhost.localdomain crond[579]: (CRON) INFO (running with inotify support)
5、查看crond服务开机自启动状态,为enabled(开启状态)
[root@localhost ~]# systemctl is-enabled crond
enabled
6、设置crond服务开机自启动状态为disabled(禁止开机自启动)
[root@localhost ~]# systemctl disable crond
Removed symlink /etc/systemd/system/multi-user.target.wants/crond.service.
[root@localhost ~]# systemctl is-enabled crond
disabled
7、设置crond服务开机自启动状态为enabled状态 (允许开机自启动)
[root@localhost ~]# systemctl enable crond
Created symlink from /etc/systemd/system/multi-user.target.wants/crond.service to /usr/lib/systemd/system/crond.service.
[root@localhost ~]# systemctl is-enabled crond
enabled
四、crontab命令示例及参数说明
crontab -u test                 # -u 指定test用户的cron服务
crontab -l                      # -l 列出当前用户下的cron服务的详细信息
crontab -u test -l              # 列出指定用户test下的cron服务的详细信息
crontab -r                      # -r 删除cron服务
crontab -u test -r              # 删除指定用户test的cron服务
crontab -e                      # -e 编辑cron服务
crontab -u test -e              # 编辑指定用户test的cron服务
五、crontab -e 编辑时的语法规则
[root@localhost ~]#crontab -e
*          *         *         *         *         echo 123456
#分钟      小时       天        月        星期        要执行的任务
#0~59     0~23      1~31     1~12     1~7或0~6      脚本、命令等
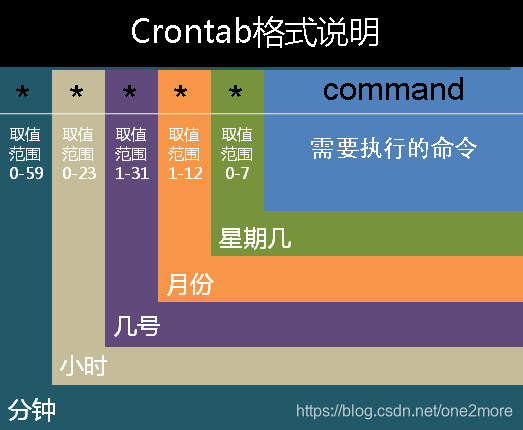
1、具体格式说明如下:一行对应一个任务
| 字段 | 第一个字段 | 第二个字段 | 第三个字段 | 第四个字段 | 第五个字段 | 第六个字段 |
|---|---|---|---|---|---|---|
| 内容 | * | * | * | * | * | command |
| 含义 | 分钟 | 小时(几点) | 天(几号) | 月 | 星期 | 需要执行的任务 |
| 取值范围 | 0~59 | 0~23 | 1~31 | 1~12 | 1 ~7 或 0 ~6 | 命令/脚本 |
2、任务条目中,特殊符号的含义
| 符号 | 含义 | 示例 |
|---|---|---|
| * | 代表取值范围内的数字 | 任意/每 |
| / | 指定时间间隔频率 | */10(每十)0-23/2(每两个小时) |
| - | 代表从某个数字到某个数字 | 8-17(8号到17号/8点到17点/8分到17分) |
| , | 逗号代表分开几个离散的数字 | 6,10-13,25(6号,10号到13号,25号) |
六、查看系统中所有用户的计划任务
系统中所有的周期性计划任务都保存在/var/spool/cron/目录下
[root@localhost ~]# ll /etc/spool/cron/         #查看系统中有哪些用户有计划任务
[root@localhost ~]# cat /etc/spool/cron/用户名   #使用cat查看具体的用户计划任务内容
七、系统级别的计划任务
系统级别的计划任务一般都为/etc/cron*
[root@localhost ~]# ll /etc/cron
cron.d/       cron.daily/   cron.deny     cron.hourly/  cron.monthly/ crontab       cron.weekly/
| 目录或文件 | 说明 |
|---|---|
| cron.d/ | 是系统自动定期需要做的任务,但是又不是按小时、按天、按星期、按月来执行的,它们就放在这个目录下 |
| cron.daily/ | 存放每天执行的脚本 |
| cron.deny | 控制用户是否能够做计划任务的文件 |
| cron.hourly/ | 存放每小时执行的脚本 |
| cron.monthly/ | 存放每月执行的脚本 |
| crontab | 主配置文件,也可在其中添加任务 |
| cron.weekly/ | 存放每周执行的脚本 |
1、/etc/crontab配置文件分析及其使用的相关注意
(1)/etc/crontab配置文件
[root@localhost ~]# cat /etc/crontab
SHELL=/bin/bash                     # 指定操作系统使用哪个shell
PATH=/sbin:/bin:/usr/sbin:/usr/bin  # 系统执行命令的搜索路径
MAILTO=root                         # 把执行任务的结果信息通过邮件发送给指定用户

# For details see man 4 crontabs
# Example of job definition:        # 示例及说明
# .---------------- minute (0 - 59)
# |  .------------- hour (0 - 23)
# |  |  .---------- day of month (1 - 31)
# |  |  |  .------- month (1 - 12) OR jan,feb,mar,apr ...
# |  |  |  |  .---- day of week (0 - 6) (Sunday=0 or 7) OR sun,mon,tue,wed,thu,fri,sat
# |  |  |  |  |
# *  *  *  *  * user-name  command to be executed
(2)使用crontab命令的注意事项
环境变量的问题(避免找不到命令或shell不同语法不通造成的不兼容从而导致执行出错)。
清理邮件日志(比如使用重定向 > /dev/null 2>&1)。
系统级别的调度任务和用户级别的调度任务虽然都可以放到系统级别去执行,但是不建议去这样做。
八、常见的计划任务写法举例(以重启Apache为例)
1、每天晚上21:00重启Apache
0 21 * * * /etc/init.d/httpd restart
2、每月1号、10号、22号的2:30重启Apache
30 2 1,10,22 * * /etc/init.d/httpd restart
3、每月1号到10号的2:30重启Apache
30 2 1-10 * * /etc/init.d/httpd restart
4、每隔两天的上午8点到11点的第3和第15分钟执行重启Apache
3,15 8-11 */2 * * /etc/init.d/httpd restart
5、晚上11点到第二天早上7点之间,每隔1小时重启Apache
* 23-7/1 * * * /etc/init.d/httpd restart
6、周一到周五每天晚上22:35寄一封信给root@test
35 22 * * 1-5 mail -s nihao root@test < /etc/fstab
九、实战案例
1、实验需求:
1、每天1:00备份/etc/目录到/tmp/backup下面;
2、将备份命令写入一个脚本中;
3、每天备份的文件名格式要求:年-月-日_etc.tar.gz;
4、在执行计划任务时,不输出任何任务信息;
5、存放备份内容的目录要求只保留最近3天的备份数据。
2、需求分析(大致流程)
mkdir /tmp/backup
tar -zcf /tmp/backup/`date +%F`_etc.tar.gz /etc
find /tmp/backup -name *etc.tar.gz -mtime +3 -exec rm -rf {} \;
3、脚本编写
  [root@localhost ~]# vim backup.sh
  #!/bin/bash
  find /tmp/backup -name *etc.tar.gz -mtime +3 -exec rm -rf {} \;
  tar -zcf /tmp/backup`date +%F`_etc.tar.gz /etc
4、编辑计划任务
  [root@localhost ~]# crontab -e
  0  1  *  *  *  /root/backup.sh
  ~
  ~
  :wq
  [root@localhost ~]# crontab -l
  0 1 * * * /root/backup.sh
注意:工作中备份的文件不要存放到/tmp目录下,因为过一段时间系统会清理/tmp目录下的内容。


 1534
1534


 被折叠的 条评论
为什么被折叠?
被折叠的 条评论
为什么被折叠?
 到【灌水乐园】发言


