


GraphQL学习与实践4(模拟客户端请求)
在前面的学习中,使用的都是偏后台,直接通过设置graphiql为true,然后通过自带的工具进行的验证。这里来说三个模拟客户端请求的案例。
使用query的ajax请求
新建一个文件夹,test9-query目录作为该项模拟的根目录。
新建schema目录,schema.js文件:
const graphql = require('graphql');
const queryType = new graphql.GraphQLObjectType({
   name: 'Query',
   fields: {
      greeting: {
         type: graphql.GraphQLString,
         resolve: () => 'Hello GraphQL  From TutorialsPoint !!',
      },
      sayHello: {
         type: graphql.GraphQLString,
         args: {
            name: {
               type: graphql.GraphQLString
            }
         },
         resolve: function (_, args) {
            return `Hi ${args.name} GraphQL server says Hello to you!!`
         }
      }
   }
});
这里的schema.js文件中,就新建了一个Query的GraphQL的类型,里面包含了greeting,sayHello两个业务。
在根目录新建server.js文件:
const express = require('express');
const cors = require('cors')
const graphqlHTTP = require('express-graphql');
const graphql = require('graphql');

const { queryType } = require("./schema/schema");

const schema = new graphql.GraphQLSchema({ query: queryType });
const app = express();
app.use(cors());
app.use('/graphql', graphqlHTTP({
    schema: schema,
    graphiql: true,
}));
app.listen(4000);
console.log('Running a GraphQL API server at localhost:4000/graphql');

module.exports = { queryType };
根据之前的逻辑建立起一个服务。
注意:这里较之前的代码新加了一个cors模块,用来处理服务端本地的跨域问题。需要安装:
npm install --save cors
服务端ok之后,同样可以使用自带的工具进行验证:
{
greeting,
sayHello(name:“test”)
}
如图:

建立客户端:
新建一个public文件夹,在该目录下新建index.html文件:
<!DOCTYPE html>
<html>

<head>
    <script src="https://code.jquery.com/jquery-3.1.1.min.js"></script>
    <script>
        $(document).ready(function () {

            $("#btnSayhello").click(function () {

                const name = $("#txtName").val();
                console.log(name);
                $("#SayhelloDiv").html("loading....");

                $.ajax({
                    url: "http://localhost:4000/graphql",
                    contentType: "application/json",
                    type: "POST",
                    data: JSON.stringify({
                        query: `{
                     sayHello(name:"${name}")}`
                    }),
                    success: function (result) {
                        console.log(JSON.stringify(result))
                        $("#SayhelloDiv").html("<h1>" + result.data.sayHello + "</h1>");
                    }
                });
            });

            $("#btnGreet").click(function () {
                $("#greetingDiv").html("loading....");
                $.ajax({
                    url: "http://localhost:4000/graphql",
                    contentType: "application/json",
                    type: "POST",
                    dataType: 'json',
                    data: JSON.stringify({
                        query: `{greeting}`
                    }),
                    success: function (result) {
                        $("#greetingDiv").html("<h1>" + result.data.greeting + "</h1>");
                    }
                });
            });
        });
    </script>
</head>

<body>
    <h1>Jquery Client </h1>

    <hr />
    <section>
        <button id="btnGreet">Greet</button>
        <br /> <br />
        <div id="greetingDiv"> </div>
    </section>

    <br /> <br /> <br />
    <hr />

    <section>
        Enter a name:<input id="txtName" type="text" value="kannan" />
        <button id="btnSayhello">SayHello</button>
        <div id="SayhelloDiv"> </div>
    </section>
</body>
</html>
然后访问该文件,点击两个按钮,出现如图所示效果:

服务端必须安装一下cors模块处理一下跨域的问题,不然就访问不了,在本地的操作。
react中通过fetch网络进行访问
新建test10-react文件夹作为该模拟的项目子根目录。
新建react项目:
create-react-app hello-world-client
若是创建项目报not found的create-react-app的话,请自行安装脚手架工具(Create React App是FaceBook的React团队官方出的一个构建React单页面应用的脚手架工具)。
npm install -g create-react-app
然后在hello-world-client目录中,修改APP.js文件:
import React, { Component } from 'react';
import logo from './logo.svg';
import './App.css';

async function loadGreeting() {
  const response = await fetch('http://localhost:4000/graphql', {
    method: 'POST',
    headers: { 'content-type': 'application/json' },
    body: JSON.stringify({ query: '{greeting}' })
  })
  const rsponseBody = await response.json();
  return rsponseBody.data.greeting;
  console.log("end of function")
}

async function loadSayhello(name) {
  const response = await fetch('http://localhost:4000/graphql', {
    method: 'POST',
    headers: { 'content-type': 'application/json' },
    body: JSON.stringify({ query: `{sayHello(name:"${name}")}` })
  })
  const rsponseBody = await response.json();
  return rsponseBody.data.sayHello;
}

class App extends Component {

  constructor(props) {
    super(props);
    this.state = { greetingMessage: '', sayHelloMessage: '', userName: '' }
    this.updateName = this.updateName.bind(this);
    this.showSayHelloMessage = this.showSayHelloMessage.bind(this);
    this.showGreeting = this.showGreeting.bind(this);
  }

  showGreeting() {
    loadGreeting().then(g => this.setState({ greetingMessage: g + " :-)" }))
  }

  showSayHelloMessage() {
    const name = this.state.userName;
    console.log(name)
    loadSayhello(name).then(m => this.setState({ sayHelloMessage: m }))
  }

  updateName(event) {
    this.setState({ userName: event.target.value })
  }

  componentDidMount() {
    this.showGreeting();
  }

  render() {
    return (
      <div className="App">
        <header className="App-header">
          <img src={logo} className="App-logo" alt="logo" />
          <p>
            Edit <code>src/App.js</code> and save to reload.
        </p>
          <a
            className="App-link"
            href="https://reactjs.org"
            target="_blank"
            rel="noopener noreferrer"
          >
            Learn React
        </a>
        </header>
        <br />
        <section>
          showGreeting:{this.state.greetingMessage}
        </section>
        <br />
        <section>
          Enter a name:<input id="txtName" type="text" onChange={this.updateName}
            value={this.state.userName} />
          <button id="btnSayhello" onClick={this.showSayHelloMessage}>SayHello</button>
          <br />
          user name is:{this.state.userName}    <br />
          <div id="SayhelloDiv">
            <h1>{this.state.sayHelloMessage}</h1>
          </div>
        </section>
      </div>
    );
  }
}

export default App;
在上面的代码中,分别封装了loadSayhello和loadGreeting两个方法进行范文graphql的服务,这个服务是上面test9-jquery中启动的服务。在hello-world-client项目中启动:
npm start
此时会自动打开默认的浏览器访问3000端口,如端口被占用,启动的时候会自动询问是否更换3001端口访问的。如图:

因为启动react客户端是全屏的,为了方便看点,这里还修改了一下app.css:
.App {
  text-align: center;
  min-height: 100vh;
}

.App-logo {
  height: 40vmin;
}

.App-header {
  background-color: #282c34;
  min-height: 90%;
  display: flex;
  flex-direction: column;
  align-items: center;
  justify-content: center;
  font-size: calc(10px + 2vmin);
  color: white;
}

.App-link {
  color: #09d3ac;
}
在react中使用Apollo客户端
新建test11-apollo-react文件夹作为该模拟的项目子根目录。
新建server.js文件,这里和上面的server.js文件是一样的:
const express = require('express');
const cors = require('cors')
const graphqlHTTP = require('express-graphql');
const graphql = require('graphql');

const { queryType } = require("./schema/schema");

const schema = new graphql.GraphQLSchema({ query: queryType });
const app = express();
app.use(cors());
app.use('/graphql', graphqlHTTP({
    schema: schema,
    graphiql: true,
}));
app.listen(4000);
console.log('Running a GraphQL API server at localhost:4000/graphql');
同样的和上面的一样的新建schema文件夹,里面新建schema.js文件:
const graphql = require('graphql');

class Student {
   constructor(id, firstName, lastName, college) {
      this.id = id;
      this.firstName = firstName;
      this.lastName = lastName;
      this.college = college;
   }
}

students = [new Student('id1', 'firstName1', 'lastName1', { name: 'test1' }),
new Student('id2', 'firstName2', 'lastName2', { name: 'test2' }),
new Student('id3', 'firstName3', 'lastName3', { name: 'test3' })];

const collegeType = new graphql.GraphQLObjectType({
   name: 'College',
   fields: {
      id: {
         type: graphql.GraphQLString
      },
      name: {
         type: graphql.GraphQLString
      },
      location: {
         type: graphql.GraphQLString
      },
      rating: {
         type: graphql.GraphQLFloat
      }
   }
});

const studentType = new graphql.GraphQLObjectType({
   name: 'Student',
   fields: {
      id: {
         type: graphql.GraphQLString
      },
      firstName: {
         type: graphql.GraphQLString
      },
      lastName: {
         type: graphql.GraphQLString
      },
      college: {
         type: collegeType
      }
   }
});

const queryType = new graphql.GraphQLObjectType({
   name: 'Query',
   fields: {
      students: {
         type: graphql.GraphQLList(studentType),
         resolve: () => students,
      }
   }
});

module.exports = { queryType };
这里就提供了students一个业务。
同样的在子根目录下创建react项目:
create-react-app hello-world-client
在hello-world-client目录中,安装客户端的graphql库以及Apollo Boost包:
npm install apollo-boost graphql
修改APP.js文件:
import React, {Component} from 'react';
// apollo client
import {ApolloClient, HttpLink, InMemoryCache} from 'apollo-boost'
import gql from 'graphql-tag'
const endPointUrl = 'http://localhost:4000/graphql'
const client = new ApolloClient({
link: new HttpLink({uri:endPointUrl}),
cache:new InMemoryCache()
});
async function loadStudentsAsync() {
const query = gql`
{
students{
id
firstName
lastName
college{
name
}
}
}
`
const {data} = await client.query({query}) ;
return data.students;
}
export default class App extends Component {
constructor(props) {
super(props);
this.state = {
students:[]
}
this.studentTemplate = [];
}
async loadStudents() {
const studentData = await loadStudentsAsync();
this.setState({
students: studentData
})
console.log("loadStudents")
}
render() {
return(
<div>
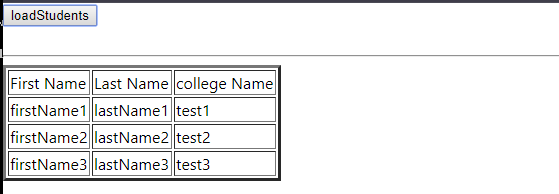
<input type = "button" value = "loadStudents" onClick = {this.loadStudents.bind(this)}/>
<div>
<br/>
<hr/>
<table border = "3">
<thead>
<tr>
<td>First Name</td>
<td>Last Name</td>
<td>college Name</td>
</tr>
</thead>
<tbody>
{
this.state.students.map(s => {
return (
<tr key = {s.id}>
<td>
{s.firstName}
</td>
<td>
{s.lastName}
</td>
<td>
{s.college.name}
</td>
</tr>
)
})
}
</tbody>
</table>
</div>
</div>
)
}
}
通过上面我们可以看到,通过apollo-boost,使用其ApolloClient, HttpLink, InMemoryCache三个模块。
ApolloClient:
使用Apollo Client,我们可以直接调用服务器而无需使用fetch API.此外,查询和突变不应嵌入使用反向刻度表示法的字符串中,这是因为, gql 函数直接解析查询.这意味着,在GraphiQL工具中编写查询时,程序员可以以相同的方式直接编写查询。 gql 是一个标记函数,它将后面的刻度表示法中的模板字符串解析为graphql查询对象. Apollo Client查询方法返回一个promise。
具体可以参考官网api解析:
https://www.apollographql.com/docs/react/api/apollo-client/
https://www.apollographql.com/docs/react/caching/cache-configuration/
项目图如下:
更多
[GraphQL学习与实践1(入门介绍)](https://blog.csdn.net/onsenOnly/artic
le/details/102639327)
GraphQL学习与实践2(类型、传参与构造函数类型)
GraphQL学习与实践3(Mutations And Input Types)
GraphQL学习与实践4(模拟客户端请求)
GraphQL学习与实践5(连接数据库mongodb与mysql)
代码:
onsenOnly:https://github.com/onsenOnly/graphql-test
有缘请点颗星,谢谢!


 358
358


 被折叠的 条评论
为什么被折叠?
被折叠的 条评论
为什么被折叠?
 到【灌水乐园】发言


