


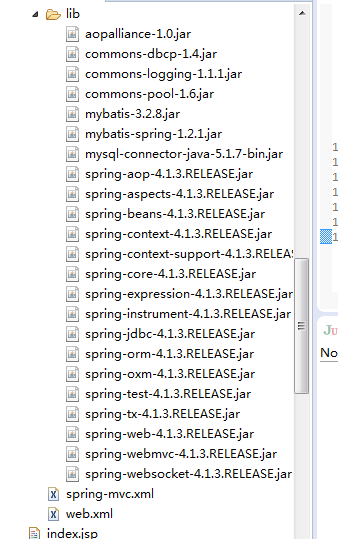
请叫我雷锋,今天为大家分享springmvc史上最简单的整合之一,好了,废话不多说,首先我们新建一个工程,命名为:MySmall_SSM_Project,接着引入我们工程所需要的包,如下图:
下面是maven的引入包(如果你是用maven就导入以下列表,我用的直接导入jar,所以不用):
<project xmlns="http://maven.apache.org/POM/4.0.0" xmlns:xsi="http://www.w3.org/2001/XMLSchema-instance"
  xsi:schemaLocation="http://maven.apache.org/POM/4.0.0 http://maven.apache.org/maven-v4_0_0.xsd">
  <modelVersion>4.0.0</modelVersion>
  <groupId>MyBaits_HelloWorld_01</groupId>
  <artifactId>MyLove</artifactId>
  <packaging>war</packaging>
  <version>0.0.1-SNAPSHOT</version>
  <name>MyLove Maven Webapp</name>
  <url>http://maven.apache.org</url>
  <properties>
        <!-- spring版本号 -->
        <spring.version>4.0.2.RELEASE</spring.version>
        <!-- mybatis版本号 -->
        <mybatis.version>3.2.6</mybatis.version>
        <!-- log4j日志文件管理包版本 -->
        <slf4j.version>1.7.7</slf4j.version>
        <log4j.version>1.2.17</log4j.version>
  </properties>
  <dependencies>
     <dependency>
            <groupId>junit</groupId>
            <artifactId>junit</artifactId>
            <version>4.11</version>
            <!-- 表示开发的时候引入,发布的时候不会加载此包 -->
            <scope>test</scope>
        </dependency>
    <dependency>
            <groupId>org.springframework</groupId>
            <artifactId>spring-core</artifactId>
            <version>${spring.version}</version>
        </dependency>

        <dependency>
            <groupId>org.springframework</groupId>
            <artifactId>spring-web</artifactId>
            <version>${spring.version}</version>
        </dependency>
        <dependency>
            <groupId>org.springframework</groupId>
            <artifactId>spring-oxm</artifactId>
            <version>${spring.version}</version>
        </dependency>
        <dependency>
            <groupId>org.springframework</groupId>
            <artifactId>spring-tx</artifactId>
            <version>${spring.version}</version>
        </dependency>

        <dependency>
            <groupId>org.springframework</groupId>
            <artifactId>spring-jdbc</artifactId>
            <version>${spring.version}</version>
        </dependency>

        <dependency>
            <groupId>org.springframework</groupId>
            <artifactId>spring-webmvc</artifactId>
            <version>${spring.version}</version>
        </dependency>
        <dependency>
            <groupId>org.springframework</groupId>
            <artifactId>spring-aop</artifactId>
            <version>${spring.version}</version>
        </dependency>

        <dependency>
            <groupId>org.springframework</groupId>
            <artifactId>spring-context-support</artifactId>
            <version>${spring.version}</version>
        </dependency>

        <dependency>
            <groupId>org.springframework</groupId>
            <artifactId>spring-test</artifactId>
            <version>${spring.version}</version>
        </dependency>
        <!-- mybatis核心包 -->
        <dependency>
            <groupId>org.mybatis</groupId>
            <artifactId>mybatis</artifactId>
            <version>${mybatis.version}</version>
        </dependency>
        <!-- mybatis/spring包 -->
        <dependency>
            <groupId>org.mybatis</groupId>
            <artifactId>mybatis-spring</artifactId>
            <version>1.2.2</version>
        </dependency>
        <!-- 导入java ee jar 包 -->
        <dependency>
            <groupId>commons-logging</groupId>
            <artifactId>commons-logging</artifactId>
            <version>1.1.1</version>
        </dependency>

        <dependency>
            <groupId>javax</groupId>
            <artifactId>javaee-api</artifactId>
            <version>7.0</version>
        </dependency>
        <!-- 导入Mysql数据库链接jar包 -->
        <dependency>
            <groupId>mysql</groupId>
            <artifactId>mysql-connector-java</artifactId>
            <version>5.1.30</version>
        </dependency>
        <!-- 导入dbcp的jar包,用来在applicationContext.xml中配置数据库 -->
        <dependency>
            <groupId>commons-dbcp</groupId>
            <artifactId>commons-dbcp</artifactId>
            <version>1.2.2</version>
        </dependency>
        <!-- JSTL标签类 -->
        <dependency>
            <groupId>jstl</groupId>
            <artifactId>jstl</artifactId>
            <version>1.2</version>
        </dependency>
        <!-- 日志文件管理包 -->
        <!-- log start -->
        <dependency>
            <groupId>log4j</groupId>
            <artifactId>log4j</artifactId>
            <version>${log4j.version}</version>
        </dependency>


        <!-- 格式化对象,方便输出日志 -->
       <!--  <dependency>
            <groupId>com.alibaba</groupId>
            <artifactId>fastjson</artifactId>
            <version>1.1.41</version>
        </dependency>


        <dependency>
            <groupId>org.slf4j</groupId>
            <artifactId>slf4j-api</artifactId>
            <version>${slf4j.version}</version>
        </dependency>

        <dependency>
            <groupId>org.slf4j</groupId>
            <artifactId>slf4j-log4j12</artifactId>
            <version>${slf4j.version}</version>
        </dependency>   -->
        <!-- log end -->
        <!-- 映入JSON -->
        <dependency>
            <groupId>org.codehaus.jackson</groupId>
            <artifactId>jackson-mapper-asl</artifactId>
            <version>1.9.13</version>
        </dependency>
        <!-- 上传组件包 -->
        <dependency>
            <groupId>commons-fileupload</groupId>
            <artifactId>commons-fileupload</artifactId>
            <version>1.3.1</version>
        </dependency>
        <dependency>
            <groupId>commons-io</groupId>
            <artifactId>commons-io</artifactId>
            <version>2.4</version>
        </dependency>
        <dependency>
            <groupId>commons-codec</groupId>
            <artifactId>commons-codec</artifactId>
            <version>1.9</version>
        </dependency>
  </dependencies>
  <build>
    <finalName>MyLove</finalName>
  </build>
</project>
我的工程目录:
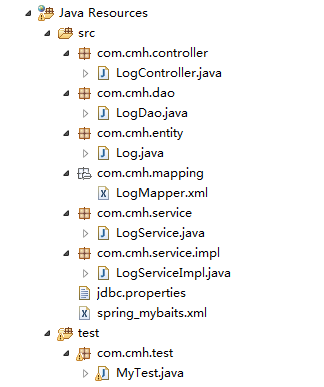
下面是我的代码实现类,在com.cmh.entity下新建一个Log类,代码如下:
package com.cmh.entity;

public class Log {

    private int id;

    private String username;

    private String password;

    public int getId() {
        return id;
    }
    public void setId(int id) {
        this.id = id;
    }
    public String getUsername() {
        return username;
    }
    public void setUsername(String username) {
        this.username = username;
    }
    public String getPassword() {
        return password;
    }
    public void setPassword(String password) {
        this.password = password;
    }

}接着我们在com.cmh.dao下去写增删改查的接口对象方法,代码如下:
package com.cmh.dao;
import com.cmh.entity.Log;
public interface LogDao {

    int insert(Log log);

    int remove(int id);

    Log AimTo(int id);

    int update(Log log);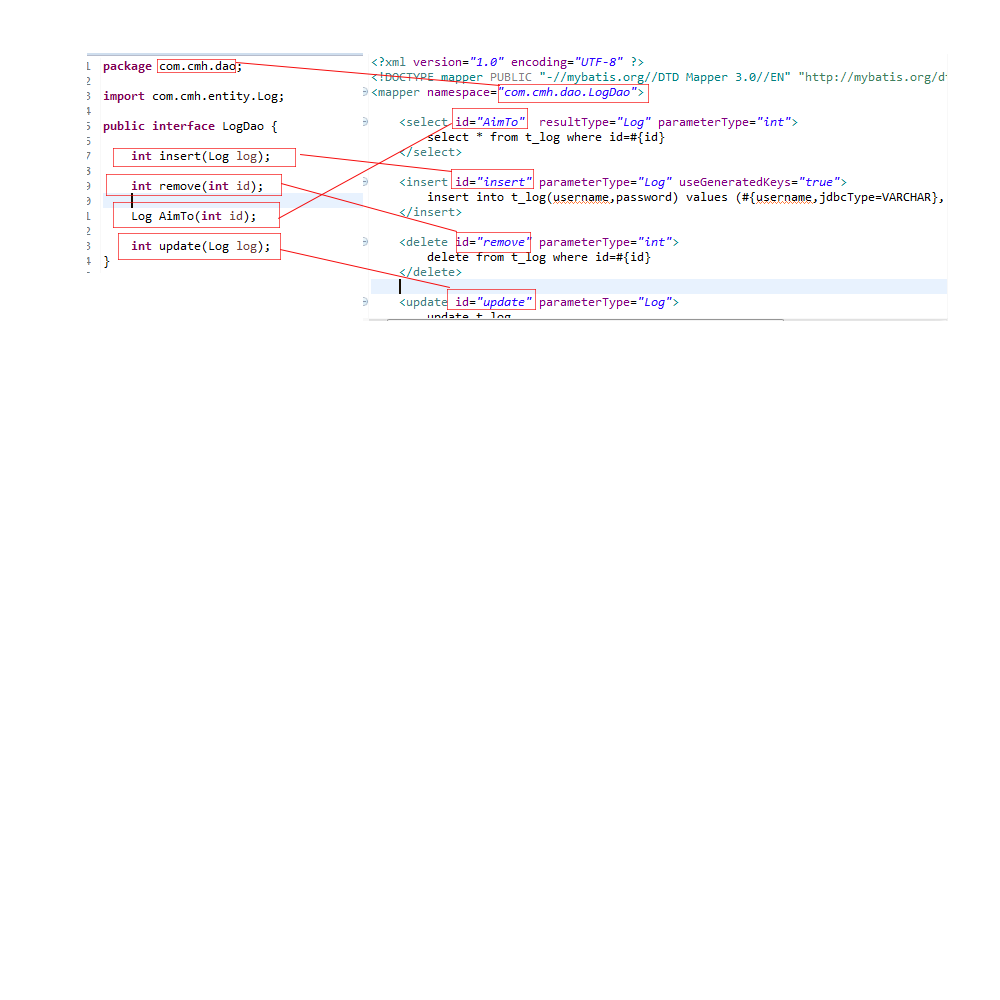
}在com.cmh.mapping编写实现类接口映射文件(记住,此处的id名一定要与接口名一一对应),如下:
<?xml version="1.0" encoding="UTF-8" ?>
<!DOCTYPE mapper PUBLIC "-//mybatis.org//DTD Mapper 3.0//EN" "http://mybatis.org/dtd/mybatis-3-mapper.dtd" >
<mapper namespace="com.cmh.dao.LogDao">

    <select id="AimTo"  resultType="Log" parameterType="int">
        select * from t_log where id=#{id}
    </select>

    <insert id="insert" parameterType="Log" useGeneratedKeys="true">
        insert into t_log(username,password) values (#{username,jdbcType=VARCHAR}, #{password,jdbcType=VARCHAR})
    </insert>

    <delete id="remove" parameterType="int">
        delete from t_log where id=#{id}
    </delete>

    <update id="update" parameterType="Log">
        update t_log
      <set >
      <if test="username != null" >
        username = #{username,jdbcType=VARCHAR},
      </if>
      <if test="password != null" >
        password = #{password,jdbcType=VARCHAR},
      </if>
    </set>
    where id = #{id,jdbcType=INTEGER}
    </update>

</mapper>
warning,不然sqlsessionfactory无法找到并注入:
下面是我们的service接口:
package com.cmh.service;

import com.cmh.entity.Log;

public interface LogService {
    public Log find(int id);
    public int add(Log log);
    public int change(Log log);
    public int delete(int id);
}在com.cmh.service.impl新建我们的service实现类:
package com.cmh.service.impl;
import javax.annotation.Resource;
import org.springframework.stereotype.Service;
import com.cmh.dao.LogDao;
import com.cmh.entity.Log;
import com.cmh.service.LogService;
@Service("logService")
public class LogServiceImpl implements LogService {

    private LogDao logDao;

    public LogDao getLogDao() {
        return logDao;
    }

    @Resource
    public void setLogDao(LogDao logDao) {
        this.logDao = logDao;
    }

    @Override
    public Log find(int id) {
        // TODO Auto-generated method stub
        return logDao.AimTo(id);
    }

    @Override
    public int add(Log log) {
        // TODO Auto-generated method stub
        return logDao.insert(log);
    }

    @Override
    public int change(Log log) {
        // TODO Auto-generated method stub
        return logDao.update(log);
    }

    @Override
    public int delete(int id) {
        // TODO Auto-generated method stub
        return logDao.remove(id);
    }


}spring_mybaits.xml配置如下:
<?xml version="1.0" encoding="UTF-8"?>
<beans xmlns="http://www.springframework.org/schema/beans"
    xmlns:xsi="http://www.w3.org/2001/XMLSchema-instance" xmlns:p="http://www.springframework.org/schema/p"
    xmlns:context="http://www.springframework.org/schema/context"
    xmlns:mvc="http://www.springframework.org/schema/mvc"
    xsi:schemaLocation="http://www.springframework.org/schema/beans
                        http://www.springframework.org/schema/beans/spring-beans-3.1.xsd
                        http://www.springframework.org/schema/context
                        http://www.springframework.org/schema/context/spring-context-3.1.xsd
                        http://www.springframework.org/schema/mvc
                        http://www.springframework.org/schema/mvc/spring-mvc-4.0.xsd">

    <!--支持注解方式-->
    <context:annotation-config />
    <!--扫描所有注解类的包-->
    <context:component-scan base-package="com.cmh" />
    <!--配置jdbc参数,引用外部的参数配置-->
    <bean id="propertyConfigurer"
    class="org.springframework.beans.factory.config.PropertyPlaceholderConfigurer">
        <property name="location" value="classpath:jdbc.properties"></property>
    </bean>

<!--配置数据源-->
    <bean id="dataSource" class="org.apache.commons.dbcp.BasicDataSource"
        destroy-method="close">
        <property name="driverClassName" value="${jdbc.driverClassName}" />
        <property name="url" value="${jdbc.url}" />
        <property name="username" value="${jdbc.username}" />
        <property name="password" value="${jdbc.password}" />
    </bean>

<!--增加mybatis的支持,将数据源导入到mybatis中,初始化SqlSessionFactoryBean中的bean-->
    <bean id="sqlSessionFactory" class="org.mybatis.spring.SqlSessionFactoryBean">
        <property name="dataSource" ref="dataSource" />
        <!--设置别名,默认情况下typeAliasesPackage会把其下的类的别名设为类名,不设的话`com.cmh.mapping`中的parameterType="Log"要连报名一起写上-->
        <property name="typeAliasesPackage" value="com.cmh.entity" />
        <!--映射文件的路径-->
        <property name="mapperLocations" value="classpath:com/cmh/mapping/*.xml"></property>
    </bean>

    <!--此处十分的关键,MapperScannerConfigurer会自动去扫描接口是否与映射文件中的配置名一致,然后生成一个代理对象来对接口进行初始化的操作,其操作全由代理对象负责实现-->
    <bean class="org.mybatis.spring.mapper.MapperScannerConfigurer">
        <!--扫描包名下的类文件-->
        <property name="basePackage" value="com.cmh.dao"/>
        <property name="sqlSessionFactoryBeanName" value="sqlSessionFactory"/>
    </bean>


</beans>jdbc.properties配置如下:
jdbc.driverClassName=com.mysql.jdbc.Driver
jdbc.url=jdbc:mysql://localhost:3306/login
jdbc.username=root
jdbc.password=
好了接下来我们来写一个实现类来测试一下:
import static org.junit.Assert.*;
import javax.annotation.Resource;
import org.junit.Before;
import org.junit.Test;
import org.springframework.context.ApplicationContext;
import org.springframework.context.support.ClassPathXmlApplicationContext;
import com.cmh.entity.Log;
import com.cmh.service.LogService;
public class MyTest {
private ApplicationContext application=null;
private LogService logService=null;
public LogService getLogService() {
return logService;
}
@Resource(name="logService")
public void setLogService(LogService logService) {
this.logService = logService;
}
@Before
public void initParam(){
application=new ClassPathXmlApplicationContext("spring_mybaits.xml");
logService=(LogService)application.getBean("logService");
}
@Test
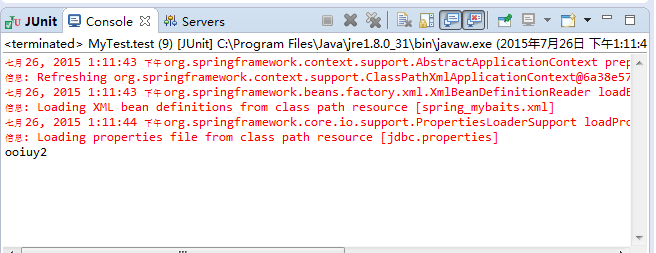
public void test() {
System.out.println(logService.find(2).getUsername());
}
@Test
public void test2(){
Log log=new Log();
log.setPassword("sss");
log.setUsername("ssedef");
int num=logService.add(log);
System.out.println(num);
}
@Test
public void test3(){
Log log=new Log();
log.setId(3);
log.setPassword("kk");
log.setUsername("kkk");
int num=logService.change(log);
System.out.println(num);
}
@Test
public void test4(){
System.out.println(logService.delete(1));
}
}下面是测试查找的功能,运行结果如下:
接下来我们就来配置一下springmvc,首先打开你的web.xml,添加如下配置:
 <!-- Spring和mybatis的配置文件,比寻配置,不然会报错 -->
    <context-param>
        <param-name>contextConfigLocation</param-name>
        <param-value>classpath:spring_mybaits.xml</param-value>
    </context-param>

  <servlet>
        <servlet-name>springmvc</servlet-name>
        <servlet-class>org.springframework.web.servlet.DispatcherServlet</servlet-class>
        <init-param>
            <param-name>contextConfigLocation</param-name>
            <param-value>/WEB-INF/spring-mvc.xml</param-value>
        </init-param>
        <load-on-startup>1</load-on-startup>
    </servlet>
    <servlet-mapping>
        <servlet-name>springmvc</servlet-name>
        <url-pattern>/</url-pattern>
    </servlet-mapping>
        <!-- Spring监听器 -->
    <listener>
        <listener-class>org.springframework.web.context.ContextLoaderListener</listener-class>
    </listener>
    <!-- 防止Spring内存溢出监听器 -->
    <listener>
        <listener-class>org.springframework.web.util.IntrospectorCleanupListener</listener-class>
</listener> 然后配置spring_mybaits.xml,代码比较简单,因为我用的是注解方式:
<?xml version="1.0" encoding="UTF-8"?>
<beans xmlns="http://www.springframework.org/schema/beans"
    xmlns:mvc="http://www.springframework.org/schema/mvc"
    xmlns:xsi="http://www.w3.org/2001/XMLSchema-instance"
    xmlns:aop="http://www.springframework.org/schema/aop"
    xmlns:context="http://www.springframework.org/schema/context"
    xmlns:tx="http://www.springframework.org/schema/tx"
    xsi:schemaLocation="
    http://www.springframework.org/schema/tx http://www.springframework.org/schema/tx/spring-tx.xsd
        http://www.springframework.org/schema/context http://www.springframework.org/schema/context/spring-context.xsd
        http://www.springframework.org/schema/aop http://www.springframework.org/schema/aop/spring-aop.xsd
        http://www.springframework.org/schema/beans
        http://www.springframework.org/schema/beans/spring-beans.xsd
        http://www.springframework.org/schema/mvc
        http://www.springframework.org/schema/mvc/spring-mvc.xsd">

        <context:component-scan base-package="com.cmh.controller"/>
        <!--添加mvc注解支持-->
        <mvc:annotation-driven/>

    <!--这个相当与是一个过滤器-->
        <bean  class="org.springframework.web.servlet.view.InternalResourceViewResolver">
            <property name="prefix" value="/View/"/>
            <property name="suffix" value=".jsp"></property>
        </bean>
</beans>好了,接下来我们在com.cmh.controller添加一个LogController类:
package com.cmh.controller;

import javax.annotation.Resource;

import org.springframework.stereotype.Controller;
import org.springframework.web.bind.annotation.RequestMapping;
import org.springframework.web.bind.annotation.RequestMethod;

import com.cmh.entity.Log;
import com.cmh.service.LogService;

@Controller
@RequestMapping("/users")
public class LogController {

    private LogService logService;

    public LogService getLogService() {
        return logService;
    }

    @Resource
    public void setLogService(LogService logService) {
        this.logService = logService;
    }

    @RequestMapping(method=RequestMethod.POST,value="/add")
    public String add(Log log){
        logService.add(log);
        System.out.println(log.getUsername());
        return "add";
    }

    @RequestMapping("/delete")
    public String delete(){
        return "delete";
    }

    @RequestMapping("/find")
    public String find(){
        return "find";
    }

    @RequestMapping("/change")
    public String update(){
        return "change";
    }
}
下面是我的jsp目录:
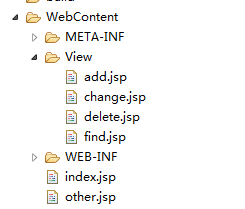
jsp代码也比较简单,index.jsp的代码如下,view文件夹的你随便写点:
<%@ page language="java" contentType="text/html; charset=UTF-8"
    pageEncoding="UTF-8"%>
<!DOCTYPE html PUBLIC "-//W3C//DTD HTML 4.01 Transitional//EN" "http://www.w3.org/TR/html4/loose.dtd">
<html>
<head>
<meta http-equiv="Content-Type" content="text/html; charset=UTF-8">
<title>Insert title here</title>
</head>
<body>
    <form action="users/add" method="post">
        username:<input type="text" name="username"><br>
        password:<input type="password" name="password"><br>
        <input type="submit" value="submit">
    </form>
</body>
</html>
好了,现在运行一下,看看是不是有新的用户被添加进去了,源代码在:
资源下载
,希望此章节对您有所帮助


 761
761

 被折叠的 条评论
为什么被折叠?
被折叠的 条评论
为什么被折叠?
 到【灌水乐园】发言


