


 本文详细介绍了nginx的工作原理,包括其模块分类、内核设计和模块加载方式。此外,文章还深入讲解了nginx的安装配置,特别是配置文件的各个部分,如main配置段、event配置段和http配置段,并探讨了关键配置参数,如worker_processes、worker_connections和事件模型的设置。同时,文章还提到了nginx作为Web服务器时的配置细节和优化策略。
nginx工作原理
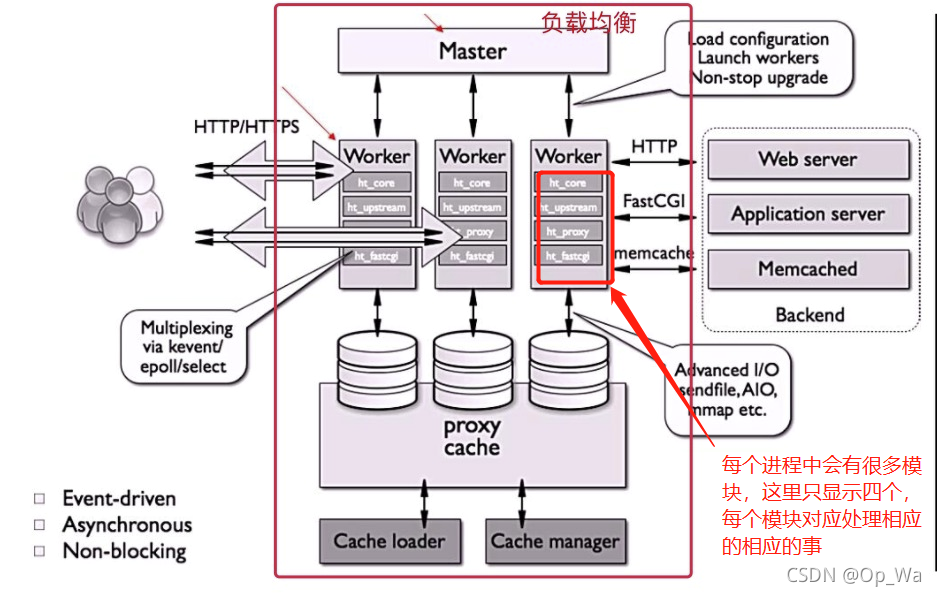
nginx由内核和模块组成。其中,内核的设计非常微小和简洁,完成的工作也非常简单,仅仅通过查找配置文件将客户端请求映射到一个location block(location是nginx配置中的一个指令,用于URI匹配),而在这个location中所配置的每个指令将会启动不同的模块去完成相应的工作。
nginx的模块分类
nginx的模块从结构上分为核心模块、基础模块和第三方模块
- HTTP模块、EVENT模块和MAIL模块等属于核心模块
- HTTP Access模块、HTTP FastCGI模块、HTTP Proxy模块和HTTP Rewrite模块属于基本模块
- HTTP Upstream模块、Request Hash模块、Notice模块和HTTP Access Key模块属于第三方模块
用户根据自己的需要开发的模块都属于第三方模块。正是有了如此多模块的支撑,nginx的功能才会如此强大
再下载nginx安装包,解压以后,进入解压目录下的configure目录,查看帮助文档,查看核心模块和基础模块
[root@localhost nginx-1.20.1]# ./configure --help
.......
--with-http_ssl_module             enable ngx_http_ssl_module
  --with-http_v2_module              enable ngx_http_v2_module
  --with-http_realip_module          enable ngx_http_realip_module
  --with-http_addition_module        enable ngx_http_addition_module
  --with-http_xslt_module            enable ngx_http_xslt_module
  --with-http_xslt_module=dynamic    enable dynamic ngx_http_xslt_module
  --with-http_image_filter_module    enable ngx_http_image_filter_module
........
//含有with字样的,在编译时如果不添加此功能是自身不带的,如果想要使用此功能,编译时加上需要的参数

......
--without-http_charset_module      disable ngx_http_charset_module
  --without-http_gzip_module         disable ngx_http_gzip_module
  --without-http_ssi_module          disable ngx_http_ssi_module
  --without-http_userid_module       disable ngx_http_userid_module
  --without-http_access_module       disable ngx_http_access_module
  --without-http_auth_basic_module   disable ngx_http_auth_basic_module
  --without-http_mirror_module       disable ngx_http_mirror_module
......
//含有without字样的,编译时是默认带有此功能,若不想使用此功能,编译时加上需要的参数即可
nginx模块从功能上分为三类,分别是:
- Proxies(代理器模块)。就是nginx的HTTP Upstream之类的模块,这些模块主要与后端一些服务比如fastcgi等操作交互,实现服务代理和负载均衡等功能
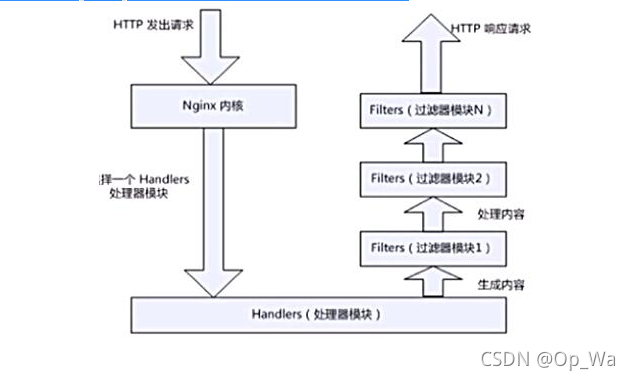
- Handlers(处理器模块)。此类模块直接处理请求,并进行输出内容和修改headers信息等操作。handlers处理器模块一般只能有一个
- Filters(过滤器模块)。此类模块主要对其他处理器模块输出的内容进行修改操作,最后由nginx输出
nginx基本模块:所谓基本模块,指的是nginx默认的功能模块,它们提供的指令,允许你使用定义nginx基本功能的变量,在编译时不能被禁用,包括:
- 核心模块:基本功能和指令,如进程管理和安全。常见的核心模块指令,大部分是放置在配置文件的顶部(每一行的最开始,官方文档顶部是叫main)
- 事件模块:在Nginx内配置网络使用的能力。常见的events(事件)模块指令,大部分是放置在配置文件的顶部
- 配置模块:提供包含机制
具体的指令,请参考nginx的官方文档
点击官方文档链接,可以看到配置文件的样例,和指令的使用方法
nginx工作原理详解
nginx的模块直接被编译进nginx,因此属于静态编译方式。
启动nginx后,nginx的模块被自动加载,与Apache不一样,首先将模块编译为一个so文件,然后在配置文件中指定是否进行加载。
在解析配置文件时,nginx的每个模块都有可能去处理某个请求,但是同一个处理请求只能由一个模块来完成。
nginx的进程架构:
- 启动nginx时,会启动一个Master进程,这个进程不处理任何客户端的请求,主要用来产生worker线程,一个worker线程用来处理n个request。(默认是一个worker线程,可以再配置文件中修改worker数)
[root@localhost conf]# vim nginx.conf
#user  nobody;
worker_processes  1;     //此处就是worker进程数,根据自己的需求设置

//默认worker数,此时只有一个
[root@localhost ~]# ps -ef |grep nginx
root       33402       1  0 10:32 ?        00:00:00 nginx: master process /usr/local/nginx/sbin/nginx
nginx      33403   33402  0 10:32 ?        00:00:00 nginx: worker process
root       34091   34068  0 18:45 pts/1    00:00:00 grep --color=auto nginx

//修改worker进程数
[root@localhost conf]# vim nginx.conf
#user  nobody;
worker_processes  4;     //修改为4

[root@localhost ~]# nginx -s reload    //修改完配置文件重新加载
[root@localhost ~]# ps -ef |grep nginx
root       33402       1  0 10:32 ?        00:00:00 nginx: master process /usr/local/nginx/sbin/nginx
nginx      34095   33402  0 18:50 ?        00:00:00 nginx: worker process
nginx      34096   33402  0 18:50 ?        00:00:00 nginx: worker process
nginx      34097   33402  0 18:50 ?        00:00:00 nginx: worker process
nginx      34098   33402  0 18:50 ?        00:00:00 nginx: worker process
root       34100   34068  0 18:50 pts/1    00:00:00 grep --color=auto nginx
下图展示了nginx模块一次常规的HTTP请求和响应的过程
下图展示了基本的WEB服务请求步骤:

1.建立连接(域名访问,寻找网站80端口号)
2.接受请求(本地apache或者nginx80端口号接受请求)
3.处理请求
4.访问资源(本地资源查找或者向RS查找)
5.构建响应(封装响应报文)
6.发送响应(通过网络协议发送给客户端)
7.记录事务处理过程(记录日志,记录整个事务的处理过程)
nginx安装后配置
- nginx命令参数
//服务控制方式,使用nginx命令
    -t  //检查配置文件语法
    -v  //输出nginx的版本
    -V  //查看编译时所选参数
    -c  //指定配置文件的路径
    -s  //发送服务控制信号,可选值有{stop|quit|reopen|reload}
- 测试参数-t
[root@localhost ~]# nginx -t
nginx: the configuration file /usr/local/nginx/conf/nginx.conf syntax is ok
nginx: configuration file /usr/local/nginx/conf/nginx.conf test is successful
//此时配置文件没有经过修改,语法无误,以下我们认为修改一下配置文件,测试一下语法错误

[root@localhost conf]# vim nginx.conf
#user  nobody;
worker_processes  4   //把此处的;去掉
[root@localhost ~]# nginx -t
nginx: [emerg] directive "worker_processes" is not terminated by ";" in /usr/local/nginx/conf/nginx.conf:12
nginx: configuration file /usr/local/nginx/conf/nginx.conf test failed
//此时就会检查语法错误,需要注意的是,即使配置文件检查语法是无误,也不能代表配置文件是没有问题的
- 测试参数-v 、 -V
[root@localhost ~]# nginx -v
nginx version: nginx/1.20.1
//除了-v以外,还有-V,-V可以查看编译时所使用的参数,如果需要重新编译时,如果需要新增参数或者减少参数时,此工程非常重要

[root@localhost ~]# nginx -V
nginx version: nginx/1.20.1
built by gcc 8.5.0 20210514 (Red Hat 8.5.0-3) (GCC)
built with OpenSSL 1.1.1k  FIPS 25 Mar 2021
TLS SNI support enabled
configure arguments: --prefix=/usr/local/nginx --user=nginx --group=nginx --with-debug --with-http_ssl_module --with-http_realip_module --with-http_image_filter_module --with-http_gunzip_module --with-http_gzip_static_module --with-http_stub_status_module --http-log-path=/var/log/nginx/access.log --error-log-path=/var/log/nginx/error.log
- 测试参数-s
nginx -s 常用选项stop、reload
- 测试参数-c
//nginx启动时默认使用的配置文件时安装目录下的/conf/nginx.conf,但是在生产环境中需要修改配置文件时,为了避免出现错误,影响用户体验,可以暂时把配置文件复制一份到其他目录下,再做修改
//因为配置文件中含有包含,复制配置文件时把包含文件也一起复制过去
[root@localhost conf]# cp nginx.conf mime.types /opt/
[root@localhost opt]# ls
mime.types  nginx.conf

//已修改worker进程数为例,使用一下参数-c
[root@localhost opt]# vim nginx.conf      //修改的是复制过来的配置文件
#user  nobody;
worker_processes  5;    //改为5
.......

//使用/opt下的配置文件,生效,再停掉nginx和重新指定配置文件时,为了不影响用户体验,把命令在一行使用,中间用;隔开
[root@localhost ~]# nginx -s stop;nginx -c /opt/nginx.conf
[root@localhost ~]# ps -ef|grep nginx
root        1345       1  0 09:45 ?        00:00:00 nginx: master process nginx -c /opt/nginx.conf
nginx       1347    1345  0 09:45 ?        00:00:00 nginx: worker process
nginx       1348    1345  0 09:45 ?        00:00:00 nginx: worker process
nginx       1349    1345  0 09:45 ?        00:00:00 nginx: worker process
nginx       1350    1345  0 09:45 ?        00:00:00 nginx: worker process
nginx       1351    1345  0 09:45 ?        00:00:00 nginx: worker process
root        1353    1316  0 09:45 pts/1    00:00:00 grep --color=auto nginx

//如果复制的配置文件修改时出现错误,可以立即恢复到原配置文件
[root@localhost ~]# nginx -s stop;nginx
nginx的配置文件详解
主配置文件:安装路径下的/conf/nginx.conf
- 默认启动nginx时,使用的配置文件是:安装路径/conf/nginx.conf文件
- 可以在启动nginx时通过-c选项来指定要读取的配置文件
nginx常见的配置文件及其作用
| 配置文件 | 作用 |
|---|---|
| nginx.conf | nginx的基本配置文件(常使用) |
| mime.types | MIME类型关联的扩展文件 |
| fastcgi.conf | 与fastcgi相关的配置 |
| proxy.conf | 与proxy相关的配置 |
| sites.conf | 配置nginx提供的网站,包括虚拟主机 |
nginx.conf配置详解
nginx.conf的内容分为以下几段:
- main配置段:全局配置段。其中main配置段中可能包含event配置段
- event {}:定义event模型工作特性
- http {}:定义http协议相关的配置
配置指令:要以分号结尾,语法格式如下:
derective(指令) value1 [value2 ...];
支持使用变量:
- 内置变量:模块会提供内建变量定义
- 自定义变量:set var_name value(不常使用)
用于调试、定位问题的配置参数
daemon {on|off};    //是否以守护进程方式运行nginx,调试时应设置为off
master_process {on|off};    //是否以master/worker模型来运行nginx,调试时可以设置为off
error_log 位置 级别;    //配置错误日志(常用)
error_log里的位置和级别能有以下可选项:
| 位置 | 级别 |
|---|---|
| file (常用) stderr syslog:server=address[,parameter=value] memory:size | debug:若要使用debug级别,需要在编译nginx时使用–with-debug选项 info notice warn error(常用) crit alert emerg 级别等级从高到底依次增大,级别越低记录越详细 |
正常运行必备的配置参数
user USERNAME [GROUPNAME];    //指定运行worker进程的用户和组
pid /path/to/pid_file;    //指定nginx守护进程的pid文件,安装过后默认是注释掉的,虽然是注释掉的,但是是在生效的,所以我们需要显示的设置,把注释去掉
worker_rlimit_nofile number;    //设置所有worker进程最大可以打开的文件数,默认为1024
worker_rlimit_core size;    //指明所有worker进程所能够使用的总体的最大核心文件大小,保持默认即可
- 参数user
//nginx安装过后配置文件中的user默认是nobody,但是配置文件中user参数是注释掉的,即使我们把注释去掉,默认user也不是nobody,是nginx
[root@localhost conf]# ps -ef |grep nginx
root        1566       1  0 18:08 ?        00:00:00 nginx: master nginx
nginx       1567    1566  0 18:08 ?        00:00:00 nginx: worker
nginx       1568    1566  0 18:08 ?        00:00:00 nginx: worker
nginx       1569    1566  0 18:08 ?        00:00:00 nginx: worker
nginx       1570    1566  0 18:08 ?        00:00:00 nginx: worker
root        1573    1447  0 18:08 pts/1    00:00:00 grep --color=ax

[root@localhost conf]# vim nginx.conf
user  nginx nginx;
......
- 参数worker_rlimit_nofile number
Linux是有文件句柄限制的(open files),一般默认是1024,当超过这个数量便会报 Too many open files错误,修改nginx参数worker_rlimit_nofile number时,同时也需要修改系统的open file,使用命令ulimit -a可以查看句柄数
[root@localhost ~]# ulimit -a
core file size          (blocks, -c) unlimited
data seg size           (kbytes, -d) unlimited
scheduling priority             (-e) 0
file size               (blocks, -f) unlimited
pending signals                 (-i) 7638
max locked memory       (kbytes, -l) 64
max memory size         (kbytes, -m) unlimited
open files                      (-n) 1024      //句柄数
pipe size            (512 bytes, -p) 8
POSIX message queues     (bytes, -q) 819200
real-time priority              (-r) 0
stack size              (kbytes, -s) 8192
cpu time               (seconds, -t) unlimited
max user processes              (-u) 7638
virtual memory          (kbytes, -v) unlimited
file locks                      (-x) unlimited

//nginx配置文件中,worker_rlimit_nofile number一般设为65535,当nginx修改过后系统也要修改
[root@localhost conf]# vim nginx.conf
......
worker_rlimit_nofile 65535;
......
[root@localhost conf]# nginx -s reload

//增大系统允许打开的文件数,修改系统配置文件
[root@localhost ~]# vim /etc/security/limits.conf
在末尾添加以下两行
*    soft    nofile    65535    //添加此行
*    hard    nofile    65535    //添加此行
//设置完成以后重开一个终端或者重启即可生效
优化性能的配置参数
worker_processes n;    //启动n个worker进程,这里的n为了避免上下文切换,通常设置为cpu总核心数-1或等于总核心数
worker_cpu_affinity cpumask ...;    //将进程绑定到某cpu中,避免频繁刷新缓存
//cpumask:使用8位二进制表示cpu核心,如:
    00000001   //第一颗cpu核心
    00000010   //第二颗cpu核心
    00000100   //第三颗cpu核心
    00001000   //第四颗cpu核心
    00010000   //第五颗cpu核心
    00100000   //第六颗cpu核心
    01000000   //第七颗cpu核心
    10000000   //第八颗cpu核心
timer_resolution interval;    //计时器解析度。降低此值,可减少gettimeofday()系统调用的次数
worker_priority number;    //指明worker进程的nice值
- **配置参数worker_processes、worker_cpu_affinity **
查看本机核心数(top)
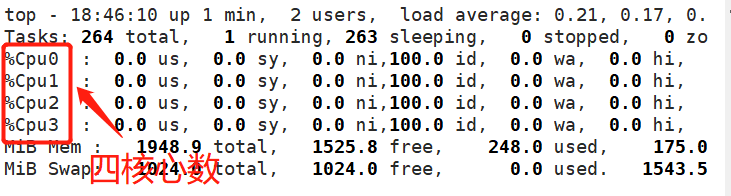
配置参数:
[root@localhost ~]# vim /usr/local/nginx/conf/nginx.conf
......
worker_processes  3;
worker_cpu_affinity  0001 0010 0100;
......
[root@localhost ~]# nginx -s stop;nginx
查看nginx运行在哪
使用命令top,输入L后输入nginx
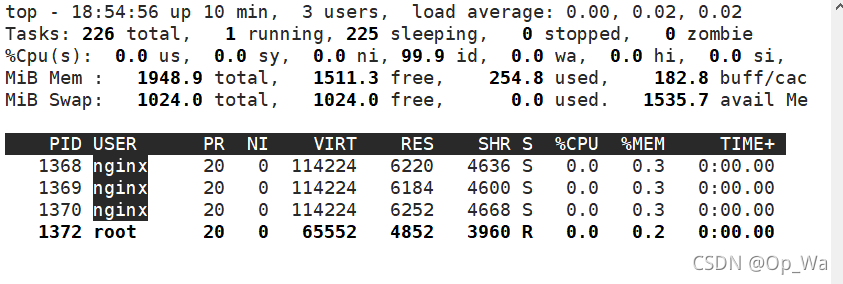
看到nginx进程以后,点击f键
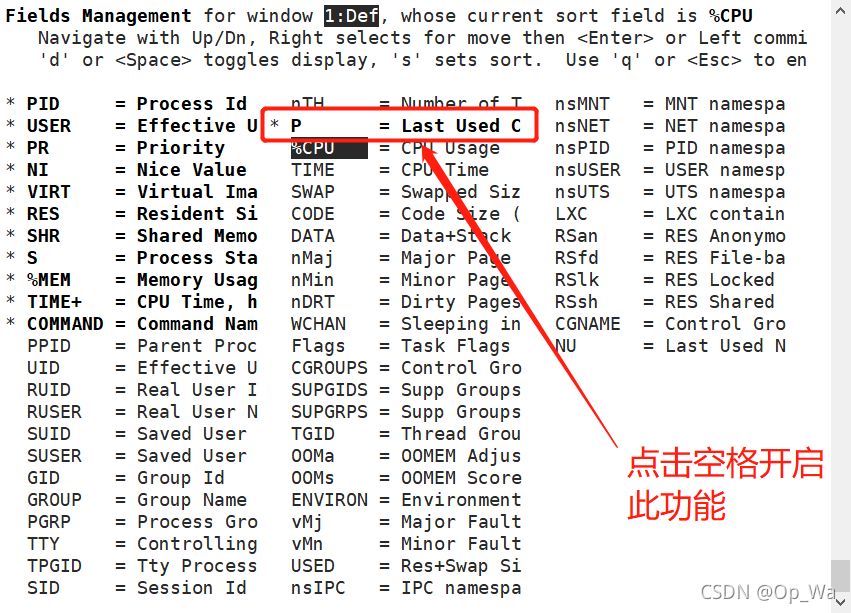
按q键退出,此时就可以看到进程所对应的核心数

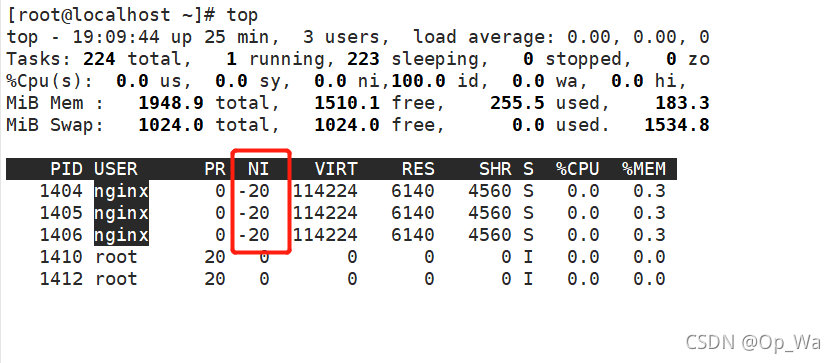
- 参数worker_priority
安装后默认优先级是0,可以再配置文件中修改优先级(优先级越高获得更多的CPU运行时间,更优先获得CPU运行的机会):
[root@localhost ~]# vim /usr/local/nginx/conf/nginx.conf
......
user  nginx nginx;
worker_processes  3;
worker_rlimit_nofile 65535;
worker_cpu_affinity  0001 0010 0100;
worker_priority -20;    //修改优先级为-20
......
[root@localhost ~]# nginx -s stop;nginx
查看修改后的优先级
事件相关的配置:event{}段中的配置参数
accept_mutex {off|on};    //master调度用户请求至各worker进程时使用的负载均衡锁;on表示能让多个worker轮流地、序列化地去响应新请求
lock_file file;    //accept_mutex用到的互斥锁锁文件路径
use [epoll | rtsig | select | poll];    //指明使用的事件模型,建议让nginx自行选择
worker_connections #;    //每个进程能够接受的最大连接数

//以上四个参数,前三个一般配置时选择默认,但是第四个参数worker_connections是一定要配置的
一个进程最大并发量最大为50000,但是实际配置时一般设为30000
并发量=(worker_processes*worker_connections)/2
配置并发量为30000
[root@localhost ~]# head -20 /usr/local/nginx/conf/nginx.conf

user  nginx nginx;
worker_processes  3;
worker_rlimit_nofile 65535;
worker_cpu_affinity  0001 0010 0100;
worker_priority -20;

#error_log  logs/error.log;
#error_log  logs/error.log  notice;
#error_log  logs/error.log  info;

pid        logs/nginx.pid;


events {
    worker_connections  20480;     //2048
}

[root@localhost ~]# nginx -s stop;nginx
并发量设置完成以后,可以使用ab(压测)命令来测试并发量是否可以执行
//如果没有ab命令,安装httpd-tools包
[root@localhost ~]# ab -n 30000 http://192.168.218.132/index.htmlThis is ApacheBench, Version 2.3 <$Revision: 1843412 $>
Copyright 1996 Adam Twiss, Zeus Technology Ltd, http://www.zeustech.net/
Licensed to The Apache Software Foundation, http://www.apache.org/

Benchmarking 192.168.218.132 (be patient)
Completed 3000 requests
Completed 6000 requests
Completed 9000 requests
Completed 12000 requests
Completed 15000 requests
Completed 18000 requests
Completed 21000 requests
Completed 24000 requests
Completed 27000 requests
Completed 30000 requests
Finished 30000 requests


Server Software:        nginx/1.20.1
Server Hostname:        192.168.218.132
Server Port:            80

Document Path:          /index.html
Document Length:        612 bytes

Concurrency Level:      1
Time taken for tests:   4.407 seconds
Complete requests:      30000
Failed requests:        0
Total transferred:      25350000 bytes
HTML transferred:       18360000 bytes
Requests per second:    6807.53 [#/sec] (mean)
Time per request:       0.147 [ms] (mean)
Time per request:       0.147 [ms] (mean, across all concurrent requests)
Transfer rate:          5617.54 [Kbytes/sec] received

Connection Times (ms)
              min  mean[+/-sd] median   max
Connect:        0    0   0.0      0       0
Processing:     0    0   0.1      0       2
Waiting:        0    0   0.1      0       1
Total:          0    0   0.1      0       2

Percentage of the requests served within a certain time (ms)
  50%      0
  66%      0
  75%      0
  80%      0
  90%      0
  95%      0
  98%      0
  99%      0
 100%      2 (longest request)
//压测成功,说明可以处理30000的并发量
网络连接相关的配置参数
keepalive_timeout number;    //长连接的超时时长,默认为65s
keepalive_requests number;    //在一个长连接上所能够允许请求的最大资源数
keepalive_disable [msie6|safari|none];    //为指定类型的UserAgent禁用长连接
tcp_nodelay on|off;    //是否对长连接使用TCP_NODELAY选项,为了提升用户体验,通常设为on
client_header_timeout number;    //读取http请求报文首部的超时时长
client_body_timeout number;    //读取http请求报文body部分的超时时长
send_timeout number;    //发送响应报文的超时时长

//以上参数,在配置nginx时,常用的是配置keepalive_timeout,keepalive_requests,其他的基本是都是保持默认
- 参数keepalive_disable
下图是官方文档关于keep_disable说明,此参数是禁用浏览器,只能禁用特定的浏览器,不是所有浏览器都可以禁用:

在配置文件中配置,这里在http中配:
[root@localhost ~]# vim /usr/local/nginx/conf/nginx.conf
......
http {
......
    keepalive_timeout  65;
    keepalive_disable  msie6;
......
[root@localhost ~]# nginx -s stop;nginx
fastcgi的相关配置参数
LNMP:php要启用fpm模型
配置示例如下:
//在nginx安装过后以下内容是被注释掉的,在配置lnmp时,需要取消掉注释
location ~ \.php$ {
  root html;
  fastcgi_pass 127.0.0.1:9000;      //定义反向代理
  fastcgi_index index.php;
  fastcgi_param SCRIPT_FILENAME /scripts$fastcgi_script_name;
  include fastcgi_params;
}
常需要进行调整的参数
- worker_processes
- worker_connections
- worker_cpu_affinity
- worker_priority
nginx作为web服务器时使用的配置:http{}段的配置参数
http{…}:配置http相关,由ngx_http_core_module模块引入(官方文档点击此处)。nginx的HTTP配置主要包括四个区块,结构如下:
http {//协议级别
  include mime.types;
  default_type application/octet-stream;
  keepalive_timeout 65;
  gzip on;
  upstream {//负载均衡配置
    ...
  }
  server {//服务器级别,每个server类似于httpd中的一个<VirtualHost>,就相当于一个网站
    listen 80;
    server_name localhost;
    location / {//请求级别,类似于httpd中的<Location>,用于定义URL与本地文件系统的映射关系
      root html;
      index index.html index.htm;
    }
  }
}
http{}段配置指令:
server {}:定义一个虚拟主机,示例如下:
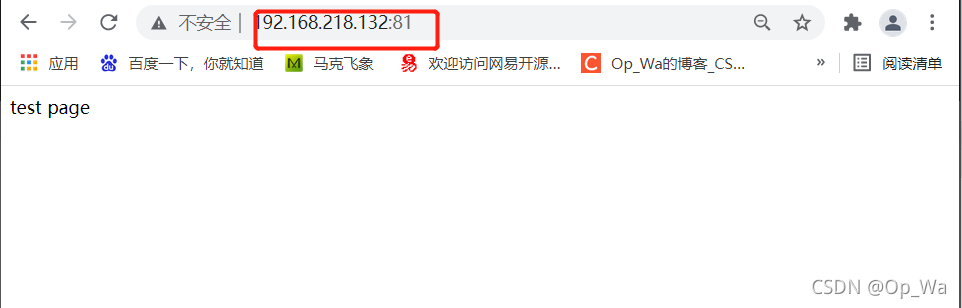
    server {
        listen 81;
        server_name test.example.com;

        location / {
            root   html/test;
            index index.html;
        }
    }

//添加网页内容
[root@localhost ~]# cd /usr/local/nginx/html/
[root@localhost html]# ls
50x.html  index.html
[root@localhost html]# mkdir test
[root@localhost html]# echo 'test page' > test/index.html

//重启服务
[root@localhost html]# nginx -s stop;nginx
[root@localhost html]# ss -antl
State  Recv-Q Send-Q Local Address:Port Peer Address:PortProcess
LISTEN 0      128          0.0.0.0:80        0.0.0.0:*
LISTEN 0      128          0.0.0.0:81        0.0.0.0:*
LISTEN 0      128          0.0.0.0:22        0.0.0.0:*
LISTEN 0      128             [::]:22           [::]:*
网页访问:
listen:指定监听的地址和端口
listen address[:port];    //当系统有很多IP时,如果不想所有的IP都可以访问,可以监听地址来限制
listen port;     //常试用此项
server_name NAME […]; 后面可跟多个主机,名称可使用正则表达式或通配符
当有多个server时,匹配顺序如下:
- 先做精确匹配检查
- 左侧通配符匹配检查,如*.idfsoft.com
- 右侧通配符匹配检查,如mail.*
- 正则表达式匹配检查,如~ ^.*.idfsoft.com$
- default_server
root path; 设置资源路径映射,用于指明请求的URL所对应的资源所在的文件系统上的起始路径
- 当我们使用此方式设置资源路径时,容易暴露自己放置资源的位置,容易遭到攻击
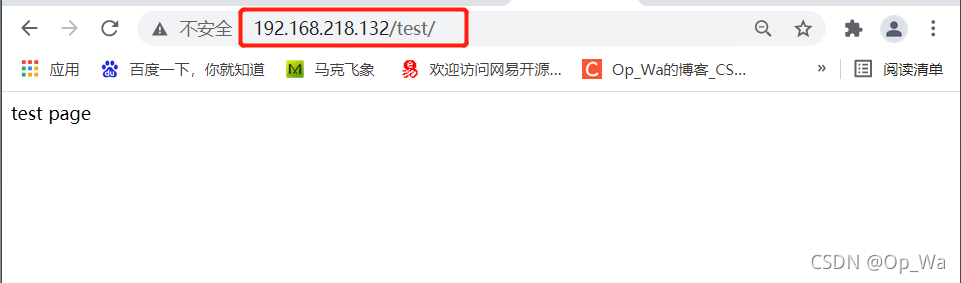
alias path; 用于location配置段,定义路径别名
//使用此方式定义资源路径,防止被攻击,但是路径需要写绝对路径

//创建新的资源路径
[root@localhost ~]# mkdir -p /var/www/html
[root@localhost ~]# cd /var/www/html/
[root@localhost html]# cp /usr/local/nginx/html/test .
cp: -r not specified; omitting directory '/usr/local/nginx/html/test'
[root@localhost html]# mv /usr/local/nginx/html/test .
[root@localhost html]# ls
test

//编辑配置文件
[root@localhost html]# vim /usr/local/nginx/conf/nginx.conf
......
location / {
            alias   /var/www/html/;     //必须写绝对路径
            index  index.html index.htm;
        }
......

[root@localhost html]# nginx -s reload
网页访问:
index file; 默认主页面


 3099
3099

 被折叠的 条评论
为什么被折叠?
被折叠的 条评论
为什么被折叠?
 到【灌水乐园】发言


