


文件上传
1.1回顾
*浏览器端:
<form method="post" enctyp="multipart/form-data">
<input type="file" name="image">
<input type="submit">
*服务器端:
手动方式
第三方:commons-fileupload 核心类ServletFileUpload
1.2介绍
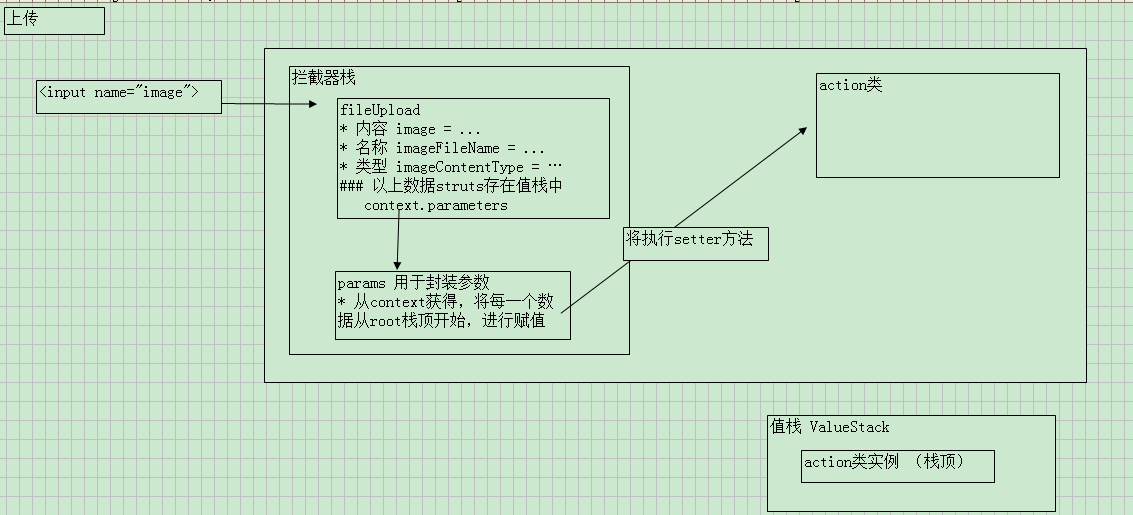
*struts通过拦截器进行文件上传,拦截器名称:fileUpload
*默认栈中引用fileUpload拦截器,及默认情况struts支持文件上传。
1.3分析
关联值栈解析图
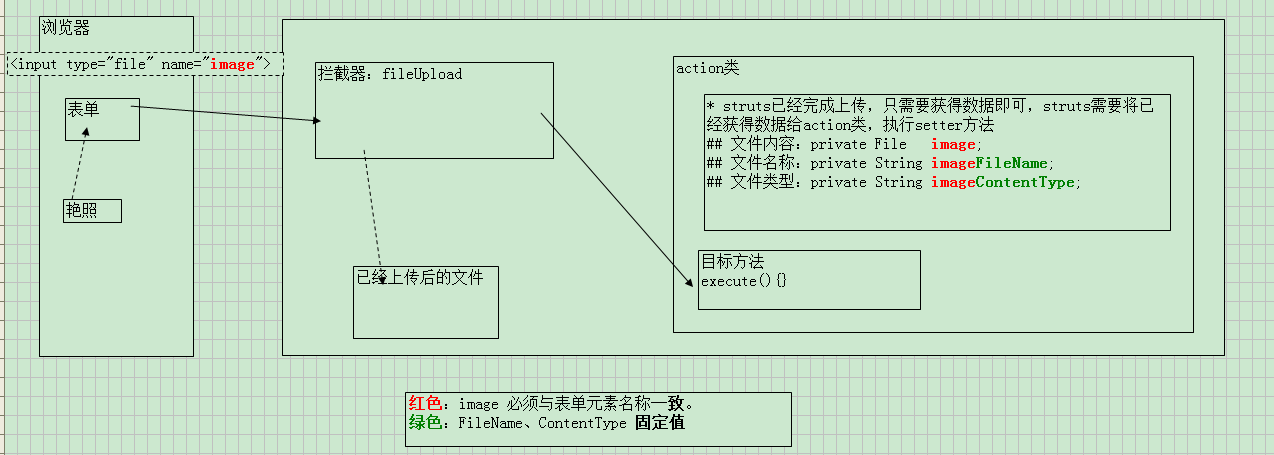
Struts2默认使用的是commons-fileUpload组件完成上传的,使用Struts2会大量简化上传文件的开发。
这一工作由fileUpload拦截器来完成。它会查看当前请求的enctype是否为multipart/form-data,
如果不是就会直接“放行”;如果是,那么它会去解析表单,然后把解析的结果传递给Action的属性!
fileUpload拦截器对会对Action提供很大的“帮助”,同时它也会对Action提出一些“小小的要求”。Action需要提供3个属性:
* File fieldName
* String fileContentType
* String fileFileName;
三个属性的前缀都(fieldName)必须与文件表单项名称一致,
例如有文件表单项内容为:<input type=”file” name=”myUpload”/>,其中表单项名称为:myUpload,
那么Action就必须要有如下3个属性:
* private File myUpload
* private String myUploadContentType
* private String myUploadFileName
上传配置
可以通过Struts2的常量来完成对上传的配置,下面是与上传相关的常量:
*struts.multipart.parser:指定使用的上传组件,默认值为jakarta,表示使用commons-fileupload组件,Struts2还支持cos和pell;
*struts.multipart.saveDir:临时目录,如果没有指定临时目录,那么临时文件会在Tomcat的work目录中;
*struts.multipart.maxSize:整个大小限制,默认值为2097152,即2M。注意,这个限制是整个请求的大小,而不是单一文件的大小。
当上传的表单超出了限制时,拦截器会向fieldError中添加错误信息!当执行wokflow拦截器时,会发现fieldError中存在错误,这时就会跳转到input视图,所以我们需要为Action指定input视图。
fileUpload拦截器也有3个参数,我们可以给fileUpload拦截器配置这3个参数:
*maximumSize:上传的单个文件的大小限制;
*allowedTypes:允许上传文件的类型,多个类型以逗号隔开;
*allowedExtensions:允许上传文件的扩展名,多个扩展名以逗号隔开;
<struts>
	<constant name="struts.devMode" value="true" />
	<constant name="struts.multipart.maxSize" value="1048576" />
	<package name="s8" namespace="/" extends="struts-default">
		<action name="UploadAction" class="cn.itcast.upload.action.UploadAction">
			<result name="input">/demo1/upload.jsp</result>
			<param name="savepath">/WEB-INF/uploads</param>
			<interceptor-ref name="defaultStack">
				<!-- 限制单个文件大小上限为512K -->
				<param name="fileUpload.maximumSize">524288</param>
				<param name="fileUpload.allowedExtensions">jpg,png,bmp</param>
			</interceptor-ref>
		</action>
	</package>
</struts>
1.4单文件实现
*编写jsp提供表单
<body>
	<form action="${pageContext.request.contextPath}/uploadDemo01Action"
	method="post" enctype="multipart/form-data">
		选择文件:<input type="file" name="image" /> <br/>
		<input type="submit" value="单文件上传"/>
	</form>
</body>*编写action提供字段及setter
public class UploadDemo01Action extends ActionSupport {

	// #1 文件内容,类型必须是 File
	private File image;
	// #2 文件名称:固定后缀FileName
	private String imageFileName;
	// #3 文件类型:固定后缀:ContentType
	private String imageContentType;

	// #4 提供setter方法
	public void setImage(File image) {
		this.image = image;
	}
	public void setImageFileName(String imageFileName) {
		this.imageFileName = imageFileName;
	}
	public void setImageContentType(String imageContentType) {
		this.imageContentType = imageContentType;
	}


	@Override
	public String execute() throws Exception {

		//父目录
		String parentDir = ServletActionContext.getServletContext().getRealPath("/WEB-INF/upload/");
		File file = new File(parentDir,imageFileName);
		//保存
		FileUtils.copyFile(image, file);

		return NONE;
	}

}
1.5多文件实现
*编写jsp提供表单
	<script type="text/javascript">
		function addFileUploadItem(){
			var itemTdObj = document.getElementById("itemTdId");
			//将原有的td中内容,添加一个字符串,设置回td
			itemTdObj.innerHTML = itemTdObj.innerHTML + "<br/>
			<span>选择文件:<input type=\"file\" name=\"image\" /></span>";
		}
	</script>
</head>
<body>
	<!-- 使用JavaScript追加上传选择 -->
	<a href="javascript:void(0)" οnclick="addFileUploadItem()">添加上传选择</a>


	<s:actionerror/>
	<form action="${pageContext.request.contextPath}/uploadDemo02Action"
	method="post" enctype="multipart/form-data">
		<table>
			<tr>
				<td id="itemTdId">
					<span>选择文件:<input type="file" name="image" /></span>
				</td>
			</tr>
			<tr>
				<td><input type="submit" value="多文件上传"/></td>
			</tr>
		</table>

	</form>
</body>
*编写action提供字段及setter
接收多个文件时,需要提供数组获得。
public class UploadDemo02Action extends ActionSupport {

	//提供接收的数据类型是数组即可。
	//#1 文件内容
	private File[] image;
	//#2文件名称
	private String[] imageFileName;
	//#3文件类型
	private String[] imageContentType;

	//#4 setter方法
	public void setImage(File[] image) {
		this.image = image;
	}
	public void setImageFileName(String[] imageFileName) {
		this.imageFileName = imageFileName;
	}
	public void setImageContentType(String[] imageContentType) {
		this.imageContentType = imageContentType;
	}


	public void add() throws Exception {

		//父目录
		String parentDir = ServletActionContext.getServletContext().getRealPath("/WEB-INF/upload");

		//遍历所有内容,并保存
		for(int i = 0 ; i < image.length ; i ++){
			// 1 文件内容
			File singleImage = image[i];
			// 2 文件名称
			String singleFileName = imageFileName[i];

			// 3 保存
			File file = new File(parentDir , singleFileName);
			FileUtils.copyFile(singleImage, file);  // (流自动关闭,父目录自动创建)
		}

	}

}
1.6国际化配置
1.6.1提供资源文件
在上传文件时如果出现错误,那么在input视图显示的错误信息都是英文的。
如果想替换这些信息,需要知道这些错误信息的资源key,然后在我们自己的国际化资源文件中指定这些key的新值即可。
与上传相关的错误信息都在org.apache.struts2包下的struts-message.properties文件中。
struts.messages.error.uploading=Error uploading: {0}
struts.messages.error.file.too.large=The file is to large to be uploaded: {0} "{1}" "{2}" {3}
struts.messages.error.content.type.not.allowed=Content-Type not allowed: {0} "{1}" "{2}" {3}
struts.messages.error.file.extension.not.allowed=File extension not allowed: {0} "{1}" "{2}" {3}
struts.messages.upload.error.SizeLimitExceededException=Request exceeded allowed size limit! Max size allowed is: {0} but request was: {1}
内容:
struts.messages.upload.error.SizeLimitExceededException=\u6587\u4EF6\u4E0A\u4F20\u5927\u5C0F\u8D85\u8FC7\u9650\u5B9A,\u5B9E\u9645\u5927\u5C0F{1}\uFF0C\u9650\u5B9A\u7684\u6700\u5927\u503C{0}
1.6.2配置资源文件
*需要覆盖struts全局配置信息
*通过struts.xml 添加常量配置
可以在src下res.properties文件,在这个文件中对象以上资源key进行替换。
然后在struts.xml文件中给出<constant name="struts.custom.i18n.resources" value="res/">即可
	<!-- 常量 -->
	<constant name="struts.devMode" value="true"></constant>
	<constant name="struts.custom.i18n.resources" value="cn/itcast/a_upload/UploadDemo02Action"></constant>
文件下载
2.1回顾
*服务器端发送数据到浏览器,通知浏览器应该下载即可。
设置头:response.setHeader("content-disposition","attachment;filename=....");
发送数据流:response.getOutputSteam()
2.2struts分析
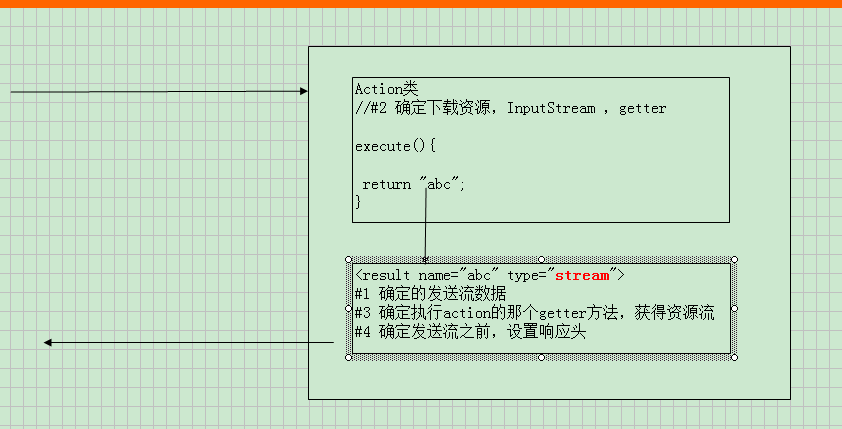
关联值栈解析
2.3实现
2.3.1编写action
public class DownloadDemo01Action extends ActionSupport {

	//确定下载资源流
	private InputStream target;
	public InputStream getTarget() {
		return target;
	}

	@Override
	public String execute() throws Exception {

		//确定下载资源, 必须保证资源流存在,如果返回null,将抛异常
		this.target = ServletActionContext.getServletContext().getResourceAsStream("/WEB-INF/download/105.jpg");
		return SUCCESS;
	}
}
2.3.2编写配置文件
*配置<result>
<!-- 2 下载 -->
<!-- 2.1 简单下载 -->
<action name="downloadDemo01Action" class="cn.itcast.b_download.DownloadDemo01Action">
<result name="success" type="stream">
<!-- 2.1.1 确定action执行的方法名称,对应属性,及将执行getter -->
<param name="inputName">target</param>
<!-- 2.1.2 确定响应头 -->
<param name="contentDisposition">attachment;filename=mm.jpg</param>
</result>
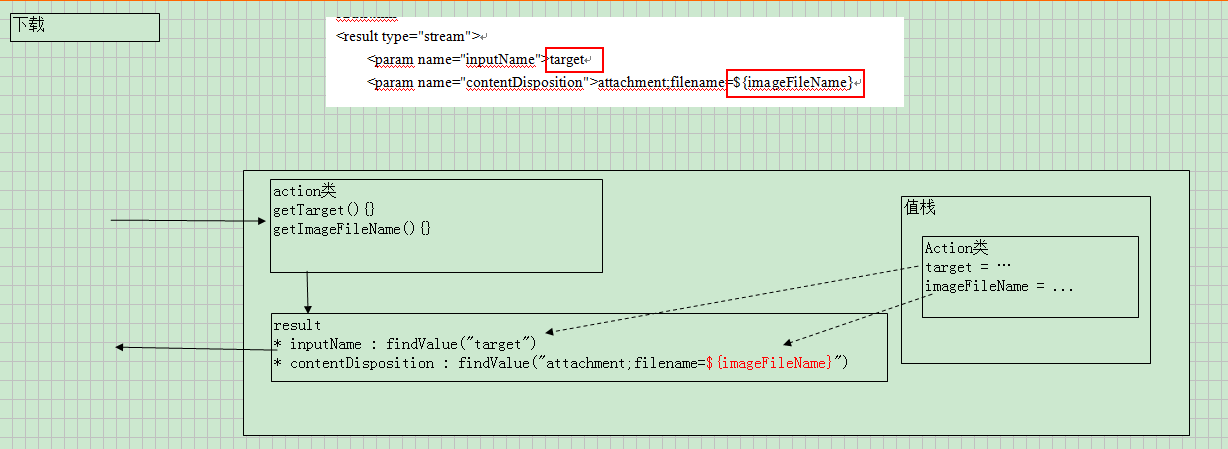
</action>2.4下载的中文乱码
*action类
响应头中只能使用拉丁(Iso-8859-1)码表
public class DownloadDemo02Action extends ActionSupport {

	//确定下载资源流
	private InputStream target;
	public InputStream getTarget() {
		return target;
	}

	//确定下载文件名称
	private String imageFileName;
	public String getImageFileName() throws UnsupportedEncodingException {
		//解决中文乱码
		return new String(imageFileName.getBytes(),"ISO-8859-1");
	}

	@Override
	public String execute() throws Exception {

		//确定下载资源, 必须保证资源流存在,如果返回null,将抛异常
		this.target = ServletActionContext.getServletContext().getResourceAsStream("/WEB-INF/download/105.jpg");
		this.imageFileName = "美女.jpg";

		return SUCCESS;
	}
}
*配置(配置文件中文件名使用了OGNL)
		<!-- 2.2 下载文件名称中文乱码 -->
		<action name="downloadDemo02Action" class="cn.itcast.b_download.DownloadDemo02Action">
			<result name="success" type="stream">
				<!-- 2.1.1 确定action执行的方法名称,对应属性,及将执行getter -->
				<param name="inputName">target</param>
				<!-- 2.1.2 确定响应头 -->
				<param name="contentDisposition">attachment;filename=${imageFileName}</param>
			</result>
		</action>
OGNL与Struts2的结合
OGNL表达式
3.1介绍
*OGNL是Object Graphic Navigation Language(对象图导航语言)的缩写,比EL更强大的表达式语言(开源项目)。
*Struts2框架使用OGNL作为默认的表达式语言。
OGNL的功能介绍:
*EL一样的JavaBean导航;
*调用对象方法;
*调用类的静态方法;
*索引数组元素;
*操作集合;
数据存放位置
root:一个对象
context:一组对象,底层使用Map,每一个对象存在一个名称。
开源框架:第三方,
3.2操作演示
1取值
*根是(javabean)取值
//1 演示ognl的基本使用
	@Test
	public  void  fun1() throws Exception{
		//参数1: 填写ognl表达式
		//参数2: Map => context 上下文
		//参数3: javaBean / List / Map.....  Root 根
//--------------------------------------------------------
		User u = new User();
		u.setName("tom");

		String name =  (String) Ognl.getValue("name", new HashMap(), u);

		System.out.println(name);
	}
*根是list([n]语法)
	@Test
	public  void  fun2() throws Exception{
		//参数1: 填写ognl表达式
		//参数2: Map => context 上下文
		//参数3: javaBean / List / Map.....  Root 根
//--------------------------------------------------------
		List<User> list = new ArrayList<User>();
		User u1 = new User();
		u1.setName("tom");
		list.add(u1);
		//---------
		User u2 = new User();
		u2.setName("jerry");
		list.add(u2);

		//ognl表达式 默认从根下取数据

		String name =  (String) Ognl.getValue("[0].name", new HashMap(), list);

		System.out.println(name);
	}
*Map(context)中取
	@Test
	public  void  fun3() throws Exception{
		Map< String, Object> context = new HashMap<String, Object>();

		context.put("name", "tom");

		//-------------------------------
		User u2 = new User();
		u2.setName("jerry");


		String name = (String) Ognl.getValue("name", context, u2);

		System.out.println(name);
	}
2赋值
*表达式赋值
	@Test
	public  void  fun5() throws Exception{
		//演示赋值1
		User u = new User();

		 Ognl.getValue("name='tom'", new HashMap(), u);

		 System.out.println(u.getName());
	}
*SetValue方法赋值
	@Test
	public  void  fun6() throws Exception{
		//演示赋值2
		User u = new User();

		 Ognl.setValue("name", new HashMap(), u,"jerry");

		 System.out.println(u.getName());
	}
3调用方法
	@Test
	public  void  fun7() throws Exception{
		//演示方法调用(方法需要存在于根对象中)
		User u = new User();

		Ognl.getValue("setName('jack')", new HashMap(), u);


		System.out.println(u.getName());

	}
4调用静态方法
public class DateUtils {

	public static double PI = 3.14159265357;


	public static String getTime(){
		return new SimpleDateFormat("yyyy/MM/dd").format(new Date());
	}

	public static String echo(String str){
		return str;
	}
}
@Test
public void fun8() throws Exception{
//演示静态方法调用(不受方法必须在根中的限制)
User u = new User();
String time = (String) Ognl.getValue("@cn.itheima.utils.DateUtils@getTime()", new HashMap(), u);
String echo = (String) Ognl.getValue("@cn.itheima.utils.DateUtils@echo('hiahia~~')", new HashMap(), u);
System.out.println(time);
System.out.println(echo);
}
5访问静态变量
	@Test
	public  void  fun9() throws Exception{
		//演示静态方法调用(不受方法必须在根中的限制)
		User u = new User();

		double Pi= (Double) Ognl.getValue("@cn.itheima.utils.DateUtils@PI", new HashMap(), u);


		System.out.println(Pi);

	}
6数学运算符
	@Test
	public  void  fun10() throws Exception{
		//演示数学运算符
		User u = new User();

		int result= (Integer) Ognl.getValue("1+1", new HashMap(), u);


		System.out.println(result);

	}
7表达式串联“,”号连接
	@Test
	public  void  fun11() throws Exception{
		//演示","连接符
		User u = new User();

		//结果会返回最后一组ognl表达式的值
		String name = (String) Ognl.getValue("name='tom',name='aa'", new HashMap(), u);


		System.out.println(name);

	}
8创建list
	@Test
	public  void  fun12() throws Exception{
		//演示 创建对象 (list)
		User u = new User();


		List list = (List) Ognl.getValue("{'tom','jerry','jack','rose'}", new HashMap(), u);


		System.out.println(list);

	}
9创建map
	@Test
	public  void  fun13() throws Exception{
		//演示 创建对象 (map)
		User u = new User();


	Map map =	(Map) Ognl.getValue("#{'name':'tom','age':'18'}", new HashMap(), u);


		System.out.println(map);

	}
10 创建对象,格式: new 对象()
	@Test
	public  void  fun14() throws Exception{
		//演示 创建对象 (user)
		User u = new User();


	User u2 =  (User) Ognl.getValue("new cn.itheima.bean.User()", new HashMap(), u);


		System.out.println(u2);

	}
11 "#this" 表示当前对象引用
	@Test
	public void demo10() throws OgnlException{
		// #10, "#this" 表示当前对象引用

		User user = new User("rose","999");

		Object obj = Ognl.getValue("#this", new HashMap(), user);
		System.out.println(obj);
	}
12In与not in运算符
	@Test
	public  void  fun15() throws Exception{
		//演示 in
		User u = new User();


	boolean b = (Boolean) Ognl.getValue("'tom' in {'tom','jerry','jack','rose'}", new HashMap(), u);

	boolean c = (Boolean) Ognl.getValue("'tom' not in {'tom','jerry','jack','rose'}", new HashMap(), u);

	System.out.println(b);//true

	System.out.println(c);//false

	}
13投影(了解)
	@Test
	public  void  fun16() throws Exception{
		//集合的投影(了解)
		List<User> list = new ArrayList<User>();
		//--------
		User u1 = new User();
		u1.setName("tom");
		list.add(u1);
		//---------
		User u2 = new User();
		u2.setName("jerry");
		list.add(u2);

		System.out.println(Ognl.getValue("#this.{name}", new HashMap(),list));

	}
14过滤(了解)
	@Test
	public  void  fun17() throws Exception{
		//集合的选择(过滤)
		//集合的投影(了解)
		List<User> list = new ArrayList<User>();
		//--------
		User u1 = new User();
		u1.setName("tom");
		u1.setAge(10);
		list.add(u1);
		//---------
		User u2 = new User();
		u2.setName("jerry");
		u2.setAge(20);
		list.add(u2);


		System.out.println(Ognl.getValue("#this.{?age > 18}", new HashMap(),list));
	}
#
可以通过#key获得context数据
#{'k':'v' , ...} 创建map
%
%{表达式} 在struts标签希望以OGNL表达式执行,实际输出字符串。强制按照OGNL表达式执行。
%{'表达式'} 在struts标签希望字符串,但实际按照OGNL表达式执行。必须是字符串,不需要执行。
$
在配置文件从值栈获得数据。 xml
国际化资源文件。properties
Strtus2 OGNL表达式的结合
*上下文对象是ActionContext;
*根对象是ValueStack,它是一个栈结构,提供了压栈和弹栈等方法,通常栈顶元素是当前方法的Action对象;
*每个请求都有自己的ActionContext,每个ActionContext中都有自己的ValueStack;
struts2为OGNL表达式准备了两个对象
ActionContext: 作为ognl表达式的Context
valueStack: 作为ognl表达式的Root
两个对象的创建
*都是strutsPrepareAndExecuteFilter中准备好.
ActionContext和ValueStack
ActionContext<--------------互相引用-------------->ValueStack
ValueStack 值栈【★★★★】
介绍
*ValueStack贯穿action生命周期(一次请求创建一个action实例)
*值栈:在一次请求中,struts用于共享数据。
在action的目标方法(execute)中,用于存放数据
在jsp页面中获得数据。
*值栈创建过程:请求开始时,struts将创建值栈对象,将值栈对象添加到request作用域。当请求结束时,tomcat销毁request对象,于此值栈销毁
。
获得值栈
值栈对象:ValueStack
// 1.1 从request作用域获得值栈,固定的字符串“struts.valueStack”
HttpServletRequest request = ServletActionContext.getRequest();
ValueStack valueStack = (ValueStack)request.getAttribute(ServletActionContext.STRUTS_VALUESTACK_KEY);
// 1.2 【掌握】
ValueStack valueStack2 = ActionContext.getContext().getValueStack();
root 分析
*底层类型是:CompoundRoot,实际就是ArrayList。CompoundRoot对象提供更多的api,将List修改了栈。
public CompoundRoot cutStack(int index):从指定的索引开始(含)创建一个新的子集合
public Object peek():取栈顶对象
public Object pop():弹出栈顶对象
public void push(Object o):压入新对象到栈顶
*root用于存放对象,此对象没有名称。
*获得root中数据,通过使用属性获得
操作【★★★★★】
值栈数据的操作
public Map<String, Object> getContext():获取contextMap
public CompoundRoot getRoot();获取contextMap中的根对象。跟对象是一个List,实现了一个栈结构
public void setValue(String expr, Object value);
设置值。存在哪里呢?注意:String expr是一个OGNL表达式。以#存在contextMap中,不以#开头,相当于设置栈中对象的属性(从栈顶撸到栈底)。
public String findString(String expr);
查找对象,返回的是String类型。注意:String expr是一个OGNL表达式。
扩展:从根中栈顶搜索指定的属性,如果没有找到,会当做key从contextMap中找。
public Object peek();获取栈顶对象
public Object pop();弹栈顶对象出栈
public void push(Object o);压栈
public void set(String key, Object o);
向根中加入数据。栈顶是一个Map,直接把数据放到Map中,如果栈顶不是Map,创建一个新Map,把数据放到Map中。
public int size();栈长度
存放数据
值栈的数据必须通过struts标签在jsp中获得
*valueStack.push() 将对象压入栈中。一般情况压入javabean
操作1:压栈push
ActionContext.getContext().getValueStack().push(javabean)
jsp 通过 javabean属性获得
*valueStack.set(key,value) 给对象进行名称,底层使用Map
操作2:底层使用自定义Map set
ActionContext.getCotnext().getValueStack().set(key,value)
jsp 直接 key获得数据
		//1 获得值栈
		// 1.1 从request作用域获得值栈,固定的字符串“struts.valueStack”
		HttpServletRequest request = ServletActionContext.getRequest();
		ValueStack valueStack =  (ValueStack)request.getAttribute(ServletActionContext.STRUTS_VALUESTACK_KEY);
		// 1.2 【掌握】
		ValueStack valueStack2 = ActionContext.getContext().getValueStack();


		// 2 root操作
		// 2.1 压栈:给栈中添加对象,自定义javabean
		// * jsp 需要通过javabean属性获得
		valueStack.push(new User("小强","998"));
		// 2.1 可以给对象进行命名,底层使用Map
//		Map<String,String> data = new HashMap<String, String>();
//		data.put("ds", "屌丝");
//		valueStack.push(data);
		//等效
		valueStack.set("dzd", "屌中屌");
jsp获得数据
*通过javabean的属性,或 map的key ,直接获得数据 值栈 <br/>
<h3>root</h3>
<s:property value="userName"/> <%-- 通过javabean属性获得数据 --%> <br/>
<s:property value="ds"/> <%-- 通过map key 获得数据,相当于javabean --%> <br/>
<s:property value="dzd"/> <%-- 通过map key 获得数据,相当于javabean --%> <br/>
context 分析

*context类型Map<String,Object> 给一个对象进行命名。value的类型Object,所以可以存放任意内容。
*通过 #key 获得context中的数据
context提供一些固定key,表示不同的作用
application:表示application作用域(servletContext)
session:表示session作用域
request:表示request作用域
attr:依次从page、request、session、application获得数据
parameters:所有的请求参数
root:对值栈的引用。//ActionContext.getContext().getValueStack()
ActionContext的主要操作
private Map<String, Object> context:contextMap
public Map<String, Object> getApplication():获取ServletContext中的所有Attributes
public Map<String, Object> getContextMap():获取contextMap的引用
public Map<String, Object> getParameters():获取请求参数的Map
public Map<String, Object> getSession():获取HttpSession中的所有Attributes
public ValueStack getValueStack():获得ValueStack对象的引用
public Object get(String key):从contextMap中根据key获得对象
public void put(String key, Object value):向contextMap中存放数据
存放数据
*ActionContext.getContext().put(key,value)
*context固定key,struts提供更方便api进行操作
固定key:session , ActionContext.getContext().getSession().put(key,value)
固定key:application ,ActionContext.getContext().getApplication().put(key,value)
ActionContext.getContext().put(key,value)
jsp 通过 #key获得
		// 3 context操作 , 必须通过  #key获得
		// * 给context设置内容
		ActionContext.getContext().put("gf", "request_gf");
		// * 给context的固定key=session设置内容,value=Map ,设置的数据对Map进行操作
		ActionContext.getContext().getSession().put("gf", "session_gf");
		// * 给context的固定key=application设置内容,value=Map,设置的数据对Map进行操作
		ActionContext.getContext().getApplication().put("gf", "application_gf");
jsp获得数据
*通过 #key 获得 context中的内容
	<h3>context</h3>
	<s:property value="#gf"/> <%-- 通过#key 获得context中内容 --%> <br/>
	<s:property value="#session.gf"/> <%-- 通过#key 获得固定值session的数据 --%> <br/>
	<s:property value="#application.gf"/>  <br/>
request作用域数据操作
action存放public class VsDemo2Action extends ActionSupport {
@Override
public String execute() throws Exception {
// 1 root 操作
ActionContext.getContext().getValueStack().push("jack");
ActionContext.getContext().getValueStack().push("rose");
// 2 request作用域分析
// * context数据
ActionContext.getContext().put("ds", "context_ds");
// * root数据
ActionContext.getContext().getValueStack().set("ds", "root_ds");
// * request作用域
ServletActionContext.getRequest().setAttribute("ds", "request_ds");
return SUCCESS;
}
}
jsp获得数据
<body>
	<s:debug></s:debug>

	值栈 <br/>
	<h3>root</h3>
	<s:property value="[1]"/>  <%--从下标1开始,获得一个新的栈 --%> <br/>
	<s:property value="top"/>  <%--获得栈顶数据 --%> <br/>
	<s:property value="[1].top"/>  <%--从新的栈获得 栈顶数据 --%> <br/>


	<h3>request作用域</h3>
	<%--
		原始获得方式 ,直接从context
	--%>
	1 <s:property value="#ds"/> 		<br/>

	<%-- findValue('')
		先从root获得
		如果没有,再从context获得
	 --%> <br/>
	2 <s:property value="ds"/>

	<%-- struts增强request,
		首先从 request作用域
		如果没有,在执行findValue()
			先root
			在context
	--%> <br/>
	3 <s:property value="#request.ds"/>

	<%=request %>
</body>
Ognl和Struts使用上的结合:
表单提交,其中提交的键可以看作是ognl表达式
Action中有User对象,我们想直接将表单参数提交到User对象中封装,
做法:
1>提交的参数的键=> user.name 就会在值栈中查找名为user的对象,并赋值到该对象的name属性
2>使用ModelDriven,我们的Action在getModel方法中将User对象返回.ModelDriven拦截器会将我们返回的User对象放入值栈中(栈顶),
那么 在表单中直接提交name,将会把name值装入栈顶的user对象的name属性
Struts2标签
打开struts-2.3.7\docs\WW\tag-reference.html
可以看到Struts2提供的所有标签。其中分为“通用标签”和“UI标签”两大部分
1_Struts2通用标签之数据标签
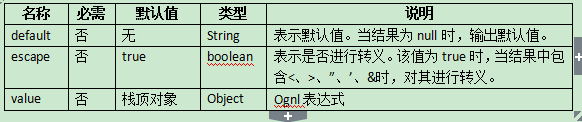
<s:property>(重要)
<s:property>标签用来执行OGNL表达式,最为常用的方式是使用它在页面中输出ValueStack或ActionContext中的数据。
<s:property value=”#request.hello”/>,等于ActionContext.getContext().getRequest().get(“hello”)。
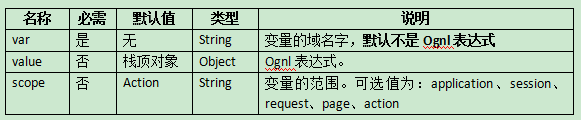
<s:set>
<s:set>标签用来创建一个变量,保存到指定的范围内。
<s:set var=”myVar” value=”#parameters.score[0]” scope=”page”/>,
创建一个变量,保存到page范围,key为myVar,值为“#parameters.score[0]”的运算结果。
scope的可选值中的action是我们陌生的范围,它是scope的默认值。它表示保存到request和OgnlContext两个范围中。即比request范围多出了一个OgnlContext范围。
<s:set var=”myVar” value=”#parameters.score[0]” />
<s:property value=”#myVar”/>等同于ActionContext.getContext().get(“myVar”);
<s:property value=”#request.myVar”/>等同于ActionContext.getContext.getReuqest().get(“myVar”);
<s:push>
<s:push>标签是把指定值暂时压入到值栈中,当执行完<s:push>标签后,压入到值栈中的值会被弹出。
<s:push value=”’hello’”/>等于把hello字符串压入到值栈中后,马上又弹出了,相当于什么都没做。
<s:push value=”#session.user”>把user压入到值栈中
<s:property value=”username”/>打印值栈元素的username属性
<s:property value=”password”/>打印值栈元素的password属性
</s:push>把user从值栈中弹出
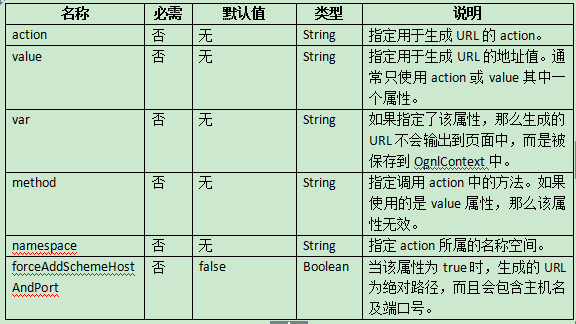
<s:url>
<s:url>标签通常用来生成action路径,它与<c:url>标签很相似。
<s:url action=”TestAction”/>在页面中打印/contextpath/TestAction.action。
也就是说它与<c:url>一样会生成全路径。而且无论给出后缀“.action”!
action属性的值只需要与struts.xml文件中<action>元素的name属性值相同即可。
<s:url action=”TestAction” namspace=”/” />还可以指定名称空间
<s:url action=”TestAction”>
<s:param name=”name” value=”’张三’”/>
</s:url>
页面中打印为:/ognl/TestAction.action?name=%E5%BC%A0%E4%B8%89
还可以为URL指定参数,其中参数包含中文时自动使用URL编码。
其中<s:param>是用来作为子标签的,它的作用是指定参数。它的value属性值为Ognl表达式,
所以我们需要把“张三”用单引号引起来,表示Ognl表达式的字符串常量。
<s:a>
它用来生成超链接,与<s:url>相似!
<s:a action=”TestAction” namespace=”/”>添加用户
<s:param name=”name” value=”’张三’”/>
</s:a>
<s:debug>
Debug标签用于调试,它在页面中生成一个“[Debug]”超链接,单击这个超链接,
可以查看ValueStack和ActionContext中保存的所有对象。
2_Struts2通用标签之控制标签
控制标签很好理解,就是流程控制了。例如if、elseif等,以及iterator等
<s:if>、<s:elseif>、<s:else>
例
<!—
在浏览器中输入:http://localhost:8080/tagtest/index.jsp?score=85
-->
<s:set name="score" value="#parameters.score[0]"/>
<s:property value="#score"/>:
<s:if test="#score > 100 || #score < 0">
<s:property value="'输入错误'"/>
</s:if>
<s:elseif test="#score >= 90">
<s:property value="'A'" />
</s:elseif>
<s:elseif test="#score >= 80">
<s:property value="'B'" />
</s:elseif>
<s:elseif test="#score >= 70">
<s:property value="'C'" />
</s:elseif>
<s:elseif test="#score >= 60">
<s:property value="'D'" />
</s:elseif>
<s:else>
<s:property value="'E'"/>
</s:else><s:iterator>
<s:iterator>标签可以用来迭代一个集合,可以迭代的集合有:Collection、Map、Enumeration、Iterator或者是数组。iterator标签在迭代过程中,会把当前对象暂时压入值栈,这样在子标签中就可以直接访问当前对象的属性(因为当前对象在栈顶),在标签体执行完毕后,位于栈顶的对象就会被删除,在循环的第二圈时,把新的当前对象再压入值栈中。
<s:iterator value="{'zhangSan','liSi','wangWu' }">
	name: <s:property/><br/>
</s:iterator>
如果为<s:iterator>标签指定了var属性,那么当前对象不只是压入到了值栈中,而且还会被添加到OgnlContext中。
<s:iterator value="{'zhangSan','liSi','wangWu' }" var="name">
	name: <s:property value="#name"/><br/>
</s:iterator>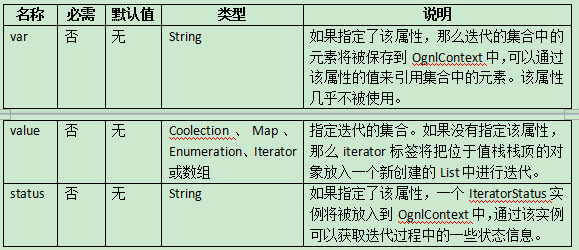
IteratorStatus类在org.apahce.struts2.views.jsp包下。下面是对该类常用方法的介绍:
*public int getCount():得到当前已经迭代的元素的总数。
*public int getIndex():得到当前迭代的元素的索引。
*public boolean isEven():判断当前迭代的元素的个数是否是偶数。
*public boolean isOdd():判断当前迭代的元素的个数是否是奇数。
*public boolean isFirst():判断当前迭代的元素是否是第一个元素。
*public boolean isLast():判断当前迭代的元素是否是最后一个元素。
在OGNL表达式中使用IteratorStatus类的方法时,可以直接使用:count、index、even、odd、first、last属性。
<s:iterator value='{"one", "two", "three"}' status="status">
	<s:property value="#status.count"/>,
	<s:property value="#status.index"/>,
	<s:property value="#status.even"/>,
	<s:property value="#status.odd"/>,
	<s:property value="#status.first"/>,
	<s:property value="#status.last"/><br/>
</s:iterator>
<hr/>
<s:iterator value="#{'1':'one','2':'two','3':'three','4':'four'}" status="st">
<s:property value="key"/>:<s:property value="value"/><br/>
</s:iterator>
3_Struts2标签UI标签之表单标签
Struts2的表单标签还是比较好用的,但它也存在一些败笔,
例如主题这一部分就不是很灵活。所以导致开发中没有公司会使用它提供的主题。
Struts2标签的优势:
*简化代码;
*自动数据回显;
*指定主题样式(说是优点,但很多人也会认为这是缺点);
<form action="<c:url value='/user/LoginAction.action'/>" method="post">
  用户名 <input type="text" name="username"/><br/>
  密 码 <input type="password" name="password"/><br/>
  <input type="submit" value="登录"/>
</form>
<hr/>
<s:form action="LoginAction" namespace="/user">
	<s:textfield name="username" label="用户名" />
	<s:password name="password" label="密 码" />
	<s:submit value="登录" />
</s:form>
a.表单标签入门
<s:form>
通过action和namespace两部分来指定请求路径,action直接给<action>元素的name值即可,无需给出后缀“.action”;
method默认为post;
会自动添加id属性,值与action属性值相同;
整个表单会生成在<table>中。
<s:textfield>
对应<input type=”text”>标签;
通过lable来生成<lable>标签;
<s:password>
对应<input type=”password”>标签;
通过label来生成<lable>标签
<s:submit>
对应<input type=”submit”>标签
b.表单主题
整个表单都会在<table>中生成,这也就说明无需为每个表单项添加<br/>。因为在表格中就无需再换行了。
生成在表格中是因为<s:form>标签的theme属性的默认值为xhtml,它表示一个主题样式。这个主题样式由Freemarker模板来完成
取消主题
在<s:textfield>的theme属性指定为simple,那么这个表单项就使用简单主题;
在<s:form>的theme属性指定为simple,那么整个表单都使用简单主题;
设置struts.ui.theme常量为simple,那么所有表单标签的默认主题都是simple
c.自动回显
当表单提交后,再返回到表单页面后,html标签不可能帮我们回显数据。而Struts2的表单标签可以做到这一点。原因是当前Action就在值栈顶,而表单标签会从值栈中获取数据来回显。
4_表单标签之选择性标签
<s:redio>标签
表单标签中简化比较大的标签可以不在需要写循环,还有就是自动回显。我们都知道在下拉列表、单选、复选中,手动回显是比较麻烦的事。但使用Struts2的表单标签就方便多了。
<s:radio list="#{'male':'男','female':'女'}" name="gender"/>也可以为list属性指定为list:
<s:radio list="{'男','女'}" name="gender"/><s:checkboxlist>标签
<s:checkboxlist list="#{'read':'看书','netplay':'上网','music':'音乐' }" name="hobby"/><s:select>标签
下拉列表与上面两个标签也一样,都是选择性的!使用它也是无需循环,无需处理循环
<s:select name="city" list="#{'bj':'北京','sh':'上海','gz':'广州'}"/>
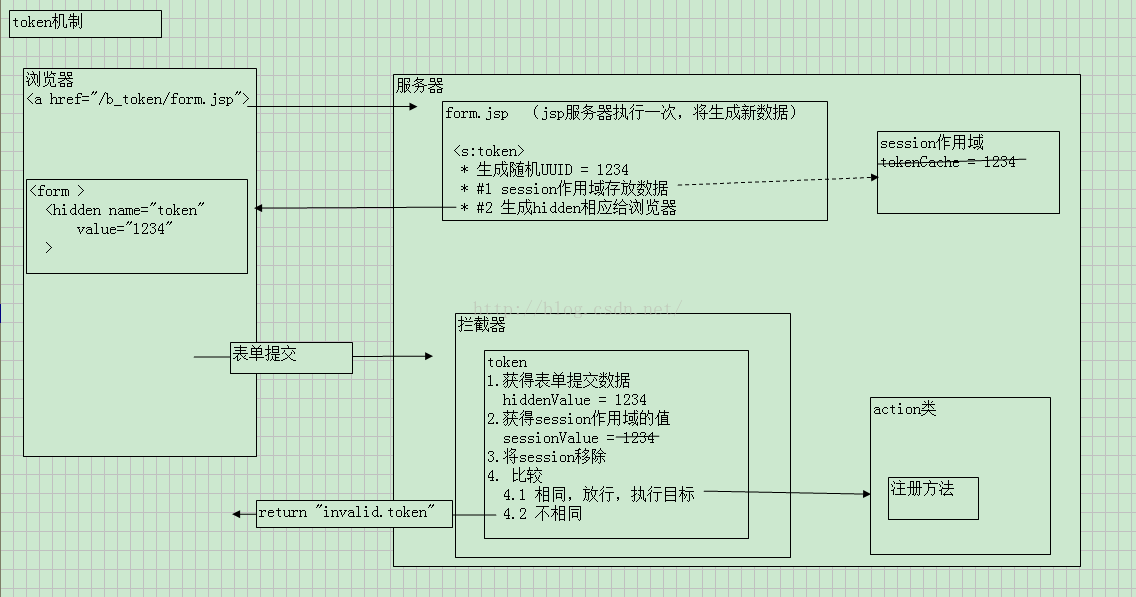
Token机制
5.1表单重复提交(回顾)
*提交成功,点击刷新按钮
*提交成功,先回退,再提交
*点击提交,网络延时,记录点击
5.2防止表单重复提交(回顾)
*验证码解决重复提交
*手动方式解决,token机制
#1提供表单,表单中保存hidden存在uuid(数据1)
#2session需要保存同样的数据(数据2)
#3当提交,服务器需要比较数据1和数据2,比较之后服务器端删除
一样:正常提交
不一样:服务器删除了,浏览器重复提交了
5.3struts token
*<s:token> : 1.表单生成hidden 2.在服务器session保存生成数据(此数据struts生成,key不知道)
*token拦截器,默认栈没有
如果一样,放行
如果不一样,返回“invalid.token”
5.4执行流程分析
struts.xml声明使用默认拦截器和token拦截器及配置重复提交返回页面
	<!-- #2 token:用户注册 -->
		<action name="userAction_*" class="cn.itcast.b_token.UserAction" method="{1}">
			<!-- 注册成功 -->
			<result name="register">/b_token/success.jsp</result>
			<!-- 重复提交 -->
			<result name="invalid.token">/b_token/demo.jsp</result>

			<!-- 声明使用默认拦截器栈 -->
			<interceptor-ref name="defaultStack"></interceptor-ref>
			<interceptor-ref name="token"></interceptor-ref>
		</action>


 731
731


 被折叠的 条评论
为什么被折叠?
被折叠的 条评论
为什么被折叠?
 到【灌水乐园】发言


