


BOS项目笔记第8天
内容:
1、权限管理(初始化权限数据、添加、查询)
2、角色管理(添加、查询)
3、用户管理(添加、查询)
4、修改BOSRealm中的授权方法----基于数据库实现
5、使用ehcache缓存权限数据
6、使用shiro提供的标签进行权限控制
7、左侧系统菜单按照登录人权限展示
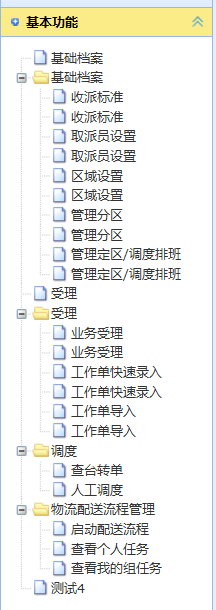
1. 权限管理
1.1 初始化权限数据到数据库
执行提供的sql文件到数据库
INSERT INTO `auth_function` VALUES ('11', '基础档案', 'jichudangan', null, null, '1', '0', null);
INSERT INTO `auth_function` VALUES ('112', '收派标准', 'standard', null, 'page_base_standard.action', '1', '1', '11');
INSERT INTO `auth_function` VALUES ('113', '取派员设置', 'staff', null, 'page_base_staff.action', '1', '2', '11');
INSERT INTO `auth_function` VALUES ('114', '区域设置', 'region', null, 'page_base_region.action', '1', '3', '11');
INSERT INTO `auth_function` VALUES ('115', '管理分区', 'subarea', null, 'page_base_subarea.action', '1', '4', '11');
INSERT INTO `auth_function` VALUES ('116', '管理定区/调度排班', 'decidedzone', null, 'page_base_decidedzone.action', '1', '5', '11');
INSERT INTO `auth_function` VALUES ('12', '受理', 'shouli', null, null, '1', '1', null);
INSERT INTO `auth_function` VALUES ('121', '业务受理', 'noticebill', null, 'page_qupai_noticebill_add.action', '1', '0', '12');
INSERT INTO `auth_function` VALUES ('122', '工作单快速录入', 'quickworkordermanage', null, 'page_qupai_quickworkorder.action', '1', '1', '12');
INSERT INTO `auth_function` VALUES ('124', '工作单导入', 'workordermanageimport', null, 'page_qupai_workorderimport.action', '1', '3', '12');
INSERT INTO `auth_function` VALUES ('13', '调度', 'diaodu', null, null, '1', '2', null);
INSERT INTO `auth_function` VALUES ('131', '查台转单', 'changestaff', null, null, '1', '0', '13');
INSERT INTO `auth_function` VALUES ('132', '人工调度', 'personalassign', null, 'page_qupai_diaodu.action', '1', '1', '13');
INSERT INTO `auth_function` VALUES ('14', '物流配送流程管理', 'zhongzhuan', null, null, '1', '3', null);
INSERT INTO `auth_function` VALUES ('141', '启动配送流程', 'start', null, 'workOrderManageAction_list.action', '1', '0', '14');
INSERT INTO `auth_function` VALUES ('142', '查看个人任务', 'personaltask', null, 'taskAction_findPersonalTask.action', '1', '1', '14');
INSERT INTO `auth_function` VALUES ('143', '查看我的组任务', 'grouptask', null, 'taskAction_findGroupTask.action', '1', '2', '14');
效果
1.2 查询权限数据
权限管理页面:
第一步:修改datagrid的URL地址,访问FunctionAction,获取权限数据展示
第二步:创建FunctionAction,提供pageQuery方法
配置struts.xml
1.3 添加权限数据
添加权限页面:
第一步:修改combobox的URL地址,加载权限数据,展示到下拉框中
第二步:为“保存”按钮绑定事件
第三步:在Action中提供add方法
Service代码:
注:
当pid下拉框字段不填写会默认发送空字符串,pid=空字符串引用主键id,主键中没有空这个值,会发生约束错误
org.springframework.dao.InvalidDataAccessApiUsageException:object references an unsaved transient instance - save the transient instancebefore flushing
所以保存前需要先判断一下parentFunction.id是否为空字符串,然后设置为空
	public void save(Function model) {
		Function parentFunction = model.getParentFunction();
		if(parentFunction != null){
			String id = parentFunction.getId();
			if(StringUtils.isBlank(id)){
				model.setParentFunction(null);
			}
		}
		functionDao.save(model);
	}
第四步:配置struts.xml
2. 角色管理
2.1 添加角色
角色添加页面:
第一步:在添加角色页面使用ztree展示权限树
		// 授权树初始化
		var setting = {
			data : {
				key : {
					title : "t"
				},
				simpleData : {
					enable : true
				}
			},
			check : {//使用ztree选中效果
				enable : true,
			}
		};

		$.ajax({
			url : '${pageContext.request.contextPath}/functionAction_listajax.action',//发送ajax请求加载权限数据
			type : 'POST',
			dataType : 'json',
			success : function(data) {//data就是服务端返回的权限数据
				//var zNodes = eval("(" + data + ")");
				//使用权限数据初始化ztree
				$.fn.zTree.init($("#functionTree"), setting, data);
			},
			error : function(msg) {
				alert('树加载异常!');
			}
		});
在权限类中增加一个pId属性来展示ztree的上下级关系效果
注:get方法如果第二个字母大写,那第一个字母必须小写getpId
 * 权限实体
 * @author zhaoqx
 *
 */
public class Function implements java.io.Serializable {

	// Fields

	private String id;//编号
	private Function parentFunction;//当前权限对应的上一级权限
	private String name;//权限名称
	private String code;//关键字
	private String description;//描述
	private String page;//访问URL
	private String generatemenu;//当前权限是否生成到菜单  1:生成 0:不生成
	private Integer zindex;//排序
	private Set children = new HashSet(0);//当前权限对应的多个下级权限
	private Set roles = new HashSet(0);//当前权限对应的多个角色

	public String getpId() {
		if(parentFunction == null){
			return "0";
		}
		return parentFunction.getId();
}第二步:在提交表单之前,使用ztree提供API,动态获取选中的节点
因为ztree的复选框不是checkbox,选中并不会提交,所以要手动获取把id赋值给隐藏域后再提交
		// 点击保存
		$('#save').click(function(){
			//location.href='${pageContext.request.contextPath}/page_admin_privilege.action';
			var v = $("#roleForm").form("validate");
			if(v){
				//获得ztree对象
				var treeObj = $.fn.zTree.getZTreeObj("functionTree");
				//获得当前ztree对象选中的节点数组
				var nodes = treeObj.getCheckedNodes(true);//在提交表单之前将选中的checkbox收集
				//循环数组,获得节点的ID,拼接成字符串使用逗号分隔
				var array = new Array();
				for(var i=0;i<nodes.length;i++){
					array.push(nodes[i].id);
				}
				var ids = array.join(",");
				//为隐藏域赋值
				$("input[name=funcitonIds]").val(ids);
				$("#roleForm").submit();
			}
});第三步:创建RoleAction,提供add方法
Service代码:
角色关联权限可以通过通过查询权限id获取持久态权限对象
也可以创建托管态(设置关联id)
	public void save(Role model, String funcitonIds) {
		roleDao.save(model);//持久对象
		String[] ids = funcitonIds.split(",");
		for (String id : ids) {
			Function function = new Function();
			function.setId(id);
			model.getFunctions().add(function);//角色关联权限
		}
	}
2.2 查询角色
3. 用户管理
3.1 添加用户功能
添加页面:
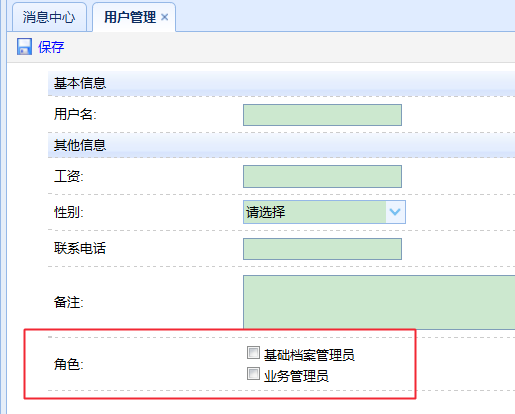
第一步:在添加页面展示角色数据为checkbox
通过ajax获取角色数据
	           	<tr><td>选择角色:</td>
		           	<td colspan="3" id="roleTD">
		           		<script type="text/javascript">
		           			$(function(){
		           				//发送ajax请求,获取角色数据,展示位checkbox
		           				var url = "${pageContext.request.contextPath}/roleAction_listajax.action";
		           				$.post(url,{},function(data){
		           					for(var i=0;i<data.length;i++){
		           						var id = data[i].id;
		           						var name = data[i].name;
		           						$("#roleTD").append("<input name='roleIds' value='"+id+"' type='checkbox'>" + name);
		           					}
		           				});
		           			});
		           		</script>
第二步:在RoleAction中提供listajax方法,查询所有角色数据,返回json对象
第三步:提交表单
第四步:在UserAction中提供add方法,完成添加用户操作
Service代码:
	//添加用户
	public void save(User user, String[] roleIds) {
		String password = user.getPassword();
		//使用md5加密
		password = MD5Utils.md5(password);
		user.setPassword(password);
		userDao.save(user);//持久对象

		for (String id : roleIds) {
			Role role = new Role();
			role.setId(id);
			//用户关联角色
			user.getRoles().add(role);
		}

	}
3.2 用户分页查询
第一步:修改datagrid的URL地址
第二步:在UserAction中提供pageQuery方法进行分页查询
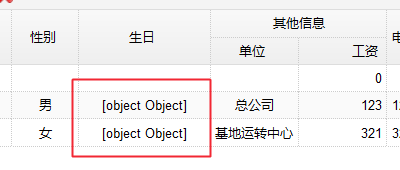
第三步:页面展示时,生日列不能正常显示,在User类中提供一个getBirthdayStr方法
第四步:在页面展示用户对应的角色,在User类中提供方法getRoleNames
public class User implements java.io.Serializable {

	// Fields

	private String id;
	private String username;
	private String password;
	private Double salary;
	private Date birthday;
	private String gender;
	private String station;
	private String telephone;
	private String remark;
	private Set noticebills = new HashSet(0);
	private Set<Role> roles = new HashSet(0);//当前用户对应的多个角色
	//提供生日的字符串属性
	public String getBirthdayStr(){
		if(birthday == null){
			return "";
		}else{
			return new SimpleDateFormat("yyyy-MM-dd").format(birthday);
		}
	}
	//提供关联角色的字符串显示属性
	public String getRoleNames(){
		String roleNames = "";
		if(roles != null && roles.size() > 0){
			for (Role role : roles) {
				String name = role.getName();
				roleNames += name + " ";
			}
		}
		return roleNames;
	}
4. 修改BOSRealm中的授权方法----基于数据库实现
/**
 * 自定义realm,实现认证和授权
 *
 * @author zhaoqx
 *
 */
public class BOSRealm extends AuthorizingRealm {
	// 注入dao
	@Resource
	private IUserDao userDao;
	@Resource
	private IFunctionDao functionDao;

	// 认证方法
	protected AuthenticationInfo doGetAuthenticationInfo(
			AuthenticationToken token) throws AuthenticationException {
		System.out.println("认证方法。。。。");
		UsernamePasswordToken pwdToken = (UsernamePasswordToken) token;
		String username = pwdToken.getUsername();
		// 根据用户名查询密码,由安全管理器负责比对查询出的数据库中的密码和页面输入的密码是否一致
		User user = userDao.findUserByUsername(username);
		if(user == null){
			return null;
		}
		String dbPassword = user.getPassword();
		//参数一:
		AuthenticationInfo info = new SimpleAuthenticationInfo(user,
				dbPassword, this.getClass().getSimpleName());
		return info;
	}

	// 授权方法
	protected AuthorizationInfo doGetAuthorizationInfo(
			PrincipalCollection principals) {

		User user = (User) principals.getPrimaryPrincipal();
		System.out.println(user);

		Subject subject = SecurityUtils.getSubject();
		User user2 = (User) subject.getPrincipal();

		//User user3 = BOSContext.getLoginUser();

		//为所用的用户授予staff权限
		SimpleAuthorizationInfo info = new SimpleAuthorizationInfo();
		List<Function> list = null;//
		//根据当前登录用户,查询用户的角色,根据角色对应获得权限,将权限添加到信息对象中
		if(user.getUsername().equals("admin")){
			//如果是超级管理员,授予所有权限
			list = functionDao.findAll();
		}else{
			//普通用户,根据用户查询对应的权限
			list = functionDao.findFunctionsByUserId(user.getId());
		}

		for (Function function : list) {
			//权限的关键字
			String code = function.getCode();
			info.addStringPermission(code);
		}

		return info;
	}

}
FunctionDao中:
@Repository
public class FunctionDaoImpl extends BaseDaoImpl<Function> implements IFunctionDao{

	public List<Function> findFunctionsByUserId(String userid) {
		String hql = "select f from Function f left outer join " +
				"f.roles r left outer join r.users u where u.id = ?";
		return this.getHibernateTemplate().find(hql,userid);
	}
5. 使用ehcache缓存权限数据
第一步:将ehcache的jar导入到bos项目中
com.springsource.net.sf.ehcache-1.6.2.jar
第二步:在项目config目录下提供ehcache的配置文件(jar包中的配置文件)
ehcache.xml
<ehcache xmlns:xsi="http://www.w3.org/2001/XMLSchema-instance" xsi:noNamespaceSchemaLocation="../config/ehcache.xsd">


    <diskStore path="java.io.tmpdir"/>


    <defaultCache
            maxElementsInMemory="10000"
            eternal="false"
            timeToIdleSeconds="120"
            timeToLiveSeconds="120"
            overflowToDisk="true"
            maxElementsOnDisk="10000000"
            diskPersistent="false"
            diskExpiryThreadIntervalSeconds="120"
            memoryStoreEvictionPolicy="LRU"
            />
</ehcache>第三步:在spring配置文件中配置一个缓存管理器
	<!-- 定义安全管理器 -->
	<bean id="securityManager" class="org.apache.shiro.web.mgt.DefaultWebSecurityManager">
		<!-- 注入realm -->
		<property name="realm" ref="bosRealm"></property>
		<!-- 注入缓存管理器 -->
		<property name="cacheManager" ref="cacheManager"></property>
	</bean>

	<!-- 注册一个缓存管理器 -->
	<bean id="cacheManager" class="org.apache.shiro.cache.ehcache.EhCacheManager">
		<property name="cacheManagerConfigFile" value="classpath:ehcache.xml"></property>
	</bean>
6. 使用shiro提供的标签展示页面元素
第一步:引入shiro标签库
<%@taglib prefix="shiro" uri="http://shiro.apache.org/tags" %> 第二步:在需要进行权限控制的元素上使用标签
	<shiro:hasPermission name="staff">
	{
		id : 'button-add',
		text : '增加',
		iconCls : 'icon-add',
		handler : doAdd
	},
	</shiro:hasPermission>
其他shiro标签
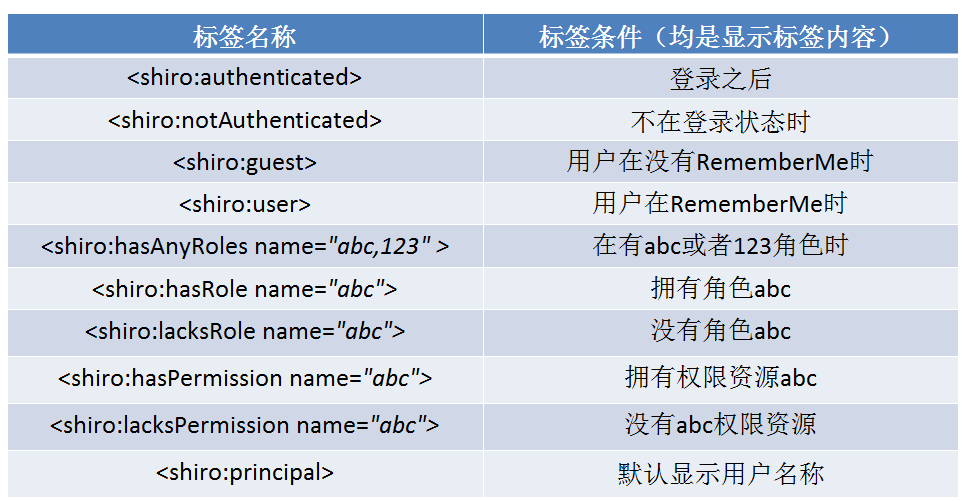
7. 系统左侧菜单根据登录人权限展示
第一步:修改/WEB-INF/pages/common/index.jsp的ajax方法提交地址
第二步:在UserAction中提供findMenu,根据登录人查询对应的菜单数据
	/**
	 * 根据登录人查询对应的权限菜单数据
	 */
	public String findMenu(){
		User user = BOSContext.getLoginUser();
		List<Function> list = null;
		if(user.getUsername().equals("admin")){
			//超级管理员,加载所有的菜单数据
			list = functionService.findAllMenu();
		}else{
			//根据用户ID查询菜单数据
			list = functionService.findMenuByUserId(user.getId());
		}

		String[] excludes = new String[]{"parentFunction","children","roles"};
		this.writeListBean2Json(list, excludes );
		return NONE;
	}
FunctionDao中:
角色重复造成权限菜单重复
在查询时需要排除重复的权限
hql 语句加上distinct
	public List<Function> findAllMenu() {
		String hql = "from Function f where f.generatemenu = '1' order by f.zindex";
		return this.getHibernateTemplate().find(hql);
	}

	public List<Function> findMenuByUserId(String id) {
		String hql = "select distinct f from Function f left outer join " +
				"f.roles r left outer join r.users u where u.id = ? and " +
				"f.generatemenu = '1' order by f.zindex";
		return this.getHibernateTemplate().find(hql,id);
	}


 4411
4411

 被折叠的 条评论
为什么被折叠?
被折叠的 条评论
为什么被折叠?
 到【灌水乐园】发言


