


添加交换分区
交换(SWAP)分区是一种通过在硬盘中预先划分一定的空间,然后把内存中暂时不常用的数据临时存放到硬盘中,以便腾出物理内存空间让更活跃的程序服务来使用的技术,其设计目的是为了解决真实物理内存不足的问题。
交换分区的划分建议:在生产环境中,交换分区的大小一般为真实物理内存的1.5~2倍。
如:我们先建立一个扩展分区
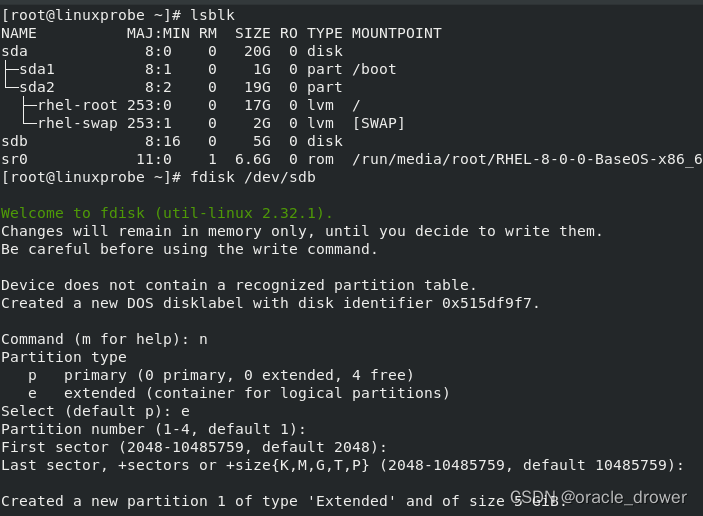
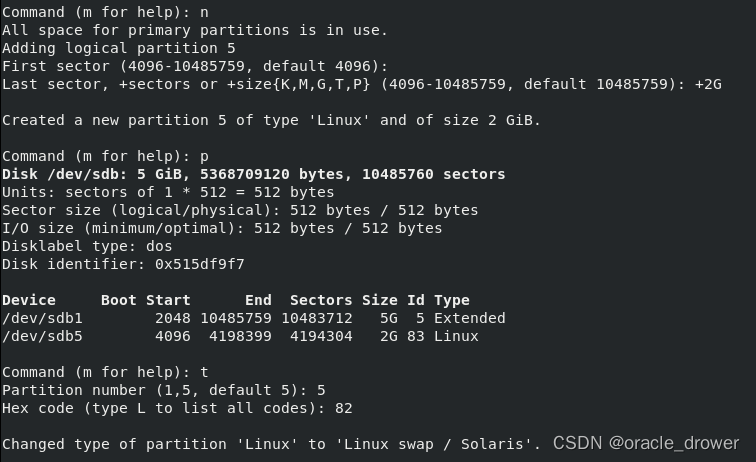
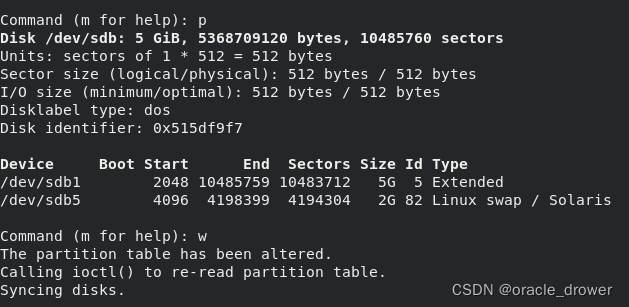
然后,建立逻辑分区,设置修改硬盘的标识码, 这里将其改成 82( Linux swap)
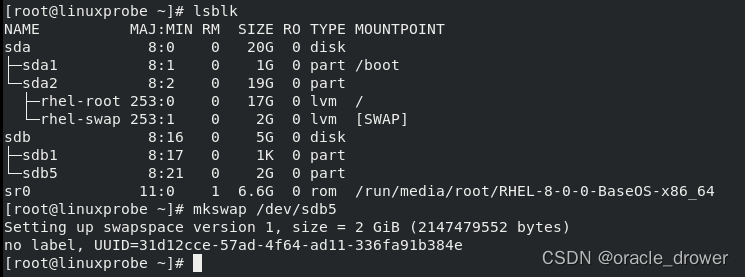
mkswap
mkswap命令用于对新设备进行交换分区格式化,语法格式为“mkswap设备名称”。
swapon
swapon命令用于激活新的交换分区设备,语法格式为“swapon设备名称”。
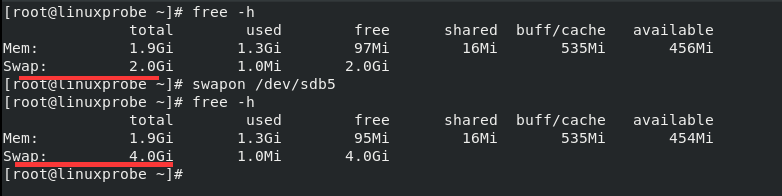
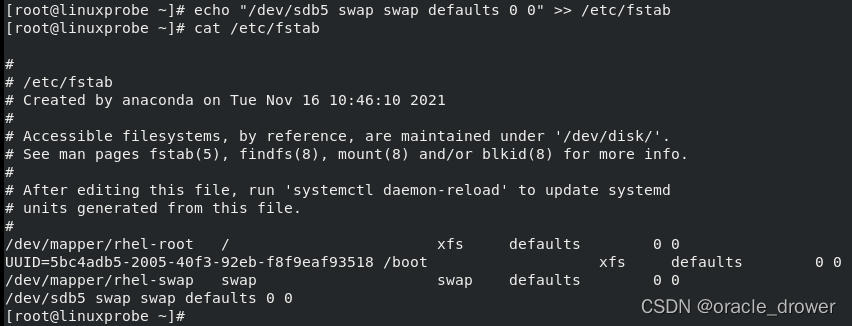
当然也要记得重启也能生效,需要写入/etc/fstab
磁盘配额
用quota技术进行磁盘容量配额管理,从而限制用户的硬盘可用容量或所能创建的最大文件个数。quota技术还有软限制和硬限制的功能。
软限制:当达到软限制时会提示用户,但仍允许用户在限定的额度内继续使用。
硬限制:当达到硬限制时会提示用户,且强制终止用户的操作。
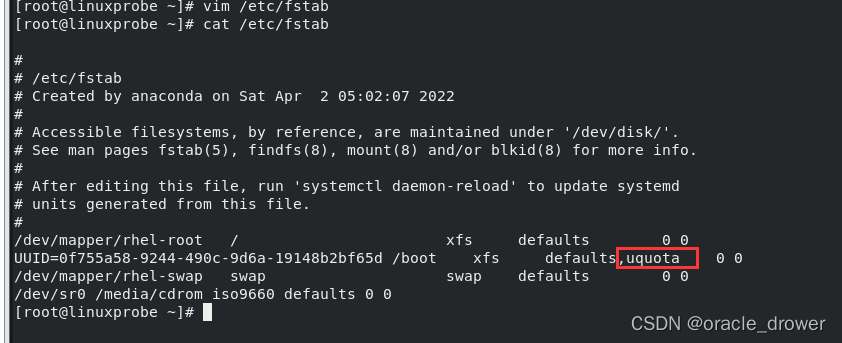
quota默认是没开启的,需要进行/etc/fstab相关配置,并重启

xfs_quota命令
这是一个专门针对XFS文件系统来管理quota磁盘容量配额服务而设计的命令。
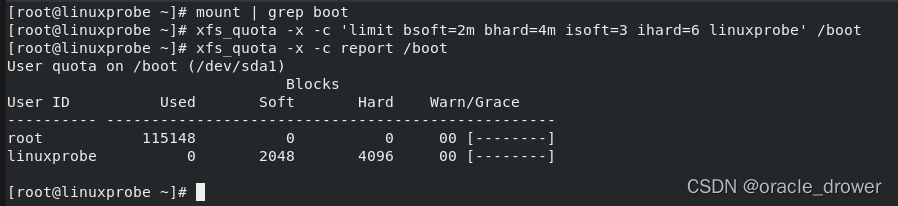
xfs_quota命令用于管理设备的磁盘容量配额,语法格式为“xfs_quota [参数] 配额 文件系统”。
参数:-c参数用于以参数的形式设置要执行的命令;-x参数是专家模式。
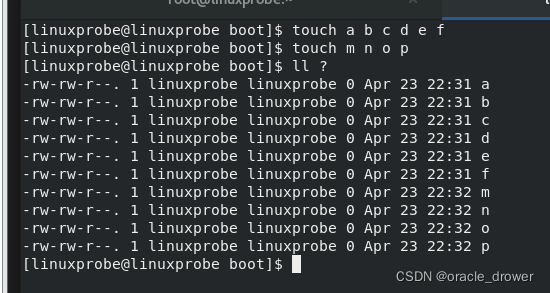
如:对用户linuxprobe进行一些限制
切换到Linuxprobe用户进行新建文件,注意是总共的数量限制。

edquota命令
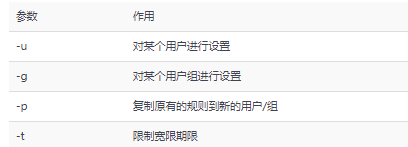
edquota命令用于管理系统的磁盘配额,语法格式为“edquota [参数] 用户名”。
edquota命令中可用的参数以及作用

VDO虚拟数据优化
VDO(Virtual Data Optimize,虚拟数据优化)是一种通过压缩或删除存储设备上的数据来优化存储空间的技术。
VDO技术支持本地存储和远程存储,可以作为本地文件系统、iSCSI或Ceph存储下的附加存储层使用。在部署虚拟机或容器时,建议采用逻辑存储与物理存储为10∶1的比例进行配置,即1TB物理存储对应10TB逻辑存储;而部署对象存储时 (例如使用Ceph)则采用逻辑存储与物理存储为3∶1的比例进行配置,即使用1TB物理存储对应3TB逻辑存储。
简言之,VDO技术能省空间!
有两种特殊情况:
其一,公司服务器上已有的dm-crypt之类的技术是可以与VDO技术兼容的,但要先对卷进行加密再使用VDO。因为加密会使重复的数据变得有所不同,因此删重操作无法实现。要始终记得把加密层放到VDO之下。
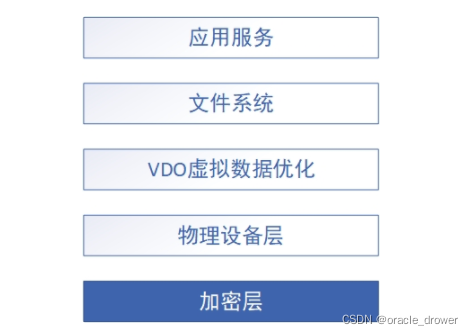
其二,VDO技术不可叠加使用,1TB的物理存储提升成10TB的逻辑存储没问题,但是再用10TB翻成100TB就不行了。
[root@linuxprobe yum.repos.d]# vdo create --name=storage --device=/dev/sdb --vdoLogicalSize=50G
Creating VDO storage
Starting VDO storage
Starting compression on VDO storage
VDO instance 0 volume is ready at /dev/mapper/storage
[root@linuxprobe yum.repos.d]# vdo status --name=storage

[root@linuxprobe yum.repos.d]# lsblk
NAME          MAJ:MIN RM  SIZE RO TYPE MOUNTPOINT
sda             8:0    0   20G  0 disk
├─sda1          8:1    0    1G  0 part /boot
└─sda2          8:2    0   19G  0 part
  ├─rhel-root 253:0    0   17G  0 lvm  /
  └─rhel-swap 253:1    0    2G  0 lvm  [SWAP]
sdb             8:16   0   20G  0 disk
└─storage     253:2    0   50G  0 vdo
sr0            11:0    1  6.6G  0 rom  /media/cdrom

[root@linuxprobe ~]# mkfs.xfs /dev/mapper/storage
meta-data=/dev/mapper/storage    isize=512    agcount=4, agsize=3276800 blks
         =                       sectsz=4096  attr=2, projid32bit=1
         =                       crc=1        finobt=1, sparse=1, rmapbt=0
         =                       reflink=1
data     =                       bsize=4096   blocks=13107200, imaxpct=25
         =                       sunit=0      swidth=0 blks
naming   =version 2              bsize=4096   ascii-ci=0, ftype=1
log      =internal log           bsize=4096   blocks=6400, version=2
         =                       sectsz=4096  sunit=1 blks, lazy-count=1
realtime =none                   extsz=4096   blocks=0, rtextents=0
[root@linuxprobe ~]# udevadm settle
[root@linuxprobe ~]# mkdir /storage
[root@linuxprobe ~]# mount /dev/mapper/storage /storage
[root@linuxprobe ~]# df -h
Filesystem             Size  Used Avail Use% Mounted on
devtmpfs               969M     0  969M   0% /dev
tmpfs                  984M     0  984M   0% /dev/shm
tmpfs                  984M  9.6M  974M   1% /run
tmpfs                  984M     0  984M   0% /sys/fs/cgroup
/dev/mapper/rhel-root   17G  3.9G   14G  23% /
/dev/sr0               6.7G  6.7G     0 100% /media/cdrom
/dev/sda1             1014M  153M  862M  15% /boot
tmpfs                  197M   16K  197M   1% /run/user/42
tmpfs                  197M  3.5M  194M   2% /run/user/0
/dev/mapper/storage     50G  390M   50G   1% /storage
[root@linuxprobe ~]# vdostats --human-readable
Device                    Size      Used Available Use% Space saving%
/dev/mapper/storage      20.0G      4.0G     16.0G  20%           99%
拷贝一个文件查看下
[root@linuxprobe images]# vdostats --human-readable
Device                    Size      Used Available Use% Space saving%
/dev/mapper/storage      20.0G      4.4G     15.6G  22%            5%
[root@linuxprobe images]#
[root@linuxprobe images]# cd /media/cdrom/images
[root@linuxprobe images]# cp install.img /storage
再复制一次看看效果:
[root@linuxprobe images]# cp install.img /storage/test1.img
root@linuxprobe images]# cd /storage
[root@linuxprobe storage]# ll -h
total 960M
-r--r--r--. 1 root root 448M Apr 23 16:18 install.img
-r--r--r--. 1 root root 412M Apr 23 16:25 test1.img
[root@linuxprobe storage]# vdostats --human-readable
Device                    Size      Used Available Use% Space saving%
/dev/mapper/storage      20.0G      4.5G     15.5G  22%           51%
[root@linuxprobe storage]#
VDO永久挂载,建议用UUID进行挂载
[root@linuxprobe storage]# blkid
/dev/sda1: UUID="0f755a58-9244-490c-9d6a-19148b2bf65d" TYPE="xfs" PARTUUID="d4652570-01"
/dev/sda2: UUID="McIrea-ld7A-g3G9-cZUG-BhXJ-lpDn-YT9MVJ" TYPE="LVM2_member" PARTUUID="d4652570-02"
/dev/sr0: UUID="2019-04-04-08-40-23-00" LABEL="RHEL-8-0-0-BaseOS-x86_64" TYPE="iso9660" PTUUID="0da1aba4" PTTYPE="dos"
/dev/sdb: UUID="8487f0ac-20b7-45f3-aa9e-f8a761bcf4c9" TYPE="vdo"
/dev/mapper/rhel-root: UUID="82daab81-75bc-403f-a1c8-d1a75d809704" TYPE="xfs"
/dev/mapper/rhel-swap: UUID="ca17f1cd-1660-458f-b386-6605316f6487" TYPE="swap"
/dev/mapper/storage: UUID="5da91e3d-b14b-4afc-b988-49a0b3f6d4e7" TYPE="xfs"

[root@linuxprobe storage]# echo "UUID=5da91e3d-b14b-4afc-b988-49a0b3f6d4e7 /storage xfs defaults,_netdev 0 0" >> /etc/fstab
[root@linuxprobe storage]# cat /etc/fstab

#
# /etc/fstab
# Created by anaconda on Sat Apr  2 05:02:07 2022
#
# Accessible filesystems, by reference, are maintained under '/dev/disk/'.
# See man pages fstab(5), findfs(8), mount(8) and/or blkid(8) for more info.
#
# After editing this file, run 'systemctl daemon-reload' to update systemd
# units generated from this file.
#
/dev/mapper/rhel-root   /                       xfs     defaults        0 0
UUID=0f755a58-9244-490c-9d6a-19148b2bf65d /boot                   xfs     defaults        0 0
/dev/mapper/rhel-swap   swap                    swap    defaults        0 0
/dev/sr0 /media/cdrom iso9660 defaults 0 0
UUID=5da91e3d-b14b-4afc-b988-49a0b3f6d4e7 /storage xfs defaults,_netdev 0 0
[root@linuxprobe storage]#
挂载的时候注意加上参数_netdev参数,表示系统网络都启动后再挂载VDO卷。
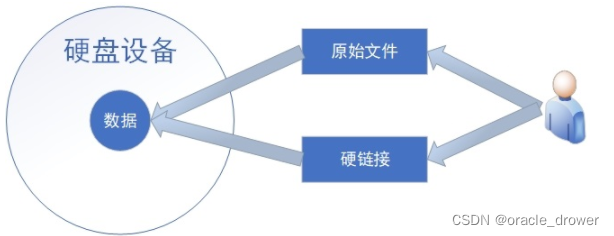
软硬方式链接
Linux系统中存在软链接和硬链接两种不同的类型。
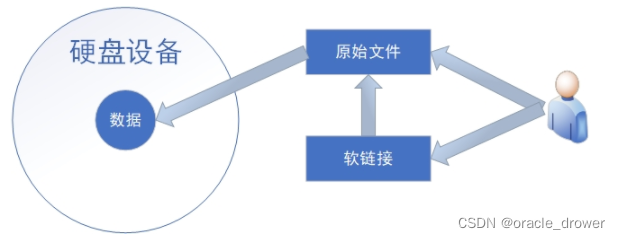
软链接(soft link):也叫符号链接(symbolic link),仅仅包含所链接文件的名称和路径。当原始文件被删除或移动后,新的链接文件也会随之失效,不能被访问。可以针对文件、目录设置软链接,跨文件系统进行链接也不是问题。
硬链接(hard link):可理解为一个“指向原始文件block的指针”,系统会创建出一个与原来一模一样的inode信息块。所以,硬链接文件与原始文件其实是一模一样的,只是名字不同。每添加一个硬链接,该文件的inode个数就会增加1;而且只有当该文件的inode个数为0时,才算彻底将它删除。
总之,由于硬链接实际上是指向原文件block的指针,因此即便原始文件被删除,依然可以通过硬链接文件来访问。需要注意的是,由于技术的局限性,不能跨分区对目录文件进行硬链接。
软,硬链接的示意图:
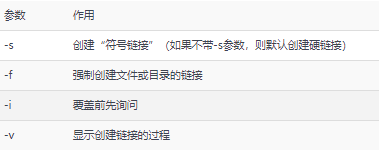
ln命令
ln命令用于创建文件的软硬链接,语法格式为“ln [参数]原始文件名 链接文件名”。
ln命令中可用的参数以及作用
如:软链接的情况,删除原文件,链接文件不可用。
[root@linuxprobe home]# echo "test old new file" > old.txt
[root@linuxprobe home]# ln -s old.txt new.txt
[root@linuxprobe home]# ll
total 4
drwx------. 3 linuxprobe linuxprobe 78 Apr  2 05:16 linuxprobe
lrwxrwxrwx. 1 root       root        7 Apr 23 22:03 new.txt -> old.txt
-rw-r--r--. 1 root       root       18 Apr 23 22:03 old.txt
[root@linuxprobe home]# cat old.txt
test old new file
[root@linuxprobe home]# cat new.txt
test old new file
[root@linuxprobe home]# rm -f old.txt
[root@linuxprobe home]# cat new.txt
cat: new.txt: No such file or directory
[root@linuxprobe home]#
如:硬链接的测试,删除原始文件,还可以查看。当然改变内容,相关链接的文件内容也改变。
[root@linuxprobe test]# echo "test hard link file" > old.txt
[root@linuxprobe test]# ll
total 4
-rw-r--r--. 1 root root 20 Apr 23 22:07 old.txt
[root@linuxprobe test]# ln old.txt new.txt
# 注意inode的变化从1 变成2
[root@linuxprobe test]# ll
total 8
-rw-r--r--. 2 root root 20 Apr 23 22:07 new.txt
-rw-r--r--. 2 root root 20 Apr 23 22:07 old.txt
[root@linuxprobe test]# ln old.txt new2.txt
[root@linuxprobe test]# ll
total 12
-rw-r--r--. 3 root root 20 Apr 23 22:07 new2.txt
-rw-r--r--. 3 root root 20 Apr 23 22:07 new.txt
-rw-r--r--. 3 root root 20 Apr 23 22:07 old.txt
[root@linuxprobe test]# cat old.txt
test hard link file
[root@linuxprobe test]# cat new.txt
test hard link file
[root@linuxprobe test]# rm -f old.txt
[root@linuxprobe test]# ll
total 8
-rw-r--r--. 2 root root 20 Apr 23 22:07 new2.txt
-rw-r--r--. 2 root root 20 Apr 23 22:07 new.txt
[root@linuxprobe test]# cat new.txt
test hard link file
[root@linuxprobe test]# cat new2.txt
test hard link file
[root@linuxprobe test]# echo "add one line" >> new.txt
[root@linuxprobe test]# cat new.txt
test hard link file
add one line
[root@linuxprobe test]# cat new2.txt
test hard link file
add one line
[root@linuxprobe test]#
照片见证


 被折叠的 条评论
为什么被折叠?
被折叠的 条评论
为什么被折叠?
 到【灌水乐园】发言


