


方法:
/*
1.让tableView处于可编辑状态 (tab)
2.设置tableView的哪些行允许编辑,
3.设置编辑的样式 (delegate)
4.提交编辑结果
4.1 修改数据源
4.2 修改界面
*/
首先布局
①建立一个 RootTableViewController 继承 ITableViewController
@implementation RootTableViewController

-(instancetype)initWithNibName:(NSString *)nibNameOrNil bundle:(NSBundle *)nibBundleOrNil{
    self = [super initWithNibName:nibNameOrNil bundle:nibBundleOrNil];
    if (self) {

    }return self;
}
如果你继承了 UITableViewController  上面这个不写也可以成功运行
② cell 的重用
这个方法要记住
- (UITableViewCell *)tableView:(UITableView *)tableView cellForRowAtIndexPath:(NSIndexPath *)indexPath {
// 在静态区设置 带标记的 cell
    static NSString *identifier =@"cell";
    // 从重用池中取出带标记的 cell
    UITableViewCell *cell = [tableView dequeueReusableCellWithIdentifier:identifier ];
    // 判断 如果 cell 没有 怎么办
    if (!cell) {
    //自己创建一个
        cell =[[[UITableViewCell alloc]initWithStyle:(UITableViewCellStyleValue1) reuseIdentifier:identifier]autorelease];

    }
    //  cell.textLabel .text cell 上面显示的内容 这一段可以等到你设定好要显示的内容之后在写
    cell.textLabel.text =[[_dataArray objectAtIndex:indexPath.section ] objectAtIndex :indexPath.row];


    return cell;
}
③显示内容
今天的例子是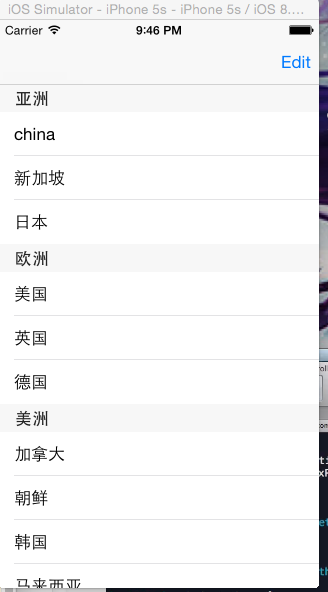
那我们的代码应该如下
- (void)viewDidLoad {
    [super viewDidLoad];
    NSArray *arr1 =@[@"china",@"新加坡",@"日本"];
    NSArray *arr2 =@[@"美国",@"英国",@"德国"];
    NSArray *arr3 =@[@"加拿大",@"朝鲜",@"韩国",@"马来西亚"];
    self.dataArray =[NSMutableArray arrayWithObjects:arr1,arr2,arr3, nil];
    showTableView  =[[UITableView alloc]initWithFrame:CGRectMake(0, 0, 320, self.view.frame.size.height) style:(UITableViewStylePlain)];

    showTableView.delegate =self;
    showTableView.dataSource =self;
    // 为了编辑 所以我们需要添加一个可以关联事件的 button 下面是比较简单一种创建形式
    self.navigationItem.rightBarButtonItem =self.editButtonItem;
    [self.view addSubview:showTableView];
    [showTableView release];

}
④ edting 是编辑的意思 里面包含很多 那我们上面的 button 就需要通过他来响应点击事件
首先 我们需要先进入编辑状态
//进入编辑状态
-(void)setEditing:(BOOL)editing animated:(BOOL)animated{
    [super setEditing:editing animated:animated];
    [showTableView setEditing:editing animated:animated];
}
//在编辑状态里面 分 YES  NO 有的地方我们不需要她编辑 就可以走这个方法
//询问是不是可以编辑
-(BOOL) tableView:(UITableView *)tableView canEditRowAtIndexPath:(NSIndexPath *)indexPath{
   1. return YES;
//   2.
//    if (indexPath.section ==0) {
//        return YES;
//    }
//    return NO;
}
//注:1.是默认值 直接默认所有 cell 都可以被编辑
 //  2.则是通过 section 分区 来判断 让哪个区进行编辑 其他区不编辑 也可以在 if 里面继续套用 让哪个区的那一行 row 是否编辑
然后 进入编辑之后 我们就操作 cell 首先我们进行删除
//设置添加 或者删除
-(UITableViewCellEditingStyle)tableView:(UITableView *)tableView editingStyleForRowAtIndexPath:(NSIndexPath *)indexPath{
if (indexPath.section == 1) {
return UITableViewCellEditingStyleInsert;
} return UITableViewCellEditingStyleDelete;
}
// 返回不一样的删除提示
- (NSString *)tableView:(UITableView *)tableView titleForDeleteConfirmationButtonForRowAtIndexPath:(NSIndexPath *)indexPath {
return @"删除";
}
//只是这样 是无法真正删除了 这个只是编辑 cell 左边的 提示 是删除 还是添加

//注;这个地方和询问编辑一样也可以做 if 来设置条件
问:我想真正的删除某一条 cell 呢 就要做下面的代码
//这个是实现 datasource 的方法
-(void)tableView:(UITableView *)tableView commitEditingStyle:(UITableViewCellEditingStyle)editingStyle forRowAtIndexPath:(NSIndexPath *)indexPath{
 //    删除一个之后 只是表面的删除了  这是假象 数据源和假象不符造成崩溃
//1.所以先要删除那个数据
    NSMutableArray *array=[NSMutableArray arrayWithArray:[_dataArray objectAtIndex:indexPath.section]];
    [array  removeObjectAtIndex:indexPath.section];
    [_dataArray replaceObjectAtIndex:indexPath.section withObject:array];
//    删除的样式
    if (editingStyle ==UITableViewCellEditingStyleDelete) {
        [tableView deleteRowsAtIndexPaths:[NSArray arrayWithObjects:indexPath,nil] withRowAnimation:UITableViewRowAnimationRight];
    }

  //注:要特别注意标注1 的地方 那是必须要做的一步  删除 cell 有两个部分:
// ①模拟机上面的 cell
// ②数据源的 cell
//  如果你只做了其中一个 只会导致崩溃 系统会告诉你 你的 cell 与数据不符
//所以 删除 cell 需要走两个方法 1 删除数据源;2 修改界面

}


 被折叠的 条评论
为什么被折叠?
被折叠的 条评论
为什么被折叠?
 到【灌水乐园】发言


