


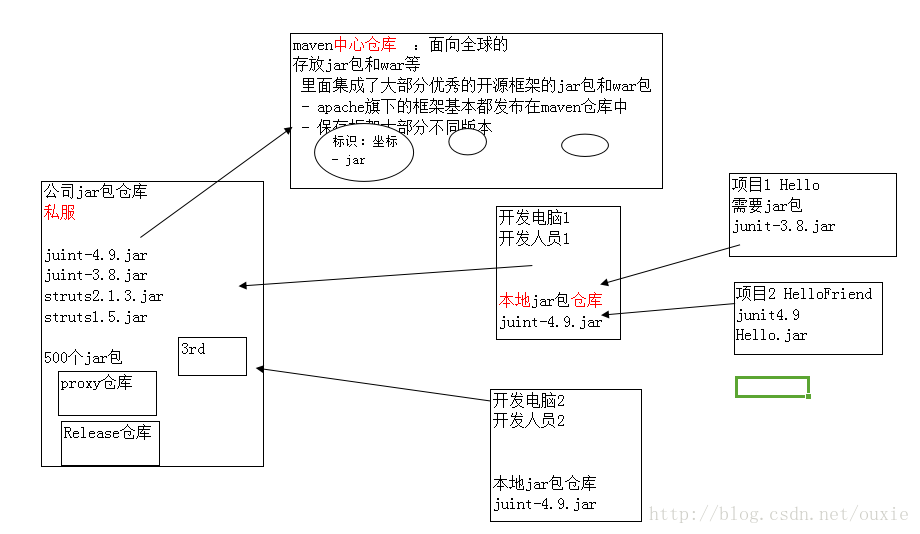
最近希望将自己的项目组件化,参考了一些网上的文章。第一步,先创建一个maven仓库以便不同工程使用。
我们使用Artifactory进行管理,先下载, 解压,运行bin\artifactory.bat即可启动Artifactory。
然后运行http://localhost:8081/artifactory/webapp/#/home,可以看到已经运行成功了。
然后我们建立3个工程,分别是MainProject, BussProject1,PublicJar1.
在三个工程中的gradle文件中分别添加
buildscript {
    dependencies {
        classpath "org.jfrog.buildinfo:build-info-extractor-gradle:3.1.1"
    }
}

apply plugin: 'com.jfrog.artifactory'
apply plugin: 'maven-publish'
然后是在grade文件中定义发布的规则
def packageName = "ngaridoctor224.easygroup.com"
def versionId = "1.0"
def projectArtifactId = "ChildBussProject"


dependencies {
    compile fileTree(dir: 'libs', include: ['*.jar'])
    androidTestCompile('com.android.support.test.espresso:espresso-core:2.2.2', {
        exclude group: 'com.android.support', module: 'support-annotations'
    })
    compile 'com.android.support:appcompat-v7:25.3.1'
    testCompile 'junit:junit:4.12'
}

publishing {
    publications {
        aar(MavenPublication) {
            groupId packageName
            version =  versionId
            artifactId projectArtifactId

            // Tell maven to prepare the generated "* .aar" file for publishing
            artifact("$buildDir/outputs/aar/${project.getName()}-release.aar")
        }
    }
}

artifactory {
    contextUrl = 'http://localhost:8081/artifactory'
    publish {
        repository {
            // The Artifactory repository key to publish to
            repoKey = 'libs-release-local'

            username = "admin"
            password = "password"
        }
        defaults {
            // Tell the Artifactory Plugin which artifacts should be published to Artifactory.
            publications('aar')
            publishArtifacts = true

            // Properties to be attached to the published artifacts.
            properties = ['qa.level': 'basic', 'dev.team': 'core']
            // Publish generated POM files to Artifactory (true by default)
            publishPom = true
        }
    }
}
这样,运行gradlew assembleRelease artifactoryPublish
就可以在artifactory上看到生成库了
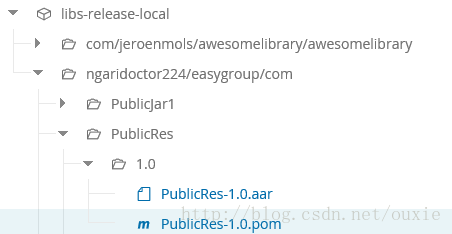
然后在使用的工程处,添加
dependencies {

    compile 'ngaridoctor224.easygroup.com:PublicJar1:1.0'
    compile 'ngaridoctor224.easygroup.com:PublicRes:1.0'
}
这样就能用咯。


 2万+
2万+

 被折叠的 条评论
为什么被折叠?
被折叠的 条评论
为什么被折叠?
 到【灌水乐园】发言


