


1、Spring IOC的基本概念
IOC(Inverse of Control)反转控制的概念,就是将原本在程序中手动创建对象的控制权,交由Spring框架管理。当某个Java对象(调用者)需要调用另一个Java对象(被调用者)时,在传统编程模式下,调用者通常会采用“new 被调用者”的代码方式来创建对象。这种方式会增加调用者与被调用者之间的耦合性,不利于后期代码的升级与维护。
当Spring框架出现后,对象的实例不再由调用者来创建,而是由Spring容器来创建。Spring容器会负责控制程序之间的关系,而不是由调用者的程序代码直接控制。这样,控制权由调用者转移到Spring容器,控制权发生了反转,这就是Spring的控制反转。
2、Spring IOC容器
实现控制反转的是Spring IOC容器,Spring IOC容器的设计主要是基于Bean Factory和ApplicationContext两个接口。
2.1、BeanFactory接口
BeanFactory由org.springframework.beans.factory.BeanFactory接口定义,它提供了完整的IOC服务支持,是一个管理Bean的工厂,主要负责初始化各种Bean。
BeanFactory接口最常用的实现类是org.springframework.beans.factory.xml.XMLBeanFactory,该类会根据XML配置文件中的定义来装配Bean。
BeanFactory实例创建代码如下:
@Test
public void demo(){
    FileSystemResource file = new FileSystemResource("C:\\demo\\applicationContext.xml");
    BeanFactory beanFactory = new XmlBeanFactory(file);
    TestDao testDao = (TestDao) beanFactory.getBean("testDao");
    testDao.sayHello();
}
由于使用BeanFactory实例加载Spring配置文件在实际开发中并不多见,所以对于该接口仅了解即可。
2.2、ApplicationContext接口
ApplicationContext是BeanFactory的子接口,也称为应用上下文,由org.springframework.context.ApplicationContext接口定义。ApplicationContext接口除了包含BeanFactory的所有功能以外,还添加了对国际化、资源访问、事件传播等内容的支持。
创建ApplicationContext接口实例通常有以下3中方法:
- 通过ClassPathXmlApplicationContext创建
- 通过FileSystemXmlApplicationContext创建
- 通过Web服务器实例化ApplicationContext容器
下面对这3种方法的代码做演示:
(1)ClassPathXmlApplicationContext
使用ClassPathXmlApplicationContext将从类路径目录(src根目录)中寻找指定的XML配置文件,代码示例:
@Test
public void demo(){
    //初始化Spring容器ApplicationContext,加载配置文件
    ApplicationContext application = new ClassPathXmlApplicationContext("applicationContext.xml");
    //通过容器获取testDao实例
    TestDao testDao = (TestDao) application.getBean("testDao");
    testDao.sayHello();

}
(2)FileSystemXmlApplicationContext
使用FileSystemXmlApplicationContext将从指定文件的绝对路径中寻找XML配置文件,找到并装载完成ApplicationContext的实例化工作,代码示例:
@Test
public void demo(){
    ApplicationContext application = new FileSystemXmlApplicationContext("C:\\demo\\applicationContext.xml");
    TestDao testDao = (TestDao) application.getBean("testDao");
    testDao.sayHello();

}
(3)使用Web服务器实例化
通过Web服务器实例化ApplicationContext容器,一般使用org.springframework.web.context.ContextLoaderListener的实现方式,需要添加Spring-web依赖,pom.xml配置如下:
<dependency>
   <groupId>org.springframework</groupId>
   <artifactId>spring-web</artifactId>
   <version>5.0.2.RELEASE</version>
 </dependency>
在web.xml中配置代码如下:
<context-param>
  <!--加载src目录下的applicationContext.xml文件-->
  <param-name>contextConfigLocation</param-name>
  <param-value>classpath:applicationContext.xml</param-value>
</context-param>
<!--指定以ContextLoaderListener方式启动Spring容器-->
<listener>
  <listener-class>org.springframework.web.context.ContextLoaderListener</listener-class>
</listener>
通过web.xml配置,web容器会自动加载context-param中的配置文件初始化ApplicationContext实例,然后就可以在web应用中通过WebApplicationContextUtils.getWebApplicationContext方法获取ApplicationContext的引用,Servlet中的代码如下:
protected void doGet(HttpServletRequest req, HttpServletResponse resp) throws javax.servlet.ServletException, IOException {
    ApplicationContext application = WebApplicationContextUtils.getWebApplicationContext(request.getServletContext());
    TestDao testDao = (TestDao) application.getBean("testDao");
    testDao.sayHello();
}
3、依赖注入(基于XML方式)
DI (Dependency Injection)依赖注入的概念,在Spring中实现IOC容器的方法是依赖注入,依赖注入的作用是在使用Spring框架创建对象时动态地将其所依赖的对象(属性值)注入Bean组件中。
Spring框架的依赖注入通常有以下几种实现方式:
- 使用构造方法注入
- 使用属性的setter方法注入
- 使用使用P名称空间注入
- 使用SpEL注入
3.1、使用构造方法注入
创建User类
package test;

public class User {
    private String name;
    private int age;

    public User(String name,int age){
        this.name = name;
        this.age = age;
    }

    @Override
    public String toString() {
        return "User{" +
                "name='" + name + '\'' +
                ", age=" + age +
                '}';
    }
}
在applicationContext.xml文件中配置user实例
<?xml version="1.0" encoding="UTF-8"?>
<beans xmlns="http://www.springframework.org/schema/beans"
       xmlns:xsi="http://www.w3.org/2001/XMLSchema-instance"
       xsi:schemaLocation="http://www.springframework.org/schema/beans http://www.springframework.org/schema/beans/spring-beans.xsd">

    <!--使用构造方法注入-->
    <bean id="user" class="test.User">
        <constructor-arg name="name" value="张三"></constructor-arg>
        <constructor-arg name="age" value="20"></constructor-arg>
    </bean>
</beans>
在测试方法中代码
@Test
public void demo(){
    //初始化Spring容器ApplicationContext,加载配置文件
    ApplicationContext application = new ClassPathXmlApplicationContext("applicationContext.xml");
    //通过容器获取实例
    User user = (User) application.getBean("user");
    System.out.println(user);
}
运行结果

3.2、使用属性的setter方法注入
创建Course课程类
package entity;

public class Course {
    private String cname;

    public String getCname() {
        return cname;
    }
    public void setCname(String cname) {
        this.cname = cname;
    }
    @Override
    public String toString() {
        return "Course{" +
                "cname='" + cname + '\'' +
                '}';
    }
}
创建Student学生类
package entity;

public class Student {
    private String name;
    private int age;
    private Course course;

    @Override
    public String toString() {
        return "Student{" +
                "name='" + name + '\'' +
                ", age=" + age +
                ", course=" + course +
                '}';
    }

    //getter和setter方法
}
配置applicationContext.xml文件
<?xml version="1.0" encoding="UTF-8"?>
<beans xmlns="http://www.springframework.org/schema/beans"
       xmlns:xsi="http://www.w3.org/2001/XMLSchema-instance"
       xsi:schemaLocation="http://www.springframework.org/schema/beans http://www.springframework.org/schema/beans/spring-beans.xsd">

    <!--使用set方法注入-->
    <bean id="course" class="entity.Course">
        <property name="cname" value="大学语文"></property>
    </bean>
    <bean id="student" class="entity.Student">
        <property name="name" value="张三"></property>
        <property name="age" value="20"></property>
        <property name="course" ref="course"></property>
    </bean>
</beans>
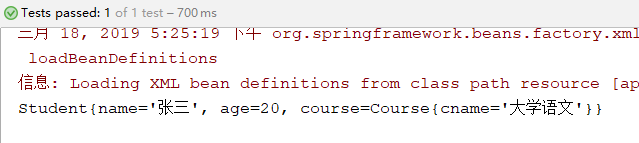
测试方法
@Test
public void demo(){
    //初始化Spring容器ApplicationContext,加载配置文件
    ApplicationContext application = new ClassPathXmlApplicationContext("applicationContext.xml");
    //通过容器获取实例
    Student student = (Student) application.getBean("student");
    System.out.println(student);

}
运行结果
3.3、使用P名称空间注入
创建Course课程类
package entity;

public class Course {
    private String cname;

    public String getCname() {
        return cname;
    }
    public void setCname(String cname) {
        this.cname = cname;
    }
    @Override
    public String toString() {
        return "Course{" +
                "cname='" + cname + '\'' +
                '}';
    }
}
创建Student学生类
package entity;

public class Student {
    private String name;
    private int age;
    private Course course;

    @Override
    public String toString() {
        return "Student{" +
                "name='" + name + '\'' +
                ", age=" + age +
                ", course=" + course +
                '}';
    }

    //getter和setter方法
}
配置applicationContext.xml文件,要在约束里面加入p名称空间的约束
<?xml version="1.0" encoding="UTF-8"?>
<beans xmlns="http://www.springframework.org/schema/beans"
       xmlns:p="http://www.springframework.org/schema/p"
       xmlns:xsi="http://www.w3.org/2001/XMLSchema-instance"
       xsi:schemaLocation="http://www.springframework.org/schema/beans http://www.springframework.org/schema/beans/spring-beans.xsd">

    <!--使用p名称空间注入-->
    <bean id="course" class="entity.Course" p:cname="英语"></bean>
    <bean id="student" class="entity.Student" p:name="张三" p:age="20" p:course-ref="course"></bean>

</beans>
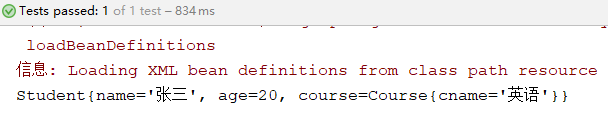
测试方法
@Test
public void demo(){
    //初始化Spring容器ApplicationContext,加载配置文件
    ApplicationContext application = new ClassPathXmlApplicationContext("applicationContext.xml");
    //通过容器获取实例
    Student student = (Student) application.getBean("student");
    System.out.println(student);

}
运行结果
3.4、使用SpEL注入
我们可以使用SpEL(Spring expression language)Spring表达式语言,对依赖注入进行简化。
语法:#{表达式},例如 <bean id="" value="#{表达式}">
#{'hello'}:使用字符串
#{beanId}:使用另一个bean
#{beanId.content.toUpperCase()}:使用指定名属性,并使用方法
#{T(java.lang.Math).PI}:使用静态字段或方法
创建Course课程类
package entity;

public class Course {
    private String cname;

    public String getCname() {
        return cname;
    }
    public void setCname(String cname) {
        this.cname = cname;
    }
    @Override
    public String toString() {
        return "Course{" +
                "cname='" + cname + '\'' +
                '}';
    }
}
创建Student学生类
package entity;

public class Student {
    private String name;
    private int age;
    private Course course;

    @Override
    public String toString() {
        return "Student{" +
                "name='" + name + '\'' +
                ", age=" + age +
                ", course=" + course +
                '}';
    }

    //getter和setter方法
}
配置applicationContext.xml文件
<?xml version="1.0" encoding="UTF-8"?>
<beans xmlns="http://www.springframework.org/schema/beans"
       xmlns:xsi="http://www.w3.org/2001/XMLSchema-instance"
       xsi:schemaLocation="http://www.springframework.org/schema/beans http://www.springframework.org/schema/beans/spring-beans.xsd">

    <!--使用SpEL方式注入-->
    <bean id="course" class="entity.Course">
        <property name="cname" value="#{'高数'}"></property>
    </bean>
    <bean id="student" class="entity.Student">
        <property name="name" value="#{'小明'}"></property>
        <property name="age" value="#{10}"></property>
        <property name="course" value="#{course}"></property>
    </bean>

</beans>
测试方法
@Test
public void demo(){
    //初始化Spring容器ApplicationContext,加载配置文件
    ApplicationContext application = new ClassPathXmlApplicationContext("applicationContext.xml");
    //通过容器获取实例
    Student student = (Student) application.getBean("student");
    System.out.println(student);

}
运行结果

在使用SpEL时,配置中也可以调用方法,示例代码如下:
创建获取年龄的类
package entity;

public class GetAge {
    public int createAge(){
        return 20;
    }
}
配置applicationContext.xml
<!--使用SpEL方式注入-->
<bean id="course" class="entity.Course">
    <property name="cname" value="#{'高数'}"></property>
</bean>
<bean id="getAge" class="entity.GetAge"></bean>
<bean id="student" class="entity.Student">
    <property name="name" value="#{'小明'}"></property>
    <property name="age" value="#{getAge.createAge()}"></property>
    <property name="course" value="#{course}"></property>
</bean>
执行测试方法,运行结果如下:


 1万+
1万+


 被折叠的 条评论
为什么被折叠?
被折叠的 条评论
为什么被折叠?
 到【灌水乐园】发言


