


一)JDOM介绍
使用方式:需要下载jdom对应的jar引入
<dependency>
    <groupId>org.jdom</groupId>
    <artifactId>jdom2</artifactId>
    <version>2.0.6</version>
</dependency>
使用场景:
1、当需要知道整个文档结构
2、使用比较简单,比JDK自带的Document解析性能稍好
3、解析的树形结构操作比较灵活,比较简便
JDOM操作xml常用类:
Document:表示整个xml文档,是一个树形结构
Eelment:表示一个xml的元素,提供方法操作其子元素,如文本,属性和名称空间等
Attribute:表示元素包含的属性
Text:表示xml文本信息
XMLOutputter:xml输出流,底层是通过JDK中流实现
Format:提供xml文件输出的编码、样式和排版等设置
二)JDOM生成XML
实现步骤:
第一步:先通过Eelment创建一个根结点
Element rootElement = new Element("root");
第二步:把根结点添加到Document中
Document doc = new Document(rootElement);
第三步:在根结点下添加一些子结点,构造成一个树形结构
第四步:创建XMLOutputter实例,输出xml文件,包括设置xml文件格式等
XMLOutputter xmlOutput = new XMLOutputter();
xmlOutput.setFormat(Format.getRawFormat());
xmlOutput.output(doc, new FileOutputStream(file));
实现源码:
package com.oysept.xml;
import java.io.File;
import java.io.FileOutputStream;
import java.io.IOException;
import org.jdom2.Attribute;
import org.jdom2.Document;
import org.jdom2.Element;
import org.jdom2.output.Format;
import org.jdom2.output.Format.TextMode;
import org.jdom2.output.XMLOutputter;
/**
* JDOM生成XML
* @author ouyangjun
*/
public class CreateJDOM {
public static void main(String[] args) {
// 执行JDOM生成XML方法
createJDOM(new File("E:\\jdom.xml"));
}
public static void createJDOM(File file) {
try {
// 创建一个根节点
Element rootElement = new Element("root");
Document doc = new Document(rootElement);
// 在根节点下创建第一个子节点
Element rootOneElement = new Element("person");
rootOneElement.setAttribute(new Attribute("attr","root one"));
// 在第一个子节点下创建第一个子节点
Element childOneElement = new Element("people");
childOneElement.setAttribute(new Attribute("attr","child one"));
childOneElement.setText("person child one");
// 在第一个子节点下创建第二个子节点
Element childTwoElement = new Element("people");
childTwoElement.setAttribute(new Attribute("attr","child two"));
childTwoElement.setText("person child two");
// 在根节点下创建第二个子节点
Element rootTwoElement = new Element("person");
rootTwoElement.setAttribute(new Attribute("attr","root two"));
// 在第一个子节点下创建第一个子节点
Element oneChildOneElement = new Element("people");
oneChildOneElement.setAttribute(new Attribute("attr","child one"));
oneChildOneElement.setText("person child one");
// 在第一个子节点下创建第二个子节点
Element twoChildTwoElement = new Element("people");
twoChildTwoElement.setAttribute(new Attribute("attr","child two"));
twoChildTwoElement.setText("person child two");
rootOneElement.addContent(childOneElement);
rootOneElement.addContent(childTwoElement);
rootTwoElement.addContent(oneChildOneElement);
rootTwoElement.addContent(twoChildTwoElement);
doc.getRootElement().addContent(rootOneElement);
doc.getRootElement().addContent(rootTwoElement);
// 创建xml输出流操作类
XMLOutputter xmlOutput = new XMLOutputter();
// 设置xml格式化的属性
Format f = Format.getRawFormat();
f.setIndent(" "); // 文本缩进
f.setTextMode(TextMode.TRIM_FULL_WHITE);
xmlOutput.setFormat(f);
// 把xml文件输出到指定的位置
xmlOutput.output(doc, new FileOutputStream(file));
} catch (IOException e) {
e.printStackTrace();
}
}
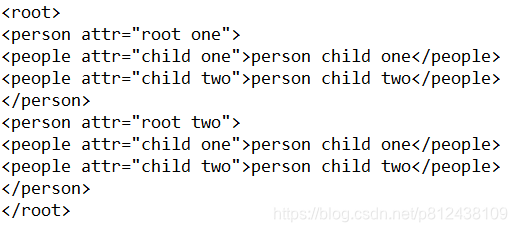
}XML文件效果图:

三)JDOM解析XML
实现步骤:
第一步:创建一个sax解析器
SAXBuilder builder = new SAXBuilder();
第二步:根据xml结构转换成一个Document对象
Document doc= builder.build(file);
第三步:解析Document中的结点信息,把xml树形结构打印到控制台
实现源码:
package com.oysept.xml;

import java.io.File;
import java.io.IOException;
import java.util.List;

import org.jdom2.Attribute;
import org.jdom2.CDATA;
import org.jdom2.Comment;
import org.jdom2.Content;
import org.jdom2.DocType;
import org.jdom2.Document;
import org.jdom2.Element;
import org.jdom2.EntityRef;
import org.jdom2.JDOMException;
import org.jdom2.ProcessingInstruction;
import org.jdom2.Text;
import org.jdom2.input.SAXBuilder;

/**
 * JDOM解析XML
 * @author ouyangjun
 */
public class ParseJDOM {

    public static void main(String[] args) {
        // 执行JDOM解析XML方法
        parseJDOM(new File("E:\\jdom.xml"));
    }

    public static void parseJDOM(File file) {
        try {
            // 创建一个sax解析器
            SAXBuilder builder = new SAXBuilder();

            // 根据xml结构转换成一个Document对象
            Document doc = builder.build(file);

            // 打印xml信息
            printXNL(doc.getContent());
        } catch(JDOMException e) {
            e.printStackTrace();
        } catch(IOException e) {
            e.printStackTrace();
        }
    }

    private static void printXNL(List<Content> list) {
        for (Content temp : list) {
            if (temp instanceof Comment) { //获取的内容是注释
                Comment com = (Comment)temp;
                System.out.println("<--"+com.getText()+"-->");
            } else if (temp instanceof Element) { //获取的内容是元素
                Element elt = (Element) temp;
                List<Attribute> attrs = elt.getAttributes();
                System.out.print("<"+elt.getName()+"");
                for (Attribute t : attrs) {
                    System.out.print(" " + t.getName()+"=\""+t.getValue()+"\"");
                }
                System.out.print(">");
                printXNL(elt.getContent());
                System.out.print("</"+elt.getName()+">");
            } else if (temp instanceof ProcessingInstruction) { // 获取的内容是处理指令
                ProcessingInstruction pi = (ProcessingInstruction)temp;
                System.out.println("<?"+pi.getTarget()+""+pi.getData()+"?>");
            } else  if (temp instanceof EntityRef) {
                EntityRef ref = (EntityRef)temp;
                System.out.println("<--"+ref.getName()+"-->");
            } else if (temp instanceof Text) { //获取的内容是文本
                Text text = (Text)temp;
                if (!text.getText().trim().equals("")) {
                    System.out.print(text.getText());
                } else {
                    System.out.println();
                }
            } else if (temp instanceof CDATA) { // 获取的内容是CDATA
                CDATA cdata = (CDATA)temp;
                System.out.println("<![CDATA["+cdata.getText()+"]]>");
            } else  if (temp instanceof DocType) {
                DocType docType = (DocType)temp;
                System.out.println("<--"+docType.getCType()+"-->");
            }
        }
    }
}
XML文件结构效果图打印:
识别二维码关注个人微信公众号

本章完结,待续,欢迎转载!
本文说明:该文章属于原创,如需转载,请标明文章转载来源!


 983
983


 被折叠的 条评论
为什么被折叠?
被折叠的 条评论
为什么被折叠?
 到【灌水乐园】发言


