


简介
在先前文章中我们搭建了SpringSecurity项目,并且讲解了自定义登录方式需要做哪些工作,如果你感兴趣可以前往博客阅读文章以及代码,在本文将继续讲解如何实现动态权限控制。
代码仓库:Gitee
代码分支:lesson3
博客地址:地址
目标
Web项目通常都有前台和后台服务,前台服务面向目标客户,后台服务为项目方提供管理和数据分析服务,因此不同的用户需要赋予不同的角色,例如前台用户角色为USER,后台用户为ADMIN,USER允许访问"/user/hello"接口,ADMIN允许访问"/admin/hello"接口,但是USER不能访问。这是项目必须有的基本功能,同时访问规则也会不断变化,例如: 有一个用户昵称功能,初期只允许会员用户(可以理解为拥有角色VIP的用户)使用,后期产品决定全员都可以使用,这种需求也很常见,如果采用硬编码的方式那么会导致频繁修改代码,测试、发布,增加额外工作量,如果可以动态配置接口访问权限,那么就能减少很多工作量,SpringSecurity框架提供了扩展点,基于这些扩展点可以很方便的实现动态权限控制访问功能,我们再来回顾一下需求:
- 基于角色进行接口权限控制
- 访问接口需要的角色可以动态配置
原理分析
通过上一篇文章我们知道SpringSecurity基于Filter实现身份验证和权限控制功能,SpringSecurity提供了默认实现FilterSecurityInterceptor对访问路径进行权限控制,核心代码逻辑如下:
public void invoke(FilterInvocation filterInvocation) throws IOException, ServletException {
		///此处省略无关逻辑
        /// 在这里执行权限控制逻辑
		InterceptorStatusToken token = super.beforeInvocation(filterInvocation);
		try {
			filterInvocation.getChain().doFilter(filterInvocation.getRequest(), filterInvocation.getResponse());
		}
		finally {
			super.finallyInvocation(token);
		}
		super.afterInvocation(token, null);
}
在访问实际业务逻辑之前调用父级方法beforeInvocation进行权限判断,如果权限不符合要求,直接抛出异常阻止访问实际业务逻辑,核心代码如下:
protected InterceptorStatusToken beforeInvocation(Object object) {
		//此处省略无关代码
		 这里获取与访问路径相关的权限信息,例如:/user/hello 对应 ROLE_USER 角色,当然一个路径可能对应多个权限
		Collection<ConfigAttribute> attributes = this.obtainSecurityMetadataSource().getAttributes(object);
		if (CollectionUtils.isEmpty(attributes)) {
	        /// 这里注意如果对应的路径在系统中没有配置权限或者是获取方法没有处理这种请求会导致放行,特别注意
			return null; // no further work post-invocation
		}
        /// 未登录用户直接返回未验证错误
		if (SecurityContextHolder.getContext().getAuthentication() == null) {
			credentialsNotFound(this.messages.getMessage("AbstractSecurityInterceptor.authenticationNotFound",
					"An Authentication object was not found in the SecurityContext"), object, attributes);
		}
         获取验证信息
		Authentication authenticated = authenticateIfRequired();
		// Attempt authorization
        /// 判断用户是否拥有访问权限
		attemptAuthorization(object, attributes, authenticated);
        /// 这里实现了类似Linux su 命令,将当前用户暂时赋予另外一个用户运行权限,可以先忽略不看
		// Attempt to run as a different user
		Authentication runAs = this.runAsManager.buildRunAs(authenticated, object, attributes);
		if (runAs != null) {
			SecurityContext origCtx = SecurityContextHolder.getContext();
			SecurityContext newCtx = SecurityContextHolder.createEmptyContext();
			newCtx.setAuthentication(runAs);
			SecurityContextHolder.setContext(newCtx);

			if (this.logger.isDebugEnabled()) {
				this.logger.debug(LogMessage.format("Switched to RunAs authentication %s", runAs));
			}
			// need to revert to token.Authenticated post-invocation
			return new InterceptorStatusToken(origCtx, true, attributes, object);
		}
		this.logger.trace("Did not switch RunAs authentication since RunAsManager returned null");
		// no further work post-invocation
		return new InterceptorStatusToken(SecurityContextHolder.getContext(), false, attributes, object);

	}
这里有两个重点内容:
- 通过this.obtainSecurityMetadataSource().getAttributes(object);方法来获取访问所需要的权限信息
- 通过attemptAuthorization(object, attributes, authenticated)方法对访问所需的权限以及用户身份信息进行决策,判断是否允许访问
路径权限分析
上述的this.obtainSecurityMetadataSource()方法返回SecurityMetadataSource类型对象,该接口核心代码如下:
public interface SecurityMetadataSource extends AopInfrastructureBean {
	/// 依据object获取权限信息,我们可以把ConfigAttribute理解为String类型,在我们系统中可以理解保存着角色信息,例如ROLE_USER
	Collection<ConfigAttribute> getAttributes(Object object) throws IllegalArgumentException;
	///获取系统中配置的所有权限信息,用于后续验证器判断是否支持该类型决策
	Collection<ConfigAttribute> getAllConfigAttributes();
	/// object 类型,用于判断SecurityMetadataSource支持解析的object类型
	boolean supports(Class<?> clazz);
}
可以看出SecurityMetadataSource的主要作用是给出当前访问需要哪些权限,方便后续判断,可以理解为一个数据源,用来获取访问权限列表
访问权限控制分析
这里我们需要重点查看方法attemptAuthorization(object, attributes, authenticated);包含对用户访问控制权限进行判断,核心代码如下:
private void attemptAuthorization(Object object, Collection<ConfigAttribute> attributes,
			Authentication authenticated) {
		try {
            /// 委托accessDecisionManager进行决策判断
			this.accessDecisionManager.decide(authenticated, object, attributes);
		}
		catch (AccessDeniedException ex) {
            /// 异常请求直接向上抛出异常信息
			throw ex;
		}
}
这个方法很简单,就是委托accessDecisionManager来进行访问决策,我们来看一下这个接口的核心代码:
public interface AccessDecisionManager {

	 对访问进行决策,判断是否有权限
	void decide(Authentication authentication, Object object, Collection<ConfigAttribute> configAttributes)
			throws AccessDeniedException, InsufficientAuthenticationException;

	/// 查看访问控制器是否支持该类型决策
	boolean supports(ConfigAttribute attribute);

	/// 查看访问控制器是否支持特定类型,这个类型就是 上面方法中object对应的类型
	boolean supports(Class<?> clazz);

}
接口也很简单,有点类似AuthenticationProvider接口,调用decide方法,如果允许访问那么不进行任何处理,如果不允许访问就抛出异常信息。
代码实现梳理分析
上述核心逻辑很简单,但是实现逻辑有点绕,不要紧我们画个流程图再来梳理一遍(觉得绕主要是不相关代码对理解造成了困扰,还有一个就是被这种俄罗斯套娃形式绕晕了)
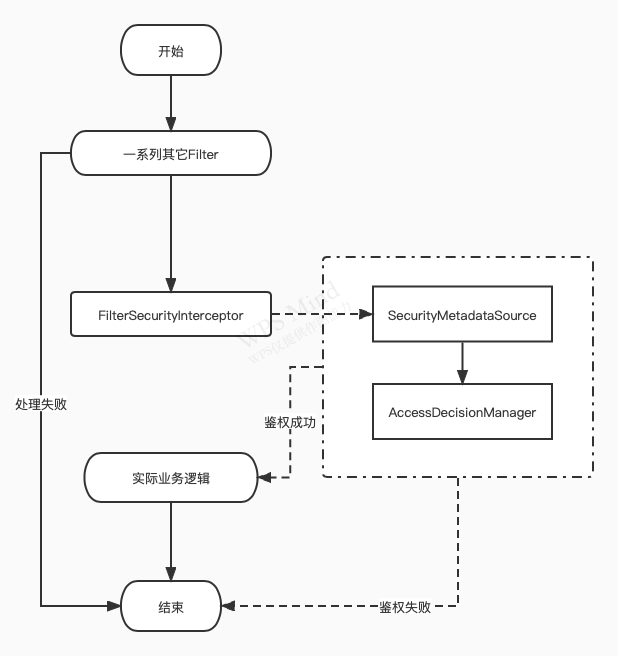
通过上述分析我们可以发现,权限控制需要两个核心功能:
- 访问路径所需要的权限(实现接口SecurityMetadataSource)
- 依据用户权限、路径所需权限进行决策判断是否运行访问(实现接口AccessDecisionManager)
完成上述功能后,将这些功能组装成FilterSecurityInterceptor类型对象,然后放置到SpringSecurity过滤链中实现过滤功能
代码实现
直接动手实现动态权限控制
实现路径权限获取
这里为了更加贴近实际项目,将提供一个RoleService作为数据源,实现代码如下:
@Service
public class RoleService {
    public List<ConfigAttribute> roles = new ArrayList<>();
    private Map<String, List<ConfigAttribute>> urlRoleMaps = new HashMap<>();
    @PostConstruct
    public void init() {
        /// 初始化数据
        roles.addAll(SecurityConfig.createList("ROLE_USER", "ROLE_ADMIN", "ROLE_VIP"));
        urlRoleMaps.put("/", SecurityConfig.createList("ROLE_USER", "ROLE_ADMIN"));
        urlRoleMaps.put("/user/hello", SecurityConfig.createList("ROLE_USER", "ROLE_ADMIN"));
        urlRoleMaps.put("/user/nickname", SecurityConfig.createList("ROLE_VIP"));
        urlRoleMaps.put("/admin/hello", SecurityConfig.createList("ROLE_ADMIN"));
    }
    /// 获取所有角色信息
    public Collection<ConfigAttribute> getAllRoles() {
        return Collections.unmodifiableList(roles);
    }
    ///依据请求路径查询所需权限
    public Collection<ConfigAttribute> getRoleByPath(String path) {
        Collection<ConfigAttribute> roles = urlRoleMaps.get(path);
        if (roles == null) {
            return Collections.EMPTY_LIST;
        }
        return Collections.unmodifiableCollection(roles);
    }
}
代码很简单,就是初始化数据,提供路径与权限对应的数据服务,实际项目中从数据库中获取对应信息。
下面编写RolePermissionMetadataSource接口的实现类,代码如下:
/// FilterInvocationSecurityMetadataSource 是SecurityMetadataSource的子接口,实际上就是 SecurityMetadataSource,没有扩展任何方法
public class RolePermissionMetadataSource implements FilterInvocationSecurityMetadataSource {
    @Autowired
    private RoleService roleService;
    @Override
    public Collection<ConfigAttribute> getAttributes(Object object)
            throws IllegalArgumentException {
        FilterInvocation invocation = (FilterInvocation) object;
        String url = invocation.getRequestUrl();
        /// 通过请求路径获取访问路径所需的权限列表
        Collection<ConfigAttribute> roles = roleService.getRoleByPath(url);
        if (roles != null && roles.size() > 0) {
            return roles;
        }
        //没有匹配上的资源,禁止访问,设置不存在的访问权限
        // 通过之前的分析知道,如果这里返回空,将会直接放行,运行登录用户访问,这是有风险的
        return SecurityConfig.createList(RoleEnums.ROLE_REFUSE.name());
    }
    @Override
    public Collection<ConfigAttribute> getAllConfigAttributes() {
        return roleService.getAllRoles();
    }
    @Override
    public boolean supports(Class<?> clazz) {
        return FilterInvocation.class.isAssignableFrom(clazz);
    }
}
实现路径访问控制决策类
继承接口AccessDecisionManager,核心代码如下:
public class PathAccessDecisionManager implements AccessDecisionManager {
    ///拒绝访问权限名称
    private static final String BASE_REFUSE_NAME = RoleEnums.ROLE_REFUSE.name();
    @Override
    public void decide(Authentication authentication, Object object,
            Collection<ConfigAttribute> configAttributes)
            throws AccessDeniedException, InsufficientAuthenticationException {
        Iterator<ConfigAttribute> iterator = configAttributes.iterator();
        //进行权限匹配,如果用户拥有资源权限那么进行放行操作
        while (iterator.hasNext()) {
            ConfigAttribute ca = iterator.next();
            // 当前请求需要的权限
            String needRole = ca.getAttribute();
            if (RoleEnums.ROLE_ANONYMOUS.name().equalsIgnoreCase(needRole)) {
                return;
            }
            if (BASE_REFUSE_NAME.equalsIgnoreCase(needRole)) {
                if (authentication instanceof AnonymousAuthenticationToken) {
                    //匿名用户
                    throw new AccessDeniedException("资源信息不存在");
                } else {
                    //登录用户
                    throw new AccessDeniedException("权限不足!");
                }
            }
            // 当前用户所具有的权限
            Collection<? extends GrantedAuthority> authorities = authentication.getAuthorities();
            for (GrantedAuthority authority : authorities) {
                if (authority.getAuthority().equalsIgnoreCase(needRole)) {
                    return;
                }
            }
        }
        //如果当前请求没有验证,返回未验证异常
        if (authentication instanceof AnonymousAuthenticationToken) {
            throw new AccessDeniedException("用户未登录");
        }
        throw new AccessDeniedException("权限不足!");
    }
    @Override
    public boolean supports(ConfigAttribute attribute) {
        return true;
    }
    @Override
    public boolean supports(Class<?> clazz) {
        return FilterInvocation.class.isAssignableFrom(clazz);
    }
}
组装Filter
我们将上述实现类与FilterSecurityInterceptor进行组装,实现权限动态过滤:
///动态权限控制 Filter, 默认会拦截所有请求进行权限判断
private FilterSecurityInterceptor filterSecurityInterceptor() {
    FilterSecurityInterceptor interceptor = new FilterSecurityInterceptor();
    /// 由于包含Spring Bean,因此需要注入实现,而不是直接new
    interceptor.setSecurityMetadataSource(rolePermissionMetadataSource);
    interceptor.setAccessDecisionManager(new PathAccessDecisionManager());
    return interceptor;
}
///加入到SpringSecurity过滤链中
httpSecurity.addFilterBefore(roleAuthFilter, FilterSecurityInterceptor.class);运行验证
我们代码里创建了三个用户:
-
15000000000, 拥有:ROLE_USER
-
15666666666, 拥有:ROLE_USER、ROLE_VIP
-
15888888888, 拥有:ROLE_USER、ROLE_ADMIN
程序运行完成后使用15000000000进行手机验证码登录:
- POST http://localhost:8080/phone/login?phone=15000000000&code=888888
- 返回:
{
    "code": 200,
    "data": {
        "username": "15000000000",
        "phone": "15000000000",
        "roles": [
            "ROLE_USER"
        ]
    },
    "message": null
}
可以看到拥有ROLE_USER权限,那么我们访问 http://localhost:8080/user/hello, 返回:
{
    "code": 200,
    "data": "Hello User",
    "message": null
}
访问http://localhost:8080/admin/hello, 返回:
{
    "code": 400,
    "message": "请求受限"
}
我们看到以上结果符合预期,同理可以使用15888888888用户进行同样的访问操作,在这里我们就不做过多介绍,大家有兴趣可以下载代码自行运行测试,文章开头有代码地址。
如果要修改路径对应的权限,那么只要修改RoleService中的数据即可实现权限动态配置。
总结
通过上述文章分析,我们已经完成权限动态配置,当然运行中展现的JSON数据是配置了对应处理器处理的结果,细节处理请前往代码仓库下载源码自行查看。
为了完成动态权限我们需要完成三个步骤,实现两个接口,步骤如下:
- 实现路径权限数据访问接口(实现SecurityMetadataSource)
- 实现访问控制决策接口(实现AccessDecisionManager)
- 组装Filter并加入到过滤链中(FilterSecurityInterceptor)
熟练掌握上述步骤,实现动态权限控制将不再是难题。
在SpringSecurity 中不仅提供了FilterSecurityInterceptor实现类来对访问进行权限控制,还提供了AuthorizationFilter实现类来实现相同功能,具体实现方式自行前往仓库进行查看
参考文档
联系方式
学习是枯燥无味的,加入我们学习牛人经验:

点击:加群讨论


 1688
1688


 被折叠的 条评论
为什么被折叠?
被折叠的 条评论
为什么被折叠?
 到【灌水乐园】发言


