


一、logging 日志管理模块
logging日志模块此文不做详细说明,这里主要介绍几个重要概念。
1、日志级别
NOTSET<DEBUG < INFO < WARNING < ERROR < CRITICAL

2、format日志格式
- %(levelno)s: 打印日志级别的数值
- %(levelname)s: 打印日志级别名称
- %(pathname)s: 打印当前执行程序的路径,其实就是sys.argv[0]
- %(filename)s: 打印当前执行程序名
- %(funcName)s: 打印日志的当前函数
- %(module)s 调用日志输出函数的模块名
- %(name)s : 所使用的日志名称,默认是'root',因为默认使用的是 rootLogger
- %(msecs)d 日志事件发生事件的毫秒部分
- %(lineno)d: 打印日志的当前行号
- %(asctime)s 字符串形式的当前时间。默认格式是 “2003-07-08 16:49:45,896”。逗号后面的是毫秒
- %(relativeCreated)d 输出日志信息时的,自Logger创建以 来的毫秒数
- %(relativeCreated)d 日志事件发生的时间相对于logging模块加载时间的相对毫秒数(目前还不知道干嘛用的)
- %(thread)d: 打印线程ID
- %(threadName)s: 打印线程名称
- %(process)d: 打印进程ID
- %(message)s: 打印日志信息
二、Captured Log 捕获日志
默认情况,pytest会自动捕获WARNING级别或更高级别的日志消息(log)、标准输出(stdout)和标准错误输出(stderr),并将每个失败的测试或者发生异常的测试捕获到的内容逐个输出到控制台,成功的测试则不输出。
可以通过--show capture命令行选项配置此行为。
1、控制台输出捕获日志
- Captured log call,捕获测试的日志消息,默认情况下,每个捕获的日志消息都会显示日志级别、模块、行号、消息。
- Captured stdout call,捕获测试的标准输出,如print
- Captured stderr call,捕获测试的标准错误输出
先来看个例子,新建test_log.py文件如下:
import logging
import sys


def test_func1():
    print("text going to stdout in test_func1")
    logging.info("info in test_func1")
    logging.warning("warnning in test_func1")
    logging.error("error in test_func1")
    print('text going to stderr in test_func1', file=sys.stderr)
    assert 1 == 2


def test_func2():
    print("text going to stdout in test_func2")
    logging.info("info in test_func2")
    logging.warning("warnning in test_func2")
    logging.error("error in test_func2")
    print('text going to stderr in test_func2', file=sys.stderr)
    assert 1 == 1
使用pytest运行这个文件结果如下:
Microsoft Windows [版本 10.0.19044.1889]
(c) Microsoft Corporation。保留所有权利。(venv) C:\Users\057776\PycharmProjects\pytest-demo>pytest
================================== test session starts ==================================
platform win32 -- Python 3.8.8, pytest-6.2.3, py-1.10.0, pluggy-0.13.1
rootdir: C:\Users\057776\PycharmProjects\pytest-demo, configfile: pytest.ini, testpaths: testlog
plugins: html-3.1.1, metadata-1.11.0, rerunfailures-9.1.1, assume-2.2.0, requests-mock-1.7.0
collected 2 itemstestlog\test_log.py F. [100%]
===================================== FAILURES =====================================
_______________________________________ test_func1 _______________________________________def test_func1():
print("text going to stdout in test_func1")
logging.info("info in test_func1")
logging.warning("warnning in test_func1")
logging.error("error in test_func1")
print('text going to stderr in test_func1', file=sys.stderr)
> assert 1 == 2
E assert 1 == 2testlog\test_log.py:20: AssertionError
------------------------------------------------------------ Captured stdout call ------------------------------------------------------------
text going to stdout in test_func1
------------------------------------------------------------ Captured stderr call -------------------------------------------------------------
text going to stderr in test_func1
-------------------------------------------------------------- Captured log call --------------------------------------------------------------
WARNING root:test_log.py:17 warnning in test_func1
ERROR root:test_log.py:18 error in test_func1
================================= short test summary info =================================
FAILED testlog/test_log.py::test_func1 - assert 1 == 2
================================ 1 failed, 1 passed in 0.45s ================================(venv) C:\Users\057776\PycharmProjects\pytest-demo>
分析运行结果:
test_func1测试失败,pytest将捕获消息内容输出到控制台,包含WARNING和ERROR级别的日志消息(Captured log call)、标准输出内容(Captured stdout call )、标准错误输出内容(Captured stderr call )。
pytest捕获的消息内容格式显示为:日志级别、模块、行号、消息。
2、--show-capture 控制捕获日志输出内容
--show-capture={no,stdout,stderr,log,all}
Controls how captured stdout/stderr/log is shown on failed tests. Default is 'all'.
- no:对于失败测试,不输出捕获内容(stdout、stderr 和日志)
- stdout:对于失败测试,输出捕获的stdout内容
- stderr:对于失败测试,输出捕获的stderr内容
- log:对于失败测试,输出捕获的log内容
- all:默认值,对于失败测试,输出捕获内容
还是test_log.py文件,使用pytest --show-capture=no来运行测试:
(venv) C:\Users\057776\PycharmProjects\pytest-demo>pytest --show-capture=no
================================= test session starts =================================
platform win32 -- Python 3.8.8, pytest-6.2.3, py-1.10.0, pluggy-0.13.1
rootdir: C:\Users\057776\PycharmProjects\pytest-demo, configfile: pytest.ini, testpaths: testlog
plugins: html-3.1.1, metadata-1.11.0, rerunfailures-9.1.1, assume-2.2.0, requests-mock-1.7.0
collected 2 itemstestlog\test_log.py F. [100%]
==================================== FAILURES ====================================
______________________________________ test_func1 ______________________________________def test_func1():
print("text going to stdout in test_func1")
logging.info("info in test_func1")
logging.warning("warnning in test_func1")
logging.error("error in test_func1")
print('text going to stderr in test_func1', file=sys.stderr)
> assert 1 == 2
E assert 1 == 2testlog\test_log.py:20: AssertionError
================================ short test summary info ================================
FAILED testlog/test_log.py::test_func1 - assert 1 == 2
=============================== 1 failed, 1 passed in 0.35s ===============================(venv) C:\Users\057776\PycharmProjects\pytest-demo>
运行结果可知,test_func1测试失败,但是由于--show-capture=no,控制台没有输出捕获的日志内容。
3、--capture=method 设置捕获日志方式
--capture=method per-test capturing method: one of fd|sys|no|tee-sys.
- --capture=fd :默认模式,在文件描述符级别捕获输出,这意味着写入文件的描述符 1(stdout)和 2(stderr)的所有输出都被捕获。
- --capture=no :禁用对标准输出、标准错误以及日志消息捕获。-s :禁用所有捕获,等同于--capture=no
- --capture=sys :仅对python的sys.stdout和sys.stderr进行捕获,而不是对文件描述符的写入进行捕获。可以用来解决问题,pytest-html输出的HTML测试报告中的"No log output captured"
- --capture=tee-sys :对python的sys.stdout和sys.stderr进行捕获,并且会继续传递给系统,参考tee命令的作用。这样在捕获一份的同时,还能实时打印输出。
4、设置捕获日志级别和消息格式
默认情况下,pytest捕获的消息内容格式显示为:日志级别、模块、行号、消息。
在pytest.ini文件中设置日志捕获的格式如下:
log_level = INFO
log_format = %(asctime)s %(levelname)s %(message)s
log_date_format = %Y-%m-%d %H:%M:%S
说明:
- log_level = INFO,设置捕获日志的日志级别。可以使用整数值或级别名称。
- log_date_format = %Y-%m-%d %H:%M:%S,设置捕获日志的日期格式
- log_format = %(asctime)s %(levelname)s %(message)s,设置捕获日志的消息格式。
配置好pytest.ini文件之后,再次运行test_log.py文件结果如下:
(venv) C:\Users\057776\PycharmProjects\pytest-demo>pytest
================================== test session starts ==================================
platform win32 -- Python 3.8.8, pytest-6.2.3, py-1.10.0, pluggy-0.13.1
rootdir: C:\Users\057776\PycharmProjects\pytest-demo, configfile: pytest.ini, testpaths: testlog
plugins: html-3.1.1, metadata-1.11.0, rerunfailures-9.1.1, assume-2.2.0, requests-mock-1.7.0
collected 2 itemstestlog\test_log.py F. [100%]
===================================== FAILURES =====================================
_______________________________________ test_func1 _______________________________________def test_func1():
print("text going to stdout in test_func1")
logging.info("info in test_func1")
logging.warning("warnning in test_func1")
logging.error("error in test_func1")
print('text going to stderr in test_func1', file=sys.stderr)
> assert 1 == 2
E assert 1 == 2testlog\test_log.py:20: AssertionError
----------------------------------------------------------- Captured stdout call -----------------------------------------------------------
text going to stdout in test_func1
----------------------------------------------------------- Captured stderr call -----------------------------------------------------------
text going to stderr in test_func1
------------------------------------------------------------- Captured log call -------------------------------------------------------------
2022-08-29 18:17:57 INFO info in test_func1
2022-08-29 18:17:57 WARNING warnning in test_func1
2022-08-29 18:17:57 ERROR error in test_func1
================================= short test summary info ================================
FAILED testlog/test_log.py::test_func1 - assert 1 == 2
=============================== 1 failed, 1 passed in 0.40s ================================(venv) C:\Users\057776\PycharmProjects\pytest-demo>
运行结果可知, Captured log call -日志详细跟pytest.ini配置文件一致。
三、Live Log 实时日志
可以设置配置选项log_cli = True,在测试运行期间启用实时日志,并输出实时日志到控制台。
1、设置实时日志级别和消息格式
- log_cli = True,在测试运行期间启用实时日志。默认值为False,不输出实时日志。设置为True,输出实时日志到控制台。
- log_cli_level = INFO,设置实时日志的日志级别,可以使用整数值或级别名称。
- log_cli_date_format = %Y-%m-%d %H:%M:%S,设置实时日志的日期格式
- log_cli_format = %(asctime)s %(levelname)s %(message)s,设置实时日志的消息格式
pytest.ini文件如下:
log_cli = True log_cli_level = INFO
log_cli_date_format = %Y-%m-%d %H:%M:%S
log_cli_format = %(asctime)s %(levelname)s %(message)s
为了避免捕获日志输出到控制台的干扰使用命令行参数 :--show-capture=no 不显示Captured log日志。
运行test_log.py文件如下:
也可以直接使用命令参数不用pytest.ini配置文件:pytest -o log_cli=True
Microsoft Windows [版本 10.0.19044.1889]
(c) Microsoft Corporation。保留所有权利。(venv) C:\Users\057776\PycharmProjects\pytest-demo>pytest -o log_cli=True
==================================== test session starts ====================================
platform win32 -- Python 3.8.8, pytest-6.2.3, py-1.10.0, pluggy-0.13.1 -- e:\programs\python\python38\python.exe
cachedir: .pytest_cache
metadata: {'Python': '3.8.8', 'Platform': 'Windows-10-10.0.19041-SP0', 'Packages': {'pytest': '6.2.3', 'py': '1.10.0', 'pluggy': '0.13.1'}, 'Plugins': {'html': '3.1.1', 'metadata': '1.11.0', 'rerunfailures': '9.1.1', 'assume': '2.2.0', 'requests-mock': '1.7.0'}, 'JAVA_HOME': 'C:\\Program Files\\Java\\jdk1.8.0_271', 'foo': 'bar'}rootdir: C:\Users\057776\PycharmProjects\pytest-demo, configfile: pytest.ini, testpaths: testlog
plugins: html-3.1.1, metadata-1.11.0, rerunfailures-9.1.1, assume-2.2.0, requests-mock-1.7.0
collected 2 itemstestlog/test_log.py::test_func1 text going to stdout in test_func1
-------------------------------------------------------------------- live log call --------------------------------------------------------------------
2022-08-29 18:38:35 INFO info in test_func1
2022-08-29 18:38:35 WARNING warnning in test_func1
2022-08-29 18:38:35 ERROR error in test_func1
text going to stderr in test_func1
FAILED
testlog/test_log.py::test_func2 text going to stdout in test_func2-------------------------------------------------------------------- live log call --------------------------------------------------------------------
2022-08-29 18:38:35 INFO info in test_func2
2022-08-29 18:38:35 WARNING warnning in test_func2
2022-08-29 18:38:35 ERROR error in test_func2
text going to stderr in test_func2
PASSED======================================= FAILURES =======================================
_________________________________________ test_func1 _________________________________________def test_func1():
print("text going to stdout in test_func1")
logging.info("info in test_func1")
logging.warning("warnning in test_func1")
logging.error("error in test_func1")
print('text going to stderr in test_func1', file=sys.stderr)
> assert 1 == 2
E assert 1 == 2
E +1
E -2testlog\test_log.py:20: AssertionError
================================== short test summary info ==================================
FAILED testlog/test_log.py::test_func1 - assert 1 == 2
================================= 1 failed, 1 passed in 0.40s =================================(venv) C:\Users\057776\PycharmProjects\pytest-demo>
运行结果可知,无论测试成功与否, 所有测试都输出了实时日志内容(live log call)。
2、将实时日志写入日志文件中
(1)设置日志文件路径和格式
- log_file = logs/pytest-logs.txt,将实时日志写入文件中
- log_file_level = INFO,写入文件的日志级别
- log_file_date_format = %Y-%m-%d %H:%M:%S,写入文件的日期格式
- log_file_format = %(asctime)s %(levelname)s %(message)s,写入文件的日志消息格式
pytest.ini文件如下:
log_file = logs/pytest-logs.txt
log_file_level = INFO
log_file_date_format = %Y-%m-%d %H:%M:%S
log_file_format = %(asctime)s %(levelname)s %(message)s
运行运行test_log.py文件结果如下:
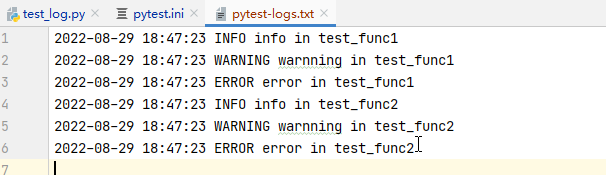
运行结果可知,pytest将实时日志写入到了日志文件中。
3、自定义日志颜色
如果启用了彩色终端输出,则日志级别是彩色的。支持从默认颜色更改或在自定义日志级别上添加颜色add_color_level()。
例子:
@pytest.hookimpl
def pytest_configure(config):
    logging_plugin = config.pluginmanager.get_plugin("logging-plugin")

    # Change color on existing log level
    logging_plugin.log_cli_handler.formatter.add_color_level(logging.INFO, "cyan")

    # Add color to a custom log level (a custom log level `SPAM` is already set up)
    logging_plugin.log_cli_handler.formatter.add_color_level(logging.SPAM, "blue")
注意:
此功能及其 API 被认为是实验性的,可能会在版本之间发生更改,而不会发出弃用通知。
四、caplog fixture 内置夹具
caplog是pytest内置的夹具,用来访问和控制日志捕获。
API Reference — pytest documentation
How to manage logging — pytest documentation
reference:
How to capture stdout/stderr output — pytest documentation


 828
828


 被折叠的 条评论
为什么被折叠?
被折叠的 条评论
为什么被折叠?
 到【灌水乐园】发言


