


工作中经常会用到验证码输入框,但是网上好多都是用4个TextView和一个隐藏的EditText,这样复用性不是很好。万幸找到了一个自定义View的案例,可以说是用很方便,也有很好的复用性,也是一个学习自定义View的不错的例子,通俗易懂,所以在这里分享一下。首先感谢作者Android 自定义验证码/密码输入框,验证码的样式完全由自定义Drawable决定
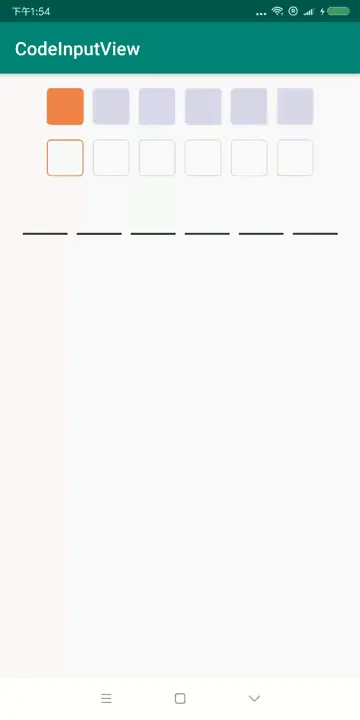
首先看一下效果
下面逐步说一下思路:
- 定义自定义属性:这里自定义了
itemCount,itemWidth,itemBackground,gapWidth,ciTextSize,ciTextColor - 完成测量
- 这里只需要考虑测量宽,高有xml指定具体值。
- 当为wrap_content时,需要自行测量控件总宽度
- 为match_parent或者具体指时,需要根据测量值重新计算itemWidth,这一点可以有不同实现
- 完成绘制
- 绘制背景和绘制字体的坐标计算还是需要理解的
- 绘制背景:自定义背景xml使用了focuse表示当前获取焦点的item,所以这里需要设置item的状态来绘制不同的背景
- 绘制字体—绘制字体居中在item的区域主要有两个关键:
- 设置画笔
textPaint.setTextAlign(Paint.Align.CENTER)这样方便找画字体的x坐标 - 计算baseLine,参考了《Android自定义开发控件开发与入门实战》中的片段
- 设置画笔
- 软键盘的使用:
- 控件能够弹出软键盘需要
setFocusableInTouchMode(true)和在事件处理,在onTouchEvent中判断按下事件弹出软键盘 - 软键盘的控制
- 重写
onCreateInputConnection来控制弹出的软键盘的类型,类似于EditText的inputType并重写onCheckIsTextEditor - 监听键盘按键事件,这里重写了
onKeyDown这样不知道有没有问题,我这边自行测试没啥问题 - 在监听键盘按键事件中,要计算按下的是什么,设置监听回调,并重绘。
- 重写
- 控件能够弹出软键盘需要
部分代码
-
测量
@Override protected void onMeasure(int widthMeasureSpec, int heightMeasureSpec) { super.onMeasure(widthMeasureSpec, heightMeasureSpec); int mode = MeasureSpec.getMode(widthMeasureSpec); switch (mode) { case MeasureSpec.UNSPECIFIED: case MeasureSpec.AT_MOST: //没有指定宽度 宽度等于单个的宽度*个数+总间距 mWidth = itemWidth * itemCount + gapWidth * (itemCount - 1); break; case MeasureSpec.EXACTLY: mWidth = MeasureSpec.getSize(widthMeasureSpec); itemWidth = mWidth - (gapWidth * (itemCount - 1)) / itemCount; break; } mHeight = MeasureSpec.getSize(heightMeasureSpec); calculateStartAndEndPoint(itemCount); setMeasuredDimension(mWidth, mHeight); } -
绘制
private void drawLine(Canvas canvas) { if (codeBuilder == null) return; int inputLength = codeBuilder.length(); //画背景 for (int i = 0; i < itemCount; i++) { if (itemBackground != null) { //绘制背景区域 itemBackground.setBounds((int) itemPoints[i].x, 0, (int) itemPoints[i].y, mHeight); //关键点4:设置背景的状态,索引等于字符串长度,代表当前item处于FOCUSED状态,否则处于普通状态 //这样可以使用xml文件Selector来的定义不同状态下的背景 itemBackground.setState(i == inputLength ? FOCUSED_STATE_SET : EMPTY_STATE_SET); itemBackground.draw(canvas);//把背景画上去 } } //画字体 Paint.FontMetricsInt fontMetricsInt = textPaint.getFontMetricsInt(); //关键点5:基线的y坐标(固定套路) int baseline = mHeight / 2 + (fontMetricsInt.bottom - fontMetricsInt.top) / 2 - fontMetricsInt.bottom; for (int i = 0; i < inputLength; i++) { if (inputType == InputMode.INPUT_TYPE_NUMBER_PASSWORD || inputType == InputMode.NPUT_TYPE_PASSWORD) { canvas.drawCircle(itemPoints[i].y - itemWidth / 2, mHeight / 2, testSize / 4, textPaint); } else { canvas.drawText(codeBuilder.toString(), i, i + 1, itemPoints[i].y - itemWidth / 2, baseline, textPaint); } } -
弹出软键盘
@Override
public boolean onTouchEvent(MotionEvent event) {
    int action = event.getAction();
    if (action == MotionEvent.ACTION_DOWN) {
        //            requestFocus();//关键点6:只有请求获取焦点,才会弹出软键盘
        KeyBoardUtil.showKeyboard(getContext(), this);
        return true;
    }
    return false;
}
4.定义键盘类型
/** * //关键点7:定义软键盘类型 * 创建一个新的InputConnection以便当前视图可以使用InputMethod,此方法默认实现返回null, * 因此它不支持输入法。因此如果当前视图想要使用输入法,则必须重写此方法,只有具有焦点和需要文本输入的视图 * 才需要主动调用此方法 * Create a new InputConnection for an InputMethod to interact * with the view. The default implementation returns null, since it doesn't * support input methods. You can override this to implement such support. * This is only needed for views that take focus and text input. * <p> * 当实现此方法后,最好也重写onCheckIsTextEditor方法来表明你将返回一个非空的InputConnection * <p>When implementing this, you probably also want to implement * {@link #onCheckIsTextEditor()} to indicate you will return a * non-null InputConnection.</p> * <p> * 另外,你必须指定EditorInfo的一些参数,以便系统输入法引擎可以参考这些参数来决定软键盘的信息 * <p>Also, take good care to fill in the {@link android.view.inputmethod.EditorInfo} * object correctly and in its entirety, so that the connected IME(Input Method Engine) can rely * on its values. For example, {@link android.view.inputmethod.EditorInfo#initialSelStart} * and {@link android.view.inputmethod.EditorInfo#initialSelEnd} members * must be filled in with the correct cursor position for IMEs to work correctly * with your application.</p> * <p> * 配置有关连接的属性信息 * * @param outAttrs Fill in with attribute information about the connection. */ @Override public InputConnection onCreateInputConnection(EditorInfo outAttrs) { BaseInputConnection bic = new BaseInputConnection(this, false); outAttrs.actionLabel = null; if (inputType == InputMode.INPUT_TYPE_NUMBER) { outAttrs.inputType = InputType.TYPE_CLASS_NUMBER; } else if (inputType == InputMode.INPUT_TYPE_TEXT) { outAttrs.inputType = InputType.TYPE_CLASS_TEXT; } else if (inputType == InputMode.INPUT_TYPE_TEXT_CAP_CHARACTERS) { outAttrs.inputType = InputType.TYPE_TEXT_FLAG_CAP_CHARACTERS; } else if (inputType == InputMode.NPUT_TYPE_PASSWORD) { outAttrs.inputType = InputType.TYPE_TEXT_VARIATION_PASSWORD; } else if (inputType == InputMode.INPUT_TYPE_NUMBER_PASSWORD) { outAttrs.inputType = InputType.TYPE_NUMBER_VARIATION_PASSWORD; } outAttrs.imeOptions = EditorInfo.IME_ACTION_NEXT; return bic; } -
处理键盘按键监听
/** * 关键点9 后续研究监听软键盘的更好解决方案 * 键盘回调函数,默认实现了ENTER键的动作 * Default implementation of {@link KeyEvent.Callback#onKeyDown(int, KeyEvent) * KeyEvent.Callback.onKeyDown()}: perform press of the view * when {@link KeyEvent#KEYCODE_DPAD_CENTER} or {@link KeyEvent#KEYCODE_ENTER} * is released, if the view is enabled and clickable. * 按压软键盘的按键通常不会触发此监听,尽管某些情况下有些人会选择实现此方法监听软键盘的键盘监听 * 但是不要依靠此来监听软键盘按键 * Key presses in software keyboards will generally NOT trigger this * listener, although some may elect to do so in some situations. Do not * rely on this to catch software key presses. * * @param keyCode a key code that represents the button pressed, from * {@link android.view.KeyEvent} * @param event the KeyEvent object that defines the button action */ @Override public boolean onKeyDown(int keyCode, KeyEvent event) { if (codeBuilder == null) codeBuilder = new StringBuilder(); if (keyCode == KeyEvent.KEYCODE_DEL) { //删除 deleteLast(); } else if (keyCode >= KeyEvent.KEYCODE_0 && keyCode <= KeyEvent.KEYCODE_9) { //纯数字 appendText(String.valueOf(event.getNumber())); } else if (((inputType == InputMode.INPUT_TYPE_TEXT || inputType == InputMode.INPUT_TYPE_TEXT_CAP_CHARACTERS || inputType == InputMode.NPUT_TYPE_PASSWORD)) && keyCode >= KeyEvent.KEYCODE_A && keyCode <= KeyEvent.KEYCODE_Z) { String text = String.valueOf((char) event.getUnicodeChar()); appendText(inputType == InputMode.INPUT_TYPE_TEXT_CAP_CHARACTERS ? text.toUpperCase() : text); } if (codeBuilder.length() >= itemCount || keyCode == KeyEvent.KEYCODE_ENTER) { KeyBoardUtil.hideKeyboard(getContext(), this); } return super.onKeyDown(keyCode, event); }完整代码见github


 2192
2192

 被折叠的 条评论
为什么被折叠?
被折叠的 条评论
为什么被折叠?
 到【灌水乐园】发言


