


一、原理概述


1、请求转发的理解
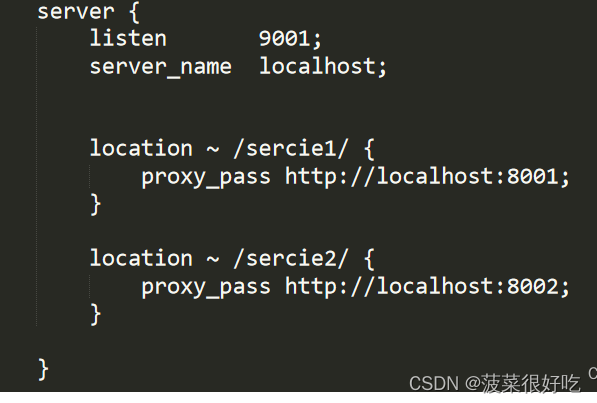
前端通过请求固定的ng地址(http://localhost:9001),nginx就根据请求路径,把根据请求的关服务名称,自动将请求转发到对应的服务上面。

二、作用
欢迎加入扣扣资源组织:783092701
- 保护网站安全:任何来自Internet的请求都必须先经过代理服务器
- 通过配置缓存功能加速Web请求:可以缓存真实Web服务器上的某些静态资源,减轻真实Web服务器的负载压力
- 实现负载均衡:充当负载均衡服务器均衡地分发请求,平衡集群中各个服务器的负载压力
三、案例
1.动静分离
将静态资源放入Nginx目录下
将静态资源如css,js,图片,动图等放入Nginx,让Nginx渲染资源
1.1) 可以先在Nginx文件夹中创建存放静态资源的目录static
mkdir /static

1.2) 将静态资源放入static文件夹
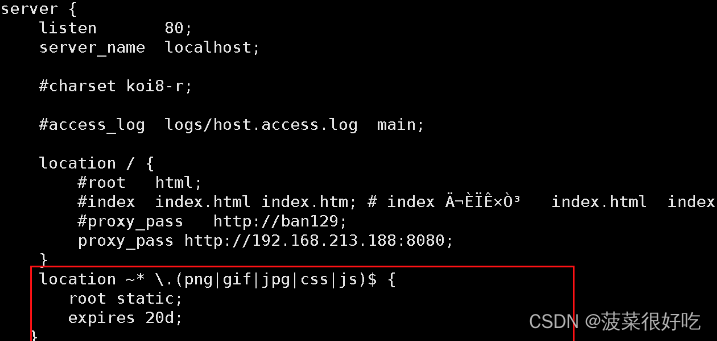
1.3) 修改配置文件
(1) 需要两台nginx服务器。
	192.168.192.145(从 BACKUP)
	192.168.192.129(主 MASTER)
(2) 需要keepalived
		安装Keepalived
		yum install keepalived  安装keepalived
		rpm -q -a keepalived  检查是否安装keepalived
(3) 需要虚拟ip
1.4) 实现Nginx的高可用
修改keepalived配置文件

2.负载均衡
常见的几种负载均衡方式
2.1) 轮询(默认)
每个请求按时间顺序逐一分配到不同的后端服务器,如果后端服务器down掉,能自动剔除。
upstream backserver {
    server 192.168.0.14;
    server 192.168.0.15;
}
2.2)weight
指定轮询几率,weight和访问比率成正比,用于后端服务器性能不均的
情况。
upstream backserver {
    server 192.168.0.14 weight=3;
    server 192.168.0.15 weight=7;
}
权重越高,在被访问的概率越大,如上例,分别是30%,70%。
2.3)ip_hash
每个请求按访问ip的hash结果分配,这样每个访客固定访问一个后端服务器,可以解决session的问题。
upstream backserver {
    ip_hash;
    server 192.168.0.14:88;
    server 192.168.0.15:80;
}
2.4)fair(第三方)
按后端服务器的响应时间来分配请求,响应时间短的优先分配。
upstream backserver {
    server server1;
    server server2;
    fair;
}
2.5)url_hash(第三方)
按访问url的hash结果来分配请求,使每个url定向到同一个后端服务器,后端服务器为缓存时比较有效。
upstream backserver {
    server squid1:3128;
    server squid2:3128;
    hash $request_uri;
    hash_method crc32;
}
每个设备的状态设置为:
1.down 表示单前的server暂时不参与负载
2.weight 默认为1.weight越大,负载的权重就越大。
3.max_fails:允许请求失败的次数默认为1.当超过最大次数时,返回proxy_next_upstream模块定义的错误
4.fail_timeout:max_fails次失败后,暂停的时间。
5.backup: 其它所有的非backup机器down或者忙的时候,请求backup机器。所以这台机器压力会最轻。
配置实例:
#user  nobody;
worker_processes  4;
events {
    # 最大并发数
    worker_connections  1024;
}
http{
    # 待选服务器列表
    upstream myproject{
        # ip_hash指令,将同一用户引入同一服务器。
        ip_hash;
        server 125.219.42.4 fail_timeout=60s;
        server 172.31.2.183;
        }

    server{
                # 监听端口
                listen 80;
                # 根目录下
                location / {
                    # 选择哪个服务器列表
                    proxy_pass http://myproject;
                }

            }
}
3.ssl认证
3.1)生成证书
- 使用Linux自带ssl生成
- 阿里生成免费证书一年
server {
                listen 443;
                ssl on;
                server_name www.681vip.com;
                root html;
                index index.html index.htm;
                ssl_certificate /usr/local/nginx/ssl/8625757_www.681vip.com.pem;
                ssl_certificate_key /usr/local/nginx/ssl/8625757_www.681vip.com.key;
                ssl_session_timeout 5m;
                ssl_ciphers ECDHE-RSA-AES128-GCM-SHA256:ECDHE:ECDH:AES:HIGH:!NULL:!aNULL:!MD5:!ADH:!RC4;
                ssl_protocols TLSv1.1 TLSv1.2 TLSv1.3;
                ssl_prefer_server_ciphers on;
                location / {
                        root /opt/;
                        index index.html index.htm;
                }
                location ~ \.(gif|jpg|jpeg|png|bmp|ico)$ {
                        root /opt/;
                        expires 30d;
                }
        }
        server {
                listen 80;
                server_name www.681vip.com;
                rewrite ^(.*)$ https://www.681vip.com:443/;
                location / {
                        index index.html index.htm;
                }
        }
4.tomcat反向代理
在生产环境,Tomcat服务器一般不单独使用在项目中,我们一般通过nginx用于反向代理的服务器,并将请求转发给后端多台Tomcat服务器,从而达到负载均衡的目的。
单个服务器解决不了,我们增加服务器的数量,然后将请求分发到各个服务器上,将原先请求集中到单个服务器上的情况改为将请求分发到多个服务器上,将负载分发到不同的服务器,也就是我们所说的负载均衡。

4.1)ip地址转发(不建议暴露地址)
proxy_pass配置的值直接就是IP地址加端口:proxy_pass http://192.168.1.1:8808;,此时后面是不建议写路径的(可以写路径),nginx只能将ip地址和端口进行代理
server {
	listen 80;
	server_name localhost;

	# 请求是:http://127.0.0.1:80/test/haha/aaa
	# 转发到:http://192.168.1.1:8808/test/haha/aaa
	location /test/ {
		proxy_pass http://192.168.1.1:8808;
	}
}
4.2) 针对访问路径进行代理(只能是127.0.0.1)
#用proxy_pass来写
server
{
    listen 80;
    server_name localhost;

    #请求的url过滤,正则匹配,~为区分大小写,~*为不区分大小写。
    #请求是http://127.0.0.1:80/Test/haha/aaa
    #分发到http://127.0.0.1:9501/Api/haha/aaa
	location ~* /test/(.*)$ {
        proxy_pass  http://127.0.0.1:9501/Api/$1?$args;
    }
}
#用rewrite来写
server
{
    listen 80;
    server_name localhost;
    location ~* /test {
        rewrite (.+) http://127.0.0.1:9501/Api$1?$args permanent;
    }
}
四、安装使用
# 依赖安装
yum -y install make zlib zlib-devel gcc-c++ libtool  openssl openssl-devel
# 正则
wget https://jaist.dl.sourceforge.net/project/pcre/pcre/8.42/pcre-8.42.tar.gz
# 解压安装
tar -xvf pcre-8.42.tar.gz
cd pcre-8.42
./configure
make && make install
# nginx安装
wget https://nginx.org/download/nginx-1.16.1.tar.gz
tar -xzvf nginx-1.16.1.tar.gz
cd nginx-1.16.1
./configure --prefix=/usr/local/nginx --with-http_stub_status_module --with-http_ssl_module --with-threads
make && make install
# 启动nginx
/usr/local/nginx/sbin/nginx
# 重启
./nginx -s reload
五、属性解释
1.localtion
1)location 区段
- location 是在 server 块中配置,根据不同的 URI 使用不同的配置,来处理不同的请求。
- location 是有顺序的,会被第一个匹配的location 处理。
- 基本语法如下:
location [=||*|^~|@] pattern{……}
2)location 前缀含义
= 表示精确匹配,优先级也是最高的
^~ 表示uri以某个常规字符串开头,理解为匹配url路径即可
~ 表示区分大小写的正则匹配
~* 表示不区分大小写的正则匹配
!~ 表示区分大小写不匹配的正则
!~* 表示不区分大小写不匹配的正则
/ 通用匹配,任何请求都会匹配到
@ 内部服务跳转
查找顺序和优先级:
= 大于 ^~ 大于 ||!|! 大于 /
多个location配置的情况下匹配顺序为:首先匹配 =,其次匹配^~, 其次是按正则匹配,最后是交给 / 通用匹配。当有匹配成功时候,停止匹配,按当前匹配规则处理请求。
3)location 配置示例
3.1) 优先级问题
location / {
# 因为所有的地址都以 / 开头,所以这条规则将匹配到所有请求
# 但是正则和最长字符串会优先匹配
}

location /documents/ {
# 匹配任何以 /documents/ 开头的地址,匹配符合以后,还要继续往下搜索
# 只有后面的正则表达式没有匹配到时,这一条才会采用这一条
}

location ~ /documents/Abc {
# 匹配任何以 /documents/ 开头的地址,匹配符合以后,还要继续往下搜索
# 只有后面的正则表达式没有匹配到时,这一条才会采用这一条
}

location ^~ /images/ {
# 匹配任何以 /images/ 开头的地址,匹配符合以后,停止往下搜索正则,采用这一条。
}
下面2个配置同时存在时:
location = / {
[ configuration A ]
}

location / {
[ configuration B ]
}
此时A生效,因为=/优先级高于/
下面3个配置同时存在时:
location  /documents/ {
[ configuration C ]
}

location ~ /documents/ {

[configuration CB]

}

location ~ /documents/abc {
[ configuration CC ]
}

当访问的url为/documents/abc/1.html,此时CC生效,首先CB优先级高于C,而CC更优先于CB
下面4个配置同时存在时:
location ^~ /images/ {
[ configuration D ]
}
location /images/ {
[ configuration F ]
}
location /images/abc {
[ configuration G ]
}
location ~ /images/abc/ {
[ configuration H ]
}
当访问的链接为/images/abc/123.jpg时,此时D生效。虽然4个规则都能匹配到,但^~优先级是最高的。若^~不存在时,H优先,因为~/images/ > /images/ 而/images/和/images/abc同时存在时,/images/abc优先级更高,因为后者更加精准
下面两个配置同时存在时:
location ~* \.(gif|jpg|jpeg)$ {
[ configuration E ]
}
location ~ /images/abc/ {
[ configuration H ]
}
当访问的链接为/images/abc/123.jpg时,E生效。因为上面的规则更加精准。
3.2)没有修饰符 表示:必须以指定模式开始
server {
listen 80;
server_name localhost;
location /abc {
root /home/www/nginx;
index 2.html;
}
那么,如下是对的:
http://192.168.1.10/abc
3.3) =表示:必须与指定的模式精确匹配
server {
listen 80;
server_name localhost;
access_log /var/log/nginx/http_access.log main;
location / {
root /usr/share/nginx/html;
index a.html index.htm;
}
location = / {
root /usr/share/nginx/html;
index b.html index.htm;
}
}
测试:
http://192.168.1.9
=/
http://192.168.1.9/a.html
/
3.4) ~ 表示:指定的正则表达式要区分大小写
server {
server_name localhost;
location ~ /abc {
root /home/www/nginx;
index 2.html index.html;
}
}
测试访问:
http://192.168.1.9/abc
不正确的
http://192.168.1.9/ABC
##########################
如果将配置文件修改为
location ~ /ABC {
root /home/www/nginx;
index 2.html index.html;
}
在创建目录和文件:
[root@ansible-server html]# cd /home/www/nginx/
[root@ansible-server nginx]# mkdir ABC
[root@ansible-server nginx]# vim ABC/2.html
访问:
http://192.168.1.9/ABC/
结论:~ 需要区分大小写。而且目录需要根据大小写定义。
3.5) ^~
类似于无修饰符的行为,也是以指定模式开始,不同的是,如果模式匹配,那么就停止搜索其他模式了。
3.6) @
定义命名 location 区段,这些区段客户段不能访问,只可以由内部产生的请求来访问,如error_page等
location 区段匹配示例
location = / {
# 只匹配 / 的查询.
[ configuration A ]
}
location / {
# 匹配任何以 / 开始的查询,但是正则表达式与一些较长的字符串将被首先匹配。
[ configuration B ]
}
location ^~ /images/ {
# 匹配任何以 /images/ 开始的查询并且停止搜索,不检查正则表达式。
[ configuration C ]
}
location ~* \.(gif|jpg|jpeg)$ {
# 匹配任何以gif, jpg, or jpeg结尾的文件
[ configuration D ]
}
各请求的处理如下例:
/ → configuration A
/documents/document.html → configuration B
/images/1.gif → configuration C
/documents/1.jpg → configuration D
2. proxy_pass
1) location与proxy_pass带/与不带/
1.1) location与proxy_pass都带/
location /aa/bb/{
proxy_pass http://***/cc/;
}
http://123/aa/bb/a.html
则转发的请求为:
http://***/cc/a.html
资源访问没有问题
1.2) location带/与proxy_pass不带/
location /aa/bb/{
proxy_pass http://***/cc;
}
http://123/aa/bb/a.html
则转发的请求为:
http://***/cca.html
资源访问有问题。
1.3) location不带/与proxy_pass带/
location /aa/bb{
proxy_pass http://***/cc/;
}
http://123/aa/bb/a.html
则转发的请求为:
http://***/cc//a.html
资源访问没有问题。
1.4) location不带/与proxy_pass不带/
location /aa/bb{
proxy_pass http://***/cc;
}
http://123/aa/bb/a.html
则转发的请求为:
http://***/cc/a.html
资源访问没有问题。
1.5) location不带/与proxy_pass不带路径
location /aa/bb{
proxy_pass http://***;
}
http://123/aa/bb/a.html
则转发的请求为:
http://***/aa/bb/a.html
location /aa/bb/{
proxy_pass http://***/;
}
http://123/aa/bb/a.html
则转发的请求为:
相当于访问:http://***/a.html
1.6 注意:
proxy_pass网址后是可以带路径的,但是带路径的话涉及到的规则比较复杂。
如下所示:
(1)如果包含路径,则匹配某个location的正常uri成功的部分则会被proxy_pass中指定的路径部分代替,例如:
location /name/ {
proxy_pass http://127.0.0.1/remote/;
}
例如/name/xxx这样的请求,转发后则会变成/remote/xxx;
(2)但是当location指令的参数是一个正则表达式的时候,此时如果proxy_pass指定的url中包含路径,则无法完成替换。此时proxy_pass指令中的url是不建议包含路径的。
所以虽然nginx proxy_pass网址后可以包含uri部分,但是一般不建议这么做。
3. rewrite
1)重定向
Rewrite对称URL Rewrite,即URL重写,就是把传入Web的请求重定向到其他URL的过程
- URL Rewrite最常见的应用是URL伪静态化,是将动态页面显示为静态页面方式的一种技术。比如http://www.123.com/news/index.php?id=123 使用URLRewrite 转换后可以显示为 http://www.123.com/news/123.html
- 从安全角度上讲,如果在URL中暴露太多的参数,无疑会造成一定量的信息泄漏,可能会被一些黑客利用,对你的系统造成一定的破坏,所以静态化的URL地址可以给我们带来更高的安全性。
- 实现网站地址跳转,例如用户访问http://360buy.com,将其跳转到http://jd.com。例如当用户访问http://tianyun.com的 80端口时,将其跳转到443端口。
2)Rewrite 相关指令
Nginx Rewrite 相关指令有 if、rewrite、set、return
2.1)if 语句
- 应用环境
server,location
语法:
if (condition) { … }
if 可以支持如下条件判断匹配符号
~ 正则匹配 (区分大小写)
~* 正则匹配 (不区分大小写)
!~ 正则不匹配 (区分大小写)
!~* 正则不匹配 (不区分大小写)
-f 和!-f 用来判断是否存在文件
-d 和!-d 用来判断是否存在目录
-e 和!-e 用来判断是否存在文件或目录
-x 和!-x 用来判断文件是否可执行
在匹配过程中可以引用一些Nginx的全局变量
$args 请求中的参数;
$document_root 针对当前请求的根路径设置值;
$host 请求信息中的"Host",如果请求中没有Host行,则等于设置的服务器名;
$limit_rate 对连接速率的限制;
$request_method 请求的方法,比如"GET"、"POST"等;
$remote_addr 客户端地址;
$remote_port 客户端端口号;
$remote_user 客户端用户名,认证用;
$request_filename 当前请求的文件路径名(带网站的主目录/usr/local/nginx/html/images /a.jpg)
$request_uri 当前请求的文件路径名(不带网站的主目录/images/a.jpg)
q u e r y s t r i n g 与 query_string 与 querystring与args相同;
$scheme 用的协议,比如http或者是https
$server_protocol 请求的协议版本,“HTTP/1.0"或"HTTP/1.1”;
$server_addr 服务器地址,如果没有用listen指明服务器地址,使用这个变量将发起一次系统调用以取得地址(造成资源浪费);
$server_name 请求到达的服务器名;
d o c u m e n t u r i 与 document_uri 与 documenturi与uri一样,URI地址;
$server_port 请求到达的服务器端口号;
2.2)Rewrite flag
- rewrite 指令根据表达式来重定向URI,或者修改字符串。可以应用于server,location, if环境下每行rewrite指令最后跟一个flag标记,支持的flag标记有: last 相当于Apache里的[L]标记,表示完成rewrite。默认为last。 break 本条规则匹配完成后,终止匹配,不再匹配后面的规则 redirect 返回302临时重定向,浏览器地址会显示跳转后的URL地址 permanent 返回301永久重定向,浏览器地址会显示跳转后URL地址 redirect 和 permanent区别则是返回的不同方式的重定向: 对于客户端来说一般状态下是没有区别的。而对于搜索引擎,相对来说301的重定向更加友好,如果我们把一个地址采用301跳转方式跳转的话,搜索引擎会把老地址的相关信息带到新地址,同时在搜索引擎索引库中彻底废弃掉原先的老地址。 使用302重定向时,搜索引擎(特别是google)有时会查看跳转前后哪个网址更直观,然后决定显示哪个,如果它觉的跳转前的URL更好的话,也许地址栏不会更改。
2.3)Rewrite匹配参考示例
本地解析host文件
# http://www.testpm.com/a/1.html ==> http://www.testpm.com/b/2.html
location /a {
root /html;
index 1.html index.htm;
rewrite .* /b/2.html permanent;
}
location /b {
root /html;
index 2.html index.htm;
}
例2:
# http://www.testpm.com/2019/a/1.html ==> http://www.testpm.com/2018/a/1.html
location /2019/a {
root /var/www/html;
index 1.html index.hml;
rewrite ^/2019/(.*)$ /2018/$1 permanent;
}
location /2018/a {
root /var/www/html;
index 1.html index.htl;
}
例3:
# http://www.qf.com/a/1.html ==> http://jd.com
location /a {
root /html;
if ($host ~* www.qf.com ) {
rewrite .* http://jd.com permanent;
}
}
例4:
# http://www.qf.com/a/1.html ==> http://jd.com/a/1.html
location /a {
root /html;
if ( $host ~* qf.com ){
rewrite .* http://jd.com$request_uri permanent;
}
}
例5: 在访问目录后添加/ (如果目录后已有/,则不加/)
# http://www.tianyun.com/a/b/c
# $1: /a/b
# $2: c
# http://$host$1$2/
location /a/b/c {
root /usr/share/nginx/html;
index index.html index.hml;
if (-d $request_filename) {
rewrite ^(.*)([^/])$ http://$host$1$2/ permanent;
}
}
例6:
# http://www.tianyun.com/login/tianyun.html ==> http://www.tianyun.com/reg/login.html?user=tianyun
location /login {
root /usr/share/nginx/html;
rewrite ^/login/(.*)\.html$ http://$host/reg/login.html?user=$1;
}
location /reg {
root /usr/share/nginx/html;
index login.html;
}
例7:
#http://www.tianyun.com/qf/11-22-33/1.html ==> http://www.tianyun.com/qf/11/22/33/1.html
location /qf {
rewrite ^/qf/([0-9]+)-([0-9]+)-([0-9]+)(.*)$ /qf/$1/$2/$3$4 permanent;
}
location /qf/11/22/33 {
root /html;
index 1.html;
}
3) 常见$参数使用
$args     # 这个变量等于请求行中的参数。
$binary_remote_addr     # 远程地址的二进制表示
$body_bytes_sent    # 已发送的消息体字节数
$content_length     # 请求头中的Content-length字段
$content_type     # 请求头中的Content-Type字段
$document_uri     # 与$uri相同
$document_root     # 当前请求在root指令中指定的值
$host     # 请求主机头字段,否则为服务器名称
$http_user_agent     # 客户端agent信息
$http_cookie     # 客户端cookie信息
$http_referer    # 引用地址
$http_user_agent    # 客户端代理信息
$http_via    # 最后一个访问服务器的Ip地址
$http_x_forwarded_for    # 相当于网络访问路径
$query_string    # 与$args相同
$request_method     # 客户端请求的动作,通常为GET或POST
$limit_rate     # 这个变量可以限制连接速率
$request_body_file     # 客户端请求主体信息的临时文件名
$remote_addr     # 客户端的IP地址
$remote_port     # 客户端的端口
$remote_user     # 已经经过Auth Basic Module验证的用户名
$request        # 用户请求
$request_body_file        # 发往后端的本地文件名称
$request_filename        # 当前请求的文件路径,由root或alias指令与URI请求生成
$request_method        # 请求的方法,比如 GET 、POST 等
$request_uri        # 请求的URI,带参数
$query_string     # 与$args相同
$scheme     # HTTP方法(如http,https)
$server_protocol     # 请求使用的协议,通常是HTTP/1.0或HTTP/1.1
$server_addr     # 服务器地址,在完成一次系统调用后可以确定这个值
$server_name     # 服务器名称
$server_port     # 请求到达服务器的端口号
$request_uri     # 包含请求参数的原始URI,不包含主机名,如 /foo/bar.php?arg=baz
$uri     # 不带请求参数的当前URI,$uri不包含主机名,如 /foo/bar.html


 被折叠的 条评论
为什么被折叠?
被折叠的 条评论
为什么被折叠?
 到【灌水乐园】发言


