


0.硬件
显卡:Tesla K80
1.查看本机GPU信息
需要安装支持 CUDA® 的显卡,才能实现 GPU 支持。支持 CUDA Compute Capability 3.0 或更高版本的 GPU 卡,可用从源码构建或 3.5 或更高版本的二进制文件。请在 NVIDIA 官方文档 中查询具备条件的 GPU 清单。
搜索栏输入cmd回车(进入cmd)输入:
nvidia-smi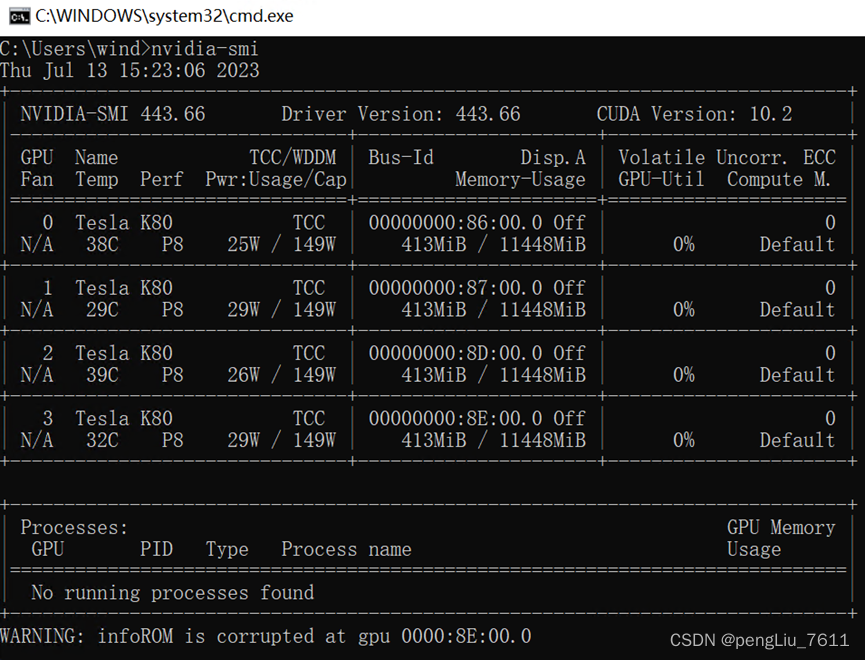
找到两个关键信息:
Name:Tesla K80
CUDA Version: 10.2
2. 查看CUDA Compute Capability
网址CUDA GPUs | NVIDIA Developer。
可以看到Tesla K80的Compute Capability=3.7>3.0,满足要求可以安装TensorFlow-GPU

3. 安装CUDA和cuDNN。
在官网上下载对应的cuda和cudnn,版本可以低于但不能高于电脑支持的版本。cuda下载地址:CUDA Toolkit Archive | NVIDIA Developer,cuDNN下载地址:cuDNN Archive | NVIDIA Developer
①输入如下指令查看是否安装CUDA
nvcc -V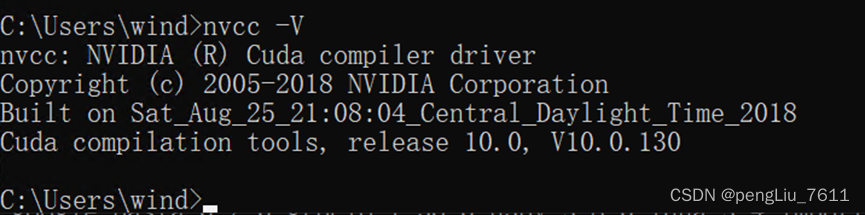
如果Cuda已安装且版本低于第1步查到的CUDA Version: 10.2,则可以直接转第4步.
②下载的是CUDA Toolkit,选择相应的系统、版本等选项,Download安装包。
我这里下载的是CUDA Toolkit 10.0
③下载对应版本的cuDNN。这里选择的是cuDNN v7.6.4 for CUDA 10.0。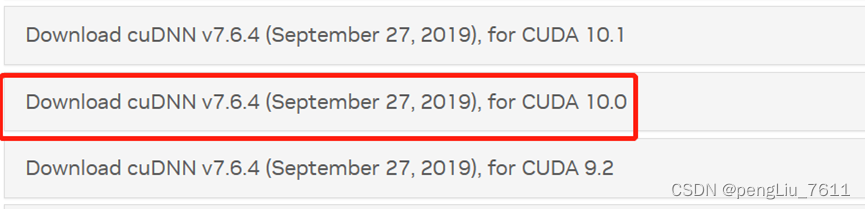
④CUDA安装:选自定义安装→默认安装路径→安装结束.
安装完成后,会默认生成两个系统变量。
系统变量查看:此电脑→右键选属性→高级系统设置→环境变量→系统变量

这里可以在系统变量中找到path→编辑→新建.添加4条路径

⑤cuDNN安装:解压→将三个文件夹复制到cuda的安装目录下,直接选择覆盖文件就可以
4. 下载并安装Anaconda
①下载地址Anaconda | Anaconda Distribution
②安装完成后,打开Anaconda Prompt,输入命令:
conda --version        #查看安装的版本
conda env list         #查看已经安装的环境,右边“*”表示当前使用的环境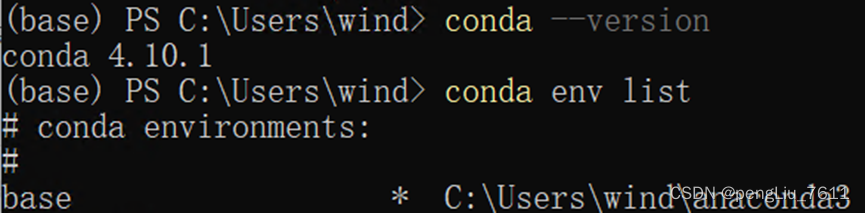
5. 创建环境
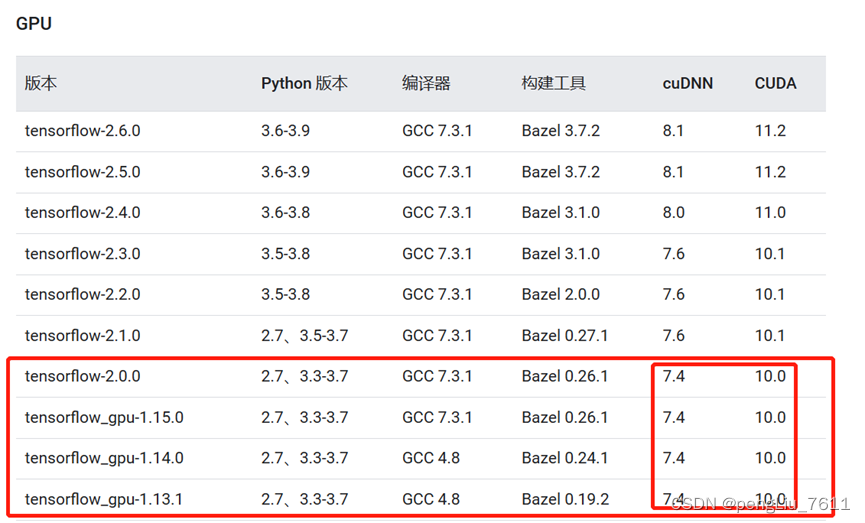
①查看合适的TensorFlow版本和依赖的Python版本,参阅经过检测的构建配置.
②创建tensorflow环境,输入命令:
conda create -n tensorflow python=3.7表示创建一个名字为tensorflow的环境,这个环境用的python版本是3.7版本的
③创建成功后,输入命令:
conda create -n tensorflow python=3.7可以看到tensorflow环境已经创建,星号为当前所在环境(基础环境base)。
④进入环境,输入命令:
activate tensorflow就可以进入tensorflow环境中。
- 安装tensorflow-gpu,输入以下命令
pip install tensorflow-gpu ==2.0.0 --default-timeout=100 -i Simple Index
后面的后缀使用的是清华镜像,若不使用,则是从国外网站进行安装,有很大可能下载不下来,导致安装失败,除了清华源,这里再提供几个常用的源。
中科大镜像:https://pypi.mirrors.ustc.edu.cn/simple
豆瓣镜像:http://pypi.douban.com/simple/
阿里镜像:https://mirrors.aliyun.com/pypi/simple/
百度镜像:https://mirror.baidu.com/pypi/simple
注:这里选择的tensorflow-gpu版本要和之前选择的cuda版本对应,对应图在上面。安装过程比较缓慢,耐心等待即可.
- 退出环境:
conda deactivate6. 测试tensorflow-gpu是否安装成功
①测试代码
import tensorflow as tf
a = tf.constant(1.)
b = tf.constant(2.)
print(a+b)
print(tf.__version__)
print(tf.test.gpu_device_name())
print('GPU:',tf.config.list_physical_devices(device_type='GPU'))
print('CPU:',tf.config.list_physical_devices(device_type='CPU'))
print(tf.test.is_gpu_available())
报错处理A:
Could not load dynamic library ‘cusolver64_11.dll‘; dlerror: cusolver64_11.dll not found解决办法:
链接:百度网盘 请输入提取码
提取码:u65i
下载文件,把文件cusolver64_11.dll添加到创建的环境\Library\bin中
报错处理B:
TypeError: Descriptors cannot not be created directly.
If this call came from a _pb2.py file, your generated code is out of date and must be regenerated with protoc >= 3.19.0.
If you cannot immediately regenerate your protos, some other possible workarounds are:
 1. Downgrade the protobuf package to 3.20.x or lower.
 2. Set PROTOCOL_BUFFERS_PYTHON_IMPLEMENTATION=python (but this will use pure-Python parsing and will be much slower).
解决办法:
pip install protobuf==3.20.0出现以下结果代表安装成功

②简单测试CPU和GPU的速度
import tensorflow as tf
import timeit
#指定在cpu上运行
def cpu_run():
    with tf.device('/cpu:0'):
        cpu_a = tf.random.normal([10000, 1000])
        cpu_b = tf.random.normal([1000, 2000])
        cpu_c = tf.matmul(cpu_a, cpu_b)
        # print( "cpu_a: ", cpu_a.device)
        # print( "cpu_b: ", cpu_b.device)
        # print("cpu_c:", cpu_c.device)
    return cpu_c
#指定在gpu上运行
def gpu_run():
    with tf.device( '/gpu:0'):
        gpu_a = tf.random. normal([ 10000,1000])
        gpu_b = tf.random. normal([ 1000, 2000])
        gpu_c = tf.matmul(gpu_a, gpu_b)
        # print( "gpu_a: ", gpu_a.device)
        # print("gpu_b: ", gpu_b.device)
        # print("gpu_c: ", gpu_c.device)
    return gpu_c
cpu_time = timeit.timeit(cpu_run, number = 10)
gpu_time = timeit.timeit(gpu_run, number = 10)
print('cpu:',cpu_time, 'gpu:',gpu_time)7.删除虚拟环境
如果安装出现问题可以删除所创建的环境
# 第一步:首先退出环境
conda deactivate
# 第二步:查看虚拟环境列表,此时出现列表的同时还会显示其所在路径
conda env list
# 第三步:删除环境
conda env remove -p 要删除的虚拟环境路径8.参考资料
tensorflow详细安装教程(Win10, Anaconda,Python3.9)_tensorflow安装教程_Yan_Yancy的博客-CSDN博客
tensorflow-gpu版本安装教程(过程详细)_tensorflow gpu_指尖在键盘上舞动的博客-CSDN博客


 702
702


 被折叠的 条评论
为什么被折叠?
被折叠的 条评论
为什么被折叠?
 到【灌水乐园】发言


