


1、NSTimer的基本使用方法
首先我们看那一下系统提供给我们的基本的使用方法。
@interface NSTimer : NSObject
// 创建一个定时器,但是没有添加到运行循环,我们需要在创建定时器后手动的调用 NSRunLoop 对象的 addTimer:forMode: 方法
+ (NSTimer *)timerWithTimeInterval:(NSTimeInterval)ti invocation:(NSInvocation *)invocation repeats:(BOOL)yesOrNo;
//  创建一个定时器,并将定时器的添加到当前的runloop中
+ (NSTimer *)scheduledTimerWithTimeInterval:(NSTimeInterval)ti invocation:(NSInvocation *)invocation repeats:(BOOL)yesOrNo;
// 创建一个定时器,但是没有添加到运行循环,我们需要在创建定时器后手动的调用 NSRunLoop 对象的 addTimer:forMode: 方法
+ (NSTimer *)timerWithTimeInterval:(NSTimeInterval)ti target:(id)aTarget selector:(SEL)aSelector userInfo:(nullable id)userInfo repeats:(BOOL)yesOrNo;
//  创建一个定时器,并将定时器的添加到当前的runloop中
+ (NSTimer *)scheduledTimerWithTimeInterval:(NSTimeInterval)ti target:(id)aTarget selector:(SEL)aSelector userInfo:(nullable id)userInfo repeats:(BOOL)yesOrNo;
// iOS 10 新添加的方法,timer的创建方式,可以解决与target的循环引用问题,我们需要在创建定时器后手动的调用 NSRunLoop 对象的 addTimer:forMode: 方法
+ (NSTimer *)timerWithTimeInterval:(NSTimeInterval)interval repeats:(BOOL)repeats block:(void (^)(NSTimer *timer))block API_AVAILABLE(macosx(10.12), ios(10.0), watchos(3.0), tvos(10.0));
// iOS 10 新添加的方法,timer的创建方式,可以解决与target的循环引用问题,自动添加到当前的runloop中
+ (NSTimer *)scheduledTimerWithTimeInterval:(NSTimeInterval)interval repeats:(BOOL)repeats block:(void (^)(NSTimer *timer))block API_AVAILABLE(macosx(10.12), ios(10.0), watchos(3.0), tvos(10.0));
// iOS 10 新添加的方法,timer的创建方式,可以设置第一次的启动时间
- (instancetype)initWithFireDate:(NSDate *)date interval:(NSTimeInterval)interval repeats:(BOOL)repeats block:(void (^)(NSTimer *timer))block API_AVAILABLE(macosx(10.12), ios(10.0), watchos(3.0), tvos(10.0));
// iOS 10 新添加的方法,timer的创建方式,可以设置第一次的启动时间
- (instancetype)initWithFireDate:(NSDate *)date interval:(NSTimeInterval)ti target:(id)t selector:(SEL)s userInfo:(nullable id)ui repeats:(BOOL)rep NS_DESIGNATED_INITIALIZER;
// 启动 Timer 触发Target的方法调用但是并不会改变Timer的时间设置。 即 time没有到达到,Timer会立即启动调用方法且没有改变时间设置,当时间 time 到了的时候,Timer还是会调用方法。
- (void)fire;
/*
这是设置定时器的启动时间,常用来管理定时器的启动与停止
     启动定时器
       timer.fireDate = [NSDate distantPast];
     停止定时器
       timer.fireDate = [NSDate distantFuture];
     开启
       [time setFireDate:[NSDate  distanPast]]
     NSTimer   关闭
       [time  setFireDate:[NSDate  distantFunture]]
    继续。
*/
@property (copy) NSDate *fireDate;
// 这个是一个只读属性,获取定时器调用间隔时间
@property (readonly) NSTimeInterval timeInterval;
// 这是7.0之后新增的一个属性,因为NSTimer并不完全精准,通过这个值设置误差范围
@property NSTimeInterval tolerance API_AVAILABLE(macos(10.9), ios(7.0), watchos(2.0), tvos(9.0));
// 唯一的方法将定时器从循环池中移除,关于这个方法API给的解释是:这个方法调用后runloop会移除对timer的强引用,同事也会移除对target,userinfo的强引用
- (void)invalidate;
// 定时器是否有效
@property (readonly, getter=isValid) BOOL valid;
// 定时器的附件数据信息
@property (nullable, readonly, retain) id userInfo;

@end
基本的注释都已经说明了。下面来说一说NSTimer的循环引用问题。
2、NSTimer的循环引用问题
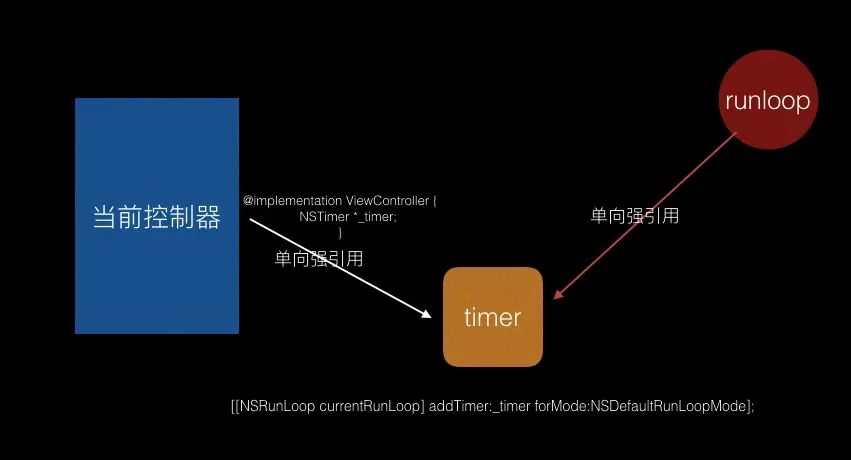
1、循环引用产生的原因
我们通过上面的方法的注释可以看到,我们创建NSTimer对象之后必须要将其加入到runloop中,API设计的时候就设定runloop会强引用timer以及timer的target以及userInfo资源对象。API解释是我们应当在合适的地方使用 invalidate()的方法。这样就会使runloop移除对timer,target,userInfo的强引用。
2、循环引用解决的办法
解决循环引用的办法有三种:
1、使用Block使NSTimer类对象成为target,这样避免了timer对象与controller的循环引用问题。但是这样做就没有问题了吗?当然不是,这样做依然会存在问题。但是最起码解决timer对象与controller的循环引用问题。产生的问题是,timer会一直执行下去。YYKit中NSTimer的Category同样存在这样的问题。 那就没有完美的方式解决吗?有的,就是在target的dealloc()方法(此时没有了循环引用,dealloc()会在target对象销毁的时候执行)里面使用invalidate(),解除runloop中的强引用。
@implementation NSTimer (BlockTimer)

+ (void)execBlock:(NSTimer *)timer {
    if ([timer userInfo]) {
        void (^block)(NSTimer *timer) = (void (^)(NSTimer *timer))[timer userInfo];
        block(timer);
    }
}
// 创建一个Timer对象,并将target指给自己的元类,同时将Timer通过userInfo来保存,此方法与YYKit的Category如出一辙。
+ (NSTimer *)scheduledTimerWithTimeInterval:(NSTimeInterval)seconds block:(void (^)(NSTimer *timer))block repeats:(BOOL)repeats {
    return [NSTimer scheduledTimerWithTimeInterval:seconds target:self selector:@selector(execBlock:) userInfo:[block copy] repeats:repeats];
}

@end
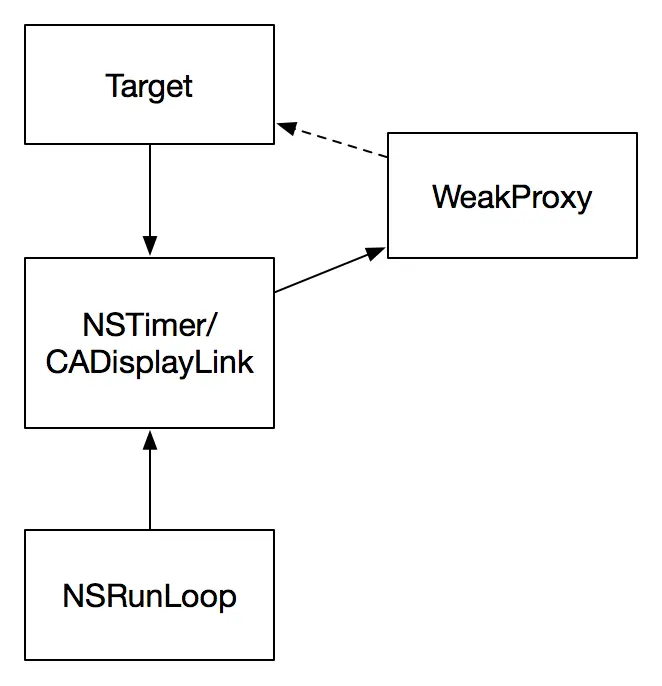
2、使用NSProxy抽象类解决循环引用
关于NSProxy这个抽象类的详细解释会在另一篇文章中详细讲解。首先大致了解一下NSProxy类的作用。NSProxy实现了包括NSObject协议在内基类所需的基础方法,但是作为一个虚拟的基类并没有提供初始化的方法。它接收到任何自己没有定义的方法他都会产生一个异常,所以一个实际的子类必须提供一个初始化方法或者创建方法,并且重载forwardInvocation:方法和methodSignatureForSelector:方法来处理自己没有实现的消息。一个子类的forwardInvocation:实现应该采取所有措施来处理invocation,比如转发网络消息,或者加载一个真实的对象,并把invocation转发给他。methodSignatureForSelector:需要为给定消息提供参数类型信息,子类的实现应该有能力决定他应该转发消息的参数类型,并构造相对应的NSMethodSignature对象。详细信息可以查看NSDistantObject, NSInvocation, and NSMethodSignature的类型说明。了解了NSProxy的作用,那么来了解一下他是如何解决循环引用的。
@interface WeakProxy : NSProxy
@property (nullable, nonatomic, weak, readonly) id target;
- (instancetype _Nonnull )initWithTarget:(id _Nonnull )target;
@end
@implementation WeakProxy
- (instancetype)initWithTarget:(id)target {
    _target = target;
    return self;
}
- (NSMethodSignature *)methodSignatureForSelector:(SEL)sel {
    return [NSObject instanceMethodSignatureForSelector:@selector(init)];
}
- (void)forwardInvocation:(NSInvocation *)invocation {
    void *null = NULL;
    [invocation invokeWithTarget:_target];
    [invocation setReturnValue:&null];
}
@end
3、第三种方式就是使用GCD的定时器。使用GCD定时器的好处是会比NSTimer更精确,NSTimer是会有误差的。另一个好处是我们可以通过弱引用解决循环引用的问题。
   self.t_timer = dispatch_source_create(DISPATCH_SOURCE_TYPE_TIMER, 0, 0,dispatch_get_main_queue());
    dispatch_source_set_timer(self.t_timer, DISPATCH_TIME_NOW, 1.0 * NSEC_PER_SEC, 1.0 * NSEC_PER_SEC);
    dispatch_source_set_event_handler(self.t_timer, ^{
        NSLog(@"嗒。。嗒。。嗒。。 timer也在在执行");
    });
    dispatch_resume(self.t_timer);
当然这里只是一个例子,如果需要更好更完美的Demo可以去了解YYTimer。下面我们简单了解一下YYTimer的实现。
- (instancetype)initWithFireTime:(NSTimeInterval)start
                        interval:(NSTimeInterval)interval
                          target:(id)target
                        selector:(SEL)selector
                         repeats:(BOOL)repeats {
    self = [super init];
    _repeats = repeats;
    _timeInterval = interval;
    _valid = YES;
    _target = target;
    _selector = selector;

    __weak typeof(self) _self = self;
    _lock = dispatch_semaphore_create(1);
    // 将定时器设置在主线程
    _source = dispatch_source_create(DISPATCH_SOURCE_TYPE_TIMER, 0, 0, dispatch_get_main_queue());
    // 设置定时器每一秒执行一次
    dispatch_source_set_timer(_source, dispatch_time(DISPATCH_TIME_NOW, (start * NSEC_PER_SEC)), (interval * NSEC_PER_SEC), 0);
    // 设置定时器执行的动作
    dispatch_source_set_event_handler(_source, ^{[_self fire];});
    // 执行定时器
    dispatch_resume(_source);
    return self;
}
我们看到YYTimer是通过__weak typeof(self) _self = self;防止self与block的循环引用。
@implementation YYTimer {
    BOOL _valid;
    NSTimeInterval _timeInterval;
    BOOL _repeats;
    __weak id _target;
    SEL _selector;
    dispatch_source_t _source;
    dispatch_semaphore_t _lock;
}
定义变量的时候将target定义为weak变量,防止GCD的timer与target的循环引用。同时YYTimer使用了dispatch_semaphore,确保YYTimer是线程安全的。这样一个可靠、安全、准确的Timer就完成了。


 2759
2759

 被折叠的 条评论
为什么被折叠?
被折叠的 条评论
为什么被折叠?
 到【灌水乐园】发言


