


性能的提升
打包大小减少41%
初次渲染快55%,更新渲染快133%
内存减少54%
源码的升级
使用Proxy代替defineProperty实现响应式
重写虚拟DOM的实现和Tree-Shaking
创建vue3工程
1)基于vue-cli创建 webpack
npm install -g @vue/cli
vue create vue_test
2)基于vite创建
vite优势:
- 轻量快速的热重载(HMR),能实现极速的服务启动
- 对TypeScript、jsx、css等支持开箱即用
- 真正的按需编译,不在等待整个应用编译完成
npm create vue@latest
编写App组件
<template>
</template>
<script lang="ts"  setup name=“Person2”>
</script>
<style
</style>
//name起作用,需配置以下参数:
安装插件:vite-plugin-vue-setup-extend

//vite.config.ts配置
import VueSetupExtend from 'vue-plugin-vue-setup-extend'
export default defineConfig({
	plugins:[
		VueSetupExtend()
	]
})
Options API的弊端
Options类型的API,数据、方法、计算属性等,是分散再:data、methods、computed中的,若想新增或者修改一个需求,就需要分别修改:data、methods、computed,不便于维护和复用。
Composition API的优势
可以用函数的方式,更加优雅的组织代码,让相关功能的代码更加有序的组织在一起。
setup
setup中this是undefined
setup执行在beforecreate前面,
setup可以与data和methods共存;
setup比data执行早,data可以调用setup中数据
响应式数据
ref:可以定义:基本类型、对象类型的响应式数据
import {ref} from ‘vue’
<script lang="ts" setup name="Person">
	let name=ref('张三')
	console.log(name.value)
	//添加对象类型
	let games=ref([
		{id:'adsdfff01',name:'aa'},
		{id:'adsdfff02',name:'bb'},
		{id:'adsdfff03',name:'cc'}
	])
	function changeFirstGame(){
		games.value[0].name='dd'
	}
</script>
<template>
  <h2>姓名:{name}</h2>
  <ul>
		<li v-for="t in games" :key=t.id>{{t.name}}</li>
	</ul>
	<button @click="changeFirstGame">修改第一个名称</button>
</template>
reactive :只能定义对象类型数据的响应式数据
<template>
	<h2>一辆{{car.brand}},价值{{car.price}}</h2>
	<button @click="changePrice">修改汽车的价格</button>
	<ul>
		<li v-for="t in games" :key=t.id>{{t.name}}</li>
	</ul>
	<button @click="changeFirstGame">修改第一个名称</button>
	<h2>测试:{{obj.a.b.c}}</h2>
	<button @click="changeObj">测试</button>
</template>
<script lang="ts" setup name="person">
import {reactive} from 'vue'
let car=reactive({brand:'奔驰',price:100})
let games=reactive([
	{id:'adsdfff01',name:'aa'},
	{id:'adsdfff02',name:'bb'},
	{id:'adsdfff03',name:'cc'}
])
let obj=reactive({
	a:{
		b:{
			c:666
		}
	}
})
function changePrice(){
	car.price+=10
}
function changeFirstGame(){
	games[0].name='dd'
}
function changeObj(){
	obj.a.b.c=999
}
</script>
ref对比reactive
宏观角度看
ref用来定义:基本类型数据、对象类型数据
reactive 用来定义:对象类型数据
区别:
ref创建的变量必须使用.value
reactive重新分配一个新对象,会失去响应式(可以使用Object.assign去整体替换)
let car =rective({brand:'奔驰',price:100})
function changeCar(){
	Object.assign(car,{brand:'奥拓',price:1})
	car={brand:'奥拓',price:1}  //不可以直接修改
}
使用原则:
1.若需要一个基本类型的响应式数据,必须使用ref
2.若需要一个响应式对象,层级不深,ref、reactive都可以
3.若需要一个响应式对象,且层级较深,推荐使用reactive
toRefs与toRef
作用:将一个响应式对象中的每一个属性,转换为ref对象。
备注:toRefs与toRef功能一致,但toRefs可以批量转换
import {reactive,toRefs,toRef} from 'vue'
let person=reactive({
	name:'张三',
	age:18
})
let {name,age}=toRefs(person)
let nl=toRef(person,'age')
console.log(n1.value)

function changeAge(){
	age.value+=1
	console.log(age.value,person.age)//打印出的值相等,person中age也改变了
}
computed计算属性
计算属性有缓存
<script lang="ts" setup name="Person">
	import {ref,computed} from 'vue'
	let firstName=ref('zhang')
	let lastName=ref('san')
	//这么定义的fullName是一个计算属性,且是只读的
	let fullName=computed(()=>{
		return firstName.value.slice(0,1).toUpperCase()+firstName.value.clice(1)+'-'+lastName.value
	})
	//这么定义的fullName是一个计算属性,可读可写
	let fullName=computed({
			get(){
				return firstName.value.slice(0,1).toUpperCase()+firstName.value.clice(1)+'-'+lastName.value
			},
			set(val){
					const [str1,str2]=val.split('-')
					firstName.value=str1
					lastName.value=str2
			}
	})
</script>
watch监视
作用:监视数据的变化
特点:vue3中watch只能监视以下四种数据:
1.ref定义的数据
2.reactive定义的数据
3.函数返回一个值
4.一个包含上述内容的数组
情况一:监视ref定义的基本类型
<script lang="ts" setup name="Person">
   import {ref ,watch} from 'vue'
   let sum=ref(0)
   function changeSum(){
		sum.value+=1
	}
	const stopWatch=watch(sum,(newValue,oldValue)=>{
		console.log('sum变化了',newValue,oldValue)
		if(newValue>=10){
			stopWatch()
		}
	})
</script>
情况二:监视ref定义对象类型
监视ref定义对象类型数据:直接写数据名,监视的是对象的【地址值】,若想监视对象内部的数据,要手动开启深度监视
注意:
若修改的是ref定义的对象中的属性,newValue和oldValue都是新值,因为他们是同一个对象。
若修改整个ref定义的对象,newValue是新值,oldValue是旧值,因为不是同一个对象了。
<script lang="ts" setup name="Person">
	import {ref,watch} from 'vue'
	let person=ref({
		name:'张三',
		age:1
	})
	function changeName(){
		person.value.name+='~'
	}
	function changeAge(){
		person.value.age+=1
	}
	function changePerson(){
		person.value={name:'李四',age:90}
	}
	//监视:情况一:监视【ref】定义的【对象类型】数据,监视的是对象的地址值,若想监视对象内部属性的变化,需要手动开启深度监视
	//watch的第一个参数是:被监视的数据
	//watch的第二个参数是:监视的回调
	//watch的第三个参数是:配置对象(deep、immediate)
	watch(person,(newValue,oldValue)=>{
		console.log('person变化了',newValue,oldValue)
	},{deep:true,immediate:true})
</script>
情况三、监视reactive定义的对象类型
监视reactive定义的对象类型数据,且默认开启了深度监视
<script lang="ts" setup name="Person">
	import {reactive,watch} from 'vue'
	let person=reactive({
		name:'张三',
		age:1
	})
	function changeName(){
		person..name+='~'
	}
	function changeAge(){
		person.age+=1
	}
	function changePerson(){
		Object.assign(person,{name:'李四',age:90})
	}
	watch(person,(newValue,oldValue)=>{
		console.log('person变化了',newValue,oldValue)
	})
</script>
情况四:监视ref或reactive定义的【对象类型】数据中的某个属性,注意点如下:
1)若该属性值不是【对象类型】,需要写成函数形式
2)若该属性值是依然是【对象类型】,可直接编,也可写成函数,不过建议写成函数。
结论:监视的要是对象里的属性,那么最好写函数式,注意点:若是对象监视的是地址值,需要关注对象内部,需要手动开启深度监视
import {reactive,watch} from 'vue'
let person=reactive({
	name:'张三',
	age:18,
	car:{
		c1:'奔驰',
		c2:'宝马’
	}
})
function changeName(){
	person.name+'~'
}
function changeAge(){
	person.age+=1
}
function changeC1(){
	person.car.c1='奥迪'
}
function changeC2(){
	person.car.c2='大众'
}
function changeCar(){
	person.car={'c1:'雅迪',c2:'艾玛'}
}
//监视响应式对象中的某个属性,且该属性是基本类型,要写成函数式
watch(()=>{return person.name},(newValue,oldValue)=>{
	console.log('person.nam变化了',newValue,oldValue)
})
//监视响应式对象中的某个属性,且该属性是对象类型的,可以直接写,也能写函数,更推荐写函数
//某个car监听到,整个car监听不到
watch(person.car,(newValue,oldValue)=>{
	console.log('person.nam变化了',newValue,oldValue)
})
//某个car监听不到,整个car能监听到
watch(()=>person.car,(newValue,oldValue)=>{
	console.log('person.nam变化了',newValue,oldValue)
})
//所有car和某个car都能监听到
watch(()=>person.car,(newValue,oldValue)=>{
	console.log('person.nam变化了',newValue,oldValue)
},{deep:true})
情况五:监视上述的多个数据
监视人的名字和多台车
watch([()=>person.name,()=>person.car.c1],(newVal,oldVal)=>{
},{deep:true})
watchEffect
官网:立即运行一个函数,同时响应式地追踪其依赖,并在依赖更改时重新执行
watch对比watchEffect
1)都能监听响应式数据的变化,不同的是监听数据变化的方式不同
2)watch:要明确指出监视的数据
3)watchEffect:不用明确指出监视的数据(函数中用到哪些属性,那就监视哪些属性)
import {ref,watch,watchEffect} from 'vue'
let temp=ref(10)
let height=ref(0)
function changeTemp(){
	temp.value+=10
}
function changeHeight(){
	height.value+=10
}
watch([temp,height],(value)=>{
	let [newTemp newHeight]=value
	if(newTemp>=60||newHeight>=80){
		console.log(''给服务器发请求)
	}
})
//watchEffect上来就执行,类似于watch+immediate,不需要明确监听的对象,watch必须有几个监听几个,需要明确监听对象
watchEffect(()=>{
	if(temp.value>=60||height.value>=80){
		console.log(''给服务器发请求)
	}
})
标签的ref属性
作用:用于注册模板引用
用在普通DOM标签上,获取的是DOM节点。
用在组件标签上,获取的是组件实例对象
父组件
<Person ref="ren" />
父组件ren要调用子组件中的a、b、c,需要在子组件中definExpose,然后导出defineExpose({a,b,c})
子组件 Person.vue
<template>
	<h2 ref="title">北京</h2>
</template>
<script lang="ts" setup name="Person">
	import {ref,defineExpose} from 'vue'
	//创建一个title,用于存储ref标记的内容
	let title=ref()
	let a=ref(0)
	let b=ref(1)
	let c=ref(2)
	defineExpose({a:a.value,b,c})
</script>
ts使用
types/index.ts
export interface PersonInter{
	name:string
}
person.vue
<script lang="ts" setup name="Person">
  import {type PersonInter} from '@/types'  //前面要添加type,否则提示错误

</script>
props
types/index.ts
export interface PersonInter{
	id:stirng,
	name:string,
	age:number
}
export type Person =PersonInt[]
//父组件
<template>
	<Person a="haha" :list="personList"/>
</template>
<script lang="ts" setup name="App">
	import Person from './componsents/Person.vue'
	import {reactive} from 'vue'
	import {type Person} from '@/types'
	let personList=reactive<Person>([
		{id:'01',name:'张三',age:18},
		{id:'02',name:'李四',age:20},
		{id:'03',name:'王五',age:22}
	])
</script>

//Person.vue
<template>
</template>
<script lang="ts" setup name="person">
import  {defineProps,withDefaults} from 'vue'
import {type Person} from '@/types'
//只接收接收a
defineProps(['a','list'])

//接收list+限制类型
defineProps<{list:Person}>()

//接收list+限制类型+限制必要性+指定默认值
withDefaults(defineProps<{list?:Person}>(),{
	list:()=>[{id:'11',name:'xiaoming',age:33}]
})
//接收a,同时将props保存起来
let x=defineProps(['a'])
</scropt>
生命周期
组件的生命周期:创建、挂载、更新、销毁
vue2
创建(创建前(beforeCreate)、创建完毕(created))
挂载(挂载前beforeMount,挂载完毕mounted)
更新(更新前beforeUpdate,更新完毕updated)
销毁(销毁前beforeDestroy,销毁完毕 destroyed)
vue3
子类先挂载完毕,然后父再挂载完毕
常用的钩子:onMounted 、onUpdated、onBeforeUnmount
<script lang="ts" setup name="person">
	import {ref,onBeforeMount,onMounted,onBeforeUpdate,onUpdated,onBeforeUnmount,onUnmounted} from 'vue'
	let sum=ref(0)
	function add(){
		sum.value+=1
	}
	//创建
	console.log('创建')
	//挂载前
	onBeforeMount(()=>{
		console.log('挂载前')
	})
	//挂载完毕
	onMounted(()=>{
		console.log('挂载完毕')
	})
	//更新前
	onBeforeUpdate(()=>{
		console.log('更新前')
	})
	//更新完毕
	onUpdated(()=>{
		console.log('更新完毕')
	})
	//卸载前
	onBeforeUnmount(()=>{
		console.log('卸载前')
	})
	//卸载完毕
	onUnmounted(()=>{
		console.log('卸载完毕')
	})
</script>
自定义Hooks
useDog.ts
import {reactive,onMounted} from 'vue'
import axios from 'axios'

export default function(){
		//数据
		let dogList=reactive(['/breed/1.jpg'])
		//方法
		async function getDog(){
			try{
					let result=await axios.get('')
					dogList.push(result.data.message)
			}catch(error){
				alert(error)
			}
		}
		//钩子
		onMounted(()=>{
			getDog()
		})
		//向外部提供东西
		return{dogList,getDog}
}
//使用
import useDag from '@/hooks/useDog'
const {dogList,getDog} = useDog()
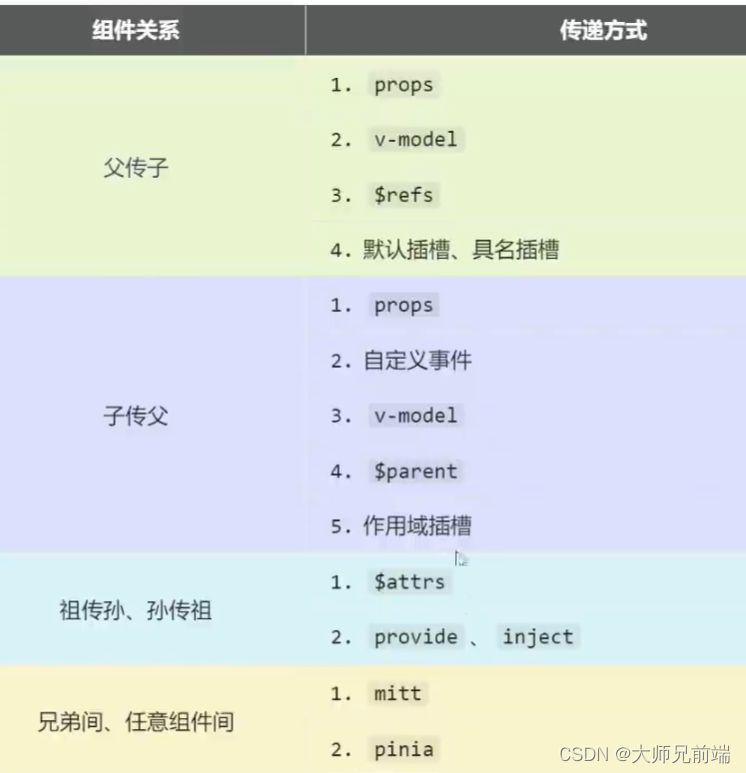
组件通信
1.props
概述:props是使用频率最高的一种通信方式,常用与:父 -->子
若父传子:属性值是非函数
若子传父:属性值是函数
父组件Father.vue
<template>
	<h4 v-show="toy">子给的玩具:{{toy}}</h4>
	<Child :car="car" :sendToy="getToy" />
</template>
<script setup lang="ts" name="Father">
	import Child from './Child.vue'
	import {ref} form 'vue'
	//数据
	let car=ref('奔驰')
	let toy=ref('')
	//方法
	function getToy(value:string){
		toy.value=value
	}
</script>
子组件Child.vue
<template>
<h4>父给的车:{{car}}</h4>
<button @click="sendToy(toy)">把玩具给父类</button>
</template>
<script setup lang="ts" name="Child">
import {ref} from 'vue'
//数据
let toy=ref('奥特曼')
//声明接收props
defineProps(['car','sendToy'])
</script>
2.自定义事件
推荐你始终使用kebab-case的事件名
//父组件
<template>
  <Child @send-toy="saveToy" />
</template>
<script setup lang="ts" name="Father">
  import Child from './Child.vue'
  function saveToy(value:string){
	console.log('saveToy',value)
  }
</script>
//子组件
<template>
	<button @click="emit('send-toy',toy)">测试</button>
</template>
<script setup lang="ts" name="Child">
	import {ref} from "vue"
	let toy=ref('奥特曼')
	//声明事件
	const emit=defineEmits(['send-toy'])
</script>
3.mitt
安装 npm i mitt
utils/emitter.ts
//引入mitt
import mitt from 'mitt'

export default mitt()
或者
//调用mitt得到emitter,emitter能绑事件、触发事件
const emitter=mitt()
//绑定事件
emitter.on('test1',()=>{
	console.log('test1被调用了')
})
emitter.on('test2',()=>{
	console.log('test2被调用了')
})
//触发事件
setTimeout(()=>{
	emitter.emit('test1')
	emitter.emit('test2')
},2000)
//解绑事件
setTimeout(()=>{
	emitter.off('test1')
	emitter.off('test2')
	//等价写法:
	emitter.all.clear()
},3000)
export default emitter
main.ts引入
import emitter from ‘@/utils/emitter’
同级传参实例
child1.vue
<template>
	<button @click="emitter.emit('send-toy',toy)"
</template>
<script setup lang="ts" name="child1">
import {ref} from 'vue'
  import emitter from '@/utils/emitter'
  let toy=ref('奥特曼')
</script>
child2.vue
<template>

</template>
<script setup lang="ts" name="child2">
  import {ref,onUnmounted} from 'vue'
  import emitter from '@/utils/emitter'
  //给emitter绑定send-toy事件
  emitter.on('send-toy',(value)=>{
	console.log(value)
  })
  //在组件卸载时解绑send-toy事件
  onUnmounted(()=>{
	emitter.off('send-toy')
  })
</script>
4、v-model
<template>
  <!--v-model用在html标签上 -->
  <!-- <input type="text" v-model="username" -->
  <input type="text" :value="username" @input="username=(<HTMLInputElement>$event.target).value"
  <!--v-model用在组件标签上 -->
  <!-- <AtguiguInput  v-model="username" /> -->
  <AtguiguInput :modelValue="username" @update:modelValue="username=$event"
  //修改modelValue
  <modelValuev-model:qwe="username" />
</template>
<script setup lang="ts" name="Father">
  import {ref} from 'vue'
  import  AtguiguInput   from './AtguiguInput  .vue'
  let username =ref('zhangsan')
</script>

//AtguiguInput.vue
子组件中modelValue:接收可以统一修改为qwe
<template>
  <input type="text" :value="modelValue"
   @input="emit('update:modelValue',(<HTMLInputElement>$event.target).value)" />
</template>
<script setup lang="ts" name="AtguiguInput ">
  defineProps(['modelValue'])
  let emit=defineEmits(['update:modelValue'])
</script>
也可以更换value,例如改为abc
也可以更换value,例如改成abc
<AtguiguInput v-model:abc="userName" />
上面代码的本质如下
<AtguiguInput :abc="userName" @update:abc="userName=$event" />
如果value可以更换,那么就可以在组件标签上多次使用v-odel
<AtguiguInput v-model:abc="userName" v-model:xyz="password" />
5.$attrs
概述:$attrs用于实现当前组件的父组件,向当前组件的子组件通信(祖–>孙)
具体说明:$attrs是一个对象,包含所有父组件传入的标签属性
Father.vue
<template>
	<Child :a="a" :b="b" :c="c" :d="d" v-bind="{x:100,y:100} "  :updateA="updateA"/>
</template>
<script setup lang="ts" name="Father">
import {ref} from 'vue'
  let a=ref(1)
  let b=ref(2)
   let c=ref(3)
   let d=ref(4)
  function updateA(value:number){
	a.value+=value
  }
</script>

Child.vue
<template>
  <GrandChild v-bind="$attrs" />
</template>
<script setup lang="ts" name="Father"></script>

GradChild.vue
<template>
 <button @click="updateA(6)">点我将爷爷那的a更新</buttoon>
</template>
<script setup lang="ts" name="Father">
   defineProps(['a','b','c','d','x','y','updateA'])
</script>
- 【$refs 、 $parent】
$refs用于:父 – 子
$parent用于:子 – 父
$refs:值为对象,包含所有被ref属性标识的DOM元素或组件实例
$parent:值为对象,当前组件的父组件实例对象
Father.vue 父组件
<template>
<h4>房产:{{house}}</h4>
<button @click="changeToy">修改child1的玩具</button>
<button @click="getAllChild($refs)">获取所有子组件实例对象</button>
<Child1 ref="c1" />
<Child2 ref="c2" />
<Child2 />
</template>
<script setup lang="ts" name="Father">
  import Child1 from './Child1.vue'
  import Child2 from './Child2.vue'
  import {ref} from "vue"
  let c1=ref()
  let house=ref(4)
  function changeToy(){
	c1.value.toy='小猪佩奇'
  }
  function getAllChild(refs:{[key:string]:any}){
	for(let key in refs){
		refs[key].book+=3
   }
  }
  defineExpose({house})
</script>
//子组件child1.vue
<template>
<button @click="minusHouse($parent)">操控父级房产</button>
</template>
<script setup lang="ts" name="Child1">
let toy='奥特曼'
let book =ref(6)
defineExpose({toy,book})
function minusHouse(parent:any){
  parent.house -=3
}
</script>
7.【provide、inject】
概述:实现祖孙组件直接通信
具体使用:
在祖先组件中通过provide配置向后代组件提供数据
在后代组件中通过inject配置来声明接收数据
//Father.vue
<script setup lang=“ts“ name="Father">
  import {ref,reactive,provide} from 'vue'
  let money=ref(100)
  let car=reactive({
	brand:'奔驰',
	price:100
  })
  function updateMoney(value:number){
	money.value-=value
  }
  //向后代提供数据
  provide('money',money)
  provide('moneyContext',{money,updateMoney})
  provide('che',car)
</script>

//GrandChild.vue
<template>
  <h4>银子:{{x}}</h4>
</template>
<script setup lang=“ts“ name="GrandChild">
import {inject} from 'vue'
let x=inject('money','我是默认值')
let {money,updateMoney}=inject('moneyContext',{
money:0,updateMoney:(x:number)=>{}
})
let car=inject('car',{brand:'未知',price:0})
</scipte>
8.pinia
9.slot
1)默认插槽
2)具名插槽
3)作用域插槽
<template>
  <Categroy title="热门游戏列表">
 	<ul>
 	   <li v-for="g in games" :key="g.id">{{g.name}}</li>
 	</ul>
  </Category>
  <Categroy title="今日美食城市">
   <img :src="imgUrl" alt="" />
  </Category>
  <Categroy title="今日影视推荐">
   <video :src="videoUrl" controls></video>
  </Category>
</template>
<script setup lang="ts" name="Father">
import CateGory from './Category.vue'
import {ref,reactive} from 'vue'
let games=reactive([
	{id:'01',name:'英雄联盟'},
	{id:'02',name:'王者联盟'},
	{id:'03',name:'斗罗大陆'},
])
let imgUrl=ref('htttp://xxx/01.jpg')
let videoUrl=ref('htttp://xxx/01.mp4')
</script>
//Category.vue
<template>
  <h2>{{title}}</h2>
  <slot>默认内容</slot>
</template>
<script setup lang="ts" name="Category">
  defineProps(['title'])
</script>
具名插槽
//Father.vue
  <Categroy>
	<template  v-slot:s2>
		<ul>
	 	   <li v-for="g in games" :key="g.id">{{g.name}}</li>
 	</ul>
	</template>
	// v-slot:s1等价于#s1
	<template  #s1>
		<h2>热门游戏列表</h2>
	</template>
 </Categroy >
//Category.vue
<slot name='s1'>默认内容</slot>
<slot name='s2'>默认内容</slot>
作用域插槽
//Father.vue
<template>
  <Game>
   <!--<template v-slot="{youxi}"> -->可以使用解构方式
    <!--<template v-slot:qwe="{youxi}"> -->访问作用域的名字为qwe
   <template v-slot="params">
		<ul>
			<li v-for="g in params.youxi" :key="g.id" >{{g.name}}</li>
		</ul>
   </template>
  </Game>
</template>
//games.vue
<template>
 <slot :youxi="games" x="哈哈" ></slot>
</template>
<script setup lang="ts" name=”Game“>
  import {reactive} from 'vue'
  let games=reactive([
	{id:'01',name:'英雄联盟'},
	{id:'02',name:'王者联盟'},
	{id:'03',name:'斗罗大陆'},
  ])
</script>
shallowRef 与shallowReactive
shallowRef
作用:创建一个响应式数据,但只对顶层属性进行响应式处理
用法:
let myVar=shallowRef(initalValue)
特点:只跟踪引用值的变化,不关心值内部的属性变化
let sum=shallowRef(0)
let person=shallowRef({
  name:'张三',
  age:18
})
//定义shallowRef点击起作
function changeSum(){
	sum.vlaue+=1
}
  //定义shallowRef点击不起作
function changeName(){
	person.value.name='lisi'用
}
  //定义shallowRef点击不起作
function changeAge(){
	person.value.age+=1
}
//定义shallowRef点击起作
function changePerson(){
	person.value={name:'tony',age:100}
}
数据很大时,不关心内部,只考虑整体数据是否替换
shallowReactive
作用:创建一个浅层响应式对象,只会使对象的最顶层属性变成响应式的,对象内部的嵌套属性则不会变成响应式
用法:const myobj=shallowReactive({…})
特点:对象的顶层属性是响应式,但嵌套对象的属性不是
//只有第一层brand或整个options可修改
let  shallowReactive({
  brand:'奔驰',
  options:{
    color:'红色',
    engine:'v8'
  }
})
function changeBrand(){
  car.barnd='宝马'
}
function changeColor(){
  car.options.color='紫色'
}
function changeEngine(){
  car.options.engine='v12'
}
总结:
通过使用shallowRef()和shallowReactive()来绕开深度响应。千层式API创建的状态只在其顶层是响应式,对所有深层的对象不会做任何处理,避免了对每一个内部属性做响应式所带来的型性能成本,这使得属性的访问变得更快,可提升性能
readonly与shallowReadonly
readonly
作用:用于创建一个对象的深只读副本
特点:
对象的所有嵌套属性都将变为只读
任何尝试修改这个对象的操作都会被阻止(在开发模式下,还会再控制台中发出警告)
应用场景:
创建不可变的状态快照
保护全局状态或配置不被修改
shallowReadonly
作用:与readonly类似,但只作用于对象的顶层属性
<script setup lang="ts" name="App">
	import {ref,reactive,readonly,shallowReaonly} from  'vue'
	let car1=reactive({
		brand:'奔驰',
		options:{
			color:‘红色’,
			price:100
		}
	})
let car2=shallowReadonly(car1)
function changeSum2(){
	car2.brand='宝马'//不可修改
}
function changeColor2(){
	car2.options.color='绿色'  //可修改,shallowReadonly是浅层次只读
}
</script>
toRaw与markRaw
toRaw
作用:用于获取一个响应式对象的原始对象,toRaw返回的对象不再是响应式的,不会触发视图更新。
官方描述:这是一个可以用于临时读取而不引起代理访问/跟踪开销,或是写入而不触发更改的特殊方法。不建议保存对原始对象的持久引用,请谨慎使用。
何时使用?——在需要将响应式对象传递给非vue的库或外部系统时(如_lodash处理数据,不希望双向绑定数据,修改数据,可以添加toRaw),使用toRaw可以确保他们受到的时普通对象
import {reactive,toRaw} from ‘vue’
let person=reactive({
	name:'tony',
	age:18
})
let person2=toRaw(person)
console.log('响应式数据',person)
console.log('原始数据',person2)
markRaw
作用:标记一个对象,使其永远不会变成响应式的
例如使用mockjs时,为了防止误把mockjs变成响应式对象,可以使用markRaw去标记mockjs
let car=markRaw({brand:'奔驰',price:100})
let car2=reactive(car)
//添加markRaw后。car2输出的也是原始数据
//不添加markRaw,car2输出的时双向绑定数据
customRef
作用:创建一个自定义的ref,并对其依赖项跟踪和更新触发进行逻辑控制。
//使用vue提供的customRef定义响应式数据
let initValue='你好'
//track(耿总),trigger(触发)
let msg=customRef((track,trigger)=>{
	return{
		//get何时调用?——msg被读取时
		get(){
			track()  //告诉vue数据msg很重要,你要对msg进行持续关注
			return initValue
		},
		set(value){
			initValue=value
			trigger()//通知vue以下数据msg变化了
		}
	}
})
teleport
什么时tlelport?–Teleport是一种能够将我们的组件html结构移动到指定位置的技术。
<teleport to="body"></teleport>
Suspense
等待异步组件时渲染一些额外内容,让应用有更好的用户体验
使用步骤:
异步引入组件
使用Suspense包裹组件,并配置好default与fallback
Father.vue
<template>
  <Suspense>
		<template v-slot:default>
			<Child />
		</template>
		<template v-slot:fallback>
			<h2>加载中...</h2>
		</template>
  </Suspense>
</template>
child.vue
<script setup lang="ts">
  import axios from 'axios'
  let {data:{content}} =await axios.get('地址')
  console.log(content)
</script>


 2808
2808


 被折叠的 条评论
为什么被折叠?
被折叠的 条评论
为什么被折叠?
 到【灌水乐园】发言


