


目录
2.3.1 可以保证自定义对象原子性:AtomicReference
2.3.2 解决ABA问题:AtomicStampedReference
2.3.3 状态戳简化:AtomicMarkableReference
5.3.3 CASE1:Cell数组不为空并且可能Cell数组扩容
1、原子类是什么,有什么?
都是 java.util.concurrent.atomic 包下的
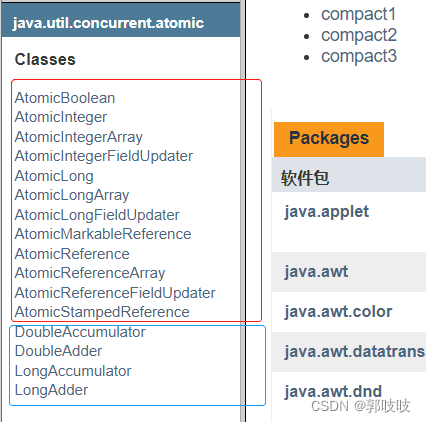
2、分类
2.1 基本数据类型
AtomicInteger
AtomicBoolean
AtomicLong
// 常用api AtomicInteger 为列
public final int get() // 获取当前值。
public final int getAndSet(int newValue) // 将原子设置为给定值并返回旧值
public final int getAndIncrement() // 原子上增加一个当前值
public final int getAndDecrement() // 原子减1当前值
public final int getAndAdd(int delta) // 将给定的值原子地添加到当前值
public boolean comapreAndSet(int expect,int update) // 如果当前值==为预期值,则将该值原子设置为给定的更新值。class MyNumber{
AtomicInteger atomicInteger = new AtomicInteger();
public void addPlusPlus(){
atomicInteger.getAndIncrement();
}
}
public class AtomicIntegerDemo {
public static final int SIZE = 50;
public static void main(String[] args) {
MyNumber myNumber = new MyNumber();
for(int i = 1;i <= SIZE;i ++){
new Thread(() -> {
for(int j = 1;j <= 1000;j ++){
myNumber.addPlusPlus();
}
},String.valueOf(i)).start();
}
System.out.println(Thread.currentThread().getName()+"\t"+"result: "+myNumber.atomicInteger);
}
}
//本来应该是50000
//1试-main result: 39000
//2试-main result: 40178
//?是不是我们的程序有问题?
//因为上面的50* 1000个计算还没结束,他就去get数值了
```*
解决
```java
//方法一(不推荐,做做Demo还行)
public class AtomicIntegerDemo {
public static final int SIZE = 50;
public static void main(String[] args) {
MyNumber myNumber = new MyNumber();
for(int i = 1;i <= SIZE;i ++){
new Thread(() -> {
for(int j = 1;j <= 1000;j ++){
myNumber.addPlusPlus();
}
},String.valueOf(i)).start();
}
try {
TimeUnit.SECONDS.sleep(2);
} catch (InterruptedException e) {
e.printStackTrace();
}
System.out.println(Thread.currentThread().getName()+"\t"+"result: "+myNumber.atomicInteger);
}
}
//方法二-减法计数器CountDownLatch
public class AtomicIntegerDemo {
public static final int SIZE = 50;
public static void main(String[] args) throws InterruptedException {
MyNumber myNumber = new MyNumber();
CountDownLatch countDownLatch = new CountDownLatch(SIZE);
for(int i = 1;i <= SIZE;i ++){
new Thread(() -> {
try {
for(int j = 1;j <= 1000;j ++){
myNumber.addPlusPlus();
}
} finally {
countDownLatch.countDown();
}
},String.valueOf(i)).start();
}
countDownLatch.await();
System.out.println(Thread.currentThread().getName()+"\t"+"result: "+myNumber.atomicInteger);
}
}
//main result: 50000
2.2 数组类型原子类
AtomicIntegerArray
AtomicLongArray
AtomicRreferenceArray
public class AtomicIntegerArrayDemo {

    public static void main(String[] args) {
        AtomicIntegerArray atomicIntegerArray = new AtomicIntegerArray(new int[5]);//0 0 0 0 0
//        AtomicIntegerArray atomicIntegerArray = new AtomicIntegerArray(5); //0 0 0 0 0
        //AtomicIntegerArray atomicIntegerArray = new AtomicIntegerArray(new int[]{1,2,3,4,5});//1 2 3 4 5
        for(int i = 0; i < atomicIntegerArray.length(); i++){
            System.out.println(atomicIntegerArray.get(i));
        }

        System.out.println();
        System.out.println();
        System.out.println();
        int tmpInt;

        // 设置0位置的数据
        tmpInt = atomicIntegerArray.getAndSet(0,1122);
        // 0    1122
        System.out.println(tmpInt+"\t"+atomicIntegerArray.get(0));

        // 设置1位置的数据
        atomicIntegerArray.getAndIncrement(1);
        atomicIntegerArray.getAndIncrement(1);
        tmpInt = atomicIntegerArray.getAndIncrement(1);
        // 2    3
        System.out.println(tmpInt+"\t"+atomicIntegerArray.get(1));
    }
}
2.3 引用原子类
2.3.1 可以保证自定义对象原子性:AtomicReference<V>
public class AtomicReferenceDemo {
    public static void main(String[] args) {
        User zs = new User("张三",18);
        User ls = new User("李四",25);

        // 将类型丢入泛型即可
        AtomicReference<User> atomicReferenceUser = new AtomicReference<>();
        // 将这个原子类设置为张三
        atomicReferenceUser.set(zs);
        // 张三换位李四
        System.out.println(atomicReferenceUser.compareAndSet(zs,ls)+"\t"+atomicReferenceUser.get().toString());
        // true    User(userName=李四, age=25)
        System.out.println(atomicReferenceUser.compareAndSet(zs,ls)+"\t"+atomicReferenceUser.get().toString());
        // false   User(userName=李四, age=25)
    }
}


@Data
@AllArgsConstructor
class User {
    String userName;
    int age;
}
2.3.2 解决ABA问题:AtomicStampedReference<V>
带版本号的应用类型原子类,可以解决ABA问题。
public class AtomicStampedReferenceDemo {

    public static void main(String[] args) {
        User zs = new User("张三",18);
        User ls = new User("李四",25);
        AtomicStampedReference<User> reference = new AtomicStampedReference<>(zs, 1);

        new Thread(() -> {
            int stamp = reference.getStamp();
            User referenceUser = reference.getReference();
            // 保证线程t2可以拿到版本号
            try {
                Thread.sleep(1000L);
            } catch (InterruptedException e) {
                e.printStackTrace();
            }
            // A
            System.out.println(Thread.currentThread().getName() + "版本号:" + stamp + " 对象" + referenceUser);
            // B
            boolean compareAndSet = reference.compareAndSet(referenceUser, ls, stamp, stamp + 1);
            System.out.println(Thread.currentThread().getName() + "将数据设置" + (compareAndSet?"成功 ":"失败 ") + reference.getReference());
            // A
            compareAndSet = reference.compareAndSet(reference.getReference(),zs,reference.getStamp(),reference.getStamp() + 1);
            System.out.println(Thread.currentThread().getName() + "将数据设置" + (compareAndSet?"成功 ":"失败 ") + reference.getReference());

        },"t1").start();

        new Thread(() -> {
            int stamp = reference.getStamp();
            User referenceUser = reference.getReference();
            // 保证线程t1发生完ABA问题
            try {
                Thread.sleep(5000L);
            } catch (InterruptedException e) {
                e.printStackTrace();
            }
            boolean compareAndSet = reference.compareAndSet(referenceUser,ls,stamp,stamp + 1);
            System.out.println(Thread.currentThread().getName() + "将数据设置" + (compareAndSet?"成功 ":"失败 ") + reference.getReference());

        },"t2").start();
    }
}
2.3.3 状态戳简化:AtomicMarkableReference<V>
类似于上面的版本号,但是是解决一次性的问题
解决是否修改过,它的定义就是将状态戳简化为true|false,类似一次性筷子
public class AtomicMarkableReferenceDemo {

    static AtomicMarkableReference<Integer> markableReference = new AtomicMarkableReference<>(100,false);

    public static void main(String[] args) {
        new Thread(()->{
            boolean marked = markableReference.isMarked();
            System.out.println(Thread.currentThread().getName()+"\t"+"默认标识"+marked);
            //暂停1秒钟线程,等待后面的T2线程和我拿到一样的模式flag标识,都是false
            try {TimeUnit.SECONDS.sleep(1);} catch (InterruptedException e) {e.printStackTrace();}
            markableReference.compareAndSet(100, 1000, marked, !marked);
        },"t1").start();

        new Thread(()->{
            boolean marked = markableReference.isMarked();
            System.out.println(Thread.currentThread().getName()+"\t"+"默认标识"+marked);
            //这里停2秒,让t1先修改,然后t2试着修改
            try {TimeUnit.SECONDS.sleep(2);} catch (InterruptedException e) {e.printStackTrace();}
            boolean t2Result = markableReference.compareAndSet(100, 1000, marked, !marked);
            System.out.println(Thread.currentThread().getName()+"\t"+"t2线程result--"+t2Result);
            System.out.println(Thread.currentThread().getName()+"\t"+markableReference.isMarked());
            System.out.println(Thread.currentThread().getName()+"\t"+markableReference.getReference());

        },"t2").start();
    }
}
//t1	默认标识false
//t2	默认标识false
//t2	t2线程result--false
//t2	true
//t2	1000
2.4 对象的属性修改原子类
AtomicIntegerFieldUpdater//原子更新对象中int类型字段的值
AtomicLongFieldUpdater//原子更新对象中Long类型字段的值
AtomicReferenceFieldUpdater//原子更新引用类型字段的值

使用要求:
1、更新的对象属性必须使用public volatile修饰符
2、因为对象的属性修改类型原子类都是抽象类,所以每次使用都必须使用静态方法newUpdater()创建一个更新器,并且需要设置想要更新的类和属性。
public class AtomicIntegerFieldUpdaterDemo {
    public static void main(String[] args) throws InterruptedException {
        BankAccount bankAccount = new BankAccount();
        CountDownLatch countDownLatch = new CountDownLatch(10);
        for(int i = 1;i <= 10;i ++){
            new Thread(()->{
                try {
                    for(int j = 1;j <= 1000;j ++){
                        // bankAccount.add();
                        bankAccount.transMoney(bankAccount);
                    }
                } finally {
                    countDownLatch.countDown();
                }
            },String.valueOf(i)).start();
        }
        countDownLatch.await();
        System.out.println(Thread.currentThread().getName()+"\t"+"result: "+bankAccount.money);
    }
}

class BankAccount{
    String bankName = "CCB";
    /**条件一 public volatile 修饰 */
    public volatile int money = 0;
    /** 条件二 更新的类和更新的字段money */
    AtomicIntegerFieldUpdater<BankAccount> fieldUpdater =
            AtomicIntegerFieldUpdater.newUpdater(BankAccount.class,"money");

    /** synchronized版本 */
    public synchronized void add(){
        money++;
    }
    public void transMoney(BankAccount bankAccount){
        fieldUpdater.getAndIncrement(bankAccount);
    }
}
修改应用类型
public class AtomicReferenceFieldUpdaterDemo {
    public static void main(String[] args) {
        MyVar myVar = new MyVar();
        for(int i = 1;i <= 5;i ++){
            new Thread(()->{
                myVar.init();
            },String.valueOf(i)).start();
        }
    }
}
class MyVar{
    public volatile Boolean isInit = Boolean.FALSE;
    AtomicReferenceFieldUpdater<MyVar,Boolean> referenceFieldUpdater =
            AtomicReferenceFieldUpdater.newUpdater(MyVar.class,Boolean.class,"isInit");
    public void init(){
        if(referenceFieldUpdater.compareAndSet(this,Boolean.FALSE,Boolean.TRUE)){
            System.out.println(Thread.currentThread().getName()+"\t"+"-----start init,needs 3 seconds");
            try {TimeUnit.SECONDS.sleep(3);} catch (InterruptedException e) {e.printStackTrace();}
            System.out.println(Thread.currentThread().getName()+"\t"+"-----over init");
        }else{
            System.out.println(Thread.currentThread().getName()+"\t"+"抱歉,已经有其他线程进行了初始化");
        }
    }
}
2.4.1 面试:哪里用到了volatile
1、在AtomicReferenceFieldUpdater中,因为是规定好的必须由volatile修饰的
2、还有的话之前我们在DCL单例中,也用了volatile保证了可见性
3、原子操作增强类
//这几个都是java8开始有的,前面的都是java5就有了
DoubleAccumulator
DoubleAdder
LongAccumulator
LongAdder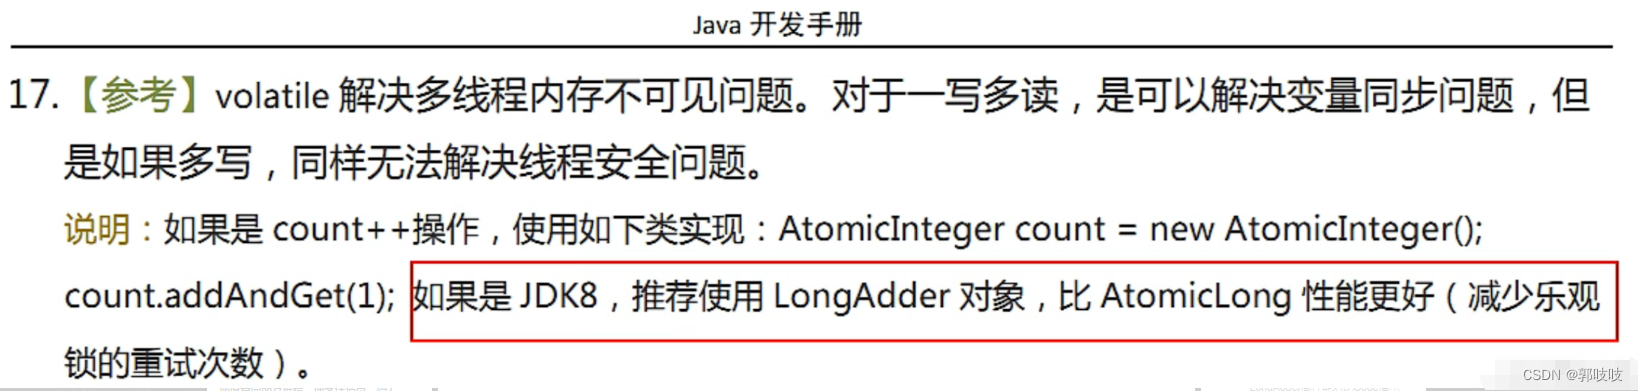
3.1 入门API
public class LongAdderAPIDemo {
    public static void main(String[] args) {
        LongAdder longAdder = new LongAdder();

        longAdder.increment();
        longAdder.increment();
        longAdder.increment();
        longAdder.add(4);
        // 7
        System.out.println(longAdder.longValue());

        //lambda表达式
        LongAccumulator longAccumulator = new LongAccumulator((x, y) -> x + y, 0);
        longAccumulator.accumulate(1);//1
        longAccumulator.accumulate(3);//4
        System.out.println(longAccumulator.get());
        // 重置
        longAccumulator.reset();
        System.out.println(longAccumulator.get());//4
    }
}
3.2 LongAdder高性能对比Code演示
class ClickNumber{
    int number = 0;
    public synchronized void add1(){
        number++;
    }

    AtomicLong atomicLong =  new AtomicLong(0);
    public void add2(){
        atomicLong.incrementAndGet();
    }

    LongAdder longAdder =new LongAdder();
    public void add3(){
        longAdder.increment();
    }

    LongAccumulator longAccumulator = new  LongAccumulator((x, y) -> x + y,0);
    public void add4(){
        longAccumulator.accumulate(1);
    }
}
public class AccumulatorCompareDemo {
    public static final int _1W = 1000000;
    public static final int threadNumber = 50;
    public static void main(String[] args) throws InterruptedException {

        ClickNumber clickNumber = new ClickNumber();
        Long startTime;
        Long endTime;
        CountDownLatch countDownLatch1 = new CountDownLatch(50);
        CountDownLatch countDownLatch2 = new CountDownLatch(50);
        CountDownLatch countDownLatch3 = new CountDownLatch(50);
        CountDownLatch countDownLatch4 = new CountDownLatch(50);

        startTime = System.currentTimeMillis();
        for(int i = 1;i <= threadNumber;i ++){
            new Thread(()->{
                try {
                    for(int j = 1;j <=_1W;j ++){
                        clickNumber.add1();
                    }
                } finally {
                    countDownLatch1.countDown();
                }
            },String.valueOf(i)).start();
        }
        countDownLatch1.await();
        endTime = System.currentTimeMillis();
        System.out.println("costTime---"+(endTime-startTime)+"毫秒"+"\t"+"synchronized---"+clickNumber.number);

        startTime = System.currentTimeMillis();
        for(int i = 1;i <= threadNumber;i ++){
            new Thread(()->{
                try {
                    for(int j = 1;j <= _1W;j ++){
                        clickNumber.add2();
                    }
                } finally {
                    countDownLatch2.countDown();
                }
            },String.valueOf(i)).start();
        }
        countDownLatch2.await();
        endTime = System.currentTimeMillis();
        System.out.println("costTime---"+(endTime-startTime)+"毫秒"+"\t"+"atomicLong---"+clickNumber.atomicLong);

        startTime = System.currentTimeMillis();
        for(int i = 1;i <= threadNumber;i ++){
            new Thread(()->{
                try {
                    for(int j = 1;j <= _1W;j ++){
                        clickNumber.add3();
                    }
                } finally {
                    countDownLatch3.countDown();
                }
            },String.valueOf(i)).start();
        }
        countDownLatch3.await();
        endTime = System.currentTimeMillis();
        System.out.println("costTime---"+(endTime-startTime)+"毫秒"+"\t"+"LongAdder---"+clickNumber.longAdder.sum());

        startTime = System.currentTimeMillis();
        for(int i = 1;i <= threadNumber;i ++){
            new Thread(()->{
                try {
                    for(int j = 1;j <= _1W;j ++){
                        clickNumber.add4();
                    }
                } finally {
                    countDownLatch4.countDown();
                }
            },String.valueOf(i)).start();
        }
        countDownLatch4.await();
        endTime = System.currentTimeMillis();
        System.out.println("costTime---"+(endTime-startTime)+"毫秒"+"\t"+"LongAccumulator---"+clickNumber.longAccumulator.longValue());
    }
}
//costTime---3284毫秒	synchronized---50000000
//costTime---1636毫秒	atomicLong---50000000
//costTime---306毫秒	LongAdder---50000000
//costTime---345毫秒	LongAccumulator---50000000

//印证了阿里卡法手册中说的 【如果是JDK8,推荐使用LongAdder对象,比AtomicLong性能更好(减少乐观锁的重试次数)】
3.3 原理思想分析
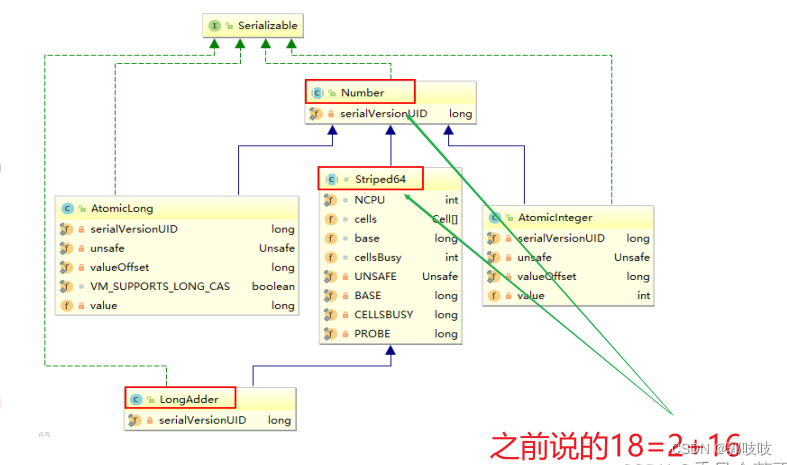
LongAdder是Striped64(重要的子类)的子类
//Number of CPUS, to place bound on table size
// CPU数量,即cells数组的最大长度
static final int NCPU = Runtime.getRuntime().availableProcessors();


//Table of cells. When non-null, size is a power of 2.
//单元格数组|cells数组,为2的幂,2,4,8,16.....,方便以后位运算
transient volatile Cell[] cells;

//基础value值,当并发较低时,只累加该值主要用于没有竞争的情况,通过CAS更新。
//Base value, used mainly when there is no contention, but also as
//a fallback during table initialization races. Updated via CAS.
transient volatile long base;

//创建或者扩容Cells数组时使用的自旋锁变量调整单元格大小(扩容),创建单元格时使用的锁。
//Spinlock (locked via CAS) used when resizing and/or creating Cells.
transient volatile int cellsBusy;
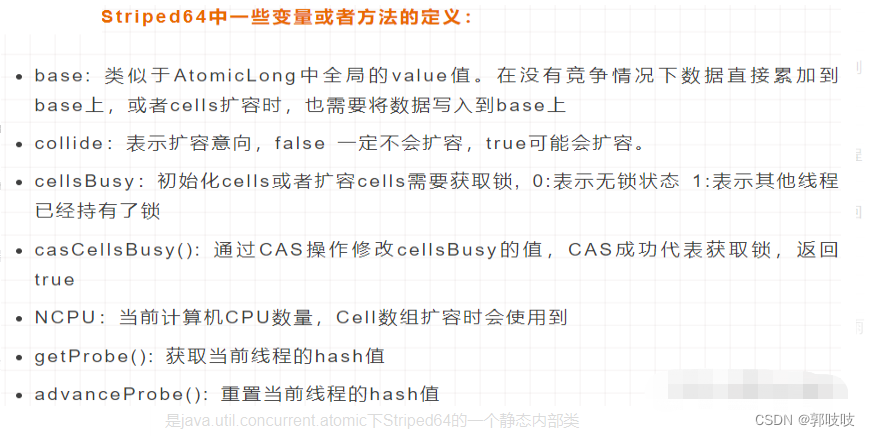
Cell 是 Striped64的一个静态内部类
@sun.misc.Contended static final class Cell {
        volatile long value;
        Cell(long x) { value = x; }
        final boolean cas(long cmp, long val) {
            return UNSAFE.compareAndSwapLong(this, valueOffset, cmp, val);
        }

        // Unsafe mechanics
        private static final sun.misc.Unsafe UNSAFE;
        private static final long valueOffset;
        static {
            try {
                UNSAFE = sun.misc.Unsafe.getUnsafe();
                Class<?> ak = Cell.class;
                valueOffset = UNSAFE.objectFieldOffset
                    (ak.getDeclaredField("value"));
            } catch (Exception e) {
                throw new Error(e);
            }
        }
    }
3.3.1 LongAdder思想(为什么快)
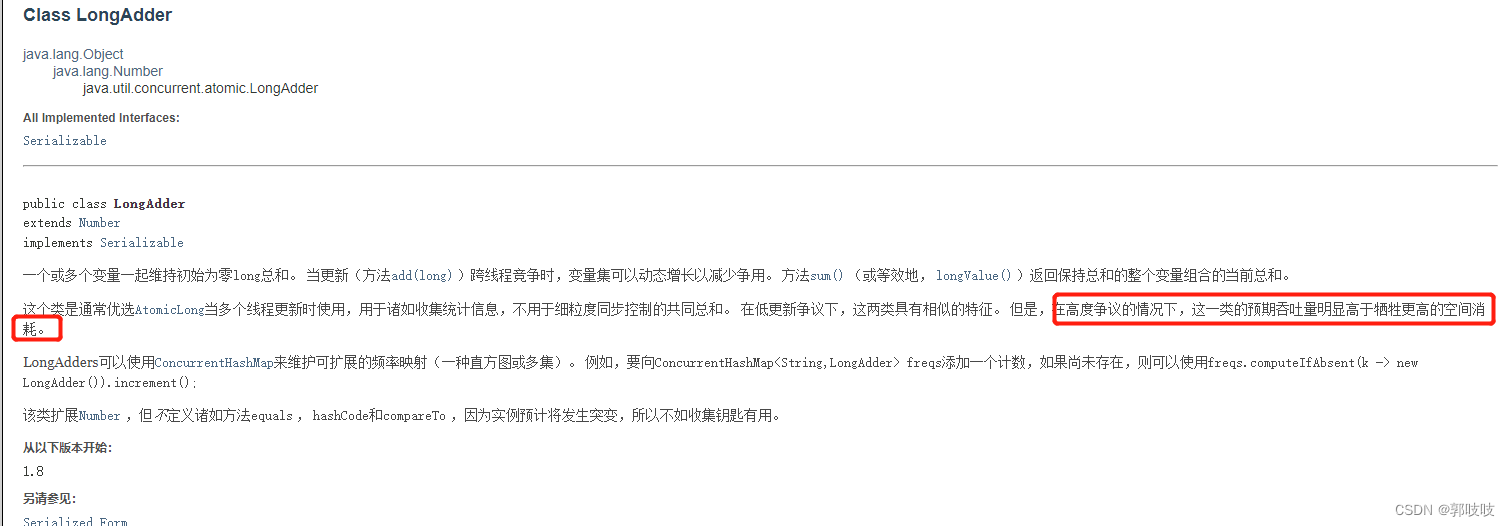
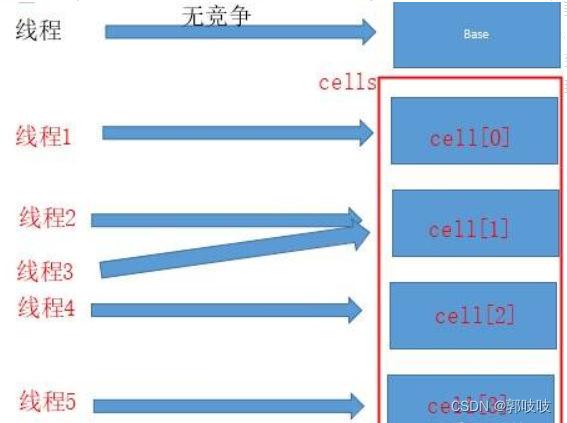
其实在小并发下情况差不多;但在高并发情况下,在 AtomicLong 中,等待的线程会不停的自旋,导致效率比较低;而LongAdder用cell[]分了几个块出来,最后统计总的结果值(base+所有的cell值),分散热点。
举个形象的例子,火车站买火车票,AtomicLong 只要一个窗口,其他人都在排队;而LongAdder 利用cell开了多个卖票窗口,所以效率高了很多。
LongAdder的基本思路就是分散热点 ,将value值分散到一个Cell数组中,不同线程会命中到数组的不同槽中,各个线程只对自己槽中的那个值进行CAS操作,这样热点就被分散了,冲突的概率就小很多。如果要获取真正的long值,只要将各个槽中的变量值累加返回。
sum()会将所有Cell数组中的value和base累加作为返回值,核心的思想就是将之前AtomicLong一个value的更新压力分散到多个value中去,从而降级更新热点 。

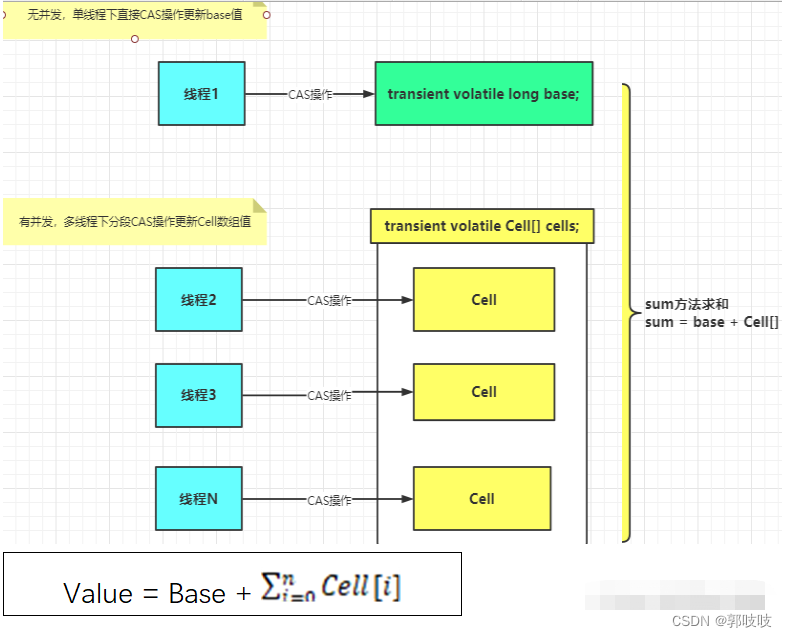
内部有一个base变量,一个Cell[]数组
base变量:非竞争条件下,直接累加到该变量上
Cell[] 数组:竞争条件下,累加各个线程自己的槽cell[i]中
3.3.2 思想小总结
LongAdder在无竞争的情况,跟AtomicLong一样,对同一个base进行操作,当出现竞争关系时则是采用化整为零的做法,从空间换时间,用一个数组 ,将一个value拆分进这个数组cells。多个线程需要同时对value进行操作时候,可以对线程id进行hash得到hash值,再根据hash值映射到这个数组cells的某个下标,再对该下标所对应的值进行自增操作。当所有线程操作完毕,将数组cells的所有值和无竞争值base都加起来作为最终结果。
源码分析(LongAdder.increment())
LongAdder longAdder = new LongAdder();
longAdder.increment();

public void increment() {
    add(1L);
}
4、add(long x)方法
public class LongAdder extends Striped64 implements Serializable {
private static final long serialVersionUID = 7249069246863182397L;
/**
* Adds the given value.
*
* @param x the value to add
*/
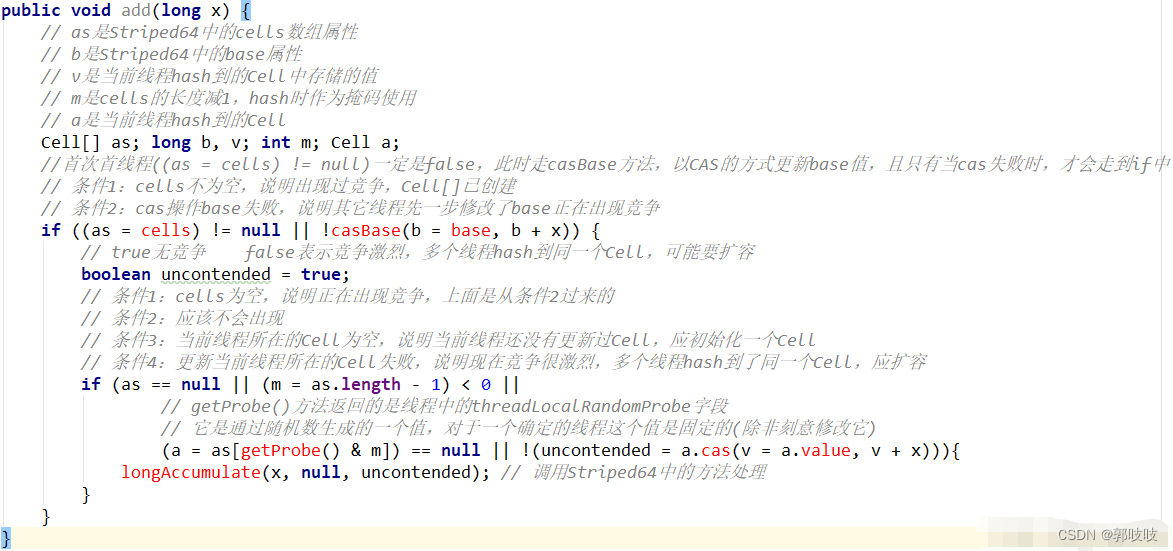
public void add(long x) {
Cell[] as; long b, v; int m; Cell a;
if ((as = cells) != null || !casBase(b = base, b + x)) {
boolean uncontended = true;
if (as == null || (m = as.length - 1) < 0 ||
(a = as[getProbe() & m]) == null ||
!(uncontended = a.cas(v = a.value, v + x)))
longAccumulate(x, null, uncontended);
}
}
4.1 看看局部变量的定义的
    // as表示cells引用
    // b表示获取的base值
    // v表示期望值
    // m表示cells数组的长度
    // a表示当前线程命中的cell单元格
    // uncontended = flase:表示有冲突 | true:有冲突
    // 真正干活的是longAccumulate
4.2 我们看看在add方法中都干了什么
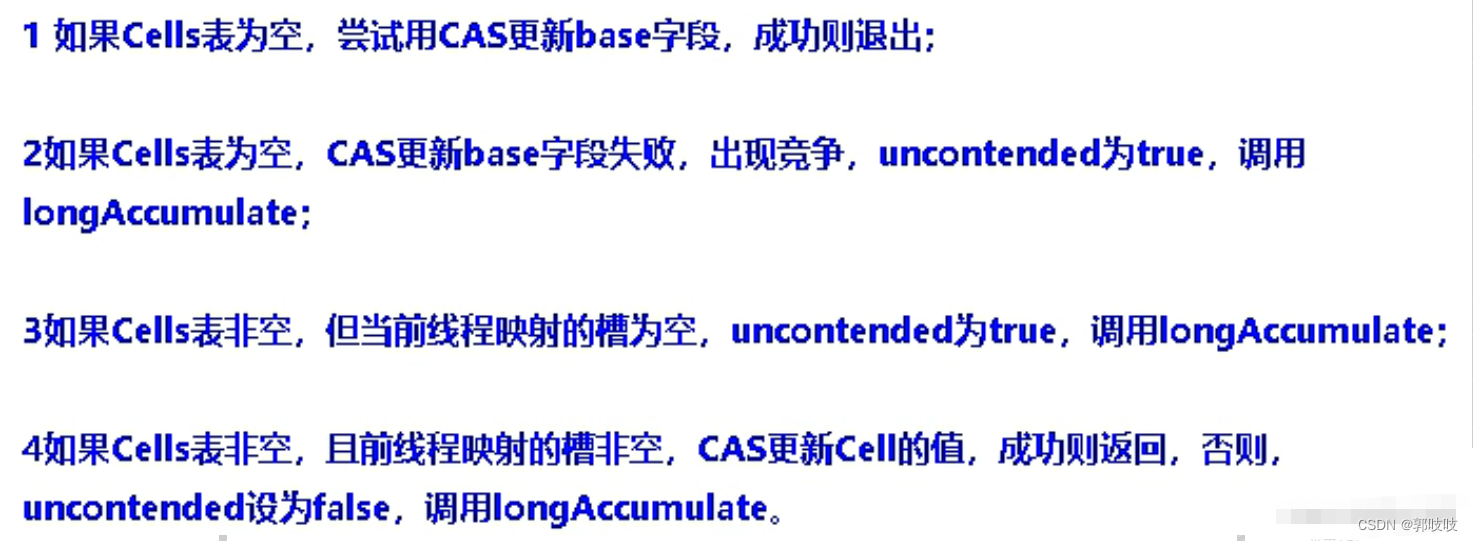
一开始进入方法中,首次cells != null 也不成立;一开始竞争小的时候CAS能成功,也就是CASBase能成功,所以casBase取反则也不成立。所以不会进入到longAccumulate方法中。干活的是casBase(long cmp,long val)方法。
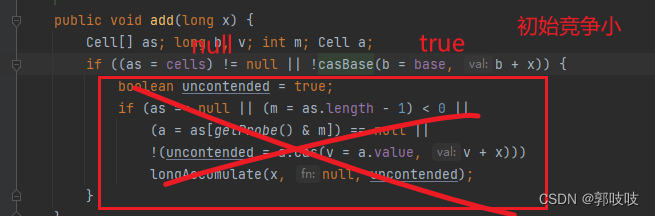
!casBase(b = base, b + x)

final boolean casBase(long cmp, long val) {
    return UNSAFE.compareAndSwapLong(this, BASE, cmp, val);
}
当前线程有命中的单元格,并且单元格不为空,则进行一次cas,如果成功则不会进入到longAccumulate方法中
uncontended = a.cas(v = a.value, v + x)

final boolean cas(long cmp, long val) {
    return UNSAFE.compareAndSwapLong(this, valueOffset, cmp, val);
}
(a = as[getProbe() & m]) 中的getProbe()方法:该方法其实就是拿到该线程对应的hash值,通过hash值然后进行位运算找到对应的cell槽
static final int getProbe() {
        return UNSAFE.getInt(Thread.currentThread(), PROBE);
    }

//其实就是得到了线程的Hash值
4.3 add方法总体总结总览
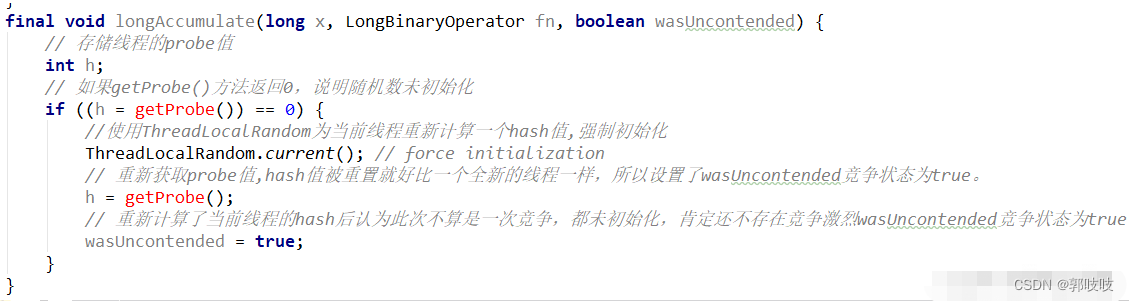
5、 LongAccumulate 方法
    final void longAccumulate(long x, LongBinaryOperator fn,
                              boolean wasUncontended) {
        int h;
        if ((h = getProbe()) == 0) {
            ThreadLocalRandom.current(); // force initialization
            h = getProbe();
            wasUncontended = true;
        }
        boolean collide = false;                // True if last slot nonempty
        for (;;) {
            Cell[] as; Cell a; int n; long v;
            if ((as = cells) != null && (n = as.length) > 0) {
            //这里是③ Cell数组不再为空且可能存在Cell数组扩容
                if ((a = as[(n - 1) & h]) == null) {
                    if (cellsBusy == 0) {       // Try to attach new Cell
                        Cell r = new Cell(x);   // Optimistically create
                        if (cellsBusy == 0 && casCellsBusy()) {
                            boolean created = false;
                            try {               // Recheck under lock
                                Cell[] rs; int m, j;
                                if ((rs = cells) != null &&
                                    (m = rs.length) > 0 &&
                                    rs[j = (m - 1) & h] == null) {
                                    rs[j] = r;
                                    created = true;
                                }
                            } finally {
                                cellsBusy = 0;
                            }
                            if (created)
                                break;
                            continue;           // Slot is now non-empty
                        }
                    }
                    collide = false;
                }
                else if (!wasUncontended)       // CAS already known to fail
                    wasUncontended = true;      // Continue after rehash
                else if (a.cas(v = a.value, ((fn == null) ? v + x :
                                             fn.applyAsLong(v, x))))
                    break;
                else if (n >= NCPU || cells != as)//不能超过cpu核数
                    collide = false;            // At max size or stale
                else if (!collide)
                    collide = true;
                else if (cellsBusy == 0 && casCellsBusy()) {
                    try {
                        if (cells == as) {      // Expand table unless stale
                            Cell[] rs = new Cell[n << 1];//扩容-左移一位,相当于x2
                            for (int i = 0; i < n; ++i)
                                rs[i] = as[i];
                            cells = rs;
                        }
                    } finally {
                        cellsBusy = 0;
                    }
                    collide = false;
                    continue;                   // Retry with expanded table
                }
                h = advanceProbe(h);
            }
            else if (cellsBusy == 0 && cells == as && casCellsBusy()) {
            //这里是①初始化
                boolean init = false;
                try {                           // Initialize table
                    if (cells == as) {
                        Cell[] rs = new Cell[2];
                        rs[h & 1] = new Cell(x);
                        cells = rs;
                        init = true;
//------可以先看这里,进行了初始化,长度是2
//------cells数组,为2的幂,2,4,8,16,方便以后位运算
                    }
                } finally {
                    cellsBusy = 0;
                }
                if (init)
                    break;
            }
            else if (casBase(v = base, ((fn == null) ? v + x :
                                        fn.applyAsLong(v, x))))//这里是②兜底
                break;                          // Fall back on using base
        }
    }
5.1 LongAccumulate入参说明

5.2 LongAccumulate 循环前的操作
这段代码就像新员工入职获取工号一样(获取每个线程的hash值)一样
5.3 LongAccumulate 总览

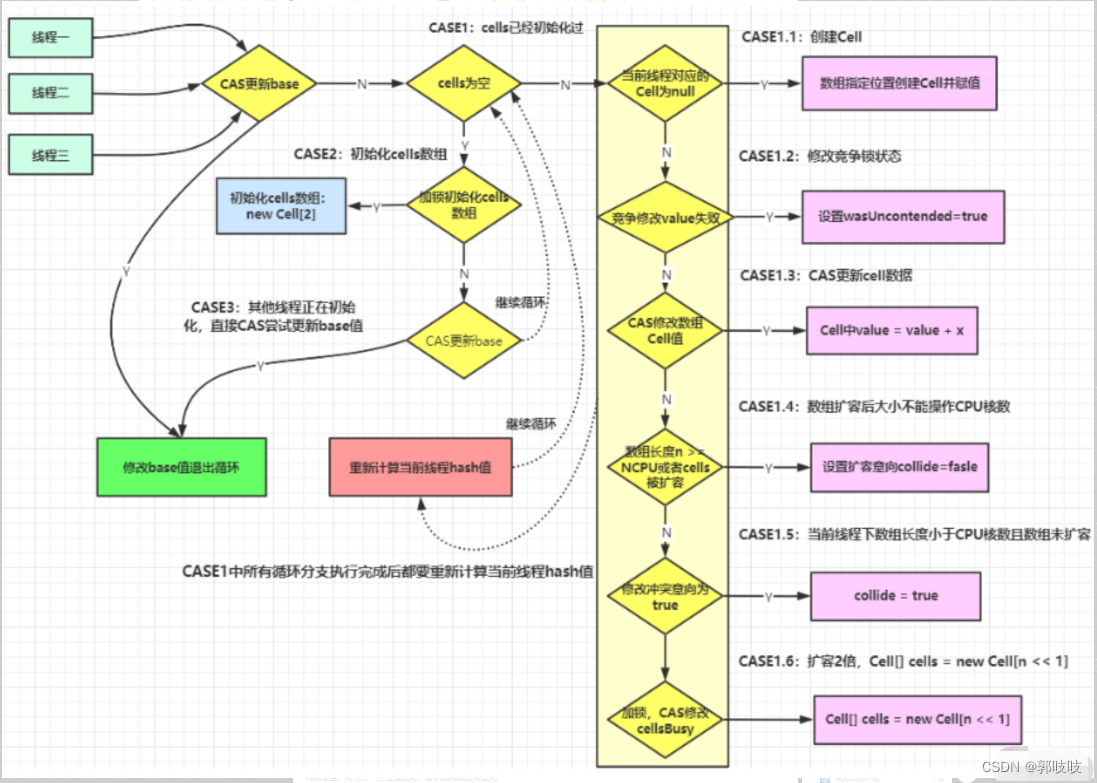
上述代码首先给当前线程分配一个hash值,然后进入一个for(;;)自旋,这个自旋分为三个分支:
CASE1:Cell[]数组已经初始化
CASE2:Cell[]数组未初始化(首次新建)
CASE3:Cell[]数组正在初始化中
5.3.1 CASE2:Cell数组初始化(首次新建数组)
cellsBusy 就是一个自旋锁,如果等于0则表示没有线程持有锁;1为有线程持有该锁。
/** * Spinlock (locked via CAS) used when resizing and/or creating Cells. */ transient volatile int cellsBusy;casCellSBusy()方法就是尝试持有该自旋锁
/**
 * CASes the cellsBusy field from 0 to 1 to acquire lock.
 */
final boolean casCellsBusy() {
    return UNSAFE.compareAndSwapInt(this, CELLSBUSY, 0, 1);
}
5.3.2 CASE3:兜底分支
//排在最后面的
else if (casBase(v = base, ((fn == null) ? v + x : fn.applyAsLong(v, x))))
//该分支实现直接操作base基数,将值累加到base上,也即其它线程正在初始化,多个线程正在更新base的值。
// (fn == null) ? v + x : fn.applyAsLong(v, x)
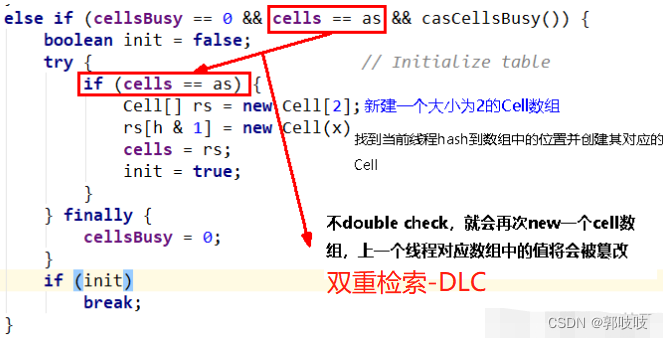
// 如果入参给定义计算方法,则用入参定义入参方法,否则默认相加的方式5.3.3 CASE1:Cell数组不为空并且可能Cell数组扩容
第一个if
// 内部小分支一:
// cells数组已经被初始化
if ((as = cells) != null && (n = as.length) > 0) {
    if ((a = as[(n - 1) & h]) == null) { // 当前线程的hash值运算后映射得到的Cell单元为null,说明cell没有被使用过
        if (cellsBusy == 0) {       // 当前锁没有被别的线程持有,cell[]没有正在扩容或者没有别的线程再进行此次操作
            Cell r = new Cell(x);   // 创建Cell单元并赋值
            if (cellsBusy == 0 && casCellsBusy()) { // 尝试获取锁,成功后cellsBusy==1
                boolean created = false; // 是否给数组赋值成功标识 false表示赋值失败|true表示成功
                try {               // Recheck under lock
                    Cell[] rs; int m, j;
                    // 在持有锁的情况下再检查一下之前的判断(双重检索)
                    if ((rs = cells) != null && (m = rs.length) > 0 && rs[j = (m - 1) & h] == null) {
                        rs[j] = r; // 将cell单元格赋值给Cell[]数组上
                        created = true; // 将标识设置为成功
                    }
                } finally {
                    cellsBusy = 0; // 释放锁
                }
                if (created) // 如果成功后跳出循环
                    break;
                // 如果created = false,说明上面指定的cells数组的位置cells[m%cells.length]已经有其它线程设置了cell了
                // 继续执行循环。
                continue;
            }
        }
        // 不进行扩容,或者代表有没有冲突
        collide = false;
    }
第二个if
// 内部小分支二:
// 如果add方法中条件4的通过cas设置cells[m%cells.length]位置的Cell对象中的value值设置为v+x失败
// 说明已经发生竞争,将wasUncontended设置为true,
// 跳出内部的if判断,最后重新计算一个新的probe,然后重新执行循环;

else if (!wasUncontended)       // CAS already known to fail
     // 设置未竞争标志位true,继续执行,后面会算一个新的probe值,然后重新执行循环。
    wasUncontended = true;      // Continue after rehash

// 为当前线程重新计算hash值
h = advanceProbe(h);
第三个if
// 内部小分支三:
// 新的争用线程参与争用的情况:处理刚进入当前方法时threadLocalRandomProbe=0的情况(线程hash值为0——重置hash值),
// 也就是当前线程第一次参与cell争用的cas失败,
// 这里会尝试将x值加到cells[m%cells.length]的value ,如果成功直接退出
else if (a.cas(v = a.value, ((fn == null) ? v + x :
                             fn.applyAsLong(v, x))))
    break;
第四个if
// 内部小分支四:
// 分支3处理新的线程争用执行失败了,这时如果cells数组的长度已经到了最大值(大于等于cup数量),
// 或者是当前cells已经做了扩容,则将collide设置为false,后面重新计算prob的值后重新再次for循环
else if (n >= NCPU || cells != as)
    // 不进行扩容
    collide = false;            // At max size or stale


// 为当前线程重新计算hash值
h = advanceProbe(h);
第五个if
// 内部小分支五:
// 如果发生了冲突collide=false,则设置其为true;会在最后重新计算hash值后,进入下一次for循环
else if (!collide)
    // 设置如果下次循环中前面都没有将该值cas成功,则下一步进行扩容
    collide = true;

// 为当前线程重新计算hash值
h = advanceProbe(h);
第六个if
// 内部小分支六:
// 扩容cells数组,新参与cell争用的线程两次均失败,且符合库容条件,会执行该分支

else if (cellsBusy == 0 && casCellsBusy()) { // 尝试获取锁
    try {
        if (cells == as) { // 判断当前线程没有进行过扩容
            Cell[] rs = new Cell[n << 1]; // 将cell数组扩容一位:左移位1位,扩容大小为之前的容量两倍
            for (int i = 0; i < n; ++i) // 将之前数组元素拷贝到新数组中
                rs[i] = as[i];
            cells = rs; // 将新数组的的应用赋值给cells数组
        }
    } finally {
        cellsBusy = 0; // 释放锁
    }
    collide = false; // 将扩容设置成false
    continue;   // 继续下一次for循环
}
6、sum()方法和longValue()方法
longValue()方法其实也调用的是sum()方法
/**
 * Equivalent to {@link #sum}.
 *
 * @return the sum
 */
public long longValue() {
    return sum();
}
把base值和所有cells数组值for循环相加得到
public long sum() {
    Cell[] as = cells; Cell a;
    long sum = base;
    if (as != null) {
        for (int i = 0; i < as.length; ++i) {
            if ((a = as[i]) != null)
                sum += a.value;
        }
    }
    return sum;
}


 1639
1639


 被折叠的 条评论
为什么被折叠?
被折叠的 条评论
为什么被折叠?
 到【灌水乐园】发言


