


环境搭建
| 名称 | 版本 |
|---|---|
| 编辑器 | idea 2021.2 |
| JDK | 1.8.0_221 |
| tomcat | 9.0.38 |
1 环境搭建总体目标

2 创建工程
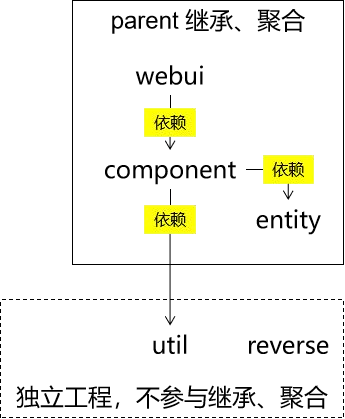
2.1 项目架构图
2.2 工程创建计划
| atcrowdfunding01-admin-parent | |
| groupId | com.atguigu.crowd |
| artifactId | atcrowdfunding01-admin-parent |
| packaging | pom |
| atcrowdfunding02-admin-webui | |
| groupId | com.atguigu.crowd |
| artifactId | atcrowdfunding02-admin-webui |
| packaging | war |
| atcrowdfunding03-admin-component | |
| groupId | com.atguigu.crowd |
| artifactId | atcrowdfunding03-admin-component |
| packaging | jar |
| atcrowdfunding04-admin-entity | |
| groupId | com.atguigu.crowd |
| artifactId | atcrowdfunding04-admin-entity |
| packaging | jar |
| atcrowdfunding05-common-util | |
| groupId | com.atguigu.crowd |
| artifactId | atcrowdfunding05-common-util |
| packaging | jar |
| atcrowdfunding06-common-reverse | |
| groupId | com.atguigu.crowd |
| artifactId | atcrowdfunding06-common-reverse |
| packaging | jar |
2.3 Maven 工程和 Maven 模块
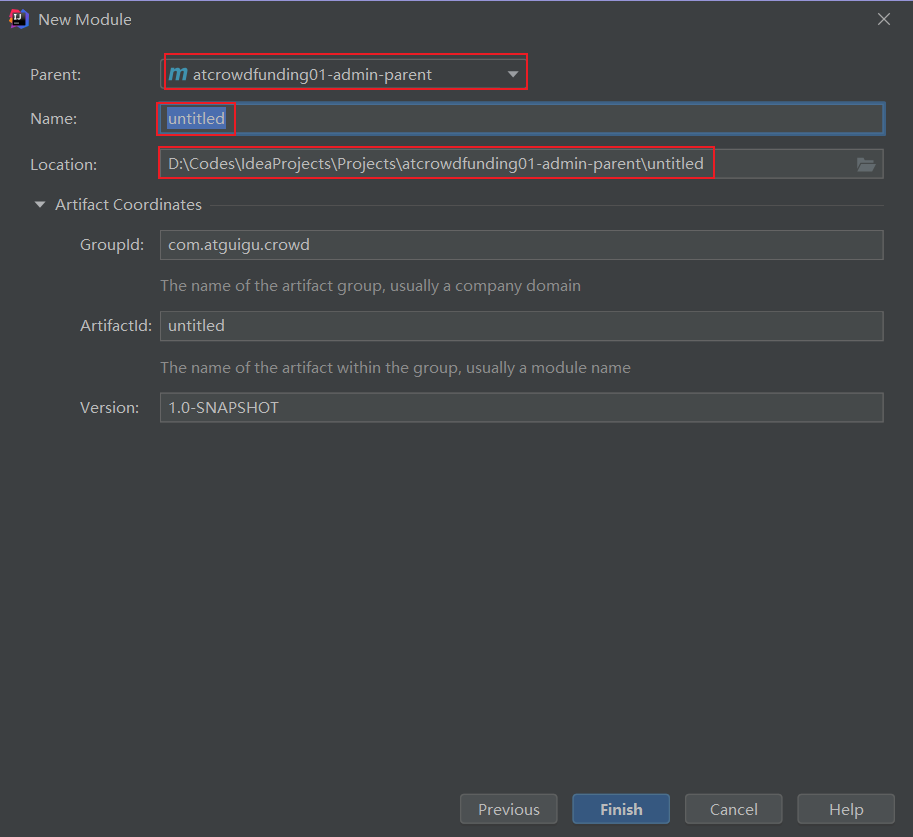
创建工程时参与继承、聚合的工程以“Maven module”的方式创建,继承和聚合 可以自动配置出来。具体做法是创建 parent 工程(Maven不带模板的工程)后,在 parent 工程上点右键,new→ module继续创建Maven工程

然后点击下一步在new Module界面选择正确的依赖关系,确定的名字以及存放的目录后进行项目创建。
引用关系

2.4 建立工程之间的依赖关系
webui 依赖 component
component 依赖 entity
component 依赖 util

以 webui 依赖 component 为例,建立依赖关系需要在webui模块下的pom.xml导入component依赖
atcrowdfunding02-admin-webui\pom.xml
<dependency>
    <groupId>com.atguigu.crowd</groupId>
    <artifactId>atcrowdfunding03-admin-component</artifactId>
    <version>1.0-SNAPSHOT</version>
</dependency>
3 创建数据库和数据库表
3.1 物理建模
3.1.1 理论
- 第一范式:数据库表中的每一列都不可再分,也就是原子性
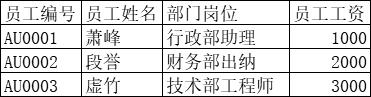
这个表中“部门”和“岗位”应该拆分成两个字段:“部门名称”、“岗位”。

这样才能够专门针对“部门”或“岗位”进行查询。
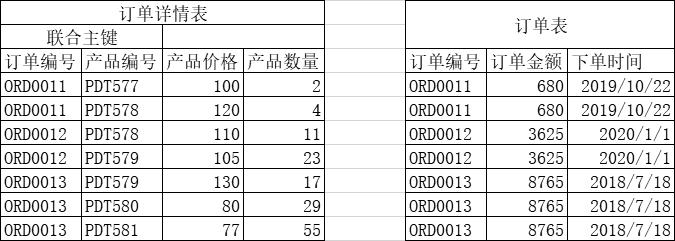
- 第二范式:在满足第一范式基础上要求每个字段都和主键完整相关,而不是仅和主键部分相关(主要针对联合主键而言)
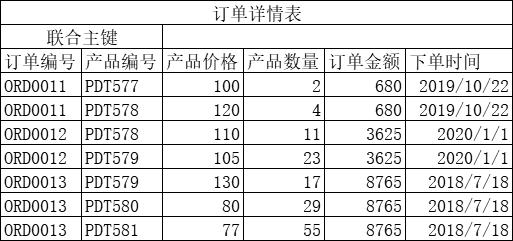
“订单详情表”使用“订单编号”和“产品编号”作为联合主键。此时“产 品价格”、“产品数量”都和联合主键整体相关,但“订单金额”和“下单时间” 只和联合主键中的“订单编号”相关,和“产品编号”无关。所以只关联了主 键中的部分字段,不满足第二范式。
把“订单金额”和“下单时间”移到订单表就符合第二范式了.
- 第三范式:表中的非主键字段和主键字段直接相关,不允许间接相关
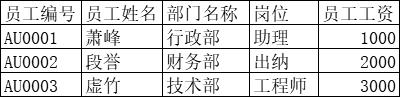
上面表中的“部门名称”和“员工编号”的关系是“员工编号”→“部门编号” →“部门名称”,不是直接相关。此时会带来下列问题:
-
数据冗余:“部门名称”多次重复出现。
-
插入异常:组建一个新部门时没有员工信息,也就无法单独插入部门 信息。就算强行插入部门信息,员工表中没有员工信息的记录同样是 非法记录。
-
删除异常:删除员工信息会连带删除部门信息导致部门信息意外丢失。
-
更新异常:哪怕只修改一个部门的名称也要更新多条员工记录。
正确的做法是:把上表拆分成两张表,以外键形式关联

“部门编号”和“员工编号”是直接相关的。
第二范式的另一种表述方式是:两张表要通过外键关联,不保存冗余字段。例 如:不能在“员工表”中存储“部门名称”。
3.1.2 实践
-
规则的变通
三大范式是设计数据库表结构的规则约束,但是在实际开发中允许局部变
通。
比如为了快速查询到关联数据可能会允许冗余字段的存在。例如在员工表 中存储部门名称虽然违背第三范式,但是免去了对部门表的关联查询。
-
根据业务功能设计数据库表
- 看得见的字段
能够从需求文档或原型页面上直接看到的数据都需要设计对应的数 据库表、字段来存储。
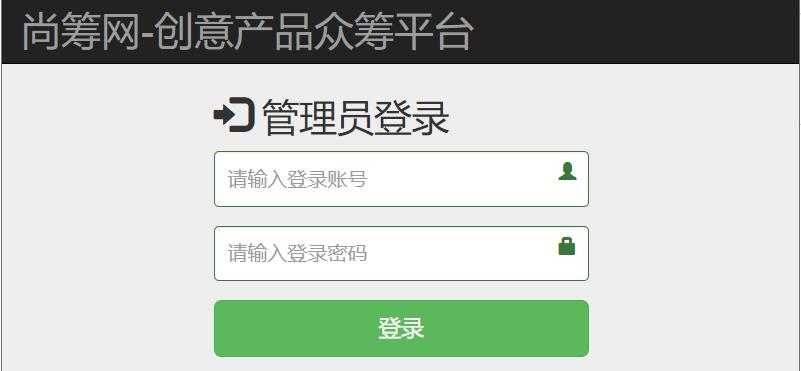
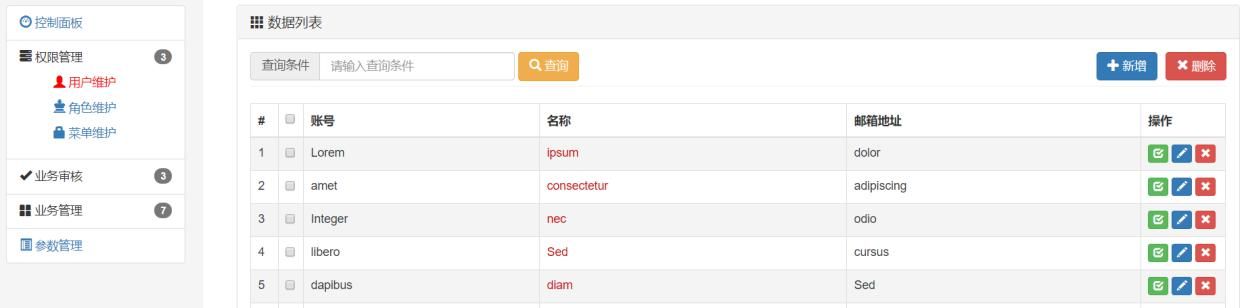
根据上面的原型页面我们看到管理员表需要包含如下字段:
-
账号
-
密码
-
名称
-
邮箱地址
看不见的字段
除了能够直接从需求文档中看到的字段,实际开发中往往还会包含一 些其他字段来保存其他相关数据。
例如:管理员表需要再增加如下字段以有利于数据维护
- 主键
- 创建时间
冗余字段
为了避免建表时考虑不周有所遗漏,到后期再修改表结构非常麻烦, 所以也有的团队会设置一些额外的冗余字段备用。
实际开发对接
实际开发中除了一些各个模块都需要使用的公共表在项目启动时创 建好,其他专属于各个模块的表由该模块的负责人创建。但通常开发人员 不能直接操作数据库服务器,所以需要把建表的 SQL 语句发送给运维工程 师执行创建操作。
3.2 创建数据库
CREATE DATABASE project_crowd CHARACTER SET utf8;
3.3 创建管理员数据库表
use project_crowd;
drop table if exists t_admin;
create table t_admin (
    id int not null auto_increment, # 主键
    login_acct varchar(255) not null, # 登录账号
    user_pswd char(32) not null, # 登录密码
    user_name varchar(255) not null, # 昵称
    email varchar(255) not null, # 邮件地址
    create_time char(19), # 创建时间
    primary key (id)
);
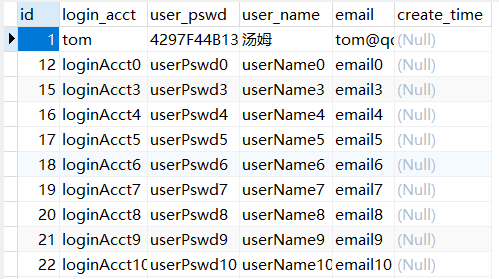
填充数据后
4 基于 Maven 的MyBatis逆向工程
4.1 pom配置
逆向工程属于atcrowdfunding06-common-reverse,所以配置的pom是在resverse模块下的pom.xml进行配置
<!-- 依赖 MyBatis 核心包 -->
<dependencies>
    <dependency>
        <groupId>org.mybatis</groupId>
        <artifactId>mybatis</artifactId>
        <version>3.2.8</version>
    </dependency>
</dependencies>

<!-- 控制 Maven 在构建过程中相关配置 -->
<build>
    <!-- 构建过程中用到的插件 -->
    <plugins>
        <!-- 具体插件,逆向工程的操作是以构建过程中插件形式出现的 -->
        <plugin>
            <groupId>org.mybatis.generator</groupId>
            <artifactId>mybatis-generator-maven-plugin</artifactId>
            <version>1.3.0</version>
            <!-- 插件的依赖 -->
            <dependencies>
                <!-- 逆向工程的核心依赖 -->
                <dependency>
                    <groupId>org.mybatis.generator</groupId>
                    <artifactId>mybatis-generator-core</artifactId>
                    <version>1.3.2</version>
                </dependency>
                <!-- 数据库连接池 -->
                <dependency>
                    <groupId>com.mchange</groupId>
                    <artifactId>c3p0</artifactId>
                    <version>0.9.2</version>
                </dependency>
                <!-- MySQL 驱动 -->
                <dependency>
                    <groupId>mysql</groupId>
                    <artifactId>mysql-connector-java</artifactId>
                    <version>5.1.8</version>
                </dependency>
            </dependencies>
        </plugin>
    </plugins>
</build>
4.2 generatorConfig.xml
generatorConfig.xml放在atcrowdfunding06-common-reverse模块下的resource根目录,该文件 代码自动生成 类对应的映射的Mapper类及配置
<!DOCTYPE generatorConfiguration
        PUBLIC "-//mybatis.org//DTD MyBatis Generator Configuration 1.0//EN"
        "http://mybatis.org/dtd/mybatis-generator-config_1_0.dtd">
<generatorConfiguration>
    <!-- mybatis-generator:generate -->
    <context id="atguiguTables" targetRuntime="MyBatis3">
        <commentGenerator>
            <!-- 是否去除自动生成的注释 true:是;false:否 -->
            <property name="suppressAllComments" value="true" />
        </commentGenerator>
        <!--数据库连接的信息:驱动类、连接地址、用户名、密码 -->
        <jdbcConnection
                driverClass="com.mysql.jdbc.Driver"
                connectionURL="jdbc:mysql://localhost:3306/project_crowd"
                userId="root"
                password="root">
        </jdbcConnection>
        <!-- 默认 false,把 JDBC DECIMAL 和 NUMERIC 类型解析为 Integer,为 true 时把 JDBC DECIMAL和 NUMERIC 类型解析为 java.math.BigDecimal -->
        <javaTypeResolver>
            <property name="forceBigDecimals" value="false" />
        </javaTypeResolver>
        <!-- targetProject:生成 Entity 类的路径 -->
        <javaModelGenerator
                targetProject=".\src\main\java"
                targetPackage="com.atguigu.crowd.entity">
            <!-- enableSubPackages:是否让 schema 作为包的后缀 -->
            <property name="enableSubPackages" value="false" />
            <!-- 从数据库返回的值被清理前后的空格 -->
            <property name="trimStrings" value="true" />
        </javaModelGenerator>
        <!-- targetProject:XxxMapper.xml 映射文件生成的路径 -->
        <sqlMapGenerator
                targetProject=".\src\main\java"
                targetPackage="com.atguigu.crowd.mapper">
            <!-- enableSubPackages:是否让 schema 作为包的后缀 -->
            <property name="enableSubPackages" value="false" />
        </sqlMapGenerator>
        <!-- targetPackage:Mapper 接口生成的位置 -->
        <javaClientGenerator
                type="XMLMAPPER"
                targetProject=".\src\main\java"
                targetPackage="com.atguigu.crowd.mapper">
            <!-- enableSubPackages:是否让 schema 作为包的后缀 -->
            <property name="enableSubPackages" value="false" />
        </javaClientGenerator>
        <!-- 数据库表名字和我们的 com.atguigu.crowd.entity 类对应的映射指定 -->
        <table tableName="t_admin" domainObjectName="Admin" />
    </context>
</generatorConfiguration>
4.3 执行逆向生成操作的 Maven 命令
配置文件信息填写完成后点击maven插件的mybatis-generator:generate即可生成对应的资源文件

生成的资源文件
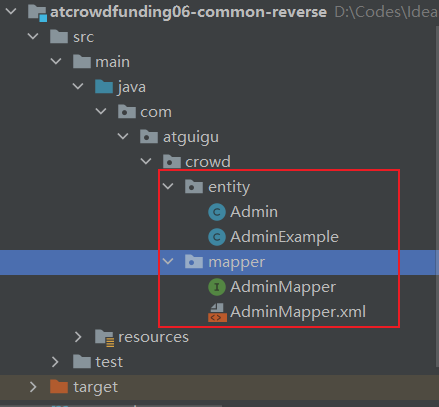
4.4 逆向工程生成的资源各归各位
WebUI 工程将来在 Tomcat 上运行时,现在 resources 目录下的资源会直接放在 WEB-INF/classes 目录(也就是类路径)下,所以放在 resources 目录下运行的时候更容易找到。
将entity下的文件移动到atcrowdfunding04-admin-entity下java目录下的com.atguigu.crowd.entity中
将mapper中的AdminMapper接口移动到atcrowdfunding03-admin-component下java目录下的com.atguigu.crowd.mapper中
将mapper目录下的AdminMapper.xml文件移动到atcrowdfunding02-admin-webui下resource目录下的mybatis\mapper目录中
5. 父工程依赖管理
基于parent目录中的pom.xml文件进行依赖管理
5.1 版本声明
<properties>
    <!-- 声明属性,对 Spring 的版本进行统一管理 -->
  <atguigu.spring.version>4.3.20.RELEASE</atguigu.spring.version>
    <!-- 声明属性,对 SpringSecurity 的版本进行统一管理 -->
  <atguigu.spring.security.version>4.2.10.RELEASE</atguigu.spring.security.version>
</properties>
5.2 依赖管理
<dependencyManagement>
    <dependencies>
        <!-- spring 依赖 -->
        <dependency>
            <groupId>org.springframework</groupId>
            <artifactId>spring-orm</artifactId>
            <version>${atguigu.spring.version}</version>
        </dependency>
        <dependency>
            <groupId>org.springframework</groupId>
            <artifactId>spring-webmvc</artifactId>
            <version>${atguigu.spring.version}</version>
        </dependency>
        <dependency>
            <groupId>org.springframework</groupId>
            <artifactId>spring-test</artifactId>
            <version>${atguigu.spring.version}</version>
        </dependency>
        <!-- aspectjweaver  AOP 相关 -->
        <dependency>
            <groupId>org.aspectj</groupId>
            <artifactId>aspectjweaver</artifactId>
            <version>1.9.2</version>
        </dependency>
        <dependency>
            <groupId>cglib</groupId>
            <artifactId>cglib</artifactId>
            <version>2.2</version>
        </dependency>
        <!-- 数据库依赖 -->
        <!-- MySQL驱动 -->
        <dependency>
            <groupId>mysql</groupId>
            <artifactId>mysql-connector-java</artifactId>
            <version>5.1.3</version>
        </dependency>

        <!-- 数据源 -->
        <dependency>
            <groupId>com.alibaba</groupId>
            <artifactId>druid</artifactId>
            <version>1.0.31</version>
        </dependency>

        <!-- MyBatis -->
        <dependency>
            <groupId>org.mybatis</groupId>
            <artifactId>mybatis</artifactId>
            <version>3.2.8</version>
        </dependency>

        <!-- MyBatis 与 Spring 整合 -->
        <dependency>
            <groupId>org.mybatis</groupId>
            <artifactId>mybatis-spring</artifactId>
            <version>1.2.2</version>
        </dependency>

        <!-- MyBatis 分页插件 -->
        <dependency>
            <groupId>com.github.pagehelper</groupId>
            <artifactId>pagehelper</artifactId>
            <version>4.0.0</version>
        </dependency>

        <!-- 日志 -->
        <dependency>
            <groupId>org.slf4j</groupId>
            <artifactId>slf4j-api</artifactId>
            <version>1.7.7</version>
        </dependency>
        <dependency>
            <groupId>ch.qos.logback</groupId>
            <artifactId>logback-classic</artifactId>
            <version>1.2.3</version>
        </dependency>

        <!-- 其他日志框架中间转换包 -->
        <dependency>
            <groupId>org.slf4j</groupId>
            <artifactId>jcl-over-slf4j</artifactId>
            <version>1.7.25</version>
        </dependency>
        <dependency>
            <groupId>org.slf4j</groupId>
            <artifactId>jul-to-slf4j</artifactId>
            <version>1.7.25</version>
        </dependency>

        <!-- Spring 进行JSON数据转换依赖 -->
        <dependency>
            <groupId>com.fasterxml.jackson.core</groupId>
            <artifactId>jackson-core</artifactId>
            <version>2.9.8</version>
        </dependency>
        <dependency>
            <groupId>com.fasterxml.jackson.core</groupId>
            <artifactId>jackson-databind</artifactId>
            <version>2.9.8</version>
        </dependency>

        <!-- JSTL标签库 -->
        <dependency>
            <groupId>jstl</groupId>
            <artifactId>jstl</artifactId>
            <version>1.2</version>
        </dependency>

        <!-- Junit测试 -->
        <dependency>
            <groupId>junit</groupId>
            <artifactId>junit</artifactId>
            <version>4.12</version>
            <scope>test</scope>
        </dependency>

        <!-- 引入Servlet容器中相关依赖 -->
        <dependency>
            <groupId>javax.servlet</groupId>
            <artifactId>servlet-api</artifactId>
            <version>2.5</version>
            <scope>provided</scope>
        </dependency>

        <!-- JSP页面使用的依赖 -->
        <dependency>
            <groupId>javax.servlet.jsp</groupId>
            <artifactId>jsp-api</artifactId>
            <version>2.1.3-b06</version>
            <scope>provided</scope>
        </dependency>

        <!-- gson -->
        <dependency>
            <groupId>com.google.code.gson</groupId>
            <artifactId>gson</artifactId>
            <version>2.8.5</version>
        </dependency>

        <!-- SpringSecurity对Web应用进行权限管理 -->
        <dependency>
            <groupId>org.springframework.security</groupId>
            <artifactId>spring-security-web</artifactId>
            <version>${atguigu.spring.security.version}</version>
        </dependency>

        <!-- SpringSecurity 配置 -->
        <dependency>
            <groupId>org.springframework.security</groupId>
            <artifactId>spring-security-config</artifactId>
            <version>${atguigu.spring.security.version}</version>
        </dependency>

        <!-- SpringSecurity 标签库 -->
        <dependency>
            <groupId>org.springframework.security</groupId>
            <artifactId>spring-security-taglibs</artifactId>
            <version>${atguigu.spring.security.version}</version>
        </dependency>
    </dependencies>
</dependencyManagement>
5.3 依赖信息来源
-
到专门网站搜索
https://mvnrepository.com
-
调试
根据实际运行情况,确认 jar 包之间是否兼容
SpringMVC 需要 jackson 的支持,来处理 JSON 数据。但是 SpringMVC并没有依赖 jackson。所以需要我们自己保证 jar 包之间的兼容性。
6 Spring 整合 MyBatis
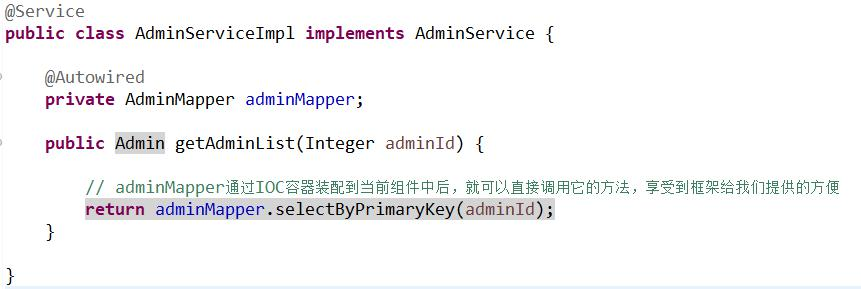
6.1 目标
adminMapper 通过 IOC 容器装配到当前组件中后,就可以直接调用它的方法,享受 到框架给我们提供的方便
6.2 思路
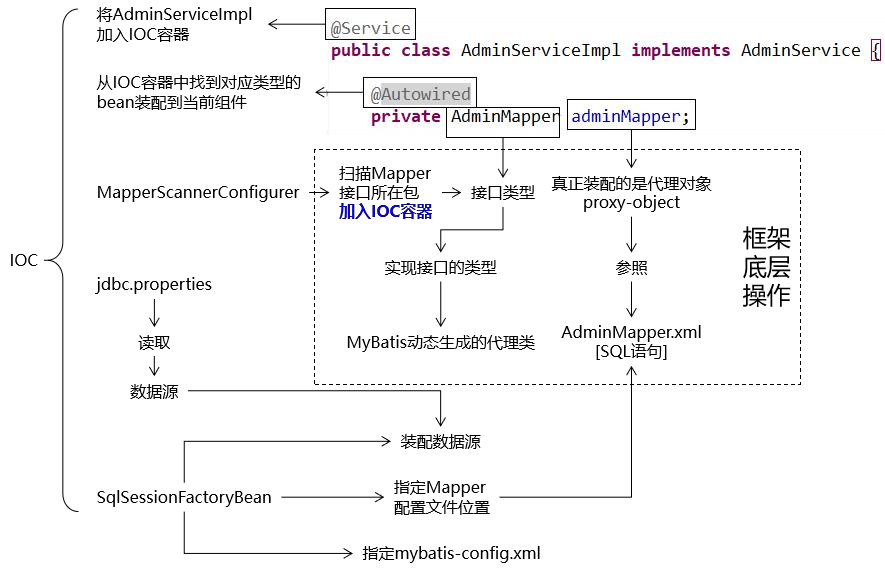
6.3 操作清单
在子工程中加入搭建环境所需要的具体依赖
准备 jdbc.properties
创建 Spring 配置文件专门配置 Spring 和 MyBatis 整合相关
在 Spring 的配置文件中加载 jdbc.properties 属性文件
配置数据源
测试从数据源中获取数据库连接
配置 SqlSessionFactoryBean
装配数据源
指定 XxxMapper.xml 配置文件的位置
指定 MyBatis 全局配置文件的位置(可选)
配置 MapperScannerConfigurer
测试是否可以装配 XxxMapper 接口并通过这个接口操作数据库
6.4 操作步骤详解
6.4.1 在子工程中加入搭建环境所需的具体依赖
子工程:选择component工程,原因是具体依赖和component工程相关

component >>> pom.xml
<!-- Spring 依赖 -->
<!-- https://mvnrepository.com/artifact/org.springframework/spring-orm -->
<dependency>
    <groupId>org.springframework</groupId>
    <artifactId>spring-orm</artifactId>
</dependency>
<!-- https://mvnrepository.com/artifact/org.springframework/spring-webmvc -->
<dependency>
    <groupId>org.springframework</groupId>
    <artifactId>spring-webmvc</artifactId>
</dependency>
<!-- https://mvnrepository.com/artifact/org.aspectj/aspectjweaver -->
<dependency>
    <groupId>org.aspectj</groupId>
    <artifactId>aspectjweaver</artifactId>
</dependency>
<!-- https://mvnrepository.com/artifact/cglib/cglib -->
<dependency>
    <groupId>cglib</groupId>
    <artifactId>cglib</artifactId>
</dependency>
<!-- MySQL 驱动 -->
<dependency>
    <groupId>mysql</groupId>
    <artifactId>mysql-connector-java</artifactId>
</dependency>
<!-- 数据源 -->
<dependency>
    <groupId>com.alibaba</groupId>
    <artifactId>druid</artifactId>
</dependency>
<!-- MyBatis -->
<dependency>
    <groupId>org.mybatis</groupId>
    <artifactId>mybatis</artifactId>
</dependency>
<!-- MyBatis 与 Spring 整合 -->
<dependency>
    <groupId>org.mybatis</groupId>
    <artifactId>mybatis-spring</artifactId>
</dependency>
<!-- MyBatis 分页插件 -->
<dependency>
    <groupId>com.github.pagehelper</groupId>
    <artifactId>pagehelper</artifactId>
</dependency>
<!-- Spring 进行 JSON 数据转换依赖 -->
<dependency>
    <groupId>com.fasterxml.jackson.core</groupId>
    <artifactId>jackson-core</artifactId>
</dependency>
<dependency>
    <groupId>com.fasterxml.jackson.core</groupId>
    <artifactId>jackson-databind</artifactId>
</dependency>
<!-- JSTL 标签库 -->
<dependency>
    <groupId>jstl</groupId>
    <artifactId>jstl</artifactId>
</dependency>
<!-- https://mvnrepository.com/artifact/com.google.code.gson/gson -->
<dependency>
    <groupId>com.google.code.gson</groupId>
    <artifactId>gson</artifactId>
</dependency>
6.4.2 数据库连接信息
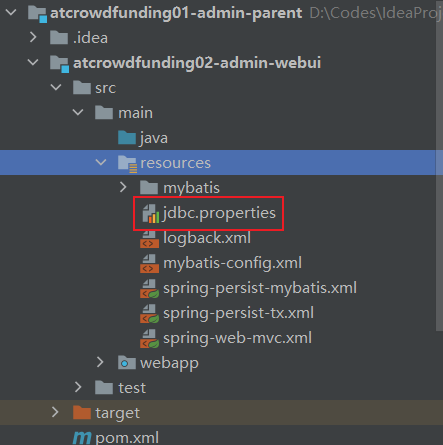
webui >>> jdbc.properties
jdbc.user=root
jdbc.password=root
jdbc.url=jdbc:mysql://localhost:3306/project_crowd?useUnicode=true&characterEncoding=UTF-8
jdbc.driver=com.mysql.jdbc.Driver
6.4.3 mybatis-config.xml
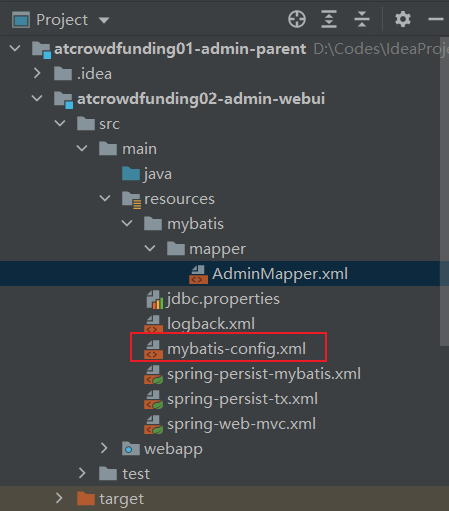
webui >>> mybatis-config.xml
<?xml version="1.0" encoding="UTF-8"?>
<!DOCTYPE configuration
        PUBLIC "-//mybatis.org//DTD Config 3.0//EN"
        "http://mybatis.org/dtd/mybatis-3-config.dtd">
<configuration>

</configuration>
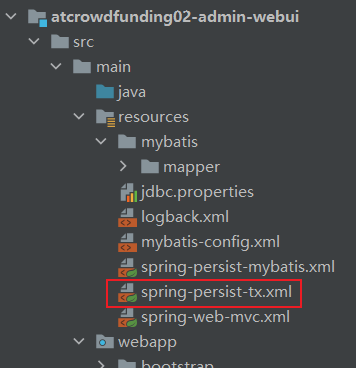
6.4.4 创建spring-persist-mybatis.xml持久层文件
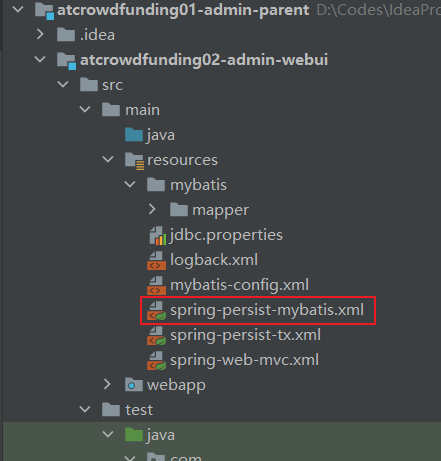
6.4.5 Spring具体配置:第一步 配置数据源
webui >>> spring-persist-mybatis.xml
<!-- 在 spring-persist-mybatis.xml 配置文件进行配置 -->
<!-- 加载 jdbc.properties -->
<context:property-placeholder location="classpath:jdbc.properties"/>
<!-- 配置数据源 -->
<bean id="dataSource" class="com.alibaba.druid.pool.DruidDataSource">
    <!-- 连接数据库的用户名 -->
    <property name="username" value="${jdbc.user}"/>
    <!-- 连接数据库的密码 -->
    <property name="password" value="${jdbc.password}"/>
    <!-- 目标数据库的 URL 地址 -->
    <property name="url" value="${jdbc.url}"/>
    <!-- 数据库驱动全类名 -->
    <property name="driverClassName" value="${jdbc.driver}"/>
</bean>
在webui 的Java测试目录下创建测试类 CrowdSpringTest.class
webui >>> test >>> CrowdSpringTest
// 创建 Spring 的 Junit 测试类
// 指定 Spring 给 Junit 提供的运行器类
@RunWith(SpringJUnit4ClassRunner.class)
// 加载 Spring 配置文件的注解
@ContextConfiguration(locations = {"classpath:spring-persist-mybatis.xml"})
public class CrowdSpringTest {
    @Autowired
    private DataSource dataSource;
    @Test public void testDataSource() throws SQLException {
        // 1.通过数据源对象获取数据源连接
        Connection connection = dataSource.getConnection();
        // 2.打印数据库连接
        System.out.println(connection); }
}
测试后控制台输出该connection对象,数据库连接成功

6.4.6 Spring具体配置:第二步 配置SqlSessionFactoryBean
webui >>> spring-persist-mybatis.xml
<!-- 配置 SqlSessionFactoryBean -->
<bean id="sqlSessionFactoryBean" class="org.mybatis.spring.SqlSessionFactoryBean">
    <!-- 装配数据源 -->
    <property name="dataSource" ref="dataSource"/>
    <!-- 指定 MyBatis 全局配置文件位置 -->
    <property name="configLocation" value="classpath:mybatis-config.xml"/>
    <!-- 指定 Mapper 配置文件位置 -->
    <property name="mapperLocations" value="classpath:mybatis/mapper/*Mapper.xml"/>
</bean>
6.4.7 Spring具体配置:第三步 配置MapperScannerConfigurer
webui >>> spring-persist-mybatis.xml
<!-- 配置 MapperScannerConfigurer -->
<!-- 把 MyBatis 创建的 Mapper 接口类型的代理对象扫描到 IOC 容器中 -->
<bean id="mapperScannerConfigurer" class="org.mybatis.spring.mapper.MapperScannerConfigurer">
    <!-- 使用 basePackage 属性指定 Mapper 接口所在包 -->
    <property name="basePackage" value="com.atguigu.crowd.mapper"/>
</bean>
在测试类CrowdSpringTest.class加入测试Mybatis框架的代码
webui >>> test >>> CrowdSpringTest
@Autowired
private AdminService adminService;

@Test
public void testAdminMapperAutowired() {
    Admin admin = adminService.getAdminById(1);
    System.out.println(admin);
}
系统输出查询数据则代表Mybatis配置成功
6.5 小结
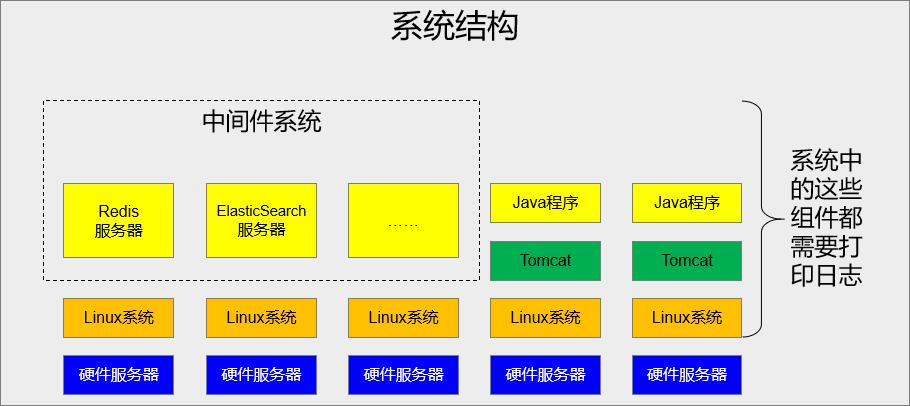
7. 日志系统
7.1 重要意义
系统在运行过程中出了问题就需要通过日志来进行排查,所以我们在上手任何新技术的时候,都要习惯性的关注一下它是如何打印日志的。
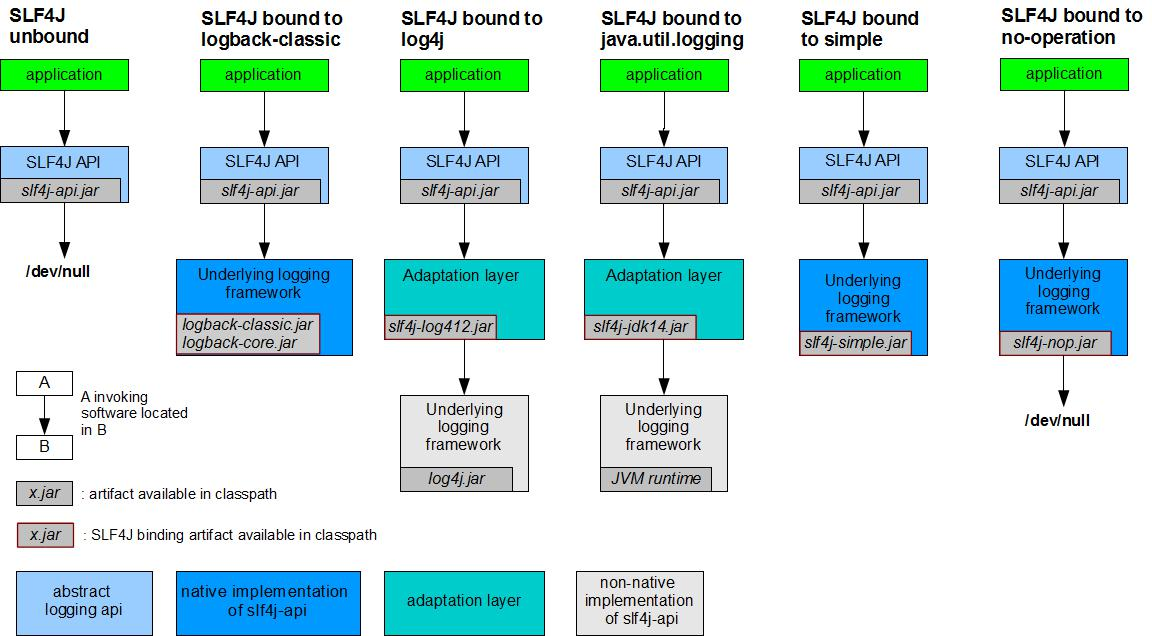
7.2 技术选型
7.2.1 总体介绍
| 门面 | |
|---|---|
| 名称 | 说明 |
| JCL(Jakarta Commons Logging) | 陈旧 |
| SLF4J(Simple Logging Facade for Java) | 适合(同一作者) |
| jboss-logging | 特殊专业领域使用 |
| 实现 | |
|---|---|
| 名称 | 说明 |
| log4j | 最初版(同一作者) |
| JUL(java.util.logging) | JDK 自带 |
| log4j2 | Apache 收购 log4j 后全面重构,内部实现和 log4j 完全不同 |
| logback | 优雅、强大(同一作者) |
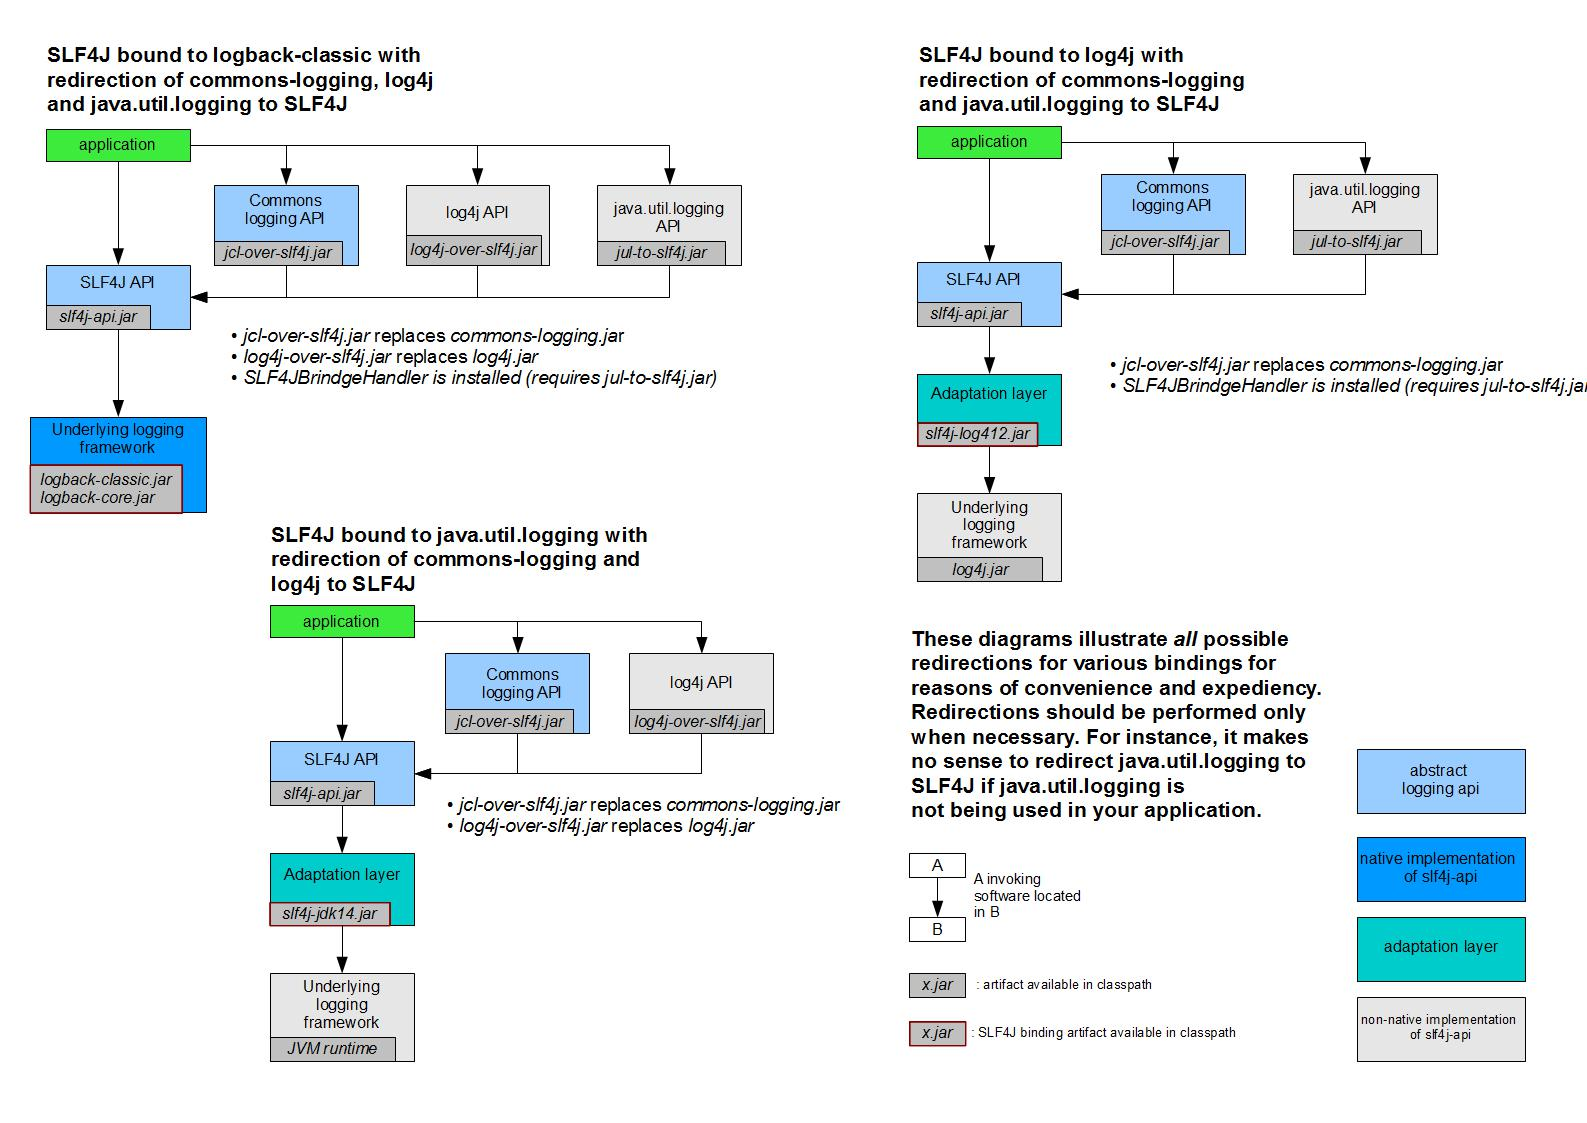
7.2.2 不同日志系统的整合
7.3 具体操作
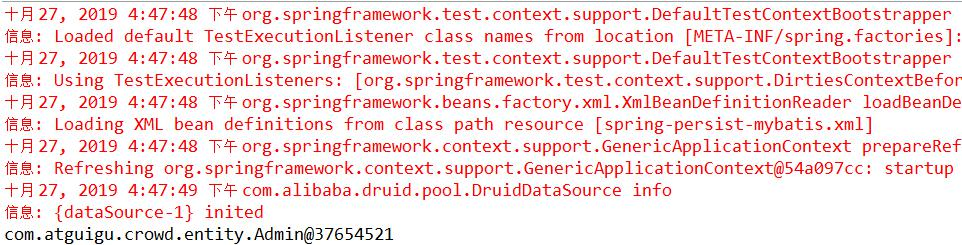
7.3.1 初始状态
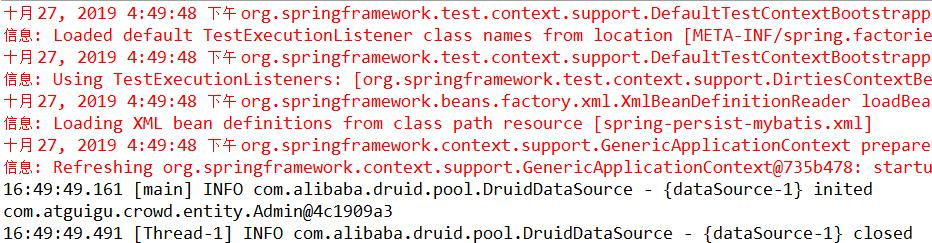
Spring 使用 commons-logging 日志包。打印的日志是下面这样的。不用细看,截图放在这是为了和后面日志打印的情况对比。
7.3.2 加入slf4j + logback
parent>>> pom.xml
<!-- 日志 -->
<dependency>
    <groupId>org.slf4j</groupId>
    <artifactId>slf4j-api</artifactId>
    <version>1.7.7</version>
</dependency>
<dependency>
    <groupId>ch.qos.logback</groupId>
    <artifactId>logback-classic</artifactId>
    <version>1.2.3</version>
</dependency>
代码不变,重新运行程序,日志情况是:
7.3.3 我们主动打印的日志
把查询到的 Admin对象以日志的方式打印出来,代码如下:
Admin admin = adminMapper.selectByPrimaryKey(1511);
// 获取日志记录对象
// CrowdTest.class 是当前类
Logger logger = LoggerFactory.getLogger(CrowdTest.class);
// 按照 Debug 级别打印日志
logger.debug(admin.toString());
使用日志打印信息和使用 sysout 打印信息的区别:sysout 如果不删除,那么执行到这里必然会打印;如果使用日志方式打印,可以通过日志级别控制信息是否打印。
效果
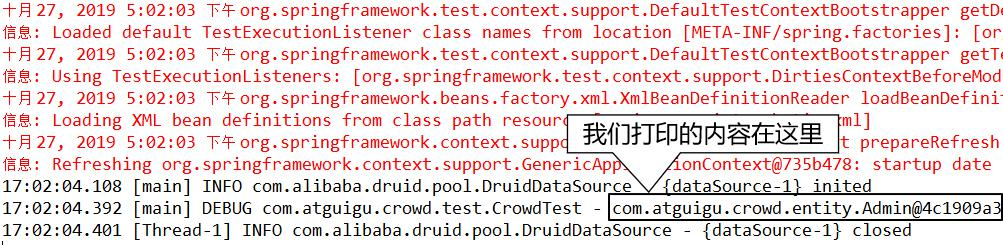
这里我们看到除了 Druid 数据源打印了两条日志,Spring 和 MyBatis 并没有通过 slf4j 打印日志。所以下一步我们要考虑的就是如何将框架所使用的日志系统统一到 slf4j。
7.3.4 更换框架的日志系统
-
排除commons-logging
修改
component >> pom.xml
<!-- spring 依赖 -->
<dependency>
    <groupId>org.springframework</groupId>
    <artifactId>spring-orm</artifactId>
    <!-- 下面为新增语句,排除commons-logging -->
    <exclusions>
        <exclusion>
            <groupId>commons-logging</groupId>
            <artifactId>commons-logging</artifactId>
        </exclusion>
    </exclusions>
</dependency>
修改webui>> pom.xml
<!-- Junit测试 -->
<dependency>
    <groupId>org.springframework</groupId>
    <artifactId>spring-test</artifactId>
    <scope>test</scope>
    <!-- 下面为新增语句,排除commons-logging -->
    <exclusions>
        <exclusion>
            <groupId>commons-logging</groupId>
            <artifactId>commons-logging</artifactId>
        </exclusion>
    </exclusions>
</dependency>
这个时候如果运行程序会抛异常,因为我们把 Spring 依赖的 commons-logging 排除了, 而这个依赖是必须有的,不是可选的。

- 加入转换包
<!-- 其他日志框架中间转换包 -->
<dependency>
    <groupId>org.slf4j</groupId>
    <artifactId>jcl-over-slf4j</artifactId>
</dependency>
打印局部效果

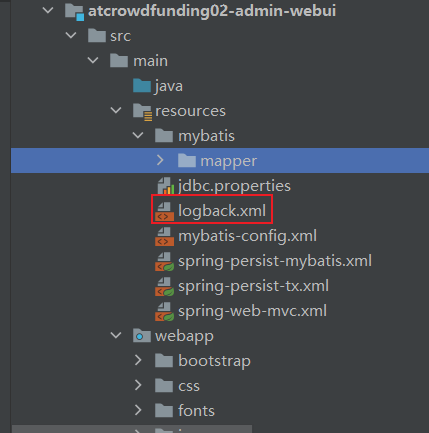
7.3.5 logback配置文件
logback 工作时的具体细节可以通过 logback.xml 来配置。
<?xml version="1.0" encoding="UTF-8"?>
<configuration debug="true">
    <!-- 指定日志输出的位置 -->
    <appender name="STDOUT" class="ch.qos.logback.core.ConsoleAppender">
        <encoder>
            <!-- 日志输出的格式 -->
            <!-- 按照顺序分别是:时间、日志级别、线程名称、打印日志的类、日志主体 内容、换行 -->
            <pattern>[%d{HH:mm:ss.SSS}] [%-5level] [%thread] [%logger] [%msg]%n</pattern>
        </encoder>
    </appender>
    <!-- 设置全局日志级别。日志级别按顺序分别是:DEBUG、INFO、WARN、ERROR -->
    <!-- 指定任何一个日志级别都只打印当前级别和后面级别的日志。 -->
    <root level="DEBUG">
        <!-- 指定打印日志的 appender,这里通过“STDOUT”引用了前面配置的 appender -->
        <appender-ref ref="STDOUT" />
    </root>
    <!-- 根据特殊需求指定局部日志级别 -->
    <logger name="com.atguigu.crowd.mapper" level="DEBUG"/>
</configuration>
8 声明式事务
8.1 目标
从事务角度:一个事务方法中包含的多个数据库操作,要么一起提交、要么一起回滚。也就是说事务方法中的多个数据库操作,有任何一个失败,整个事务全部回滚。从声明式角度:由 Spring 来全面接管数据库事务。用声明式代替编程式。
以前对于事务的管理
try {
    // 核心操作前:开启事务(关闭自动提交)
    // 对应 AOP 的前置通知
    connection.setAutoCommit(false);
    // 核心操作
    adminService.updateXxx(xxx, xxx);
    // 核心操作成功:提交事务
    // 对应 AOP 的返回通知
    connection.commit();
}catch(Exception e){
    // 核心操作失败:回滚事务
    // 对应 AOP 的异常通知
    connection.rollBack();
}finally{
    // 不论成功还是失败,核心操作终归是结束了
    // 核心操作不管是怎么结束的,都需要释放数据库连接
    // 对应 AOP 的后置通知
    if(connection != null){
        connection.close();
    }
}
8.2 思路
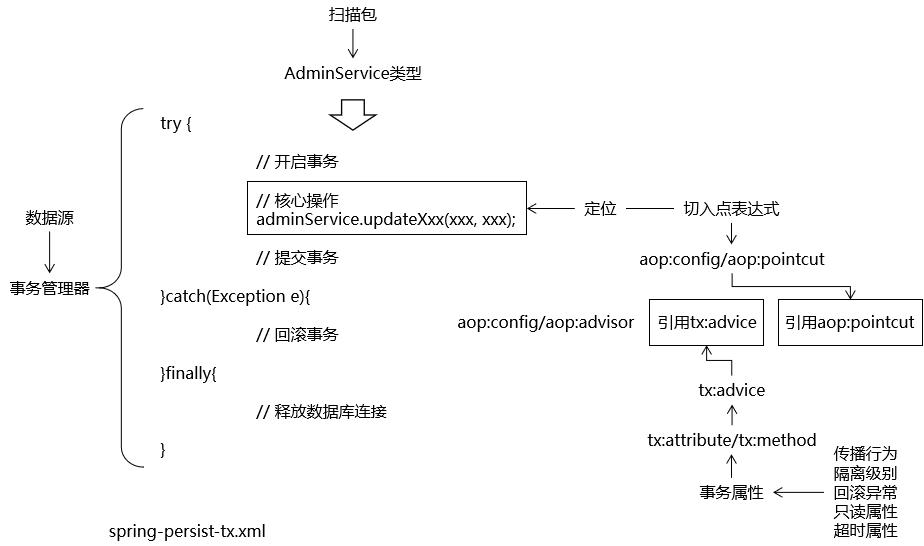
8.3 操作
8.3.1 加入AOP依赖包
component >>> pom.xml
<!-- AOP 所需依赖 -->
<dependency>
    <groupId>org.aspectj</groupId>
    <artifactId>aspectjweaver</artifactId>
</dependency>
<!-- AOP 所需依赖 -->
<dependency>
    <groupId>cglib</groupId>
    <artifactId>cglib</artifactId>
</dependency>
8.3.2 第一步 创建Spring配置文件
<?xml version="1.0" encoding="UTF-8"?>
<beans xmlns="http://www.springframework.org/schema/beans"
       xmlns:xsi="http://www.w3.org/2001/XMLSchema-instance"
       xmlns:context="http://www.springframework.org/schema/context"
       xmlns:aop="http://www.springframework.org/schema/aop"
       xmlns:tx="http://www.springframework.org/schema/tx" xmlns:jdbc="http://www.springframework.org/schema/jdbc"
       xsi:schemaLocation="http://www.springframework.org/schema/beans http://www.springframework.org/schema/beans/spring-beans.xsd
           http://www.springframework.org/schema/context http://www.springframework.org/schema/context/spring-context-3.0.xsd
           http://www.springframework.org/schema/aop http://www.springframework.org/schema/aop/spring-aop.xsd
           http://www.springframework.org/schema/tx http://www.springframework.org/schema/tx/spring-tx.xsd http://www.springframework.org/schema/jdbc http://www.springframework.org/schema/jdbc/spring-jdbc.xsd">

</beans>
8.3.3 第二步:配置事务管理器
<!-- 配置事务管理器 -->
<bean id="txManager" class="org.springframework.jdbc.datasource.DataSourceTransactionManager">
    <!-- 装配数据源 -->
    <property name="dataSource" ref="dataSource"></property>
</bean>
8.3.4 第三步:配置AOP
<!-- 配置事务切面 -->
<aop:config>
    <!-- 配置切入点表达式 -->
    <!-- ..表示任意个数的参数,*表示任意参数 -->
    <!-- 考虑到后面整合SpringSecurity,避免把UserDetailsService加入到事务控制,让切入点表达式定位打ServiceImpl -->
    <!-- public String com.atguigu.crowd.service.AdminService.getXxx(Integer id) -->
    <aop:pointcut id="txPointcut" expression="execution(* *..*Service.*(..))"/>

    <!-- 将切入式表达式和事务通知关联起来 -->
    <aop:advisor advice-ref="txAdvice" pointcut-ref="txPointcut" />
</aop:config>
8.3.5 第四步:配置事务属性
<!-- 配置事务通知 -->
<!-- id 属性用于在 aop:advisor 中引用事务通知 -->
<!-- transaction-manager 属性用于引用事务管理器,如果事务管理器的 bean 的 id 正好是 transactionManager,可以省略这个属性 -->
<tx:advice id="txAdvice" transaction-manager="txManager">
    <!-- 配置事务属性 -->
    <tx:attributes>
        <!-- name 属性指定当前要配置的事务方法的方法名 -->
        <!-- 查询方法:配置只读属性,让数据库知道这是一个查询操作,能够进行一定优化 -->
        <tx:method name="get*" read-only="true"/>
        <tx:method name="find*" read-only="true" />
        <tx:method name="query*" read-only="true" />
        <tx:method name="count*" read-only="true" />

        <!-- 增删改方法:配置事务的传播行为和回滚的异常 -->
        <!--
                propagation -属性配置事务方法的传播行为
                    REQUIRED 默认值,表示当前方法必须工作中事务中,如果当前线程上没有已经开启的事务,则自己开新事务。如果已经有了,那么就使用这个已有的事务。
                             不是首选,因为事务一启用的时候,事务二继续使用事务一的通道,倘若事务一出错,事务二也会跟着回滚。
                             用别人的事务也可能“被”回滚
                    REQUIRES_NEW 建议使用的值。默认值,表示当前方法必须工作中事务中,如果当前线程上没有已经开启的事务,则自己开新事务。就算是已经有了,也在自己开启的事务中运行
                                 表示不管当前线程上有没有事务,都要自己开事务,在自己的事务中进行
                                 不会收到其他事务回滚的异常
            -->
        <!--
                rollback-for -配置事务方法针对什么样的异常回滚
                    默认:运行时异常回滚
                    建议:编译时异常、运行时异常都回滚
            -->
        <tx:method name="save*" propagation="REQUIRES_NEW" rollback-for="java.lang.Exception" />
        <tx:method name="update*" propagation="REQUIRES_NEW" rollback-for="java.lang.Exception" />
        <tx:method name="remove*" propagation="REQUIRES_NEW" rollback-for="java.lang.Exception" />
        <tx:method name="bench*" propagation="REQUIRES_NEW" rollback-for="java.lang.Exception" />
    </tx:attributes>
</tx:advice>
9 表述层工作机制
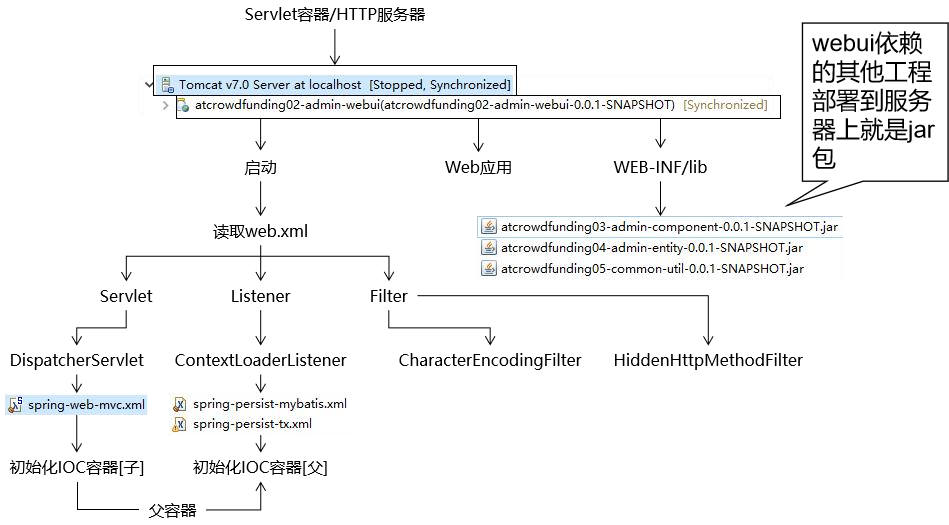
9.1 启动过程
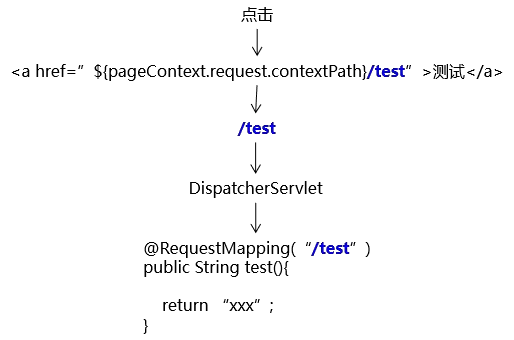
9.2 访问过程
10 表述层环境搭建
10.1 加入依赖
使用 SpringMVC 环境引入 spring-webmvc 依赖即可,同时可以把 spring-context 依赖去掉,因为根据依赖的传递性,spring-webmvc 会依赖 spring-context。
component >>> pom.xml
<dependency>
    <groupId>org.springframework</groupId>
    <artifactId>spring-webmvc</artifactId>
</dependency>
10.2 web.xml配置
10.2.1 ContextLoaderListener
作用:加载 Spring 的配置文件,根据 Spring 的配置文件初始化 IOC 容器
<!-- 配置 ContextLoaderListener 加载 Spring 配置文件 -->
<!-- needed for ContextLoaderListener -->
<context-param>
    <param-name>contextConfigLocation</param-name>
    <param-value>classpath:spring-persist-*.xml</param-value>
</context-param>
<!-- Bootstraps the root web application context before servlet initialization -->
<listener>
    <listener-class>org.springframework.web.context.ContextLoaderListener</listener-class>
</listener>
10.2.2 CharacterEncodingFilter
解决 POST 请求的字符乱码问题。需要注意的是:在 web.xml 中存在多个 Filter时,让这个 Filter 作为过滤器链中的第一个 Filter。
request.setCharacterEncoding(encoding) 要求必须在所有 request.getParameter(xxx)操作前面 response.setCharacterEncoding(encoding)要求必须在所有 response.getWriter() 操作前面
不满足这个顺序要求字符集设定无法生效
<!-- 配置 CharacterEncodingFilter 解决 POST 请求的字符乱码问题 -->
<filter>
    <filter-name>CharacterEncodingFilter</filter-name>
    <filter-class>org.springframework.web.filter.CharacterEncodingFilter</filter-class>
    <!-- 指定字符集 -->
    <init-param>
        <param-name>encoding</param-name>
        <param-value>UTF-8</param-value>
    </init-param>
    <!-- 强制请求进行编码 -->
    <init-param>
        <param-name>forceRequestEncoding</param-name>
        <param-value>true</param-value>
    </init-param>
    <!-- 强制响应进行编码 -->
    <init-param>
        <param-name>forceResponseEncoding</param-name>
        <param-value>true</param-value>
    </init-param>
</filter>
<!-- 这个Filter执行的顺序要在其他Filter前面 -->
    <!--
        原因如下,
        request.setCharacterEncoding(encoding);必须在request.getParameter() 前面
        response.setCharacterEncoding(encoding);必须在response.getWriter()前面
    -->
<filter-mapping>
    <filter-name>CharacterEncodingFilter</filter-name>
    <url-pattern>/*</url-pattern>
</filter-mapping>
10.2.3 HiddenHttpMethodFilter
遵循 RESTFUL 风格将 POST 请求转换为 PUT 请求、DELETE 请求时使用。
本项目暂时用不到,所以省略不配。
10.2.4DispatcherServlet
基本配置
<!-- 配置 SpringMVC 的前端控制器 -->
<!-- The front controller of this Spring Web application, responsible for handling all application requests -->
<servlet>
    <servlet-name>springDispatcherServlet</servlet-name>
    <servlet-class>org.springframework.web.servlet.DispatcherServlet</servlet-class>
    <!-- 以初始化参数的形式指定 SpringMVC 配置文件的位置 -->
    <init-param>
        <param-name>contextConfigLocation</param-name>
        <param-value>classpath:spring-web-mvc.xml</param-value>
    </init-param>
    <!-- 让 DispatcherServlet 在 Web 应用启动时创建对象、初始化 -->
    <!-- 默认情况:Servlet 在第一次请求的时候创建对象、初始化 -->
    <!-- Servlet 默认生命周期中,创建对象是在第一次接收到请求时 -->
        <!-- 而DispatcherServlet创建对象后有大量的“框架初始化”工作,不适合在第一次请求时来做
             设置load-on-startup就是为了让DispatcherServlet这web应用启动时创建对象,初始化
             值越小创建的越早
         -->
    <load-on-startup>1</load-on-startup>
</servlet>
<!-- Map all requests to the DispatcherServlet for handling -->
<servlet-mapping>
    <servlet-name>springDispatcherServlet</servlet-name>
    <!-- DispatcherServlet 映射的 URL 地址 -->
    <!-- 大白话:什么样的访问地址会交给 SpringMVC 来处理 -->
    <!-- 配置方式一:符合 RESTFUL 风格使用“/” -->
    <!-- <url-pattern>/</url-pattern> -->
    <!-- 配置方式二:请求扩展名 -->
    <!-- url-pattern的配置方式一:/拦截所以请求 -->
        <!-- <url-pattern>/</url-pattern>-->
        <!-- url-pattern的配置方式二:配置请求扩展名,例如拦截所以*.html -->
        <!-- <url-pattern>*.html</url-pattern> -->
        <!--
            优点:
                1. js、css、jpg等静态资源完全不经过SpringMVC,不需要特殊处理
                2. 可以实现伪静态的效果。表面上看起来是访问一个HTML文件这样的静态资源,其实实际上是访问经过Java代码处理过的动态页面
                伪静态的优点:
                    1. 给黑客的入侵增加难度。
                    2. 有利于SEO优化(让百度、谷歌这样的搜索引擎更容易的找到我们的项目)
                伪静态的缺点:
                    1.不符合RESTFul风格
        -->
        <!--
            为什么要另外配置一个Json扩展名呢?
                如果一个Ajax请求扩展名是html,但实际服务器给浏览器返回的是json数据,二者就不匹配,会出现406错误。
        -->
    <url-pattern>*.html</url-pattern>
    <url-pattern>*.json</url-pattern>
</servlet-mapping>
10.3 请求扩展名
10.3.1 *.html 扩展名
举例
http://localhost:8080/atcrowdfunding02-admin-webui/save/emp**.html**
作用:伪静态
表面上看起来是一个访问静态资源的请求,但是实际上是由 SpringMVC交给 handler 来处理的动态资源。
-
好处 1:有利于 SEO 优化
-
让搜索引擎更容易找到我们的网站,有利于网站的推广
-
好处 2:隐藏后端技术实现细节
-
给黑客入侵系统增加难度
-
好处 3:自动解决静态资源访问问题
访问 a.png 本身不符合*.html 这个 url-pattern,和 SpringMVC 完全没有关系,当前请求由 Tomcat 处理。
如 果 url-pattern 映 射 了 “ / ”, 那 么 SpringMVC 中 还 需 要 配 置
DefaultServletHandler。
缺陷:不符合 RESTFUL 风格
10.3.2 *.json扩展名
- 提出问题
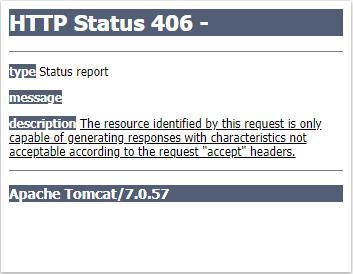
- 描述问题
请求扩展名 http://localhost:8080/extra01-ajax/get/emp/by/ajax**.html** 服务器端打算返回的数据:JSON 格式
二者不匹配!!!
-
分析问题
请求扩展名和响应体的数据格式不匹配!!!
-
解决问题
让请求扩展名和预计的响应体数据格式一致。
http://localhost:8080/extra01-ajax/get/emp/by/ajax**.json**
同时让 SpringMVC 在映射*.html 扩展名之外再映射***.json** 扩展名,不然会返回 404
<!-- Map all requests to the DispatcherServlet for handling -->
<servlet-mapping>
    <servlet-name>springDispatcherServlet</servlet-name>
    <url-pattern>*.html</url-pattern>
    <!-- 加入对json文件的映射 -->
    <url-pattern>*.json</url-pattern>
</servlet-mapping>
10.4 spring-web-mvc.xml 配置
10.4.1导入名称空间 context mvc
<?xml version="1.0" encoding="UTF-8"?>
<beans xmlns="http://www.springframework.org/schema/beans"
       xmlns:xsi="http://www.w3.org/2001/XMLSchema-instance"
       xmlns:context="http://www.springframework.org/schema/context"
       xmlns:mvc="http://www.springframework.org/schema/mvc"
       xsi:schemaLocation="http://www.springframework.org/schema/beans http://www.springframework.org/schema/beans/spring-beans.xsd
           http://www.springframework.org/schema/context http://www.springframework.org/schema/context/spring-context-3.0.xsd
           http://www.springframework.org/schema/mvc https://www.springframework.org/schema/mvc/spring-mvc.xsd ">

</beans>
10.4.2 创建SpringMVC扫描的包
component >>> com.atguigu.crowd.mvc
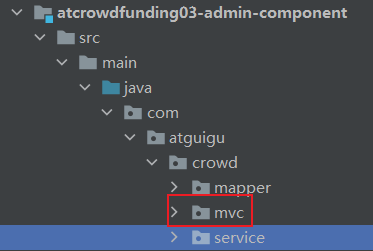
10.4.3 具体配置
<!-- 配置自动扫描的包 -->
<context:component-scan base-package="com.atguigu.crowd.mvc"/>
<!-- 配置视图解析器 -->
<!-- 拼接公式→前缀+逻辑视图+后缀=物理视图 -->
<!--
	@RequestMapping("/xxx/xxx")
    public String xxx() {
        // 这个返回值就是逻辑视图
        return "target";
	}
物理视图是一个可以直接转发过去的地址
物理视图:"/WEB-INF/"+"target"+".jsp"
转发路径:"/WEB-INF/target.jsp"
 -->
<bean id="viewResolver" class="org.springframework.web.servlet.view.InternalResourceViewResolver">
    <!-- 前缀:附加到逻辑视图名称前 -->
    <property name="prefix" value="/WEB-INF/"/>
    <!-- 后缀:附加到逻辑视图名称后 -->
    <property name="suffix" value=".jsp"/>
</bean>
<!-- 启用注解驱动 -->
<mvc:annotation-driven/>
10.5 页面上的 base 标签
10.5.1 加入依赖
webui >>> pom.xml
<!-- 引入 Servlet 容器中相关依赖 -->
<dependency>
    <groupId>javax.servlet</groupId>
    <artifactId>servlet-api</artifactId>
    <scope>provided</scope>
</dependency>
<!-- JSP 页面使用的依赖 -->
<dependency>
    <groupId>javax.servlet.jsp</groupId>
    <artifactId>jsp-api</artifactId>
    <scope>provided</scope>
</dependency>
10.5.2 作用
将页面上路径中的${pageContext.request.contextPath}部分提取到页面开头
10.5.3 写法
<base href="http://${pageContext.request.serverName }:${pageContext.request.serverPort }${page Context.request.contextPath }/" />
${pageContext.request.serverName } 代表当前请求的地址
${pageContext.request.serverPort }代表当前请求端口
${page Context.request.contextPath } 代表当前请求路径
contextPath本身是以/开头,所以不用加 /
10.5.4 需要注意的点
-
base 标签必须写在 head 标签内部
-
base 标签必须在所有“带具体路径”的标签的前面
-
serverName部分 EL 表达式和serverPort部分 EL 表达式之间必须写“:” -
serverPort部分 EL 表达式和contextPath部分 EL 表达式之间绝对不能写“/”- 原因:contextPath 部分 EL 表达式本身就是“/”开头
- 如果多写一个“/”会干扰 Cookie 的工作机制
-
serverPort部分 EL 表达式后面必须写“/” -
contextPath部分 EL 表达式后面必须写“/”
10.6 初步测试
10.6.1 创建Handler类
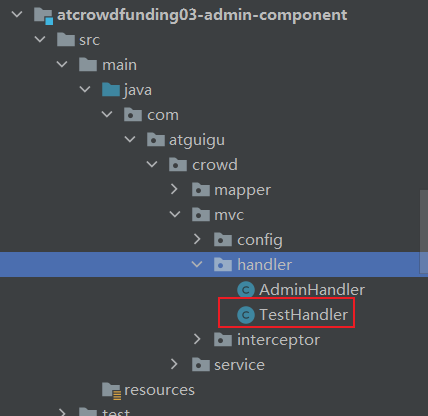
10.6.2 编写Handler方法
package com.atguigu.crowd.mvc.handler;

@Controller
public class TestHandler {
    @RequestMapping("/test/aaa/bbb/ccc.html")
    public String doTest() {
        return "target";
    }
}
10.6.3 创建目标jsp页面(视图)(target.jsp)
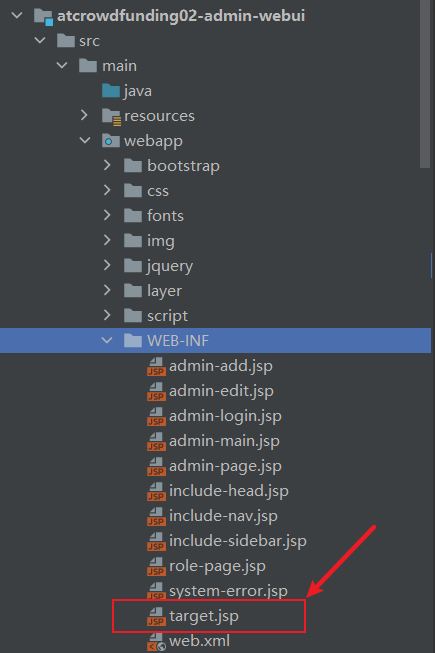
target.jsp
<%@ page language="java" contentType="text/html; charset=UTF-8" pageEncoding="UTF-8"%>
<!DOCTYPE html>
<html>
    <head>
        <meta charset="UTF-8">
        <title>搭建环境,测试页面</title>
    </head>
	<body>
        <h1>测试</h1>
    </body>
</html>
浏览器访问工程目录下的/test/aaa/bbb/ccc.html出现测试字样则代表配置成功
10.6.4 友情提示
跟着视频学习项目开发,表面上的现象错综复杂,一会儿在页面,一会儿写 jQuery,一会儿写 handler,一会儿写 Service,一会儿写 SQL,一会儿写配置文件。
背后有思路作为一根红线把所有的现象都穿起来,跟着思路走,就不会迷路。
思路的背后是目标。
思维一定要有层次!!!

11 SpringMVC 环境下的 Ajax 请求
11.1 建立意识
前端发送过来,后端要处理的请求有两种:
普通请求:后端处理完成后返回页面,浏览器使用使用页面替换整个窗口中的内容
Ajax 请求:后端处理完成后通常返回 JSON 数据,jQuery 代码使用 JSON 数据对页面局部更新
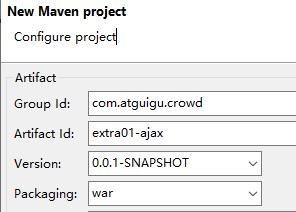
11.2 创建测试工程-自己未做
11.2.1 创建工程
11.2.2 加入依赖
<dependencies>
    <!-- SpringMVC 环境 -->
    <dependency>
        <groupId>org.springframework</groupId>
        <artifactId>spring-webmvc</artifactId>
        <version>4.3.20.RELEASE</version>
    </dependency>
    <!-- Spring 进行 JSON 数据转换依赖 -->
    <dependency>
        <groupId>com.fasterxml.jackson.core</groupId>
        <artifactId>jackson-core</artifactId>
        <version>2.9.8</version>
    </dependency>
    <dependency>
        <groupId>com.fasterxml.jackson.core</groupId>
        <artifactId>jackson-databind</artifactId>
        <version>2.9.8</version>
    </dependency>
    <!-- 引入 Servlet 容器中相关依赖 -->
    <dependency>
        <groupId>javax.servlet</groupId>
        <artifactId>servlet-api</artifactId>
        <version>2.5</version>
        <scope>provided</scope>
    </dependency>
    <!-- JSP 页面使用的依赖 -->
    <dependency>
        <groupId>javax.servlet.jsp</groupId>
        <artifactId>jsp-api</artifactId>
        <version>2.1.3-b06</version>
        <scope>provided</scope>
    </dependency>
</dependencies>
11.2.3 加入 jQuery

<base href="http://${pageContext.request.serverName }:${pageContext.request.serverPort }${pageCon text.request.contextPath }/"/>
<script type="text/javascript" src="jquery-3.2.1.js"></script>
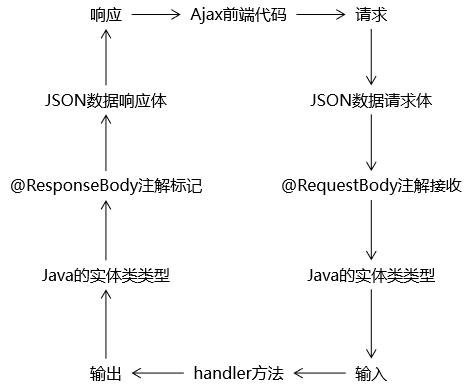
11.3 @ResponseBody 注解
11.3.1 作用
让 handler 方法的返回值本身就是当前请求的响应数据。不再参考视图处理器中配置的前后缀信息。
@Controller
public class AjaxHandler {
    @ResponseBody
    @RequestMapping("/get/emp/by/ajax")
    public Employee getEmployeeByAjax() {
        return new Employee(555, "empName555", 555.55);
    }
}
倘若Employee重写了toString方法,则会向页面输出
Employee{id: 555, name: empName555, salary: 555.55}
11.3.2 注意
-
开启 SpringMVC 的注解驱动
<mvc:annotation-driven/> -
必须有 jackson 依赖
jackson-core
jackson-databind
-
扩展名需要和实际返回的数据格式一致
响应体返回 JSON
请求扩展名*.json
web.xml 中 DispatcherServlet 必须映射*.json 扩展名
11.4 @RequestBody 注解
11.4.1 场景设定
jQuery 通过 Ajax 请求给服务器端发送一个数组:[5,8,12]
11.4.2 尝试方案一
-
前端发送数据
$.ajax({ "url":"send/array/plan/one.html", "type":"post", "data":{ "empIdArray":[5,8,12] }, }) -
浏览器开发者工具看到的请求体
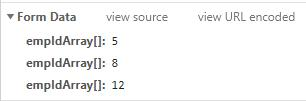
jQuery 私自在请求参数名字后面附加了“[]”
-
后端接收数据
@RequestParam("empIdArray[]") Integer[] empIdArray 这里一定要带上多出来的方括号!!!
结论:不建议采用这个方案!!!
11.4.3 尝试方案二
-
前端发送数据
$.ajax({ "url":"send/array/plan/two.html", "type":"post", "data":{ "empId":5, "empId":8, "empId":12 }, }) -
浏览器开发者工具看到的请求体

-
后端接收数据
@RequestParam("empIdArray") Integer empIdArray**结论:**后端只能接收到传来的
12所以这个方案不成立
11.4.4 尝试方案三
-
前端发送数据
// 准备要发送的数组 var array = [5,8,12]; // 将 JSON 数组转换成 JSON 字符串 // "[5,8,12]" var arrayStr = JSON.stringify(array); // 发送 Ajax 请求 $.ajax({ "url":"send/array/plan/three.html", "type":"post", "data":arrayStr,// JSON 字符串作为请求体" "contentType":"application/json;charset=UTF-8",// 告诉服务器端当前请求的请求体是 JSON 格式 }) -
浏览器开发者工具看到的请求体
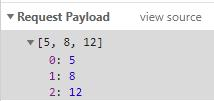
-
后端接收数据
@ResponseBody
@RequestMapping("/send/array/plan/three")
public String receiveArrayPlanThree(@RequestBody Integer[] empIdArray) {
    for (Integer empId : empIdArray) {
        System.out.println(empId);
    }
    return "success";
}
后端能接受并成功打印json数据,并且前端等响应后端返回的
success结论:建议使用的方案!!!
11.4.5 需要注意的点
-
前端
-
首先准备好要发送的 JSON 数据
- JSON 对象
- JSON 数组
-
将 JSON 对象或 JSON 数组转换为 JSON 字符串 var
arrayStr = JSON.stringify(array);
-
将 JSON 字符串直接赋值给 data 属性
“data”:arrayStr
-
必须要设置 contentType
“contentType”:“application/json;charset=UTF-8”
-
-
后端
-
加入 jackson 依赖
-
开启注解驱动
-
使用注解
@RequestBody Integer[] empIdArray
-
11.4.6 发送复杂对象举例
- 前端发送数据
// 准备要发送的 JSON 数据
var student = {
    "stuId": 999,
    "stuName": "tom",
    "stuAge": 23,
    "address": {
        "province": "shandong",
        "city": "heze",
        "street": "hello"
    },
    "schoolList": [
        {
            "schoolName":"schoolONe",
            "schoolSize":500
        },{
            "schoolName":"schoolTwo",
            "schoolSize":1000
        },{
            "schoolName":"schoolThree",
            "schoolSize":2000
        }
    ],
    "scoreMap": {
        "yingyu": 100,
        "shuxue": 80,
        "wuli": 90
    }
};
// 将 JSON 对象转换为 JSON 字符串
var requestBdoy = JSON.stringify(student);
// 发送 Ajax 请求
$.ajax({
    "url": "save/student.html",
    "type": "post",
    "data":requestBdoy,
    "contentType":"application/json;charset=UTF-8",
    "dataType":"text",
    "success":function(response){
        console.log(response);
     },
    "error":function(response){
        console.log(response);
    }
});
- 浏览器开发者工具中看到的请求体
- 后端接受数据
@ResponseBody
@RequestMapping("/save/student")
public String saveStudent(@RequestBody Student student) {
    System.out.println(student);
    return "success";
}
后端采用的是一个Student对象来接收数据,Student对象不仅可以对基本数据类型进行接收,还可以接收如SchoolList的对象数组、scoreMap的map类型的数据。
11.4.7 小结
@RequestBody 使用的场景:传统发送请求参数方式不方便发送的数据,使用 JSON 请求体的方式发送。特别是要发送复杂对象的时候。
11.5 对比
11.6 统一返回数据格式
util >>> com.atguigu.crowd.util
/**
* 用于统一项目中所有 Ajax 请求的返回值类型
* @author Lenovo
*
* @param <T>
*/
public class ResultEntity<T> {
    public static final String SUCCESS = "SUCCESS";
    public static final String FAILED = "FAILED";
    public static final String NO_MESSAGE = "NO_MESSAGE";
    public static final String NO_DATA = "NO_DATA";
    /**
    * 返回操作结果为成功,不带数据
    * @return
    */
    public static <E> ResultEntity<E> successWithoutData() {
        return new ResultEntity<E>(SUCCESS, NO_MESSAGE, null);
        }
    /**
    * 返回操作结果为成功,携带数据
    * @param data
    * @return
    */
    public static <E> ResultEntity<E> successWithData(E data) {
        return new ResultEntity<E>(SUCCESS, NO_MESSAGE, data);
    }
    /**
    * 返回操作结果为失败,不带数据
    * @param message
    * @return
    */
    public static <E> ResultEntity<E> failed(String message) {
        return new ResultEntity<E>(FAILED, message, null);
    }
    private String operationResult;
    private String operationMessage;
    private T queryData;
    public ResultEntity() { }
    public ResultEntity(String operationResult, String operationMessage, T queryData) {
        super();
        this.operationResult = operationResult;
        this.operationMessage = operationMessage;
        this.queryData = queryData;
    }
    @Override
    public String toString() {
        return "AjaxResultEntity [operationResult=" + operationResult + ", operationMessage=" + operationMessage+ ", queryData=" + queryData + "]";
    }
    public String getOperationResult() {
        return operationResult;
    }
    public void setOperationResult(String operationResult) {
        this.operationResult = operationResult;
    }
    public String getOperationMessage() {
        return operationMessage;
    }
    public void setOperationMessage(String operationMessage) {
        this.operationMessage = operationMessage;
    }
    public T getQueryData() {
        return queryData;
    }
    public void setQueryData(T queryData) {
        this.queryData = queryData;
    }
}
12 前端页面
12.1 静态资源引入
12.1.1 来源
“前端页面”目录下
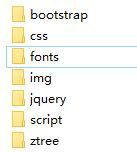
12.1.2 复制到工程目录中的位置
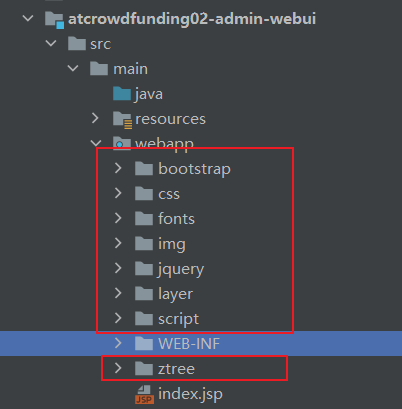
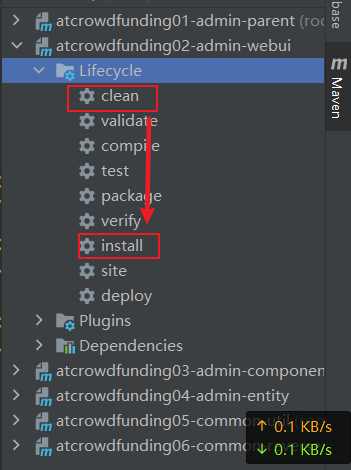
复制到工程目录中后,然后点击maven中的webui下的lifecycle下到clean,执行完成后再点击install
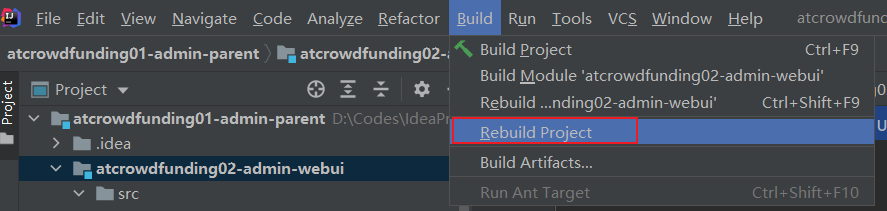
当install执行完成后点击build下的rebuild对项目进行重新打包
12.2 初步显示管理员登录页面
12.2.1准备页面文件
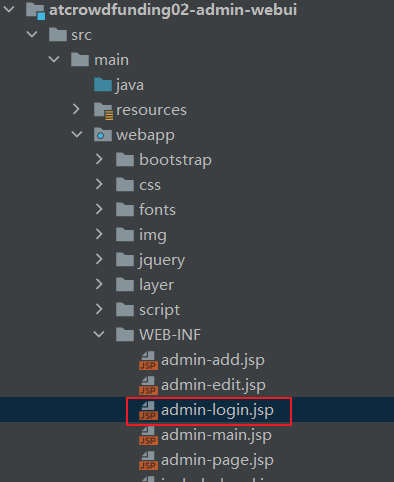
12.2.2 调整页面文件
把页面文件的内容从原型文件中复制过来,再进行必要的调整
<meta charset="UTF-8">
<meta http-equiv="X-UA-Compatible" content="IE=edge">
<meta name="viewport" content="width=device-width, initial-scale=1">
<meta name="description" content="">
<meta name="keys" content="">
<meta name="author" content="">
<base href="http://${pageContext.request.serverName }:${pageContext.request.serverPort }${pageC ontext.request.contextPath }/"/>
<link rel="stylesheet" href="bootstrap/css/bootstrap.min.css">
<link rel="stylesheet" href="css/font-awesome.min.css">
<link rel="stylesheet" href="css/login.css">
<script type="text/javascript" src="jquery/jquery-2.1.1.min.js"></script>
<script type="text/javascript" src="bootstrap/js/bootstrap.min.js"></script>
12.2.3 配置view-controller
webui >>> resources >>> spring-web-mvc.xml中加入
<mvc:view-controller path="/admin/to/login/page.html" view-name="admin-login"/>
12.3 layer 弹层组件
12.3.1 解压
layer-v3.1.1.zip
12.3.2 加入layer环境
将 layer 目录整个复制到项目中
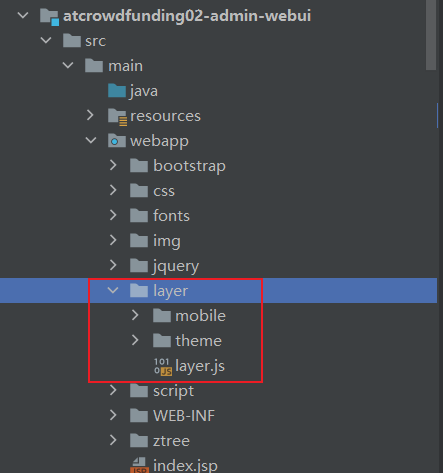
12.3.3 页面引入layer
<script type="text/javascript" src="jquery/jquery-2.1.1.min.js"></script>
<script type="text/javascript" src="layer/layer.js"></script>
12.3.4 实验layer
layer.msg("这里是 layer 弹出的消息!");
13 异常映射
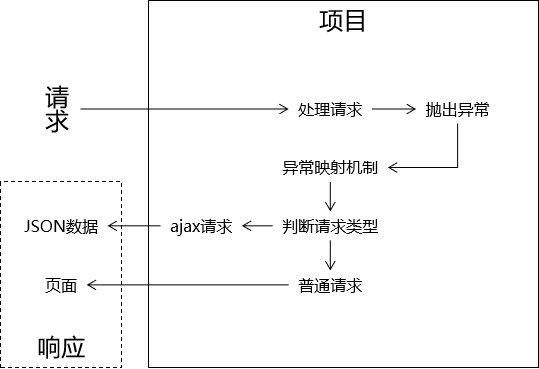
13.1 作用
统一管理项目中的异常
- 抛出异常
- 显示异常消息
- 普通请求:在页面上显示异常信息
- Ajax请求:返回 JSON 数据
13.2 异常映射的工作机制
13.3 判断请求类型的工具方法
13.3.1 判断依据
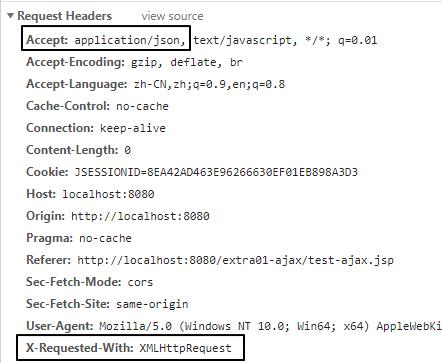
通过请求头和X-Requested-With可以判断请求类型是JSON还是普通请求
13.3.2 创建工具类
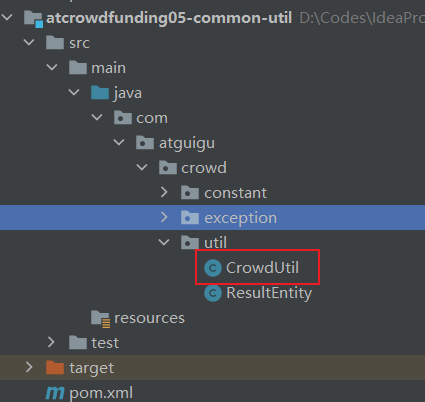
utils >>> CrowdUtil.java
/**
     * 判断当前请求是否为Ajax请求
     * @param request
     * @return
     *  true:当前请求是Ajax请求
     *  false:当前请求不是Ajax请求
     */
public static boolean judgeRequestType(HttpServletRequest request) {

    // 1.获取请求消息头
    String acceptInformation = request.getHeader("Accept");
    String xRequestInformation = request.getHeader("X-Requested-With");
	// 2.检查并返回
    return (
        (acceptInformation != null && acceptInformation.length() > 0 && acceptInformation.contains("application/json"))
        ||
        (xRequestInformation != null && xRequestInformation.length() > 0 && xRequestedWith.equals("XMLHttpRequest")));
}
13.4 异常映射实现方式
13.4.1 基于xml
webui >>> resources >>> spring-web-mvc.xml文件中的配置(全局)
<!-- 配置基于XML的异常映射 -->
<bean id="simpleMappingExceptionResolver" class="org.springframework.web.servlet.handler.SimpleMappingExceptionResolver">
    <!-- 配置异常的类型和具体视图页面的对应关系 -->
    <property name="exceptionMappings">
        <props>
            <!-- key属性指定异常全类名 -->
            <!-- 标签体中写对应的视图(这个值和上面的viewResolver拼前后缀得到具体的资源) -->
            <prop key="java.lang.NullPointerException">system-error</prop>
        </props>
    </property>
    <!-- 使用 exceptionAttribute 可以修改异常对象存入请求域时使用的属性名 -->
    <!-- <property name="exceptionAttribute"></property> -->
</bean>
新建system-error.jsp界面
位置
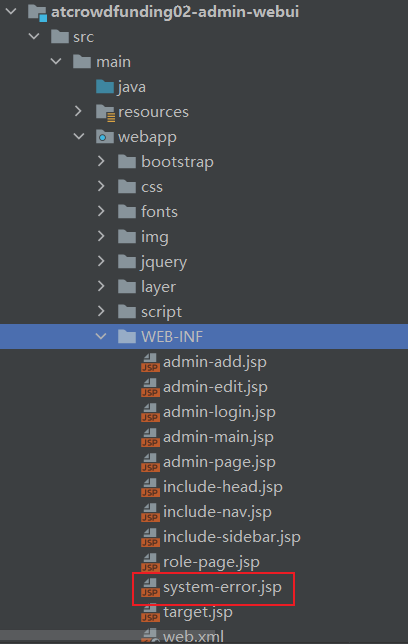
system-error.jsp
<!--...代码...-->
<!-- 如果设定为真,那么JSP中的表达式被当成字符串处理。 -->
<%@ page isELIgnored="false" %>

<!--...代码...-->
<script type="text/javascript">
    $(function () {
        $("button").click(function (){
            // 相当于浏览器的后退按钮
            window.history.back();
        })
    })
</script>

</head>
<body>

<!--...代码...-->
<div class="container">
    <h2 class="form-signin-heading" style="text-align: center">
        <i class="glyphicon glyphicon-log-in"></i> 尚筹网系统消息
    </h2>
    <h3 style="text-align: center">${requestScope.exception.message}</h3>
    <button style="width: 150px;margin: 50px auto 0px auto" class="btn btn-lg btn-success btn-block">点我返回上一步</button>
</div>
</body>
</html>
13.4.2 基于注解
- 加入gson
component >>> pom.xml
<!-- 处理 JSON 数据 -->
<dependency>
    <groupId>com.google.code.gson</groupId>
    <artifactId>gson</artifactId>
</dependency>
- 创建异常处理器类
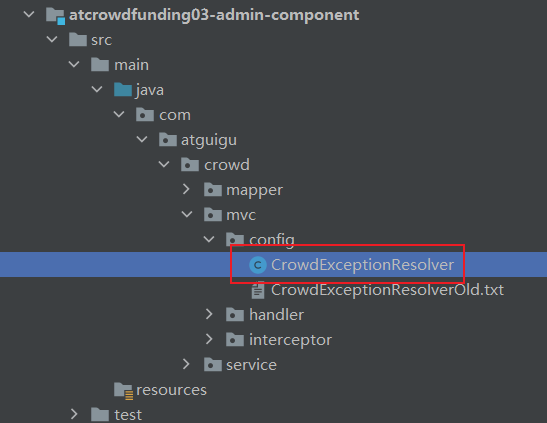
- 异常处理器类代码(优化后)
component >>> CrowdExceptionResolver
/*** 基于注解的异常处理器类
*
*/
// 表示当前类是一个处理异常的类
@ControllerAdvice
public class CrowdExceptionResolver {
    @ExceptionHandler(value = LoginFailedException.class)
    public ModelAndView resolveLoginFailedException(
        LoginFailedException exception,
        HttpServletRequest request,
        HttpServletResponse response
    ) throws IOException {
        // 只是指定当前异常对应的页面即可
        String viewName = "admin-login";
        return commonResolveException(exception, request, response, viewName);
    }

    // 表示捕获到 Exception 类型的异常对象由当前方法处理
    @ExceptionHandler(value = Exception.class)
    public ModelAndView resolveException(
        Exception exception,
        HttpServletRequest request,
        HttpServletResponse response
    ) throws IOException {
        // 只是指定当前异常对应的页面即可
        String viewName = "system-error";
        return commonResolveException(exception, request, response, viewName);
    }
    /**
    * 核心异常处理方法
    * @param exception SpringMVC 捕获到的异常对象
    * @param request 为了判断当前请求是“普通请求”还是“Ajax 请求” 需要传入原生 request 对象
    * @param response 为了能够将 JSON 字符串作为当前请求的响应数 据返回给浏览器 * @param viewName 指定要前往的视图名称
    * @return ModelAndView * @throws IOException
    */
    private ModelAndView commonResolveException(
        Exception exception,
        HttpServletRequest request,
        HttpServletResponse response,
        String viewName
    ) throws IOException {
        // 1.判断当前请求是“普通请求”还是“Ajax 请求”
        boolean judgeResult = CrowdUtil.judgeRequestType(request);
        // 2.如果是 Ajax 请求
        if(judgeResult) {
            // 3.从当前异常对象中获取异常信息
            String message = exception.getMessage();
            // 4.创建 ResultEntity
            ResultEntity<Object> resultEntity = ResultEntity.failed(message);
            // 5.创建 Gson 对象
            Gson gson = new Gson();
            // 6.将 resultEntity 转化为 JSON 字符串
            String json = gson.toJson(resultEntity);
            // 7.把当前 JSON 字符串作为当前请求的响应体数据返回给浏览器
            // ①获取 Writer 对象
            PrintWriter writer = response.getWriter();
            // ②写入数据
            writer.write(json);
            // 8.返回 null,不给 SpringMVC 提供 ModelAndView 对象
            // 这样 SpringMVC 就知道不需要框架解析视图来提供响应, 而是程序员自己提供了响应
            return null;
        }
        // 9.创建 ModelAndView 对象
        ModelAndView modelAndView = new ModelAndView();
        // 10.将 Exception 对象存入模型
        modelAndView.addObject(CrowdConstant.ATTR_NAME_EXCEPTION, exception);
        // 11.设置目标视图名称
        modelAndView.setViewName(viewName);
        // 12.返回 ModelAndView 对象
        return modelAndView;
    }
}
14 以常量管理属性名和异常消息
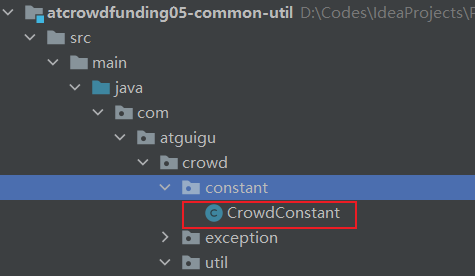
util >>> CrowdConstant
public class CrowdConstant {
    public static final String ATTR_NAME_EXCEPTION = "exception";
    public static final String MESSAGE_LOGIN_FAILED = "登录失败!请确认账 号密码是否正确!";
}
好处: 减少打字错误


 325
325


 被折叠的 条评论
为什么被折叠?
被折叠的 条评论
为什么被折叠?
 到【灌水乐园】发言


