


本文是学习鸿洋大神的博文http://blog.csdn.net/lmj623565791/article/details/38339817之后加深理解。
为了真正理解鸿洋大神Demo中每一句代码的作用,进而理解onMeasure和onLayout的职能,以下将重新梳理代码。
  @Override
    public LayoutParams generateLayoutParams(AttributeSet attrs)
    {
        return new MarginLayoutParams(getContext(),attrs);
    }


 @Override
    protected void onMeasure(int widthMeasureSpec, int heightMeasureSpec) {
        super.onMeasure(widthMeasureSpec, heightMeasureSpec);
        int widthSize=MeasureSpec.getSize(widthMeasureSpec);
        int widthMode=MeasureSpec.getMode(widthMeasureSpec);
        int heightSize=MeasureSpec.getSize(heightMeasureSpec);
        int heightMode=MeasureSpec.getMode(heightMeasureSpec);
        //计算出所有childView的宽和高
        measureChildren(widthMeasureSpec,heightMeasureSpec);
        Log.i(TAG,"onMeasure---heightSize:"+heightSize+",widthSize"+widthSize);

        setMeasuredDimension(widthSize,heightSize);
    }


    @Override
    protected void onLayout(boolean changed, int l, int t, int r, int b) {
        int childCount=getChildCount();
        for (int i=0;i<childCount;i++){
            View child = getChildAt(i);
            //不能调用getWidth和getHeight方法,此时这些值仍然为零
            /*int cWidth = child.getWidth();
            int cHeight=child.getHeight();*/
            //上面调用了memeasureChildren这里才能获得值
            int cWidth=child.getMeasuredWidth();
            int cHeight=child.getMeasuredHeight();
            Log.i(TAG,"childView-----"+cWidth+"----"+cHeight);
            MarginLayoutParams mp= (MarginLayoutParams) child.getLayoutParams();
            int cl=0,ct=0,cr=0,cb=0;
            switch (i){
                case 0:
                    cl=mp.leftMargin;
                    ct=mp.topMargin;
                    break;
                case 1:
                    cl=getWidth()-mp.rightMargin-cWidth;
                    ct=mp.topMargin;
                    break;
                case 2:
                    cl=mp.leftMargin;
                    ct=getHeight()-mp.bottomMargin-cHeight;
                    break;
                case 3:
                    cl=getWidth()-mp.rightMargin-cWidth;
                    ct=getHeight()-mp.bottomMargin-cHeight;
                    break;
            }
            cr=cWidth+cl;
            cb=cHeight+ct;
            child.layout(cl,ct,cr,cb);
        }
    }
去掉onMeasure方法中处理ViewGroup自身宽或者高为wrap_content时的代码。
这时候写一个布局文件如下,包括ViewGroup是wrap_content,math_parent和确定数值三种情况如下。
<LinearLayout xmlns:android="http://schemas.android.com/apk/res/android"
android:layout_width="match_parent"
android:layout_height="match_parent"
android:orientation="vertical">
<LinearLayout
android:layout_width="match_parent"
android:layout_height="0dp"
android:layout_weight="1">
<com.pngfi.cvg.CustomViewGroup
android:layout_width="wrap_content"
android:layout_height="wrap_content">
<TextView
android:layout_width="50dp"
android:layout_height="50dp"
android:background="#FF4444"
android:gravity="center"
android:text="0"
android:textColor="#FFFFFF"
android:textSize="22sp"
android:textStyle="bold" />
<TextView
android:layout_width="50dp"
android:layout_height="50dp"
android:background="#00ff00"
android:gravity="center"
android:text="1"
android:textColor="#FFFFFF"
android:textSize="22sp"
android:textStyle="bold" />
<TextView
android:layout_width="50dp"
android:layout_height="50dp"
android:background="#ff0000"
android:gravity="center"
android:text="2"
android:textColor="#FFFFFF"
android:textSize="22sp"
android:textStyle="bold" />
<TextView
android:layout_width="50dp"
android:layout_height="50dp"
android:background="#0000ff"
android:gravity="center"
android:text="3"
android:textColor="#FFFFFF"
android:textSize="22sp"
android:textStyle="bold" />
</com.pngfi.cvg.CustomViewGroup>
</LinearLayout>
<LinearLayout
android:layout_width="match_parent"
android:layout_height="0dp"
android:layout_weight="1">
<com.pngfi.cvg.CustomViewGroup
android:layout_width="match_parent"
android:layout_height="match_parent">
<TextView
android:layout_width="50dp"
android:layout_height="50dp"
android:background="#FF4444"
android:gravity="center"
android:text="0"
android:textColor="#FFFFFF"
android:textSize="22sp"
android:textStyle="bold" />
<TextView
android:layout_width="50dp"
android:layout_height="50dp"
android:background="#00ff00"
android:gravity="center"
android:text="1"
android:textColor="#FFFFFF"
android:textSize="22sp"
android:textStyle="bold" />
<TextView
android:layout_width="50dp"
android:layout_height="50dp"
android:background="#ff0000"
android:gravity="center"
android:text="2"
android:textColor="#FFFFFF"
android:textSize="22sp"
android:textStyle="bold" />
<TextView
android:layout_width="50dp"
android:layout_height="50dp"
android:background="#0000ff"
android:gravity="center"
android:text="3"
android:textColor="#FFFFFF"
android:textSize="22sp"
android:textStyle="bold" />
</com.pngfi.cvg.CustomViewGroup>
</LinearLayout>
<LinearLayout
android:layout_width="match_parent"
android:layout_height="0dp"
android:layout_weight="1">
<com.pngfi.cvg.CustomViewGroup
android:layout_width="250dp"
android:layout_height="130dp">
<TextView
android:layout_width="50dp"
android:layout_height="50dp"
android:background="#FF4444"
android:gravity="center"
android:text="0"
android:textColor="#FFFFFF"
android:textSize="22sp"
android:textStyle="bold" />
<TextView
android:layout_width="50dp"
android:layout_height="50dp"
android:background="#00ff00"
android:gravity="center"
android:text="1"
android:textColor="#FFFFFF"
android:textSize="22sp"
android:textStyle="bold" />
<TextView
android:layout_width="50dp"
android:layout_height="50dp"
android:background="#ff0000"
android:gravity="center"
android:text="2"
android:textColor="#FFFFFF"
android:textSize="22sp"
android:textStyle="bold" />
<TextView
android:layout_width="50dp"
android:layout_height="50dp"
android:background="#0000ff"
android:gravity="center"
android:text="3"
android:textColor="#FFFFFF"
android:textSize="22sp"
android:textStyle="bold" />
</com.pngfi.cvg.CustomViewGroup>
</LinearLayout>
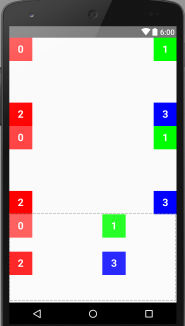
</LinearLayout>效果如下,可以看出wrap_content的情况当做math_parent来处理了
以及在AndroidStudio中打印的Log

另外measureChildren(widthMeasureSpec,heightMeasureSpec);方法如果不调用的话,界面时绘制不出来东西的。此时子View的getMeasureWidth和getMeasureHeight方法都返回0;
先来强调一下View的三种测量模式:
EXACTLY:表示设置了精确的值,一般当childView设置其宽、高为精确值、match_parent时,ViewGroup会将其设置为EXACTLY;
AT_MOST:表示子布局被限制在一个最大值内,一般当childView设置其宽、高为wrap_content时,ViewGroup会将其设置为AT_MOST;
UNSPECIFIED:表示子布局想要多大就多大,一般出现在AadapterView的item的heightMode中、ScrollView的childView的heightMode中;此种模式比较少见。
注:上面的每一行都有一个一般,意思上述不是绝对的,对于childView的mode的设置还会和ViewGroup的测量mode有一定的关系;当然了,这是第一篇自定义ViewGroup,而且绝大部分情况都是上面的规则,所以为了通俗易懂,暂不深入讨论其他内容。
此时差不多能够理清OnMeasure方法中需要做的事情:
- 根据widthMeasureSpec和heightMeasureSpec来获得ViewGroup宽和高的尺寸值以及测量模式。
- 为子View计算大小。
处理ViewGroup的大小为wrap_content的情况
此时我们为onMeasure方法增加处理wrap_content的部分。
 @Override
    protected void onMeasure(int widthMeasureSpec, int heightMeasureSpec) {
        super.onMeasure(widthMeasureSpec, heightMeasureSpec);
        int widthSize = MeasureSpec.getSize(widthMeasureSpec);
        int widthMode = MeasureSpec.getMode(widthMeasureSpec);
        int heightSize = MeasureSpec.getSize(heightMeasureSpec);
        int heightMode = MeasureSpec.getMode(heightMeasureSpec);
        //计算出所有childView的宽和高
        measureChildren(widthMeasureSpec, heightMeasureSpec);

        //处理wrap_content部分
        if (widthMode == MeasureSpec.AT_MOST) {
            widthSize = getWrapWidth();
        }
        if (heightMode== MeasureSpec.AT_MOST) {
            heightSize = getWrapHeight();
        }

        //这个方法在OnMeasure中必须调用,用来储存测量的值,否则会抛出异常
        setMeasuredDimension(widthSize, heightSize);
    }


 private int getWrapWidth() {
        int width = 0;
        int cCount = getChildCount();

        int cWidth = 0;
        MarginLayoutParams cParams = null;


        // 用于计算上边两个childView的宽度
        int tWidth = 0;
        // 用于计算下面两个childiew的宽度,最终宽度取二者之间大值
        int bWidth = 0;

        // 根据childView计算的出的宽和高,以及设置的margin计算容器的宽和高,主要用于容器是warp_content时
        for (int i = 0; i < cCount; i++) {
            View childView = getChildAt(i);
            cWidth = childView.getMeasuredWidth();
            cParams = (MarginLayoutParams) childView.getLayoutParams();
            // 上面两个childView
            if (i == 0 || i == 1) {
                tWidth += cWidth + cParams.leftMargin + cParams.rightMargin;
            }

            if (i == 2 || i == 3) {
                bWidth += cWidth + cParams.leftMargin + cParams.rightMargin;
            }

        }
        width = Math.max(tWidth, bWidth);
        return width;
    }


    private int getWrapHeight() {

        int height = 0;
        int cCount = getChildCount();
        int cHeight = 0;
        MarginLayoutParams cParams = null;

        // 用于计算左边两个childView的高度
        int lHeight = 0;
        // 用于计算右边两个childView的高度,最终高度取二者之间大值
        int rHeight = 0;

        // 根据childView计算的出的宽和高,以及设置的margin计算容器的宽和高,主要用于容器是warp_content时
        for (int i = 0; i < cCount; i++) {
            View childView = getChildAt(i);
            cHeight = childView.getMeasuredHeight();
            cParams = (MarginLayoutParams) childView.getLayoutParams();

            if (i == 0 || i == 2) {
                lHeight += cHeight + cParams.topMargin + cParams.bottomMargin;
            }

            if (i == 1 || i == 3) {
                rHeight += cHeight + cParams.topMargin + cParams.bottomMargin;
            }
        }
        height = Math.max(lHeight, rHeight);
        return height;
    }
此时wrap_content的效果就正常了,如下图

到此我们再说一下onLayout方法,这个方法比较简单主要就是给每个字View定位,调用子View的layout方法。传入左上角的坐标l,t和右下角的坐标r,b;计算坐标时可能会用到测量的宽度,需先调用过measureChildren(widthMeasureSpec, heightMeasureSpec);


 1447
1447


 被折叠的 条评论
为什么被折叠?
被折叠的 条评论
为什么被折叠?
 到【灌水乐园】发言


