


二、nova-api
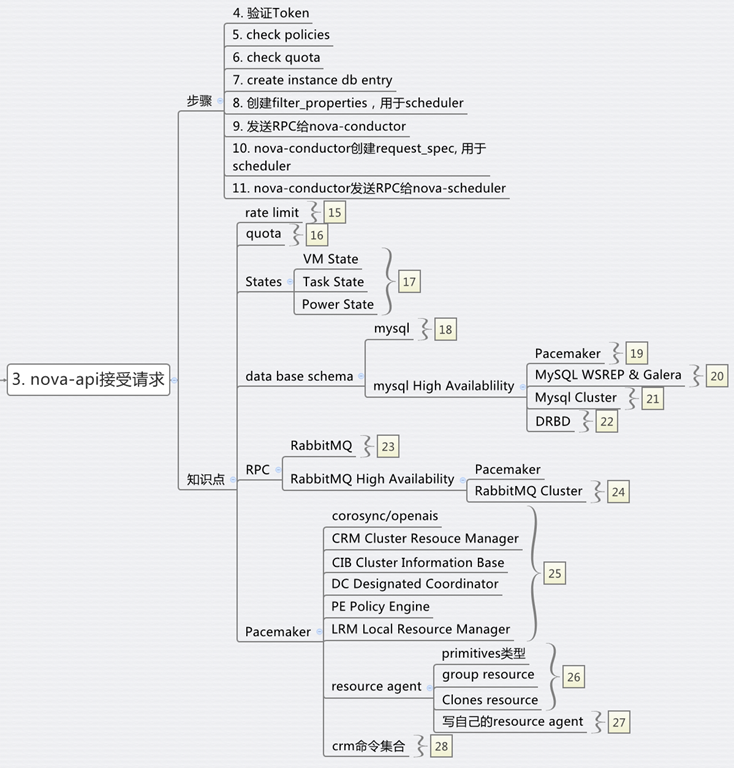
步骤3:nova-api接收请求
nova-api接收请求,也不是随便怎么来都接收的,而是需要设定rate limits,默认的实现是在ratelimit的middleware里面实现的。
然而有时候,我们希望实现distributed rate-limiting,从而Turnstile是一个不错的选择。
https://github.com/klmitch/turnstile
http://pypi.python.org/pypi/turnstile
步骤4:对Token的验证
步骤5:查看Policy
这两步已经在keystone的时候研究过
步骤6:检查quota
nova, neutron, Cinder各有各的quota,并且可以从命令行进行管理
# nova -h | grep quota
quota-class-show List the quotas for a quota class.
quota-class-update Update the quotas for a quota class.
quota-defaults List the default quotas for a tenant.
quota-delete Delete quota for a tenant/user so their quota will
quota-show List the quotas for a tenant/user.
quota-update Update the quotas for a tenant/user.
# nova quota-show
+-----------------------------+-------+
| Quota | Limit |
+-----------------------------+-------+
| instances | 10 |
| cores | 20 |
| ram | 51200 |
| floating_ips | 10 |
| fixed_ips | -1 |
| metadata_items | 128 |
| injected_files | 5 |
| injected_file_content_bytes | 10240 |
| injected_file_path_bytes | 255 |
| key_pairs | 100 |
| security_groups | 10 |
| security_group_rules | 20 |
+-----------------------------+-------+
# cinder -h | grep quota
quota-class-show List the quotas for a quota class.
quota-class-update Update the quotas for a quota class.
quota-defaults List the default quotas for a tenant.
quota-show List the quotas for a tenant.
quota-update Update the quotas for a tenant.
quota-usage List the quota usage for a tenant.
# cinder quota-show 1779b3bc725b44b98726fb0cbdc617b1
+-----------+-------+
| Property | Value |
+-----------+-------+
| gigabytes | 1000 |
| snapshots | 10 |
| volumes | 10 |
+-----------+-------+
# neutron -h | grep quota
quota-delete Delete defined quotas of a given tenant.
quota-list List quotas of all tenants who have non-default quota values.
quota-show Show quotas of a given tenant
quota-update Define tenant's quotas not to use defaults.
# neutron quota-show 1779b3bc725b44b98726fb0cbdc617b1
+---------------------+-------+
| Field | Value |
+---------------------+-------+
| floatingip | 50 |
| network | 10 |
| port | 50 |
| router | 10 |
| security_group | 10 |
| security_group_rule | 100 |
| subnet | 10 |
+---------------------+-------+
推荐下面的文章
openstack nova 基础知识——Quota(配额管理)
http://www.sebastien-han.fr/blog/2012/09/19/openstack-play-with-quota/
步骤7:在数据库中创建Instance实例
有关nova的database schema参考下面的文章
http://www.prestonlee.com/2012/05/03/openstack-nova-essex-mysql-database-schema-diagram-and-sql/
MySQL是Openstack中最重要的组件之一,所以在生产环境中High Availability是必须的。
MySQL的HA有下面几种方式:
http://dev.mysql.com/doc/mysql-ha-scalability/en/index.html
| Requirement | MySQL Replication | MySQL with DRBD with Corosync and Pacemaker | MySQL Cluster |
| Availability | |||
| Platform Support | All Supported by MySQL Server | Linux | All Supported by MySQL Cluster |
| Automated IP Failover | No | Yes | Depends on Connector and Configuration |
| Automated Database Failover | No | Yes | Yes |
| Automatic Data Resynchronization | No | Yes | Yes |
| Typical Failover Time | User / Script Dependent | Configuration Dependent, 60 seconds and Above | 1 Second and Less |
| Synchronous Replication | No, Asynchronous and Semisynchronous | Yes | Yes |
| Shared Storage | No, Distributed | No, Distributed | No, Distributed |
| Geographic redundancy support | Yes | Yes, via MySQL Replication | Yes, via MySQL Replication |
| Update Schema On-Line | No | No | Yes |
| Scalability | |||
| Number of Nodes | One Master, Multiple Slaves | One Active (primary), one Passive (secondary) Node | 255 |
| Built-in Load Balancing | Reads, via MySQL Replication | Reads, via MySQL Replication | Yes, Reads and Writes |
| Supports Read-Intensive Workloads | Yes | Yes | Yes |
| Supports Write-Intensive Workloads | Yes, via Application-Level Sharding | Yes, via Application-Level Sharding to Multiple Active/Passive Pairs | Yes, via Auto-Sharding |
| Scale On-Line (add nodes, repartition, etc.) | No | No | Yes |
要想系统的学习Mysql replication,推荐下面的这本书
《MySQL High Availability Tools for Building Robust Data Centers》
还有一种方式是Mysql + galera,可以搭建Active + Active的Mysql应用
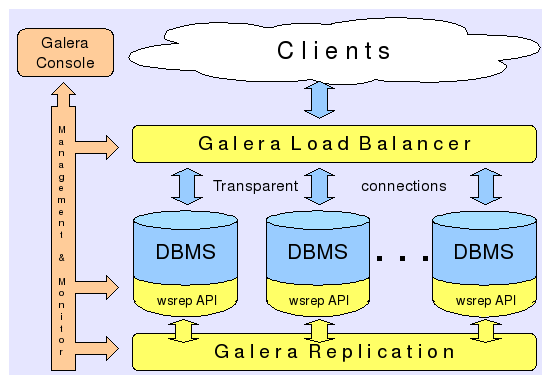
参考下面的两篇文章
http://www.sebastien-han.fr/blog/2012/04/08/mysql-galera-cluster-with-haproxy/
http://www.sebastien-han.fr/blog/2012/04/01/mysql-multi-master-replication-with-galera/
还有一种常见的HA的技术,就是pacemaker
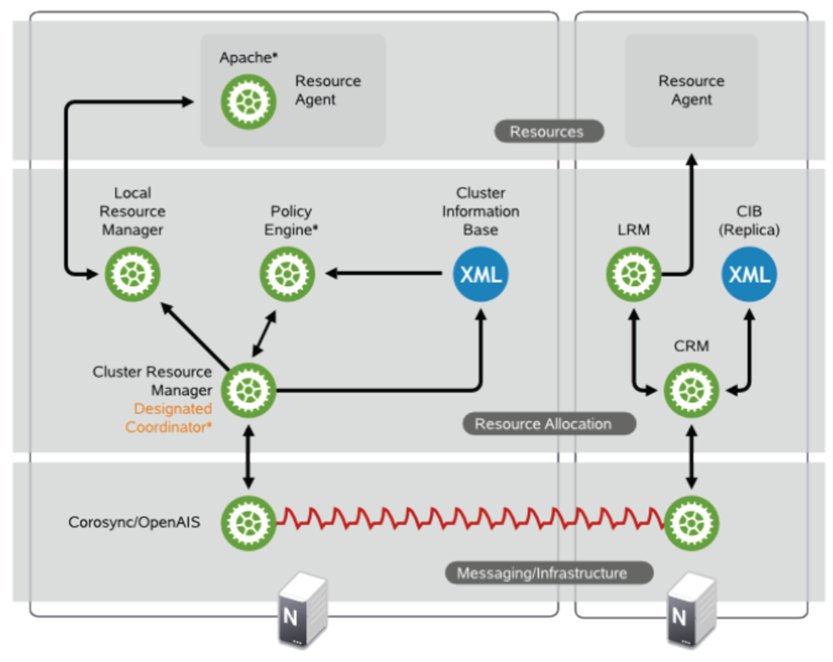
最底层是通信层corosync/openais
负责cluster中node之间的通信
上一层是Resource Allocation Layer,包含下面的组件:
CRM Cluster Resouce Manager
是总管,对于resource做的任何操作都是通过它。每个机器上都有一个CRM。
CIB Cluster Information Base
CIB由CRM管理,是在内存中的XML数据库,保存了cluster的配置和状态。我们查询出来的configuration都是保存在CIB里面的。nodes, resources, constraints, relationship.
DC Designated Coordinator
每个node都有CRM,会有一个被选为DC,是整个Cluster的大脑,这个DC控制的CIB是master CIB,其他的CIB都是副本。
PE Policy Engine
当DC需要进行一些全局配置的时候,首先由PE根据当前的状态和配置,计算出将来的状态,并生成一系列的action,使得cluster从初始状态变为结果状态。PE仅仅在DC上运行。
LRM Local Resource Manager
本地的resource管理,调用resource agent完成操作,启停resource,将结果返回给CRM
再上一层是Resource Layer
包含多个resource agent。resource agent往往是一些shell script,用来启动,停止,监控resource的状态。
要弄懂Pacemaker,推荐读《SUSE high availability guide》
https://www.suse.com/documentation/sle_ha/singlehtml/book_sleha/book_sleha.html
本人做了一些笔记和实验,请参考
步骤8:创建filter_properties,用于nova scheduler
步骤9:发送RPC给nova-conductor
有关nova-conductor的文章
http://cloudystuffhappens.blogspot.com/2013/04/understanding-nova-conductor-in.html
在Openstack中,RPC的发送是通过RabbitMQ
RabbitMQ可以通过Pacemaker进行HA,当然也可以搭建自己的RabbitMQ Cluster
学习RabbitMQ当然首推《RabbitMQ in Action》
本人也做了一些笔记
RabbitMQ in Action (1): Understanding messaging
RabbitMQ in Action (2): Running and administering Rabbit
RabbitMQ in Action(5): Clustering and dealing with failure
还没完全读完,敬请谅解
当然Openstack中对于RabbitMQ的使用,一篇很好的文章是
本人也对RPC的调用过程进行了代码分析
步骤10:nova-condutor创建request_spec,用于scheduler
步骤11:nova-conductor发送RPC给nova-scheduler
三、nova-scheduler
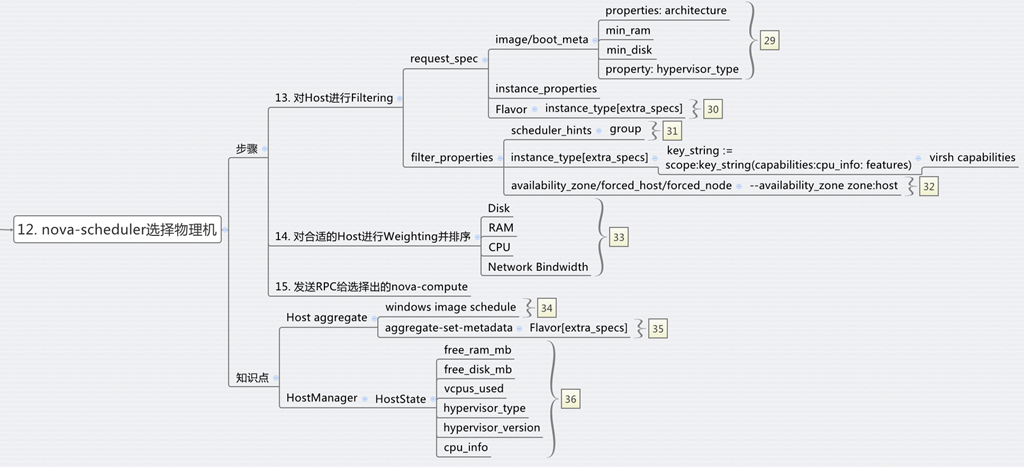
选择一个物理机来创建虚拟机,我们称为schedule的过程
nova scheduler的一个经典的图如下
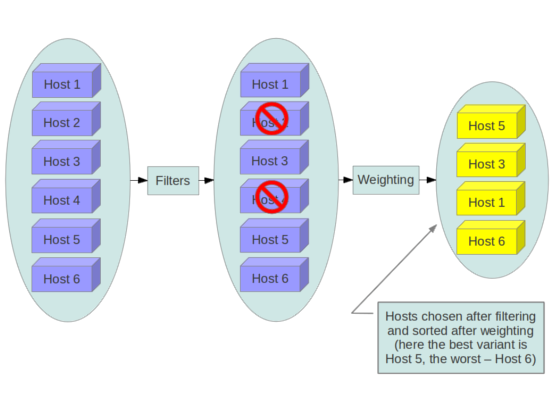
就是先Filter再Weighting,其实scheduler的过程在很早就参与了。
步骤13:对Host进行Filtering
Filtering主要通过两个变量进行,request_spec和filter_properties,而这些变量在前面的步骤,都已经准备好了。
而不同的Filter只是利用这些信息,然后再根据从HostManager统计上来的HostState信息,选出匹配的Host。
request_spec中的第一个信息就是image的properties信息,尤其是当你想支持多种Hypervisor的时候,Xen的image, KVM的image, Hyper-V的image各不相同,如何保证image跑在正确的Hypervisor上?在image里面这种hypervisor_type property就很必要。
请阅读下面的文章
http://www.cloudbase.it/filtering-glance-images-for-hyper-v/
image properties还会有min_ram, min_disk,只有内存和硬盘够大才可以。
Flavor里面可以设置extra_specs,这是一系列key-value值,在数据结构中,以instance_type变量实现,可以在里面输入这个Flavor除了资源需求的其他参数,从而在Filter的时候,可以使用。
host aggregates将所有的Host分成多个Group,当然不同的Group可以根据不同的属性Metadata划分,一种是高性能和低性能。
在Openstack文档中,这个例子很好的展示了host aggregates和Flavor extra_specs的配合使用
http://docs.openstack.org/trunk/config-reference/content/section_compute-scheduler.html
Example: Specify compute hosts with SSDs
This example configures the Compute service to enable users to request nodes that have solid-state drives (SSDs). You create a fast-io host aggregate in the nova availability zone and you add the ssd=true key-value pair to the aggregate. Then, you add the node1, and node2 compute nodes to it.
$ nova aggregate-create fast-io nova
+----+---------+-------------------+-------+----------+
| Id | Name    | Availability Zone | Hosts | Metadata |
+----+---------+-------------------+-------+----------+
| 1  | fast-io | nova              |       |          |
+----+---------+-------------------+-------+----------+

$ nova aggregate-set-metadata 1 ssd=true
+----+---------+-------------------+-------+-------------------+
| Id | Name    | Availability Zone | Hosts | Metadata          |
+----+---------+-------------------+-------+-------------------+
| 1  | fast-io | nova              | []    | {u'ssd': u'true'} |
+----+---------+-------------------+-------+-------------------+

$ nova aggregate-add-host 1 node1
+----+---------+-------------------+-----------+-------------------+
| Id | Name    | Availability Zone | Hosts      | Metadata          |
+----+---------+-------------------+------------+-------------------+
| 1  | fast-io | nova              | [u'node1'] | {u'ssd': u'true'} |
+----+---------+-------------------+------------+-------------------+

$ nova aggregate-add-host 1 node2
+----+---------+-------------------+---------------------+-------------------+
| Id | Name    | Availability Zone | Hosts                | Metadata          |
+----+---------+-------------------+----------------------+-------------------+
| 1  | fast-io | nova              | [u'node1', u'node2'] | {u'ssd': u'true'} |
+----+---------+-------------------+----------------------+-------------------+
Use the nova flavor-create command to create the ssd.large flavor called with an ID of 6, 8 GB of RAM, 80 GB root disk, and four vCPUs.
$ nova flavor-create ssd.large 6 8192 80 4
+----+-----------+-----------+------+-----------+------+-------+-------------+-----------+-------------+
| ID | Name      | Memory_MB | Disk | Ephemeral | Swap | VCPUs | RXTX_Factor | Is_Public | extra_specs |
+----+-----------+-----------+------+-----------+------+-------+-------------+-----------+-------------+
| 6  | ssd.large | 8192      | 80   | 0         |      | 4     | 1           | True      | {}          |
+----+-----------+-----------+------+-----------+------+-------+-------------+-----------+-------------+
Once the flavor is created, specify one or more key-value pairs that match the key-value pairs on the host aggregates. In this case, that is the ssd=true key-value pair. Setting a key-value pair on a flavor is done using thenova flavor-key command.
$ nova flavor-key ssd.large set ssd=true
Once it is set, you should see the extra_specs property of the ssd.large flavor populated with a key of ssd and a corresponding value of true.
$ nova flavor-show ssd.large
+----------------------------+-------------------+
| Property                   | Value             |
+----------------------------+-------------------+
| OS-FLV-DISABLED:disabled   | False             |
| OS-FLV-EXT-DATA:ephemeral  | 0                 |
| disk                       | 80                |
| extra_specs                | {u'ssd': u'true'} |
| id                         | 6                 |
| name                       | ssd.large         |
| os-flavor-access:is_public | True              |
| ram                        | 8192              |
| rxtx_factor                | 1.0               |
| swap                       |                   |
| vcpus                      | 4                 |
+----------------------------+-------------------+
Now, when a user requests an instance with the ssd.large flavor, the scheduler only considers hosts with the ssd=true key-value pair. In this example, these are node1 and node2.
另一个作用是Xen和KVM的POOL分开,有利于XEN进行Live Migration
另一个作用是Windows和Linux的POOL分开,因为Windows是需要收费的,而Linux大多不需要,Windows的收费是按照物理机,而非虚拟机来收费的,所有需要尽量的将windows的虚拟机放到一个物理机上。
Filter_properties的里面scheduler_hints是一个json,里面可以设置任何值,用于Filter的时候使用。
例如JsonFilter
The JsonFilter allows a user to construct a custom filter by passing a scheduler hint in JSON format. The following operators are supported:
- =
- <
- >
- in
- <=
- >=
- not
- or
- and
The filter supports the following variables:
- $free_ram_mb
- $free_disk_mb
- $total_usable_ram_mb
- $vcpus_total
- $vcpus_used
Using the nova command-line tool, use the --hint flag:
$ nova boot --image 827d564a-e636-4fc4-a376-d36f7ebe1747 --flavor 1 --hint query='[">=","$free_ram_mb",1024]' server1
With the API, use the os:scheduler_hints key:
![]()
{
"server": {
"name": "server-1",
"imageRef": "cedef40a-ed67-4d10-800e-17455edce175",
"flavorRef": "1"
},
"os:scheduler_hints": {
"query": "[>=,$free_ram_mb,1024]"
}
}
我们可以指定某个物理机,用下面的命令--availability-zone <zone-name>:<host-name>
步骤14:对合适的Hosts进行weighting并且排序
选出了Hosts,接下来就是进行Weighting的操作
Weighting可以根据很多变量来,一般来说Memory和disk是最先需要满足的,CPU和network io则需要次要考虑,一般来说,对于付钱较少的Flavor,能满足memory和disk就可以了,对于付钱较多的Flavor,则需要保证其CPU和network io.


 3254
3254

 被折叠的 条评论
为什么被折叠?
被折叠的 条评论
为什么被折叠?
 到【灌水乐园】发言


