


前言:最近要用到mybatis-plus,所以重新过一遍内容,那么首先,我们就需要搭建一个mybatis-plus的测试环境来学习demo。
目录
一.创建新工程
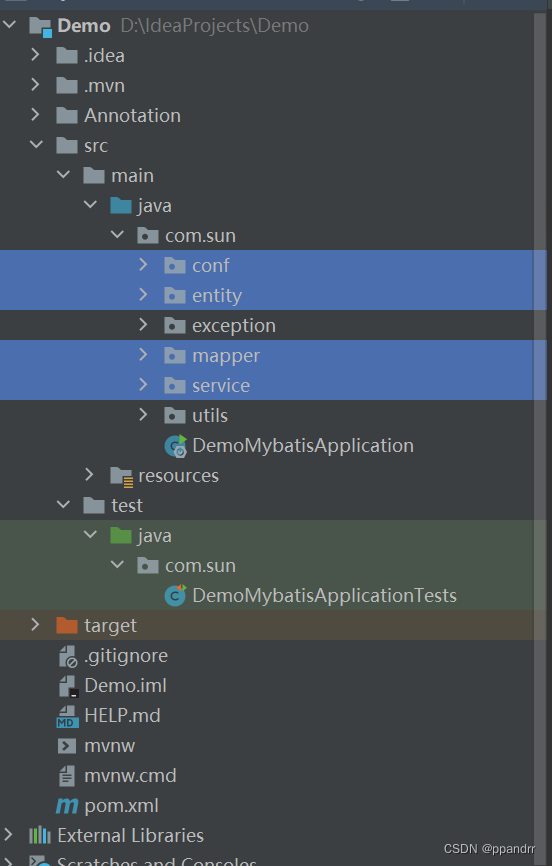
工程的创建在这里我就不多说了,建好以后大致都是差不多的这种结构…
ps :大家可以在resources.com.sun包下先创建mapper包,这是我们以后要存放mapper.xml文件的地方。

1.建立模块
1.创建entity, entity模块存放实体类。
2.创建mapper包,放mapper接口。
3.创建service包, 存放service的接口和serviceimpl实现类。
4.创建conf包,存放配置文件,一会mybatis-plus的分页的配置类就可以存放在这里
2.创建类
如果不想一个个创建,可以使用MybatisX插件进行逆向生成
2.1 entity类
AccountWebapiInfo 实体类
package com.sun.entity;

import com.baomidou.mybatisplus.annotation.TableField;
import com.baomidou.mybatisplus.annotation.TableId;
import com.baomidou.mybatisplus.annotation.TableName;
import java.io.Serializable;
import java.text.SimpleDateFormat;
import java.util.Date;

import com.fasterxml.jackson.annotation.JsonFormat;
import lombok.Data;

/**
 *
 * @TableName account_webapi_info
 */
@TableName(value ="account_webapi_info")
@Data
public class AccountWebapiInfo implements Serializable {
    /**
     * 调用webapi ID
     */
    @TableId
    private String webapiId;

    /**
     * 调用webapi KEY
     */
    private String webapiKey;

    /**
     * 接口URL
     */
    private String webapiUrl;

    /**
     * 接口名称
     */
    private String webapiName;

    /**
     * 过期时间
     */
    @JsonFormat(pattern = "yyyy-MM-dd HH:mm:ss")
    private Date expiryTime;

    /**
     * 创建时间
     */
    @JsonFormat(pattern = "yyyy-MM-dd HH:mm:ss")
    private Date createTime;

    @TableField(exist = false)
    private static final long serialVersionUID = 1L;

    @Override
    public String toString() {
        SimpleDateFormat sdf = new SimpleDateFormat("yyyy-MM-dd HH:mm:ss");
        StringBuilder sb = new StringBuilder();
        sb.append(getClass().getSimpleName());
        sb.append(" [");
        sb.append(", webapiId=").append(webapiId);
        sb.append(", webapiKey=").append(webapiKey);
        sb.append(", webapiUrl=").append(webapiUrl);
        sb.append(", webapiName=").append(webapiName);
        sb.append(", expiryTime=").append(sdf.format(expiryTime));
        sb.append(", createTime=").append(sdf.format(createTime));
        sb.append(", serialVersionUID=").append(serialVersionUID);
        sb.append("]");
        return sb.toString();
    }
}
2.2 mapper接口
mapper接口层,mybatis-plus需要其继承BaseMappe< E > 接口
package com.sun.mapper;

import com.sun.entity.AccountWebapiInfo;
import com.baomidou.mybatisplus.core.mapper.BaseMapper;
import org.apache.ibatis.annotations.Mapper;

/**
* @author 15689
* @description 针对表【account_webapi_info】的数据库操作Mapper
* @createDate 2023-08-22 11:21:49
* @Entity com.sun.entity.AccountWebapiInfo
*/
@Mapper
public interface AccountWebapiInfoMapper extends BaseMapper<AccountWebapiInfo> {

}
2.3 mapper层xml文件
这里的文件需要放到之前创建的com.sun.mapper包下
<?xml version="1.0" encoding="UTF-8"?>
<!DOCTYPE mapper
        PUBLIC "-//mybatis.org//DTD Mapper 3.0//EN"
        "http://mybatis.org/dtd/mybatis-3-mapper.dtd">
<mapper namespace="com.sun.mapper.AccountWebapiInfoMapper">

    <resultMap id="BaseResultMap" type="com.sun.entity.AccountWebapiInfo">
            <id property="webapiId" column="WEBAPI_ID" jdbcType="VARCHAR"/>
            <result property="webapiKey" column="WEBAPI_KEY" jdbcType="VARCHAR"/>
            <result property="webapiUrl" column="WEBAPI_URL" jdbcType="VARCHAR"/>
            <result property="webapiName" column="WEBAPI_NAME" jdbcType="VARCHAR"/>
            <result property="expiryTime" column="EXPIRY_TIME" jdbcType="TIMESTAMP"/>
            <result property="createTime" column="CREATE_TIME" jdbcType="TIMESTAMP"/>
    </resultMap>

    <sql id="Base_Column_List">
        WEBAPI_ID,WEBAPI_KEY,WEBAPI_URL,
        WEBAPI_NAME,EXPIRY_TIME,CREATE_TIME
    </sql>
    <select id="getById" resultType="com.sun.entity.AccountWebapiInfo">

    </select>
</mapper>
2.4 serice接口
package com.sun.service.inter;

import com.sun.entity.AccountWebapiInfo;
import com.baomidou.mybatisplus.extension.service.IService;

/**
* @author 15689
* @description 针对表【account_webapi_info】的数据库操作Service
* @createDate 2023-08-22 11:21:49
*/
public interface AccountWebapiInfoService extends IService<AccountWebapiInfo> {

}
2.5 serice实现类
package com.sun.service.impl;

import com.baomidou.mybatisplus.extension.service.impl.ServiceImpl;
import com.sun.entity.AccountWebapiInfo;
import com.sun.service.inter.AccountWebapiInfoService;
import com.sun.mapper.AccountWebapiInfoMapper;
import org.springframework.stereotype.Service;

/**
* @author 15689
* @description 针对表【account_webapi_info】的数据库操作Service实现
* @createDate 2023-08-22 11:21:49
*/
@Service
public class AccountWebapiInfoServiceImpl extends ServiceImpl<AccountWebapiInfoMapper, AccountWebapiInfo>
    implements AccountWebapiInfoService{

}
2.6 测试类
package com.sun;

import lombok.extern.slf4j.Slf4j;
import org.junit.Test;
import org.junit.runner.RunWith;
import org.springframework.boot.test.context.SpringBootTest;
import org.springframework.test.context.junit4.SpringRunner;

@RunWith(SpringRunner.class)
@SpringBootTest
@Slf4j
public class DemoMybatisApplicationTests {
    @Test
    public void test(){

    }

}
一.配置类-分页
1. 配置类
为了使用分页技术,我们必须对maybatis-plus进行配置。配置有两种方法:
1.直接在启动类上进行配置。别忘记加上@Bean…(坑1)
2.在目录下创建一个config文件夹,在config文件夹下面创建一个配置类。
package com.sun.conf;

import com.baomidou.mybatisplus.annotation.DbType;
import com.baomidou.mybatisplus.extension.plugins.MybatisPlusInterceptor;
import com.baomidou.mybatisplus.extension.plugins.inner.PaginationInnerInterceptor;
import org.springframework.context.annotation.Bean;
import org.springframework.context.annotation.Configuration;

@Configuration
public class MybatisPlusConfig {
    @Bean
    public MybatisPlusInterceptor mybatisPlusInterceptor() {
        MybatisPlusInterceptor interceptor = new MybatisPlusInterceptor();
        interceptor.addInnerInterceptor(new PaginationInnerInterceptor(DbType.MYSQL));
        return interceptor;
    }


}
下面放下目前的目录结构
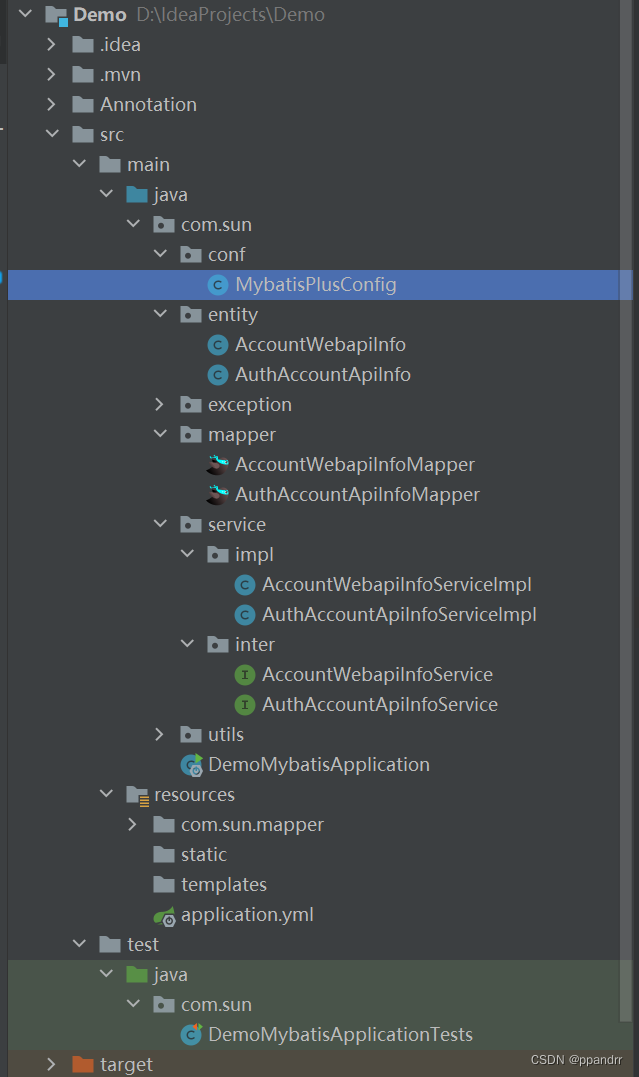
2. 添加包扫描
这里是个坑,如果不添加包扫描,就无法扫描到config配置(坑2)
这里你可以具体到某一个文件夹,也可以直接定到父目录。

三.添加测试类
1.测试类位置
找到test文件夹下,在最后一层建立一个测试类

2.测试类
注意你的Test导入的包名。
1.如果是import org.junit.jupiter.api.Test,你的测试类上不需要加RunWith(SpringRunner.class)
2.如果是import org.junit.Test,你的测试类上需要加上RunWith(SpringRunner.class)
package com.sun;

//如果Test导入的下面这种,则不需要加RunWith()
//import org.junit.jupiter.api.Test
//如果Test导入的是下面这种,则需要加RunWitch()
import lombok.extern.slf4j.Slf4j;
import org.junit.Test;
import org.junit.runner.RunWith;
import org.springframework.boot.test.context.SpringBootTest;
import org.springframework.test.context.junit4.SpringRunner;

@RunWith(SpringRunner.class)
@SpringBootTest
@Slf4j
public class DemoMybatisApplicationTests {

    @Test
    public void contextLoads() {
    }

}


 547
547


 被折叠的 条评论
为什么被折叠?
被折叠的 条评论
为什么被折叠?
 到【灌水乐园】发言


