


1.使用eclipse建立测试类:
http://blog.csdn.net/wangpeng047/article/details/9627527
Eclipse中集成了JUnit,可以非常方便的建立测试类
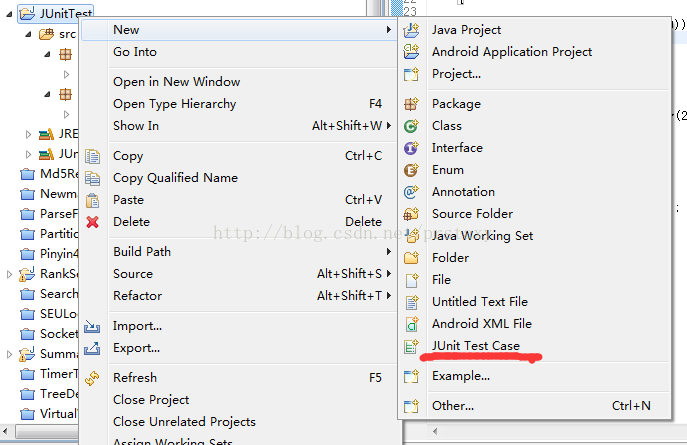
使用JUnit4,测试类的名称一般在被测试的类后加Test即可,在Class under test中选择要进行测试的类

然后点击Next勾选要测试的函数方法
2.断言和注解的说明:
assertEquals(expected, actual)
一个测试类单元测试的执行顺序为:
@BeforeClass –> @Before –> @Test –> @After –> @AfterClass
每一个测试方法的调用顺序为:
@Before –> @Test –> @After
http://blog.csdn.net/wangpeng047/article/details/9628449
测试方法一般是实例化一个被测试的类,调用相应的方法,使用断言比较测试用例的值是否是期待值。
@Test:JUnit 3.x是通过对测试方法的命名(test+方法名)来确定是否是测试,且所有的测试类必须继承TestCase。JUnit 4.x只需要在方法前加上@Test 就可以定义一个测试方法。
注意:测试方法必须是public void,即公共、无返回值的;可以抛出异常。
注意:@BeforeClass和@AfterClass方法名可以任意,但必须是public static void,即公开的、静态的、无返回值的。这个方法只会运行一次。
@Before和@After方法必须是public void,不能为static。在每个测试方法执行之前都要执行一次
3.参数化测试
异常测试
限时测试
打包测试
http://blog.csdn.net/wangpeng047/article/details/9630203
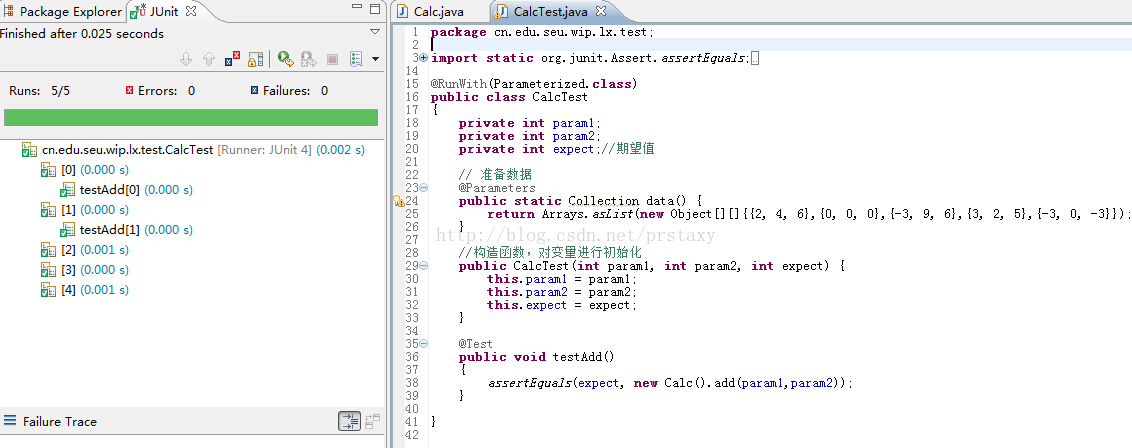
参数化测试:
package cn.edu.seu.wip.lx.test;

import static org.junit.Assert.assertEquals;

import java.util.Arrays;
import java.util.Collection;

import org.junit.Test;
import org.junit.runner.RunWith;
import org.junit.runners.Parameterized;
import org.junit.runners.Parameterized.Parameters;

import cn.edu.seu.wip.lx.Calc;

@RunWith(Parameterized.class)
public class CalcTest
{
    private int param1;
    private int param2;
    private int expect;//期望值

    // 准备数据
    @Parameters
    public static Collection data() {
        return Arrays.asList(new Object[][]{{2, 4, 6},{0, 0, 0},{-3, 9, 6},{3, 2, 5},{-3, 0, -3}});
    }

    //构造函数,对变量进行初始化
    public CalcTest(int param1, int param2, int expect) {
        this.param1 = param1;
        this.param2 = param2;
        this.expect = expect;
    }

	@Test
	public void testAdd()
	{
		assertEquals(expect, new Calc().add(param1,param2));
	}

}
打包测试:
对多个类打包进行测试
@RunWith(Suite. class )
 @Suite.SuiteClasses( {
         ATest. class ,
         BTest. class
         } )
 public   class  AllCalculatorTests  {
 }
简单使用教程
http://www.open-open.com/lib/view/open1386811667408.html


 4243
4243


 被折叠的 条评论
为什么被折叠?
被折叠的 条评论
为什么被折叠?
 到【灌水乐园】发言


