


javaweb 建立数据库连接
1、编写数据库建立连接工具类
public class JDBCUtils{
	private static DruidDataSource dataSource;
	static{
		try{
			Properties propertis = new Properties();
			InputStream inputStream = JDBCUtils.class.getClassLoader().getResourceAsStream(jdbc.properties);
			properties.load(inputStream);
			dataSource = (DruidDataSource)DruidDataSourceFactory.createDataSource(properties);
            //判断是否创建成功
            System.out.println(dataSource.getConnection());
		}catch(Exception e){
			e.printStackTrace();
		}
	}
    //获取数据库连接池中的连接
    public static Connection getConnection(){
        Connection conn = null;
        try{
            conn = dataSource.getConnection();
        }catch(Exception e){
            e.printStackTrace();
        }
        return conn;
    }
    //关闭连接,释放数据库连接池
	public static void close(Connection conn){
        if(conn != null){
            try{
                conn.close();
            }catch(SQLException e){
                e.printStackTrace();
            }
        }
    }

}
2、编写操作数据库的类,使用commons-dbutils.jar
private class BaseDao{
	private QueryRunner queryRunner = new QueryRunner();
	public int update(String sql,Object ...args){
		Connection conn = JDBCUtils.getConnection();
		try{
			return queryRunner.update(conn,sql,args);;
		}catch(Exception e){
			e.printStackTrace();
		}finally{
            JDBCUtils.closeConnection(conn);
        }
		return -1;
	}
}
3、编写查询返回一个javaBean的sql
public <T> T queryForOne(Class<T> type,String sql, Object ... args){
	Connection conn = JDBCUtils.getConnection();
	try{
		return queryRunner.query(conn,sql,new BeanHandler<T>(type),args);
	}catch(Exception e){
		e.printStackTrace();
	}finally{
        JDBCUtils.closeConnection(conn);
    }
    return null;
}
4、查询返回多个对象
public <T> List<T> queryForList(Class<T> type,String sql, Object ... args){
	Connection conn = JDBCUtils.getConnection();
	try{
		return queryRunner.query(conn,sql,new BeanHandler<T>(type),args);
	}catch(Exception e){
		e.printStackTrace();
	}finally{
        JDBCUtils.closeConnection(conn);
    }
    return null;
}
5、查询返回单个值
public Object queryForStringValue(String sql,Object... args){
	Connection conn = JDBCUtils.getConnection();
	try{
		return queryRunner.query(conn,sql,new ScalarHandler(),args);
	}catch(Exception e){
		e.printStackTrace();
	}finally{
        JDBCUtils.closeConnection(conn);
    }
	return null;
}
前后端联调:
<base href="http://localhost:8080/book/" >
book是对应的web目录,加了这个之后,所有的都要重新修改路径。
action="register" method="post" 即可
跳转到注册页面:
req.getRequestDispatcher(“/pages/user/register.html”).forward(req,resp);
JSP完全被淘汰了,跳过一部分
JSP的作用是:代理Servlet程序回传html页面的数据。
访问jsp和访问html页面一样。
1、本质:本质上是一个servlet程序? catalina/localhost/工程名C盘下
当我们第一次访问jsp时,该目录会创建org/apache/jsp/a_jsp.class文件。和a_jsp.java文件
tomcat服务器会帮我们把jsp翻译成为统一的java源文件,并且把它编译成为.class字节码文件。
a_jsp extends HttpJspBase类,该类继承了HttpServlet
![[外链图片转存失败,源站可能有防盗链机制,建议将图片保存下来直接上传(img-gqPTWZ7L-1692847792828)(picture/jsp九大内置对象.png)]](https://img-blog.csdnimg.cn/c7200009020c445ba53c5f296fe9c8a8.png)
![[外链图片转存失败,源站可能有防盗链机制,建议将图片保存下来直接上传(img-yu9fDKAp-1692847792829)(picture/jsp的四大域对象的存储范围.png)]](https://img-blog.csdnimg.cn/5da5beaf7f9a4befac3b3d8decef0dd6.png)
response.getWriter().write();在response缓冲区
out.write();在out缓冲区
执行out.flush操作,会把out缓冲区中的数据追加写入到response缓冲区的末尾。
out.write()输出字符串没有问题,但是一旦输出整型,则会变为asc码字符。
out.print()输出时,源码将其输出的内容变为字符串,再进行输出,不会出问题。
常用标签:
<%@ include=“/include/footer.jsp” %> /是映射到http://ip:port/工程路径 映射到代码的web目录
footer.jsp没有源代码和字节码文件,但是main.jsp有。
静态包含特点:
1、不会翻译被包含的源代码
2、实质上就是将被包含的文件拷贝到主文件中,在主文件中进行翻译。
动态包含:
<!--main.jsp-->
<jsp:include page="/include/footer.jsp">
    <jsp:param name="username" value="pshdhx"/>
</jsp:include>
<!--footer.jsp-->
<%= request.getParameter("username") %>
动态包含特点:
1、会将被包含的文件进行源码生成和编译。
2、使用代码区调用被包含的jsp页面执行程序的。
3、可以使用jsp:param传递参数,公用主页面的request等域对象和缓冲区
请求转发:
<jsp:forward page="/include/footer.jsp"></jsp:forward>
jsp回显java传递信息
req.setAttribute("stuList",studentList);
req.getRequestDispatcher("/show").forward(req,resp);
 <%
 	List<Student> studentList = (List<Student>)request.getAttribute("stuList");
 %>
配置好servlet访问路径,直接访问servlet即可。
Listener监听器
Listener监听器是javaWeb的三大组件之一。Servlet程序、Filter过滤器、Listener监听器。
作用:监听某种事物的变化,通过回调函数,反馈给客户做一些相应的处理。
ServletContextListener监听器
可以监听ServletContext对象的创建和销毁,在web工程启动的时候创建。
监听到创建和销毁之后,都会调用实现其接口的方法进行操作。extends EventListener
<listener>
	<listener-class>com.xxxxxxxxxx</listener-class>
</listener>
public class MyServletContextListener implements ServletContextListener{
	//xxxxxxxxxxxxxxxxxx
}
EL表达式和JSTL
作用:EL表达式主要是代替jsp页面中的表达式脚本和jsp页面中进行数据的模糊。
<%= request.getAtribute("key")%>
${key}
//表达式是空的话,输出空字符。jsp表达式脚本输出的是null,这个不友好。
当四个域中都有相同key的时候,会按照作用域大小进行寻找。
1、pageContext
2、request
3、session
4、application
EL表达式的输出
1、输出Bean toString()
2、输出Map ${person.map.key1}
3、输出List ${persion.cities[0]}
4、输出数组 ${persion.phones[0]}
都是根据get方法进行获取值的。
不是直接找属性,而是找属性对应的get方法。
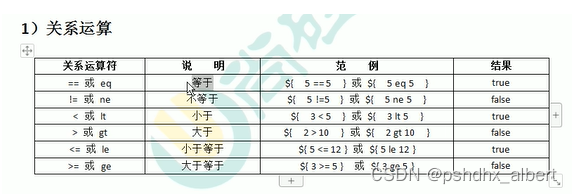
EL表达式的运算
EL表达式的逻辑运算
![[外链图片转存失败,源站可能有防盗链机制,建议将图片保存下来直接上传(img-wNbB74yv-1692847792831)(picture/EL表达式逻辑运算.png)]](https://img-blog.csdnimg.cn/0b564eaabee249eda7ae2ffd5613c731.png)
EL表达式的算术运算
![[外链图片转存失败,源站可能有防盗链机制,建议将图片保存下来直接上传(img-qFzNLJhc-1692847792831)(picture/EL表达式的算术运算.png)]](https://img-blog.csdnimg.cn/1c08bf58fff64f3192dcc3fa1ed78c81.png)
144/12 = 12.0
empty运算:值为null 值为"" Object数组长度为0 list和map的元素个数为0
<% request.setAttribute("emptyNull",null); %>
${empty emptyNull} //true
三元运算:
#{map[‘a.a.a.a’]}
EL表达式中的11个隐藏对象
| 变量 | 类型 | 作用 |
|---|---|---|
| pageContext | PageContextImpl | 它可以获取jsp中的九大内置对象 |
| pageScope | Map<String,Object> | 它可以获取pageContext域中的数据 |
…
![[外链图片转存失败,源站可能有防盗链机制,建议将图片保存下来直接上传(img-mtM3X8CW-1692847792832)(picture/EL表达式中的11个隐藏对象.png)]](https://img-blog.csdnimg.cn/d0404d0364364a0595da189dbb3cb1a9.png)
jsp中pageContext对象的使用
1、协议 ${pageContext.request.scheme}
2、服务器ip ${pageContext.request.serverName}
3、服务器端口 ${pageContext.request.serverPort}
4、获取工程路径 ${pageContext.request.contextPath}
5、获取请求方法 ${pageContext.request.method}
6、获取客户端ip地址 ${pageContext.request.remoteHost}
7、获取会话的id编号 ${pageContext.session.id}
JSTL标签库
jsp standard tag library
核心标签库:http://java.sun.com/jsp/jstl/core 前缀c
<%@ taglib prefix=“c” uri=“http://java.sun.com/jsp/jstl/core” %>
1、导入jstl的jar包
2、导入jar包到模块
3、导入taglib引入 标签库

1、set标签 往域中保存数据
${requestScope.abc} 没有值
<c:set scope="request/session/page/application" var="abc" value="abcValue" />
${requestScope.abc} 存在值

2、if标签 使用EL表达式
<c:if test="${12=12}"></c:if>

3、相当于swith case 里边不能使用html注释,要使用jsp注释
<c:choose>
	<c:when test="${requestScope.height > 190}">....</c:when>
    <c:otherwise>.....</c:otherwise>
</c:choose>
<c:otherwise></c:otherwise>

4、遍历
<c:forEach begin="1" end="10" var="i">
    ${i}
</forEach>
<c:forEach items="${requestScope.arr}" var="item">
	${item} <br/>
</c:forEach>
<c:forEach items="${map}" var="entry" begin end> begin end是开始和结束的索引。step是步长值
	${entry['key1']}
    ${entry.key}
    ${entry.value}
    ${status.current}标识当前遍历到的对象
        ${status.begin}标识当前遍历到的对象
        ${status.end}标识当前遍历到的对象
        ${status.step}标识当前遍历到的对象
        ${status.first}标识当前遍历到的对象
        ${status.index}标识当前遍历到的对象
</c:forEach>
文件的上传
1、要有一个form标签,method为post请求【get请求有长度限制】
2、form标签必有一个encType属性=multipart/form-data【提交的数据以多段的形式进行拼接,以二进制流的方式发送到服务器。每个表单项就是一段数据,boundary:就是分隔符。 】
3、input type=file
4、服务器接收文件上传的数据
<form action="" method="post" enctype="multipart/form-data">
	用户名:<input type="text" name="username"/> <br/>
    头像:<input type="file" name="photo"/> <br/>
     <input type="submit" value="上传"/>
</form>
//此处打印的就是 客户端传递过来的请求头和请求体。

//此时,request.getParameter("username") 接收不到了 只能以流的方式进行接收
ServletInputStream inputStream = req.getInputStream();
byte[] buffer = new byte[1024];
int read = inputStream.read(buffer);
System.out.println(new String(buffer,0,read)); //此时的String包不要导错了

使用封装好的jar包来接收参数 commons-fileupload.jar  需要依赖commons-io.jar包。

所以需要引入这俩包。

1、先判断上传的数据是不是多段数据

```java
//先判断上传的数据是否是多段数据 只有多段的数据,才是文件上传的。
if(ServletFileUpload.isMultipartContent(req)){
	FileItemFactory fileItemFactory = new DiskFileItemFactory();
    //创建用于解析文件上传的工具类 servletFileUpload类
    ServletFileUpload servletFileUpload = new ServletFileUpload(fileItemFactory);
    //解析上传的数据,得到每一个表单项FileItem
    try{
        List<FileItem> list = servletFileUpload.parseRequest(req);
        for(FileItem fileItem : list){
            if(fileItem.isFormField){
                //普通表单项
                System.out.println("表单项的name属性值"+fileItem.getFieldName());
				System.out.println("表单项的value属性值"+fileItem.getString("UTF-8"));
            }else{
                //上传的文件
                System.out.println("上传文件的属性值"+fileItem.getFieldName());
				System.out.println("上传的文件名"+fileItem.getName());
                //把上传的文件写到
                fileItem.write(new File("e:\\"+fileItem.getName()));
            }
        }
    }catch(Exception e){
        e.printStackTrace();
    }
}
文件的下载
1、获取要下载的文件名
2、读取要下载的文件内容
3、在回传之前,通过响应头告诉客户端返回的数据类型
4、还要告诉客户端收到的数据是用于下载使用【还是使用响应头】
String downloadFileName = "2.jpg";
ServletContext servletContext = getServletContext();
//获取要下载文件的类型
String mimeType = servletContext.getMimeType("/file/"+downloadFileName);
System.out.println("下载的文件类型"+mimeType);
resp.setContextType(mimeType);
//斜杠被服务器解析表示地址为http://ip:port/工程名/ 映射到代码目录的web目录
InputStream resourceAsStream = servletContext.getResourceAsStream("/file/"+downloadFileName);
OutputStream outputStream = resp.getOutputStream();
IOUtils.copy(resourceAdStream,outputStream);

//此时,图片是返回给了客户端,但是此时只能是在网页上展示,我们需要的是下载。

//在上边设置响应头
resp.setHeader("content-Disposition","attachment;filename="+downloadFileName);
//如果文件名是中文,会无法识别,需要将文件名进行url编码。
URLEncoder.encode("中国.jpg","UTF-8"); //IE和谷歌是url编码,火狐是base64编码
String content = "base64编码测试";
BASE64Encoder b = new BASE64Encoder();
String encodedString = b.encode(content.getBytes("UTF-8"));
System.out.println(encodedString);

byte[] bytes = base64Decoder.decodeBuffer(encodedString);
String str = new String(bytes,"UTF-8");
解决浏览器下载的兼容问题
if(req.getHeader("User-Agent").contains("Firefox")){

}else{

}
页面动态化
1、添加行 <%@ page contentType="text/html;charset=UTF-8" language="java" %>
2、改后缀名html为jsp
3、抽取页面中相同的内容
<%@ include file="/pages/common/login_success_menu.jsp" %>
<base href="http://localhost:8080/book" />
<%
    String basePath = request.getScheme()
    +"://"
    +request.getServerName()
    +":"
    +request.getServerPort()
    +request.getContextPath()
    +"/"
    %>
<base href="<%=basePath%>" >
1、只要登录失败,就会调回原来登录的几面,回显原来的信息**【把接收到的信息保存到request域中】**
2、并且告诉客户端 回显的错误信息
<span class="errorMsg">
	<%=request.getAttribute("msg") == null ? "请输入用户名和密码" :request.getAttribute("msg")%>
</span>

<input value="<%= request.getAttribute("email")==null ? "" : request.getAttribute("email") %>" />
代码优化
在实际开发过程中,1个模块,一般只使用一个servlet程序。但是现在,我们每个接口都使用了一个servelt程序。
所以我们需要将注册和登录的servlet合并到一块。
public void doPost(){
	//判断action的来源即可。
    //<input type="hidden" name="action" value="login"/>
    //<input type="hidden" name="action" value="regist"/>
}
//通过反射执行,而不是通过if判断
String action = "login";
try{
    Method method = this.getClass().getDeclareMethod(action,"参数");
    method.invoke(new UserTest()/this);
}catch(Exception e){
    e.printStackTrace();
}
建立一个总的BaseServlet.class
public abstract class BaseServlet extends HttpServlet{

}
BeanUtils工具类
它可以一次性的把所有的请求参数注入到JavaBean中。
//common-beanutils-xxx.jar common-logging-xxx.jar
try{
	User user = new User();
	BeanUtils.populate(user,req.getParameterMap());
}
//必须通过user对象的set方法完全匹配才可以注入成功。

User user = (User) WebUtils.copyParamToBean(req.getparameterMap(),new User());
改为:

public static  <T> T copyparamToBean(Map map,T bean){
    try{
        BeanUtils.populate(bean,map);
    }catch(Exception e){
        e.printStackTrace();
    }
}
使用EL表达式回显
${empty requestScope.msg ? "请输入用户名和密码" : requestScope.msg}
路径来区分权限管理
1、后台/manager/bookServlet
2、前台/client/bookServlet
转发和重定向:
添加图书,入库后,需要跳转到列表页面,此时出现了问题。【到了list方法里边后,又回到了add方法,成了死循环。】
req.getRequestDispatcher("/manager/bookServlet?action=list").forward(req,resp);
当用户提交完成请求,浏览器会记录下最后一次请求的全部信息。当用户发起功能按键F5,就会发起浏览器记录的最后一次请求。
所以此处不能用转发: 转发是一次请求。【虽然跳转到了list,但是url还是原先的add,此时F5刷新,还会添加数据。】
重定向是两次请求:所以应该重定向。【地址栏发生了变化,到了list,此时再刷新页面,只会是list】
resp.sendRedirect(req.getContextPath()+"/manager/bookServlet?action=list");
将字符串转换为int类型
public static int parseInt(String strInt,int defaultValue){
	try{
        return Integer.parseInt(strInt);
    }catch(Exception e){
        e.printStackTrace();
    }
    return defalutValue;
}
页面元素传递-修改
修改,list页面,经过servelt程序查询保存到request域,跳转到编辑页面。然后渲染值。
${requestScope.book.name}
修改遇到的问题
因为添加和修改用到的是用一个表单,value的值需要动态。
动态修改隐藏域:
<a href="pages/manager/book_edit.jsp?method=add">添加图书</a>
<a href="pages/manager/bookServlet?action=getBook&id=${book.id}&method=update">修改图书</a>
<input type="hidden" name="action" value="${param.method}" />
方案二:
看看是否有id,如果是修改,则有id。
<input type="hidden" name="action" value="${empty param.id ? "add" : "update"}" />
方案三:
如果request域中有对象,则是修改;否则,就是添加。
<input type="hidden" name="action" value="${empty requestScope.book ? "add" : "update"}" />
都必须加上:
<input type="hidden" name="id" value="${requestScope.book.id}" />
原始列表分页
pageNo 当前页码 【传递的参数】
pageTotal 总页码
pageTotalCount 总记录数
pageSize 每页显示数量【传递的参数】
items 当前页数据 select * from table limit begin,pageSize 【begin=(pageNo-1)*pageSize】
public class Page<T>{
	public static final Integer PAGE_SIZE = 4;
	private Integer pageNo;
	private Integer pageTotal;
	private Integer pageSize = PAGE_SIZE;
	private Integer pageTotalCount;
	private List<T> items;
}
location.href=可读可写,可以跳转到指定页码。
首页处理分页数据
http://ip:port/工程路径/index.jsp
index.jsp到bookServlet请求数据,到别的pages/clients/index.jsp进行分页数据展示。
<jsp:forward page="/client/bookServlet?action=page"></jsp:forward>
Cookie
cookie的大小不能超过4KB
resp.setContextType("text/html","charset=UTF-8")
Cookie cookie = new Cookie("key1","value1");
resp.addCookie(cookie);
resp.getWriter().write("cookie 创建成功");
//在浏览器开发者工具中,会看到cookie创建的键值对。
服务器如何获取客户端的cookie
Cookie[] cookies = req.getCookies();
for(Cookie cookie : cookies){
	resp.getWriter().write("Cookie["+cookie.getName()+"="+cookie.getValue()+"]<br/>");
}
cookie.setMaxAge(-1);//浏览器关闭之后,删除cookie,默认级别
cookie.setMaxAge(0);//马上删除cookie
cookie.setMaxAge(10);//10秒后,删除cookie

cookie.setPath(req.getContextPath()+"/abc"); //满足路径时,cookie才发送到服务器
免用户名登录:
cookie.setMaxAge(60 * 60 * 24 * 7); //cookie7天消失
<input type="text" name="username" valu="${cookie.username.value}"/>
session
public void setMaxInactiveInterval(int interval);
public int getMaxInactiveInterval();
public void invalididate() ; //设置sessin马上销毁
session默认的超时时长是多少?1800秒=半小时。
在IEDA中,整合的tomcat的web.xml中,在c盘,catalina中。
<session-config>
    <session-timeout>30</session-timeout>  <!-- 30分钟 -->
</session-config>
session超时的概念:客户端两次请求的最大间隔时长。
会话中没有响应才能超时。
表单重复提交
1、由于页面转发,多次刷新操作【此时会执行最后一次请求】,进行了多次数据库插入的操作。
解决办法:重定向。
2、由于服务器延迟,用户以为没有提交上,造成了表单多次提交:【需要验证码】
3、服务器也没有延迟卡顿,用户回退了,再进行提交。【需要验证码】
验证码逻辑:
1、第一次访问表单,随机生成验证码给前端
2、要把验证码保存到session域中
【1、Session中的验证码,并删除session中的验证码
2、获取表单中的验证信息,比较验证码是否相等。】
谷歌验证码Kaptcha
1、导入jar包
2、 配置web.xml的servlet程序。
<servlet>
    <servlet-name>KaptchaServlet</servlet-name>
    <servlet-class>com.google.code.kaptcha.servlet.KaptchaServlet</servlet-class>
</servlet>
<servlet-mapping>
    <servlet-name>kaptchaServlet</servlet-name>
    <url-pattern>/kaptchaServlet</url-pattern>
</servlet-mapping>
3、在表单中显示img的验证码
4、比较:
request.getSession().getAttribute("KAPTCHA_SESSION_KEY");
request.getSession().removeAttribute(KAPTCHA_SESSION_KEY);
切换验证码
$("#code_img").click(function(){
	this.src = "${basePath}kaptcha.jpg";
})
src属性:表示验证码img标签的 图片路径,它可读,可写【可写就是重新对其进行赋值,发起一次请求】。
但是:火狐,点了一次,就不变了。这是因为浏览器做了缓存。
跳过缓存:?d=new Date();加一个时间戳即可跳过缓存。
item.setTotalPrice(item.getPrice().multiply(new BigDecimal(item.getCount())));

public Integer getTotalCount(){
    totalCount = 0;
    for(Map.Entry<Integer,CartItem> entry : items.entrySet()){
        totalCount += entry.getValue().getCount();
    }
    //或者是另外一种
    for(CartItem value : items.values()){

    }
    return totalCount;
}
<button bookId="${book.id}" class="addToCart">
    加入购物车
</button>
$(function(){
    $("button.addToCart").click(function(){
        var bookId = $(this).attr("bookId");
        location.href = "http://localhost:8080/book/cartServlet?action=addItem&id=商品编号";
    })
})
添加到购物车之后,重定向到商品列表页面
resp.sendRedirect(req.getContextPath());
购物车只有一辆:
//购物车的信息,放到sessin中
Cart cart = (Cart)req.getSession().getAttribute("cart");
if(cart == null){
    cart = new Cart();
    cart.addItem(cartItem);
    req.getSession.setAttribute("cart",cart);
}
//如果此时有分页,添加购物车后应该跳回到原来的页面。而不是首页,那么为什么要页面跳转呢?直接前端给个提示【成功购入购物车】不是更好么?
在http协议中有一个请求头,叫做Refer,它可以把请求发起时,浏览器地址栏中的地址发送给服务器
req.getHeader(“Refer”);
Filter过滤器
作用:拦截请求,过滤响应。
应用场景:
1、权限检查
2、日志操作
3、事务管理
要求在web工程下,有个admin目录,admin目录下所有的资源必须是登录后才能访问(html/js/css);
<%
	Object user = session.getAttribute("user");
	if(user == null){
		request.getRequestDispatcher("/login.jsp").forward(request,response);
	}
%>
以上的方法,它仅仅只能用在jsp中,html和图片照样可以访问。
有权限,放行。
无权限,页面跳转。
public  class AdminFilter implements Filter{
	@Override
	public  void init(FilterConfig filterConfig) throws ServletException{

	}
	@Override
	public  void doFilter(ServletRequest servletRequest,ServletResponse servletResponse,FilterChain filterChain) throws ServletException{
		HttpServletRequest httpServletRequest = (HttpServletRequest)servletRequest;
        HttpSession session = httpServletRequest.getSession();
        Object user = session.getAttribute("user");
        if(user == null){
            ServletRequest.getRequestDispatcher("/login.jsp").forward(servletRequest,servletResponse);
        }else{
            //放行
            filterChain.doFilter(servletRequest,servletResponse);
        }
	}
    @Override
	public  void destory(){

	}
}
<filter>
	<filter-name>AdminFilter</filter-name>
    <filter-class>com.pshdhx.filter.AdminFilter</filter-class>
    <init-param>
    	<param-name></param-name>
        <param-value></param-value>
    </init-param>
</filter>
<filter-mapping>
	<filter-name>AdminFilter</filter-name>
    <!-- /表示请求地址为: http://ip:port/工程路径/ 映射到IDEA的web目录 -->
    <url-pattern>/admin/*  </url-pattern>
</filter-mapping>
Filter的生命周期
1、构造器方法
2、初始化方法
第一二步,web启动的时候就已经执行。
doFilter方法
每次拦截到请求就会执行。
销毁方法
停止web工程的时候就会执行,也会销毁Filter过滤器。
FilterConfig类
Tomcat每次创建Filter的时候,也会创建一个FilterConfig类。
这里包含了Filter配置文件的配置信息。
1、获取Filter的别名Filter-name
2、配置的init-param初始化参数
3、获取servletContext对象。
filterConfig.getFilterName();
filterConfig.getInitParameter("username");
filterConfig.getServletContext();
filterChain过滤器链
多个过滤器如何一起工作。
http://ip:port/工程路径 filter1(doFilter)->filter2(doFilter)->resources
chain.doFilter()作用:
1、执行下一个filter过滤器,如果有的话。
2、执行目标资源。没有filter了。
执行顺序:
1、filter1的前置代码
2、filter2的前置代码
3、target的资源目标执行了
4、filter2的后置代码
5、filter1的后置代码
6、跳转到target的资源目录,到客户端。
如果没有了filter2的 filterChain.doFilter()方法,则不会往下走了。
在多个过滤器执行的过程中,它们执行的优先顺序是由web.xml中配置的优先顺序决定的
多个过滤器执行的特点:
1、所有Filter和目标资源,默认执行在同一个线程中 Thread .currentThread().getName();
2、多个Filter共同执行的时候,公用一个request对象。
Filter的拦截路径
精确匹配
/target.jsp
目录匹配
/admin/*
后缀名匹配
*.html 可以写多个
ThreadLocal和Filter管理事务
ThreadLocal实例,通常是类中的private static 字段,他们希望将状态与某一个线程(例如:用户ID或者是事务ID)相关联。
作用:
1、解决多线程数据安全问题
2、可以给当前线程关联一个数据(可以是普通变量,可以是对象,也可以是数组,集合)
特点:
1、ThreadLocal可以为当前线程关联一个数据。【可以像Map一样存取数据,key为当前线程】
2、ThreadLocal对象只能为当前线程关联一个数据,如果要关联多个数据,需要创建多个实例。
3、一般都是static类型
4、保存的数据在线程销毁后,会由JVM自动释放
ThreadLocal只能set和get一个对象。
订单结账的时候,下订单和去库存都是在一个线程中。使用ThreadLocal要确保所有操作都是使用同一个Connectin对象。那么操作的前提条件是所有操作都必须在同一个线程中完成。
//JDBCUtils.java
public static final ThreadLocal<Connection> conns = new ThreadLocal<Connection>();
public static Connection getConnection(){
	Connection conn = conns.get();
	if(conn == null){
		try{
			conn = dataSource.getConnection();
			conns.set(conn); //保存到ThreadLocal当中。
            conn.setAutoCommit(false);
		}catch(Exception e){
			e.printStackTrace();
		}
	}
	return conn;
}

public static void commitAndClose(){
    Connection conn = conns.get();
    if(conn != null){
        try{
            conn.commit();
        }catch(Exception e){
            e.printStackTrace();
        }finally{
            try{
                conn.close();
            }catch(Exception e){
                e.printStackTrace();
            }
        }
    }
    //一定要执行remove操作,因为Tomcat服务器使用了线程池
    conns.remove();
}
public static void rollb ackAndClose(){
    Connection conn = conns.get();
    if(conn != null){
        try{
            conn.rollback();
        }catch(Exception e){
            e.printStackTrace();
        }finally{
            try{
                conn.close();
            }catch(Exception e){
                e.printStackTrace();
            }
        }
    }
    //一定要执行remove操作,因为Tomcat服务器使用了线程池
    conns.remove();
}
OrderServlet.java
    //往后的BaseDao如果有一场,不要捕获,要抛出 throw new RuntimeException(e),此处才能获得。
    try{
    	orderId = orderService.createOrder(cart,userId);
        jdbcUtils.commitAndClose();
    }catch(Exception e){
        jdbcUtils.rollbackAndClose();
    }
但是如上,要给所有的service的方法调用的时候,加上trycatch,使用Filter过滤器。
在Filter的后置代码中,统一进行提交或者是回滚。
try{
	filterChain.doFilter();
	commit();
}catch(Exception e){
	rollback();
}
但是:在一切的过程中,不要捕获异常
留给用户的友好提示:
将所有异常交给tomcat统一展示,在web.xml中配置
服务器出错自动跳转的页面【也不能捕获异常,需要把异常抛给tomcat。】
<error-page>
    <error-code>500</error-code>
	<location>/pages/error/error500.jsp</location>
</error-page>
json转为list和map,使用gson的TypeToken的匿名内部类的形式
Gson gson = new Gson();
gson.toJson(personList);
gson.fromJson(personListToJsonString,new TypeToken<Person>(){}.getType());
国际化i18n-international
locale对象表示不同的时区,位置,语言
zh_CN
en_US
properties属性配置文件。
国际化配置文件命名规则。
baseName+local.properties
i18n_zh_CN.properties
i18n_en_US.properties
jdk:ResourceBundle local
ResourceBundle.getBundle():根据 给定的baseName和Locale读取响应的配置文件,得到文字信息。
public void TestLocale(){
	locale locale =     locale.getDeafault();
    System.out.println(locale); //zh_CN  Locale.CHINA
}
直接在src下创建的属性文件。
i18n_zh_CN.properties
username=用户名
password=密码
sex=性别
age=年龄
=======================================
i18n_en_US.properties
username=username
password=password
应用:
public void testI18n(){
	Locale locale = Locale.US;
    ResourceBundle bundle = ResourceBundle.getBundle("i18n",locale);
    bundle.getString("username");
}
<a href="i18n.jsp?country=cn">中文</a>
<a href="i18n.jsp?country=us">English</a>
<%
	Locale locale = null;
   String country = request.getParameter("country");
   if("cn".equals(counrty))
   		locale = "zh_CN";
   }else{
   		locale = "en_US";
   }
   ResourceBundle i18n = ResourceBundle.getBundle("i18n",locale);
%>
引入jstl的tablib包。
<fmt:setLocale value="${param.locale}"/>
<fmt:setBundle basename="i18n"/>
<fmt:message key="username"/> 输出


 5421
5421


 被折叠的 条评论
为什么被折叠?
被折叠的 条评论
为什么被折叠?
 到【灌水乐园】发言


