


Oracle Database 11g Enterprise在CentOS上的安装
环境

- VMware Workstation 15 Pro
- CentOS 7 64位(CentOS-7-x86_64-DVD-1810.iso)
如果还没有准备好环境,可以参考: VMware虚拟机安装CentOS
工具
- SecureCRT 8.7
- SecureFX 8.7
- Navicat Premium 12
- PL/SQL
安装包
Oracle Database 11g Enterprise Edition Release 11.2.0.4.0
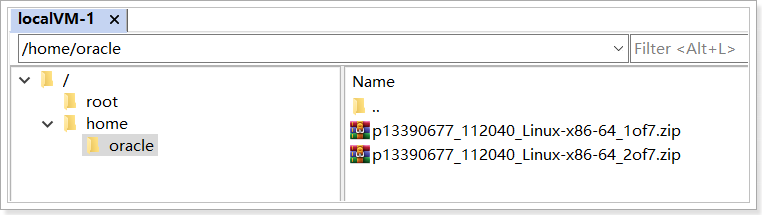
- p13390677_112040_Linux-x86-64_1of7.zip
- p13390677_112040_Linux-x86-64_2of7.zip
客户端
- instantclient-basic-windows.x64-11.2.0.4.0.zip
创建用户和用户组
# 添加用户组
groupadd -g 502 oinstall
groupadd -g 503 dba
groupadd -g 504 oper
groupadd -g 505 asmadmin

# 添加用户
useradd -u 502 -g oinstall -G oinstall,dba,asmadmin,oper -s /bin/bash -m oracle

# 设置用户密码
passwd oracle
# 设置oracle用户密码
Af8JPoRh2lyM
上传软件安装包
操作用户:oracle
# 切换用户
su - oracle

上传软件安装包到 /home/oracle目录下
安装依赖包
操作用户:root
注:可能会出现这样的提示信息没有可用软件包,这个不影响后面的操作
yum install -y automake autotools-dev binutils bzip2 elfutils expat \
gawk gcc gcc-multilib g++-multilib lib32ncurses5 lib32z1 \
ksh less lib32z1 libaio1 libaio-dev libc6-dev libc6-dev-i386 \
libc6-i386 libelf-dev libltdl-dev libodbcinstq4-1 libodbcinstq4-1:i386 \
libpth-dev libpthread-stubs0-dev libstdc++5 make openssh-server rlwrap \
rpm sysstat unixodbc unixodbc-dev unzip x11-utils zlibc unzip cifs-utils \
libXext.x86_64  glibc.i686
防火墙设置
操作用户:root
这一步不是必须的,因为按照前面安装虚拟机的时候,防火墙已经关闭了
# 如果防火墙开启的话,防火墙添加1521端口
firewall-cmd  --zone=public  --add-port=1521/tcp  --permanent
firewall-cmd  --reload
firewall-cmd  --list-port

# 或者关闭防火墙并设置开机不启动
systemctl stop firewalld
systemctl disable firewalld
修改操作系统配置
操作用户:root
vim /etc/security/limits.conf

# vim快捷键:shift + g 跳到文件尾行
oracle          soft      nproc   2047
oracle          hard      nproc   16384
oracle          soft      nofile  1024
oracle          hard      nofile  65536
oracle          soft      stack   10240
分配管理员权限给oracle用户
普通用户sudo获取不到管理员权限会报错
普通用户获取管理员权限
# root用户添加oracle用户到sudoers
sudo vim /etc/sudoers
在root下面添加一行
oracle ALL=(ALL) ALL
vim快捷键:
- y:复制
- p:粘贴
# 强制保存
:wq!

解压Oracle数据库安装包
操作用户:oracle
# 操作目录 /home/oracle
unzip p13390677_112040_Linux-x86-64_1of7.zip
unzip p13390677_112040_Linux-x86-64_2of7.zip
创建Oracle安装目录
操作用户:oracle
# -p代表递归创建多级目录 ~波浪线代表当前登录用户的根目录,这里的orcle用户的根目录是 /home/oracle
mkdir -p ~/oracle11g
修改环境变量
操作用户:oracle
# ~ 代表当前用户根目录/home/oracle
vim ~/.bash_profile
在文件末尾添加如下配置项
export ORACLE_BASE=/home/oracle/oracle11g
export ORACLE_HOME=$ORACLE_BASE/product/11.2.0/dbhome_1
export ORACLE_SID=orcl
export ORACLE_UNQNAME=orcl
export NLS_LANG=.AL32UTF8
export PATH=${PATH}:${ORACLE_HOME}/bin/:$ORACLE_HOME/lib64

使得环境变量生效
source ~/.bash_profile
修改Oracle配置文件
静默安装 db_install.rsp文件修改
操作用户:oracle
复制文件模板
# /home/oracle
cp /home/oracle/database/response/db_install.rsp .
注意:复制命令的最后一个 . 不能省略,表示将db_install.rsp文件从/home/oracle/database/response目录拷贝到当前目录。
对db_install.rsp文件进行编辑。
vim db_install.rsp
需要修改的配置项如下所示,这里,我将修改后的配置项列举出来:
vim快捷键:显示行号 :set nu
具体的配置项的含义,可以阅读注释,注释非常详细
# 29行
oracle.install.option=INSTALL_DB_AND_CONFIG

# 37行
# 实际上可以修改成你自己的主机名或者域名(IP)
ORACLE_HOSTNAME=localhost

# 42行
UNIX_GROUP_NAME=oinstall

# 49行
INVENTORY_LOCATION=/home/oracle/oraInventory

# 86行
SELECTED_LANGUAGES=en,zh_CN

# 91行
ORACLE_HOME=/home/oracle/oracle11g/product/11.2.0/dbhome_1

# 96行
ORACLE_BASE=/home/oracle/oracle11g

# 107行
oracle.install.db.InstallEdition=EE

# 154行
oracle.install.db.DBA_GROUP=dba

# 160行
oracle.install.db.OPER_GROUP=oper

# 189行
oracle.install.db.config.starterdb.type=GENERAL_PURPOSE

# 194行
oracle.install.db.config.starterdb.globalDBName=orcl

# 199行
oracle.install.db.config.starterdb.SID=orcl

# 213行(默认)
oracle.install.db.config.starterdb.characterSet=AL32UTF8

# 221行(默认)
oracle.install.db.config.starterdb.memoryOption=true

# 229行
oracle.install.db.config.starterdb.memoryLimit=1024

# 235行(默认)
oracle.install.db.config.starterdb.installExampleSchemas=false

# 262行 all schemas in the starter database(这里使用随机密码生成器生成的随机密码)
oracle.install.db.config.starterdb.password.ALL=DdKUQbzz9fm2

# 290行(默认)
oracle.install.db.config.starterdb.control=DB_CONTROL

# 311行(默认)
oracle.install.db.config.starterdb.automatedBackup.enable=false

# 336行
oracle.install.db.config.starterdb.storageType=FILE_SYSTEM_STORAGE

# 344行
oracle.install.db.config.starterdb.fileSystemStorage.dataLocation=/home/oracle/oracle11g/oradata

# 351行
oracle.install.db.config.starterdb.fileSystemStorage.recoveryLocation=/home/oracle/oracle11g/fast_recovery_area

# 400行
DECLINE_SECURITY_UPDATES=true
静默安装 db_install.rsp文件详解
####################################################################

## Copyright(c) Oracle Corporation1998,2008. All rights reserved.           ##

## Specify values for the variables listedbelow to customize your installation.    ##

## Each variable is associated with acomment. The comment                 ##

## can help to populate the variables withthe appropriate values.               ##

## IMPORTANT NOTE: This file contains plaintext passwords and            ##

## should be secured to have readpermission only by oracle user               ##

## or db administrator who owns thisinstallation.                           ##

##对整个文件的说明,该文件包含参数说明,静默文件中密码信息的保密   ##

####################################################################

#------------------------------------------------------------------------------

# Do not change the following system generatedvalue. 标注响应文件版本,这个版本必须和要#安装的数据库版本相同,安装检验无法通过,不能更改

#------------------------------------------------------------------------------

oracle.install.responseFileVersion=/oracle/install/rspfmt_dbinstall_response_schema_v11_2_0

#------------------------------------------------------------------------------

# Specify the installation option.

# It can be one of the following:

# 1. INSTALL_DB_SWONLY

# 2. INSTALL_DB_AND_CONFIG

# 3. UPGRADE_DB

#选择安装类型:1.只装数据库软件 2.安装数据库软件并建库 3.升级数据库

#-------------------------------------------------------------------------------

oracle.install.option=INSTALL_DB_SWONLY

#-------------------------------------------------------------------------------

# Specify the hostname of the system as setduring the install. It can be used

# to force the installation to use analternative hostname rather than using the

# first hostname found on the system.(e.g., for systems with multiple hostnames

# and network interfaces)指定操作系统主机名,通过hostname命令获得

#-------------------------------------------------------------------------------

ORACLE_HOSTNAME=ora11gr2

#-------------------------------------------------------------------------------

# Specify the Unix group to be set for theinventory directory.

#指定oracle inventory目录的所有者,通常会是oinstall或者dba

#-------------------------------------------------------------------------------

UNIX_GROUP_NAME=oinstall

#-------------------------------------------------------------------------------

# Specify the location which holds theinventory files.

#指定产品清单oracle inventory目录的路径,如果是Win平台下可以省略

#-------------------------------------------------------------------------------

INVENTORY_LOCATION=/u01/app/oracle/oraInventory

#-------------------------------------------------------------------------------

# Specify the languages in which thecomponents will be installed.

# en  : English                  ja   : Japanese

# fr  : French                   ko   : Korean

# ar  : Arabic                   es   : Latin American Spanish

# bn  : Bengali                  lv   : Latvian

# pt_BR: Brazilian Portuguese       lt   : Lithuanian

# bg  : Bulgarian                ms   : Malay

# fr_CA: Canadian French          es_MX: Mexican Spanish

# ca  : Catalan                  no   : Norwegian

# hr  : Croatian                  pl   : Polish

# cs  : Czech                    pt   : Portuguese

# da  : Danish                   ro   : Romanian

# nl  : Dutch                    ru   : Russian

# ar_EG: Egyptian                 zh_CN: Simplified Chinese

# en_GB: English (Great Britain)     sk   :Slovak

# et  : Estonian                  sl   : Slovenian

# fi  : Finnish                   es_ES: Spanish

# de  : German                  sv   : Swedish

# el  : Greek                    th   : Thai

# iw  : Hebrew                  zh_TW:Traditional Chinese

# hu  : Hungarian                tr   : Turkish

# is  : Icelandic                  uk  : Ukrainian

# in  : Indonesian                vi   :Vietnamese

# it  : Italian

# Example : SELECTED_LANGUAGES=en,fr,ja

#指定数据库语言,可以选择多个,用逗号隔开。选择en, zh_CN(英文和简体中文)

#------------------------------------------------------------------------------

SELECTED_LANGUAGES=en,zh_CN

#------------------------------------------------------------------------------

# Specify the complete path of the OracleHome.设置ORALCE_HOME的路径

#------------------------------------------------------------------------------

ORACLE_HOME=/u01/app/oracle/product/11.2.0/db_1

#------------------------------------------------------------------------------

# Specify the complete path of the OracleBase. 设置ORALCE_BASE的路径

#------------------------------------------------------------------------------

ORACLE_BASE=/u01/app/oracle

#------------------------------------------------------------------------------

# Specify the installation edition of thecomponent.

# The value should contain only one ofthese choices.

# EE    : EnterpriseEdition

# SE    : Standard Edition

# SEONE  Standard Edition One

# PE    : Personal Edition (WINDOWS ONLY)

#选择Oracle安装数据库软件的版本(企业版,标准版,标准版1),不同的版本功能不同

#详细的版本区别参考附录D

#------------------------------------------------------------------------------

oracle.install.db.InstallEdition=EE

#------------------------------------------------------------------------------

# This variable is used to enable ordisable custom install.

# true : Components mentioned as part of 'customComponents' property

#are considered for install.

# false : Value for 'customComponents' isnot considered.

#是否自定义Oracle的组件,如果选择false,则会使用默认的组件

#如果选择true否则需要自己在下面一条参数将要安装的组件一一列出。

#安装相应版权后会安装所有的组件,后期如果缺乏某个组件,再次安装会非常的麻烦。

#------------------------------------------------------------------------------

oracle.install.db.isCustomInstall=true

#------------------------------------------------------------------------------

# This variable is considered only if'IsCustomInstall' is set to true.

# Description: List of Enterprise EditionOptions you would like to install.

#              The following choices areavailable. You may specify any

#              combination of thesechoices.  The components you chooseshould

#              be specified in the form"internal-component-name:version"

#              Below is a list of components youmay specify to install.

#              oracle.rdbms.partitioning:11.2.0.1.0- Oracle Partitioning

#              oracle.rdbms.dm:11.2.0.1.0- Oracle Data Mining

#              oracle.rdbms.dv:11.2.0.1.0- Oracle Database Vault

#              oracle.rdbms.lbac:11.2.0.1.0- Oracle Label Security

#              oracle.rdbms.rat:11.2.0.1.0- Oracle Real Application Testing

#              oracle.oraolap:11.2.0.1.0- Oracle OLAP

# oracle.install.db.isCustomInstall=true的话必须手工选择需要安装组件的话

#------------------------------------------------------------------------------

oracle.install.db.customComponents=oracle.server:11.2.0.1.0,oracle.sysman.ccr:10.2.7.0.0,oracle.xdk:11.2.0.1.0,oracle.rdbms.oci:11.2.0.1.0,oracle.network:11.2.0.1.0,oracle.network.listener:11.2.0.1.0,oracle.rdbms:11.2.0.1.0,oracle.options:11.2.0.1.0,oracle.rdbms.partitioning:11.2.0.1.0,oracle.oraolap:11.2.0.1.0,oracle.rdbms.dm:11.2.0.1.0,oracle.rdbms.dv:11.2.0.1.0,orcle.rdbms.lbac:11.2.0.1.0,oracle.rdbms.rat:11.2.0.1.0

###############################################################################

# PRIVILEGED OPERATING SYSTEM GROUPS

# Provide values for the OS groups to whichOSDBA and OSOPER privileges       #

# needs to be granted. If the install isbeing performed as a member of the          #

# group "dba", then that will beused unless specified otherwise below.               #

#指定拥有OSDBA、OSOPER权限的用户组,通常会是dba组

###############################################################################

#------------------------------------------------------------------------------

# The DBA_GROUP is the OS group which is tobe granted OSDBA privileges.

#------------------------------------------------------------------------------

oracle.install.db.DBA_GROUP=dba

#------------------------------------------------------------------------------

# The OPER_GROUP is the OS group which isto be granted OSOPER privileges.

#------------------------------------------------------------------------------

oracle.install.db.OPER_GROUP=oinstall

#------------------------------------------------------------------------------

# Specify the cluster node names selectedduring the installation.

#如果是RAC的安装,在这里指定所有的节点

#------------------------------------------------------------------------------

oracle.install.db.CLUSTER_NODES=

#------------------------------------------------------------------------------

# Specify the type of database to create.

# It can be one of the following:

# - GENERAL_PURPOSE/TRANSACTION_PROCESSING

# - DATA_WAREHOUSE

#选择数据库的用途,一般用途/事物处理,数据仓库

#------------------------------------------------------------------------------

oracle.install.db.config.starterdb.type=GENERAL_PURPOSE

#------------------------------------------------------------------------------

# Specify the Starter Database GlobalDatabase Name. 指定GlobalName

#------------------------------------------------------------------------------

oracle.install.db.config.starterdb.globalDBName=ora11g

#------------------------------------------------------------------------------

# Specify the Starter Database SID.指定SID

#------------------------------------------------------------------------------

oracle.install.db.config.starterdb.SID=ora11g

#------------------------------------------------------------------------------

# Specify the Starter Database characterset.

# It can be one of the following:

# AL32UTF8, WE8ISO8859P15, WE8MSWIN1252,EE8ISO8859P2,

# EE8MSWIN1250, NE8ISO8859P10,NEE8ISO8859P4, BLT8MSWIN1257,

# BLT8ISO8859P13, CL8ISO8859P5,CL8MSWIN1251, AR8ISO8859P6,

# AR8MSWIN1256, EL8ISO8859P7, EL8MSWIN1253,IW8ISO8859P8,

# IW8MSWIN1255, JA16EUC, JA16EUCTILDE,JA16SJIS, JA16SJISTILDE,

# KO16MSWIN949, ZHS16GBK, TH8TISASCII,ZHT32EUC, ZHT16MSWIN950,

# ZHT16HKSCS, WE8ISO8859P9, TR8MSWIN1254,VN8MSWIN1258

#选择字符集。不正确的字符集会给数据显示和存储带来麻烦无数。

#通常中文选择的有ZHS16GBK简体中文库,建议选择unicode的AL32UTF8国际字符集

#------------------------------------------------------------------------------

oracle.install.db.config.starterdb.characterSet=AL32UTF8

#------------------------------------------------------------------------------

# This variable should be set to true ifAutomatic Memory Management

# in Database is desired.

# If Automatic Memory Management is notdesired, and memory allocation

# is to be done manually, then set it tofalse.

#11g的新特性自动内存管理,也就是SGA_TARGET和PAG_AGGREGATE_TARGET都#不用设置了,Oracle会自动调配两部分大小。

#------------------------------------------------------------------------------

oracle.install.db.config.starterdb.memoryOption=true

#------------------------------------------------------------------------------

# Specify the total memory allocation forthe database. Value(in MB) should be

# at least 256 MB, and should not exceedthe total physical memory available on the system.

# Example:oracle.install.db.config.starterdb.memoryLimit=512

#指定Oracle自动管理内存的大小,最小是256MB

#------------------------------------------------------------------------------

oracle.install.db.config.starterdb.memoryLimit=

#------------------------------------------------------------------------------

# This variable controls whether to loadExample Schemas onto the starter

# database or not.是否载入模板示例

#------------------------------------------------------------------------------

oracle.install.db.config.starterdb.installExampleSchemas=false

#------------------------------------------------------------------------------

# This variable includes enabling auditsettings, configuring password profiles

# and revoking some grants to public. Thesesettings are provided by default.

# These settings may also be disabled.   是否启用安全设置

#------------------------------------------------------------------------------

oracle.install.db.config.starterdb.enableSecuritySettings=true

###############################################################################

# Passwords can be supplied for thefollowing four schemas in the                         #

# starter database:                                                               #

#   SYS                                                                     #

#   SYSTEM                                                                  #

#  SYSMAN (used by Enterprise Manager)                                         #

#  DBSNMP (used by Enterprise Manager)                                         #

# Same password can be used for allaccounts (not recommended)                         #

# or different passwords for each accountcan be provided (recommended)                  #

#设置数据库用户密码

###############################################################################

#------------------------------------------------------------------------------

# This variable holds the password that isto be used for all schemas in the

# starter database.

#设定所有数据库用户使用同一个密码,其它数据库用户就不用单独设置了。

#-------------------------------------------------------------------------------

oracle.install.db.config.starterdb.password.ALL=oracle

#-------------------------------------------------------------------------------

# Specify the SYS password for the starterdatabase.

#-------------------------------------------------------------------------------

oracle.install.db.config.starterdb.password.SYS=

#-------------------------------------------------------------------------------

# Specify the SYSTEM password for thestarter database.

#-------------------------------------------------------------------------------

oracle.install.db.config.starterdb.password.SYSTEM=

#-------------------------------------------------------------------------------

# Specify the SYSMAN password for thestarter database.

#-------------------------------------------------------------------------------

oracle.install.db.config.starterdb.password.SYSMAN=

#-------------------------------------------------------------------------------

# Specify the DBSNMP password for thestarter database.

#-------------------------------------------------------------------------------

oracle.install.db.config.starterdb.password.DBSNMP=

#-------------------------------------------------------------------------------

# Specify the management option to beselected for the starter database.

# It can be one of the following:

# 1. GRID_CONTROL

# 2. DB_CONTROL

#数据库本地管理工具DB_CONTROL,远程集中管理工具GRID_CONTROL

#-------------------------------------------------------------------------------

oracle.install.db.config.starterdb.control=DB_CONTROL

#-------------------------------------------------------------------------------

# Specify the Management Service to use ifGrid Control is selected to manage

# the database. GRID_CONTROL需要设定grid control的远程路径URL

#-------------------------------------------------------------------------------

oracle.install.db.config.starterdb.gridcontrol.gridControlServiceURL=

#-------------------------------------------------------------------------------

# This variable indicates whether toreceive email notification for critical

# alerts when using DB control.是否启用Email通知, 启用后会将告警等信息发送到指定邮箱

#-------------------------------------------------------------------------------

oracle.install.db.config.starterdb.dbcontrol.enableEmailNotification=false

#-------------------------------------------------------------------------------

# Specify the email address to which thenotifications are to be sent.设置通知EMAIL地址

#-------------------------------------------------------------------------------

oracle.install.db.config.starterdb.dbcontrol.emailAddress=

#-------------------------------------------------------------------------------

# Specify the SMTP server used for emailnotifications.设置EMAIL邮件服务器

#-------------------------------------------------------------------------------

oracle.install.db.config.starterdb.dbcontrol.SMTPServer=

###############################################################################

# SPECIFY BACKUP AND RECOVERY OPTIONS                                      #

# Out-of-box backup and recovery optionsfor the database can be mentioned                #

# using the entries below.                                                         #

#安全及恢复设置(默认值即可)out-of-box(out-of-box experience)缩写为OOBE

#产品给用产品给用户良好第一印象和使用感受

###############################################################################

#------------------------------------------------------------------------------

# This variable is to be set to false ifautomated backup is not required. Else

# this can be set to true.设置自动备份,和OUI里的自动备份一样。

#------------------------------------------------------------------------------

oracle.install.db.config.starterdb.automatedBackup.enable=false

#------------------------------------------------------------------------------

# Regardless of the type of storage that ischosen for backup and recovery, if

# automated backups are enabled, a job willbe scheduled to run daily at

# 2:00 AM to backup the database. This jobwill run as the operating system

# user that is specified in this variable.自动备份会启动一个job,指定启动JOB的系统用户ID

#------------------------------------------------------------------------------

oracle.install.db.config.starterdb.automatedBackup.osuid=

#-------------------------------------------------------------------------------

# Regardless of the type of storage that ischosen for backup and recovery, if

# automated backups are enabled, a job willbe scheduled to run daily at

# 2:00 AM to backup the database. This jobwill run as the operating system user

# specified by the above entry. Thefollowing entry stores the password for the

# above operating system user.自动备份会开启一个job,需要指定OSUser的密码

#-------------------------------------------------------------------------------

oracle.install.db.config.starterdb.automatedBackup.ospwd=

#-------------------------------------------------------------------------------

# Specify the type of storage to use forthe database.

# It can be one of the following:

# - FILE_SYSTEM_STORAGE

# - ASM_STORAGE

#自动备份,要求指定使用的文件系统存放数据库文件还是ASM

#------------------------------------------------------------------------------

oracle.install.db.config.starterdb.storageType=

#-------------------------------------------------------------------------------

# Specify the database file location whichis a directory for datafiles, control

# files, redo logs.

# Applicable only when oracle.install.db.config.starterdb.storage=FILE_SYSTEM

#使用文件系统存放数据库文件才需要指定数据文件、控制文件、Redo log的存放目录

#-------------------------------------------------------------------------------

oracle.install.db.config.starterdb.fileSystemStorage.dataLocation=

#-------------------------------------------------------------------------------

# Specify the backup and recovery location.

# Applicable only whenoracle.install.db.config.starterdb.storage=FILE_SYSTEM

#使用文件系统存放数据库文件才需要指定备份恢复目录

#-------------------------------------------------------------------------------

oracle.install.db.config.starterdb.fileSystemStorage.recoveryLocation=

#-------------------------------------------------------------------------------

# Specify the existing ASM disk groups tobe used for storage.

# Applicable only whenoracle.install.db.config.starterdb.storage=ASM

#使用ASM存放数据库文件才需要指定存放的磁盘组

#-------------------------------------------------------------------------------

oracle.install.db.config.asm.diskGroup=

#-------------------------------------------------------------------------------

# Specify the password for ASMSNMP user ofthe ASM instance.

# Applicable only whenoracle.install.db.config.starterdb.storage=ASM_SYSTEM

#使用ASM存放数据库文件才需要指定ASM实例密码

#-------------------------------------------------------------------------------

oracle.install.db.config.asm.ASMSNMPPassword=

#------------------------------------------------------------------------------

# Specify the My Oracle Support AccountUsername.

# Example   :MYORACLESUPPORT_USERNAME=metalink

#指定metalink账户用户名

#------------------------------------------------------------------------------

MYORACLESUPPORT_USERNAME=

#------------------------------------------------------------------------------

# Specify the My Oracle Support AccountUsername password.

# Example   : MYORACLESUPPORT_PASSWORD=password

# 指定metalink账户密码

#------------------------------------------------------------------------------

MYORACLESUPPORT_PASSWORD=

#------------------------------------------------------------------------------

# Specify whether to enable the user to setthe password for

# My Oracle Support credentials. The valuecan be either true or false.

# If left blank it will be assumed to befalse.

# Example   : SECURITY_UPDATES_VIA_MYORACLESUPPORT=true

# 用户是否可以设置metalink密码

#------------------------------------------------------------------------------

SECURITY_UPDATES_VIA_MYORACLESUPPORT=

#------------------------------------------------------------------------------

# Specify whether user wants to give anyproxy details for connection.

# The value can be either true or false. Ifleft blank it will be assumed to be false.

# Example   : DECLINE_SECURITY_UPDATES=false

# False表示不需要设置安全更新,注意,在11.2的静默安装中疑似有一个BUG

# Response File中必须指定为true,否则会提示错误,不管是否正确填写了邮件地址

#------------------------------------------------------------------------------

DECLINE_SECURITY_UPDATES=true

#------------------------------------------------------------------------------

# Specify the Proxy server name. Lengthshould be greater than zero.

#代理服务器名

# Example   : PROXY_HOST=proxy.domain.com

#------------------------------------------------------------------------------

PROXY_HOST=

#------------------------------------------------------------------------------

# Specify the proxy port number. Should beNumeric and atleast 2 chars.

#代理服务器端口

# Example   : PROXY_PORT=25

#------------------------------------------------------------------------------

PROXY_PORT=

#------------------------------------------------------------------------------

# Specify the proxy user name. LeavePROXY_USER and PROXY_PWD

# blank if your proxy server requires noauthentication.

#代理服务器用户名

# Example   : PROXY_USER=username

#------------------------------------------------------------------------------

PROXY_USER=

#------------------------------------------------------------------------------

# Specify the proxy password. LeavePROXY_USER and PROXY_PWD

# blank if your proxy server requires noauthentication.

#代理服务器密码

# Example   : PROXY_PWD=password

#------------------------------------------------------------------------------

PROXY_PWD=
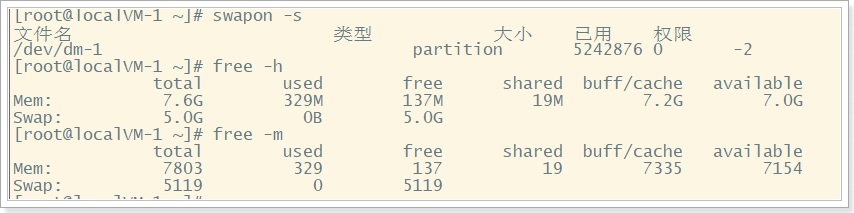
设置虚拟内存
操作用户:root
如果不设置虚拟内存,后面安装会报错
增加虚拟内存
虚拟内存设置多大: 如果不打算开启休眠功能,物理内存在8G以下,则swap设置为与物理内存一样大。如果物理内存在8G以上,swap空间设置为8G即可。当物理内存大于64G时,不建议开启休眠功能。
使用swapon -s命令检查是否已经启用swap,如果没有任何输出,则代表没有启用。
也可以使用free -h或者free -m命令
如果Swap总的容量是0,代表Swap没有启用
注:虚拟机安装的时候已经启用了虚拟内存,如果没有启用,则按照下面的教程进行设置
设置虚拟内存
# 创建一个大小为5GB的文件 路径 /swap 计算:5GB=1024*1024*5=5242880
sudo dd if=/dev/zero of=/swap bs=1024 count=5242880

# 设置此文件的权限,防止内存被非法读写:
sudo chmod 600 /swap

# 将此文件制作为swap文件
sudo mkswap /swap

# 开启swap
sudo swapon /swap

# 使用swapon -s命令检查是否已经成功启用swap
swapon -s
系统重启之后不会自动启用swap
如果需要开机自动启用swap,需要修改fstab文件:
sudo vim /etc/fstab

# 在文件末尾添加一行
/swap   swap    swap    sw  0   0
删除虚拟内存
# 查看交换分区文件
cat /proc/swaps

# 关闭分区,将上面查出来的文件路径写上即可。
swapoff /swap

# 删除文件
rm -rf /swap

# 编辑fstab 文件,删除或注释掉我们之前在fstab文件里追加的开机自动挂载配置内容
vim /etc/fstab

# /dev/mapper/centos-swap swap                    swap    defaults        0 0

重新设置虚拟内存
可以将原来的虚拟内存删除再重新设置,或者设置新的虚拟内存分区,添加到虚拟内存中
静默安装Oracle 11g
操作用户:oracle
# /home/oracle/database
./runInstaller -silent -ignoreSysPrereqs -responseFile /home/oracle/db_install.rsp
接下来,就是默默的等待Oracle自行安装了,安装过程会有需要一些时间,耐心等待即可
期间会出现一些日志信息,警告的可以不用管,没有报错即可

[外链图片转存失败,源站可能有防盗链机制,建议将图片保存下来直接上传(img-daCKoBfF-1603099057995)(https://blog.javaood.com/upload/image/image-20201019022017302.png)]
执行脚本
操作用户:root
/home/oracle/oraInventory/orainstRoot.sh

/home/oracle/oracle11g/product/11.2.0/dbhome_1/root.sh

Navicat Premium远程连接
使用参考:Navicat Premium 12

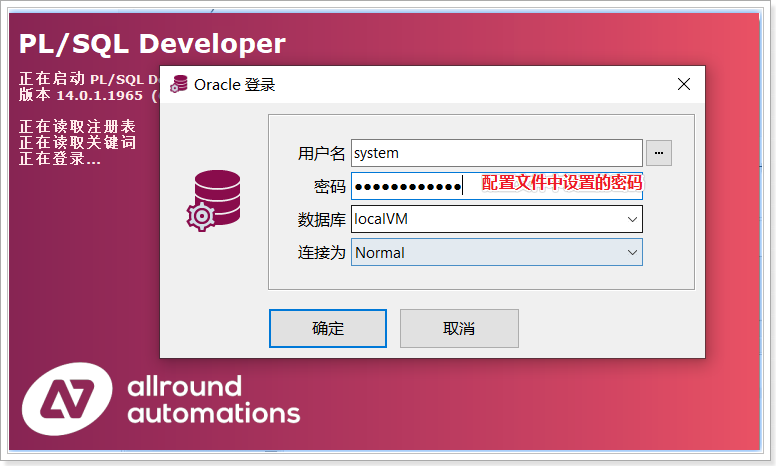
PLSQL Developer远程连接
使用参考:PL/SQL Developer 14
localVM =
  (DESCRIPTION =
    (ADDRESS_LIST =
      (ADDRESS = (PROTOCOL = TCP)(HOST = 192.168.211.133)(PORT = 1521))
    )
    (CONNECT_DATA =
      (SID = orcl)
    )
  )
设置开机启动
操作用户:root
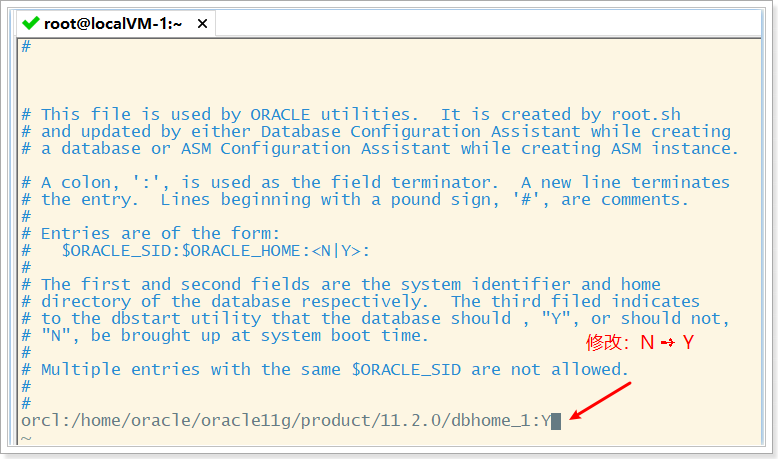
vim /etc/oratab

# 将最后一行的N改为Y
chmod 777 /etc/rc.d/rc.local
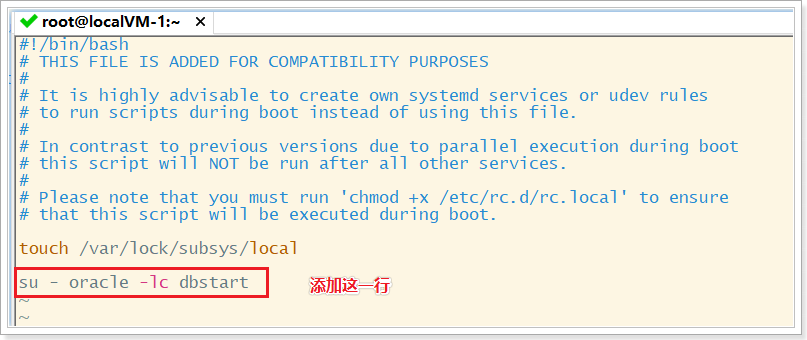
vim /etc/rc.d/rc.local
# 末尾添加一行
su - oracle -lc dbstart
操作用户:Oracle
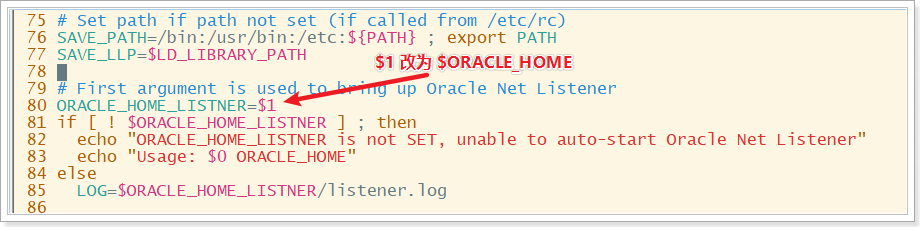
cd $ORACLE_HOME/bin

vim dbstart

# 80行 修改 ORACLE_HOME_LISTNER=$1 --> ORACLE_HOME_LISTNER=$ORACLE_HOME
$1 改为 $ORACLE_HOME
 [外链图片转存失败,源站可能有防盗链机制,建议将图片保存下来直接上传(img-MHYKfdtf-1603099058015)(https://blog.javaood.com/upload/image/image-20201019130515142.png)]
重启CentOS
操作用户:root
reboot
然后Navicat Premium、PL/SQL Developer测试是否能连接Oracle数据库
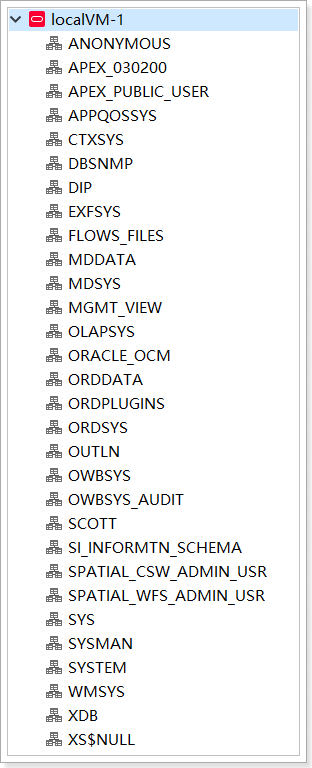
Oracle体系结构
为了让其他同学更好的理解Oracle的一些基本概念,这里做了一些介绍(Oracle和MySQL的体系结构还是有一些不一样的地方的)
[外链图片转存失败,源站可能有防盗链机制,建议将图片保存下来直接上传(img-1U8U1z7n-1603099058019)(https://blog.javaood.com/upload/image/image-20201019131811577.png)]
MySQL数据库管理系统下面有N个数据库,每一个数据库下面包含着一些表,可以理解为MySQL数据库管理系统中的每个数据库才是表的基本单位,一个数据库包含着一些表。
Oracle数据库管理系统下面也有多个用户,每个用户下面包含着一些表,可以理解为Oracle数据库管理系统中用户才是表的基本单位,一个用户包含着一些表。
注意:总结起来就是Oracle中建库就是新建一个用户,因为Oracle中的一个用户就等用于MySQL中的一个数据库
解锁SCOTT用户
[外链图片转存失败,源站可能有防盗链机制,建议将图片保存下来直接上传(img-MbI2Eb6c-1603099058021)(https://blog.javaood.com/upload/image/image-20201019132925214.png)]
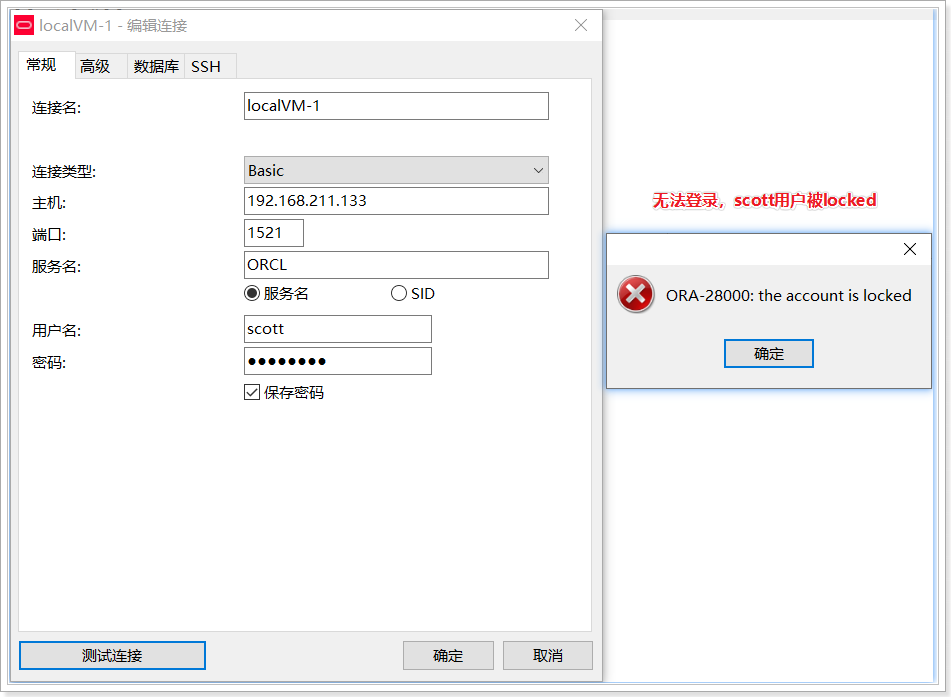

SCOTT用户包含了一些测试样表,这里可以解锁使用SCOTT用户
操作用户:oracle
sqlplus /nolog

conn /as sysdba

alter user scott account unlock;
commit;

conn scott/tiger

# 输入密码、重复输入密码(这里为了方便记忆,统一使用了上面设置的同一个密码:DdKUQbzz9fm2)
New password: DdKUQbzz9fm2
Retype new password: DdKUQbzz9fm2

# 退出
exit
[外链图片转存失败,源站可能有防盗链机制,建议将图片保存下来直接上传(img-Nk2nrCJn-1603099058026)(https://blog.javaood.com/upload/image/image-20201019133653996.png)]
现在再次测试,发现能成功登录scott用户了
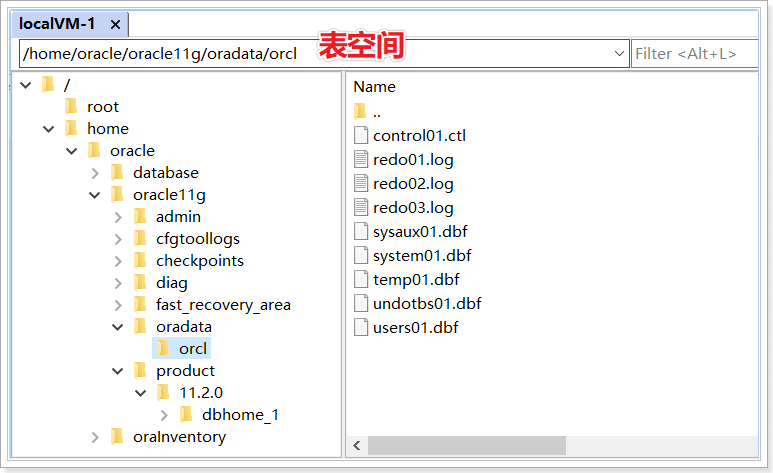
创建|删除表空间、创建|删除用户以及用户授权
[外链图片转存失败,源站可能有防盗链机制,建议将图片保存下来直接上传(img-lAQ9UJ5S-1603099058038)(https://blog.javaood.com/upload/image/image-20201019141809855.png)]
表空间:ORACLE数据库的逻辑单元
数据库—表空间:一个表空间可以与多个数据文件(物理结构)关联
一个数据库下可以建立多个表空间,一个表空间可以建立多个用户、一个用户下可以建立多个表。
创建、删除表空间
tablespace 为表空间名称
datafile 指定表空间对应的数据文件
size 后定义的是表空间的初始大小
autoextend on 自动增长 ,当表空间存储都占满时,自动增长
next 后指定的是一次自动增长的大小。

--创建表空间
create tablespace test
datafile '/home/oracle/oracle11g/oradata/orcl/test.dbf'
size 100m
autoextend on
next 10m;

--删除表空间
drop tablespace test;
[外链图片转存失败,源站可能有防盗链机制,建议将图片保存下来直接上传(img-n9l4iMGs-1603099058041)(https://blog.javaood.com/upload/image/image-20201019143238574.png)]
创建、删除用户
--创建用户 identified:密码(为了方便记忆,这里统一使用同一个密码)
create user test
identified by DdKUQbzz9fm2
default tablespace test;


--删除用户
语法:drop user 用户名;
例子:drop user test;

若用户拥有对象,则不能直接删除,否则将返回一个错误值。
指定关键字cascade,可删除用户所有的对象,然后再删除用户。
语法: drop user 用户名 cascade;
例子: drop user test cascade;
[外链图片转存失败,源站可能有防盗链机制,建议将图片保存下来直接上传(img-A1Zx7N0J-1603099058044)(https://blog.javaood.com/upload/image/image-20201019143506305.png)]
用户授权
--给用户授权
--oracle数据库中常用角色
connect--连接角色,基本角色
resource--开发者角色
dba--超级管理员角色


--给test用户授予dba角色
grant dba to test;
--赋予多个角色
grant connect,resource,dba to test;
三种标准角色
connect role(连接角色)- 临时用户,特指不需要建表的用户,通常只赋予他们connect role.
- connect是使用oracle简单权限,这种权限只对其他用户的表有访问权限,包括select/insert/update和delete等
- 拥有connect role 的用户还能够创建表、视图、序列(sequence)、簇(cluster)、同义词(synonym)、回话(session)和其他 数据的链(link)
resource role(资源角色)- 更可靠和正式的数据库用户可以授予resource role
- resource提供给用户另外的权限以创建他们自己的表、序列、过程(procedure)、触发器(trigger)、索引(index)和簇(cluster)
dba role(数据库管理员角色)- dba role拥有所有的系统权限
- 包括无限制的空间限额和给其他用户授予各种权限的能力。system由dba用户拥有
[外链图片转存失败,源站可能有防盗链机制,建议将图片保存下来直接上传(img-Q8Mvyeiq-1603099058046)(https://blog.javaood.com/upload/image/image-20201019144029487.png)]

原文:https://blog.javaood.com/archives/o-r-a-c-l-e–d-a-t-a-b-a-s-e–1-1-g–e-n-t-e-r-p-r-i-s-e-zai-c-e-n-t-o-s-shang-de-an-zhuang


 559
559


 被折叠的 条评论
为什么被折叠?
被折叠的 条评论
为什么被折叠?
 到【灌水乐园】发言


