


 本文深入解析Gin框架的实现原理,包括HTTP请求处理流程、路由匹配机制、中间件设计及Context对象的应用。通过源码分析,揭示Gin框架高效运作的秘密。
开篇
-
首先gin 框架是在 官方提供的net/http标准包进行的相应封装。
-
那么要想理解gin框架, 就要先懂一些 net/http标准包 的相关知识。
-
可以参考中文的 文档: https://studygolang.com/pkgdoc
-
可以参考的很多文章视频等:
- gin源码分析流程思维导图:https://www.processon.com/view/link/5f4b70c2079129356ec5cb70#map
- gin源码解读
- 哔哩哔哩视频讲 gin源码: https://www.bilibili.com/video/BV1Br4y1N7DG?spm_id_from=333.999.0.0
参考大佬文章: 两篇gin技术内幕:https://zhuanlan.zhihu.com/p/133208366(重点)参考大佬两篇:深入gin框架内幕 https://zhuanlan.zhihu.com/p/102303084(重点)- https://www.cnblogs.com/yjf512/p/9670990.html
- https://blog.csdn.net/u012988972/article/details/118991542
- 等等资料和视频(资料文章能找到很多,我也没咋都看,但是有机会可以多看看,融入融入)
另外: 文章源码的上述注释解析,来自机器翻译,可能有不准确的情况。
-
有话讲:
- 有的地方可能是我自己的推敲与判断,整体分析的思路,也是一步步来的。
- 锻炼阅读源码的能力, 如何搞清楚一个框架的定位,以及如何,从那一步开始研究框架和源码,这都是一个学习的过程。
- 开场,会从最基本的入门小例子讲起。
- 阅读优秀的代码,还会发现很多比较优质的代码书写的相关技巧!都会总结一下。比如 for 遍历先初始化 len(t), 保证结构体是否实现相关接口等等。
-
同时还可以参考对应的 官方文档, 有相关项目经验后再来分析源码,这样你就会思考,
我在框架中使用的某些功能,或者逻辑处理流程是如何实现的?这些都很关键。- github上当然有官方的文档介绍: https://github.com/gin-gonic/gin#gin-web-framework, 并且还有相关的 例子,就在examples 目录下。
- 在打开 github 查看源码的时候,可以将链接变为 https://github1s.com, 加个 “1s” , 项目会被打开成 vscode 风格! 方便查看。 很棒~
- 还有相关的中文文档, 访问比较快:https://www.kancloud.cn/shuangdeyu/gin_book/949413
-
引用文章中的一段描述介绍开篇:
开始
1. 从入门教程推出 Engine 对象
-
从最开始的语句来入门教程:
func main() { // 创建一个默认的路由引擎 r := gin.Default() // GET:请求方式;/hello:请求的路径 // 当客户端以GET方法请求/hello路径时,会执行后面的匿名函数 r.GET("/hello", func(c *gin.Context) { // c.JSON:返回JSON格式的数据 c.JSON(200, gin.H{ "message": "Hello world!", }) }) // 启动HTTP服务,默认在0.0.0.0:8080启动服务 r.Run() } -
我们点击进去 Run 函数的源码:
//执行命令将路由器连接到http。服务器并开始侦听和服务HTTP请求。 // http的快捷方式。ListenAndServe (addr,路由器) //注意:这个方法会无限期地阻塞调用goroutine,除非发生错误。 func (engine *Engine) Run(addr ...string) (err error) { defer func() { debugPrintError(err) }() trustedCIDRs, err := engine.prepareTrustedCIDRs() if err != nil { return err } engine.trustedCIDRs = trustedCIDRs address := resolveAddress(addr) debugPrint("Listening and serving HTTP on %s\n", address) err = http.ListenAndServe(address, engine) return }- 其中最核心的语句就是 :
err = http.ListenAndServe(address, engine)-
这就是调用的官方标准包, net/http。 可以去查看对应的用法:

- 它负责监听 tcp请求,并且交给 handler 参数去调用一个 Server函数处理接收到的链接。
- 一般handler 为 nil, 那么默认有一个 DefaultServeMux 对象, 去调用 server函数处理请求。
-
打开 http.ListenAndServe 源码,会发现,它获取的handler参数就是传递给 Server对象的。
// ListenAndServe监听TCP网络地址addr,然后调用 //使用handler处理传入连接的请求。 //已接受的连接配置为启用TCP keep-alive。 // //处理程序通常为nil,在这种情况下使用DefaultServeMux。 // // ListenAndServe总是返回一个非nil错误。 func ListenAndServe(addr string, handler Handler) error { server := &Server{Addr: addr, Handler: handler} //源码中创建 server服务器对象,将handler传递进去 return server.ListenAndServe() } -
Server函数: server对象的方法,接收每一个链接,并开启 go程,读取请求,调用handler回复请求。

-
默认的 DefaultServeMux
// ServeMux是一个HTTP请求复用器。 //它将每个传入请求的URL与一个已注册的列表进行匹配 // 的模式,并调用处理程序的模式 //最接近URL。 // //模式名称固定,根路径,如"/favicon.ico", //或根子树,如"/images/"(注意后面的斜杠)。 //较长的模式优先于较短的模式,因此 //如果有两个处理程序注册"/images/" //和"/images/thumbnails/",后一个处理器将是 //调用以"/images/thumbnails/"开头的路径 //前将接收任何其他路径的请求 / / /图片/子树。 // //注意,因为以斜杠结尾的模式命名了根子树, //模式"/"匹配所有未被其他注册的路径 //模式,而不仅仅是URL与Path == "/"。 // //如果一个子树已经注册,并且接收到一个命名为 //不带末尾斜杠的子树根,ServeMux重定向它 //请求到子树根(添加末尾的斜杠)。这种行为可以 //被一个单独的注册路径覆盖 //末尾的斜杠。例如,注册“/images/”会导致ServeMux //重定向请求"/images"到"/images",除非"/images"有 //已单独注册。 // //模式可以选择以主机名开头,限制匹配为 //该主机上的url。特定于主机的模式优先 //通用模式,以便处理程序可以注册这两个模式 // "/codesearch"和"codesearch.google.com/"不需要接管 //请求“http://www.google.com/”。 // // ServeMux还负责清理URL请求路径和主机 //头,剥离端口号和重定向任何请求包含。或 / / . .元素或重复的斜杠到等效的、更干净的URL。 type ServeMux struct { mu sync.RWMutex m map[string]muxEntry es []muxEntry // slice of entries sorted from longest to shortest. hosts bool // whether any patterns contain hostnames } // NewServeMux allocates and returns a new ServeMux. func NewServeMux() *ServeMux { return new(ServeMux) } // DefaultServeMux is the default ServeMux used by Serve. var DefaultServeMux = &defaultServeMux var defaultServeMux ServeMux -
而对应的server对象在这
type Server struct {
    Addr           string        // 监听的TCP地址,如果为空字符串会使用":http"
    Handler        Handler       // 调用的处理器,如为nil会调用http.DefaultServeMux
    ReadTimeout    time.Duration // 请求的读取操作在超时前的最大持续时间
    WriteTimeout   time.Duration // 回复的写入操作在超时前的最大持续时间
    MaxHeaderBytes int           // 请求的头域最大长度,如为0则用DefaultMaxHeaderBytes
    TLSConfig      *tls.Config   // 可选的TLS配置,用于ListenAndServeTLS方法
    // TLSNextProto(可选地)指定一个函数来在一个NPN型协议升级出现时接管TLS连接的所有权。
    // 映射的键为商谈的协议名;映射的值为函数,该函数的Handler参数应处理HTTP请求,
    // 并且初始化Handler.ServeHTTP的*Request参数的TLS和RemoteAddr字段(如果未设置)。
    // 连接在函数返回时会自动关闭。
    TLSNextProto map[string]func(*Server, *tls.Conn, Handler)
    // ConnState字段指定一个可选的回调函数,该函数会在一个与客户端的连接改变状态时被调用。
    // 参见ConnState类型和相关常数获取细节。
    ConnState func(net.Conn, ConnState)
    // ErrorLog指定一个可选的日志记录器,用于记录接收连接时的错误和处理器不正常的行为。
    // 如果本字段为nil,日志会通过log包的标准日志记录器写入os.Stderr。
    ErrorLog *log.Logger
    // 内含隐藏或非导出字段
}
-
- 其中最核心的语句就是 :
-
可以看到, 我们的代码中:
err = http.ListenAndServe(address, engine)-
也就是将 engine 传递进去, 作为 handler 参数,也就是不使用默认的 DefaultServeMux -
engine 是 *Engine 类型。 也就是 我们 gin.Default() 出来的“引擎”(Default 出来的默认带有两个中间件)。 engin 既然可以作为 Handler 类型参数, 那么肯定实现了对应的接口:
//处理程序响应HTTP请求。
//
// serverhttp应该向ResponseWriter写入应答头和数据
//返回。返回请求完成的信号;它
// 的ResponseWriter或从
//请求。正文后或与之同时完成
// ServeHTTP电话。
//
//根据HTTP客户端软件、HTTP协议版本和
//客户端和Go服务器之间的任何中介,它可能不会
//可以读取请求。身体写完后给
// ResponseWriter。谨慎的处理程序应该读取请求。身体
//首先,然后回复。
//
//除了读取主体外,处理程序不应该修改
//请求提供。
//
//如果ServeHTTP崩溃,服务器(调用ServeHTTP的人)会假设
//将panic的影响与主动请求隔离。
//它恢复panic,记录堆栈跟踪到服务器错误日志,
//关闭网络连接或者发送HTTP/2
// RST_STREAM,取决于HTTP协议。中止处理程序,所以
//客户端看到一个中断的响应,但服务器没有记录
//一个错误,慌乱与值ErrAbortHandler。
type Handler interface {
	ServeHTTP(ResponseWriter, *Request)
}
-
-
总结:
- 调用Run方法, 实际底层是使用 http包的方法, 将 Engine 类型对象作为 handler 参数传递进去(实现了Handler接口),构造 Server对象, 代替默认的 DefaultServeMux 处理请求链接,DefaultServeMux 实现了 相关的 match 等方法(去server.go 搜索ServeMux, 找到它实现的相关方法) 。
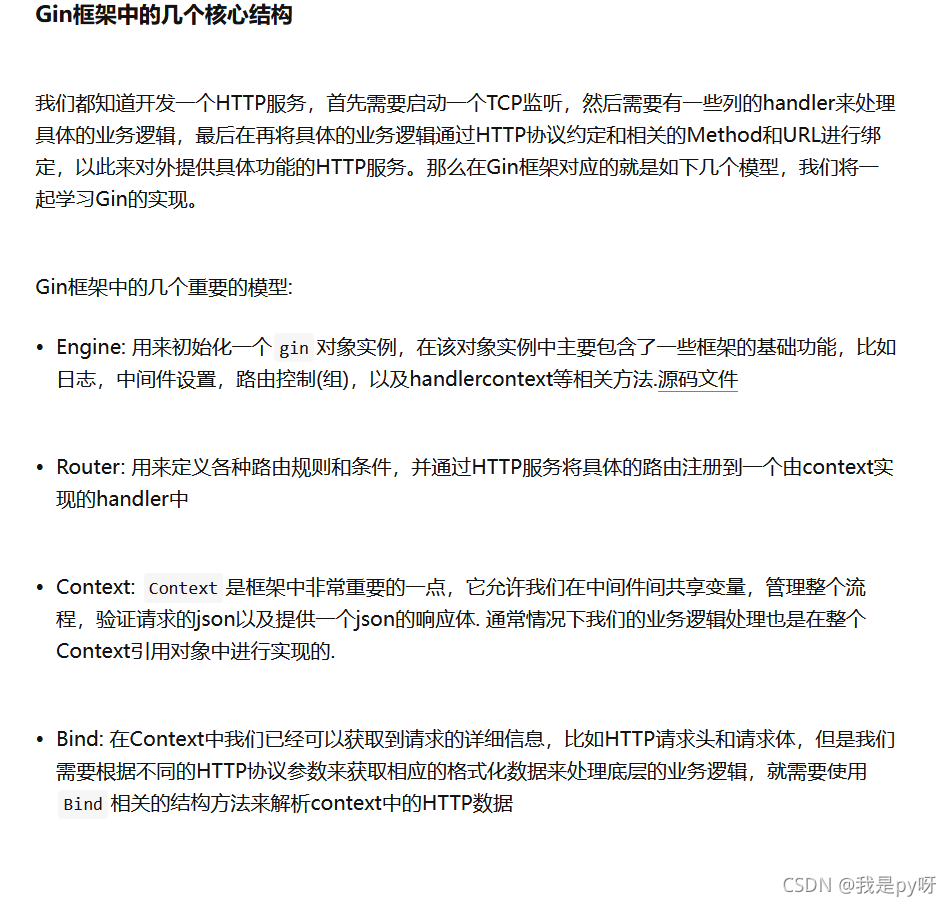
2. Engine 对象介绍及handleHTTPRequest接口实现与路由方法树树相关操作
- 认清
Engine 对象及giin框架。- 源码上方的介绍:
Engine 是框架的实例,它包含muxer,中间件和配置设置。- 可以看到是非常重要的! 同时我们也知道了 gin 框架的主要作用, 就是 充当了 muxer 代替 net/http 包里 启动服务器对象的默认 muxer, 同时还提供了 中间件,配置设置等功能
- 源码上方的介绍:
- 我们查看源码,找到Egine 对象: 比较长,注释很清晰,每个功能的作用。
-
参考文章: https://zhuanlan.zhihu.com/p/102303084, Engine 相关常用的方法,在这里都有介绍。一定进去查看下!
- 理解了其实还可以使用 goland编辑器, 鼠标停在gin,Default()。Defalut上。 然后出现返回类型, *Engine, 点击一下,就会出现相关具有的方法 和 内容。(缺少一个maxParams参数,老版本这个参数是在路由树的里定义的)
//Engine是框架的实例,它包含muxer,中间件和配置设置。 //创建一个Engine实例,使用New()或Default() type Engine struct { // 路由组,在实际开发过程中我们通常会使用路由组来组织和管理一些列的路由. 比如: /apis/,/v1/等分组路由 RouterGroup // 开启自动重定向。如果当前路由没有匹配到,但是存在不带/开头的handler就会重定向. 比如: 用户输入/foo/但是存在一个/foo 就会自动重定向到该handler,并且会向客户端返回301或者307状态码(区别在于GET方法和其他方法) RedirectTrailingSlash bool // 如果开启该参数,没有handler注册时,路由会尝试自己去修复当前的请求地址. // 修复流程: // 1.首位多余元素会被删除(../ or //); 2.然后路由会对新的路径进行不区分大小写的查找;3.如果能正常找到对应的handler,路由就会重定向到正确的handler上并返回301或者307.(比如: 用户访问/FOO 和 /..//Foo可能会被重定向到/foo这个路由上) RedirectFixedPath bool // 如果开启该参数,当当前请求不能被路由时,路由会自己去检查其他方法是否被允许.在这种情况下会响应"Method Not Allowed",并返回状态码405; 如果没有其他方法被允许,将会委托给NotFound的handler HandleMethodNotAllowed bool // 是否转发客户端ip ForwardedByClientIP bool // 如果开启将会在请求中增加一个以"X-AppEngine..."开头的header AppEngine bool // 如果开启将会使用url.RawPath去查找参数(默认:false) UseRawPath bool // 如果开启,请求路径将不会被转义. 如果UseRawPath为false,该参数实际上就为true(因为使用的是url.Path) UnescapePathValues bool // maxMemory参数的值(http.Request的ParseMultipartForm调用时的参数) MaxMultipartMemory int64 // 是否删除额外的反斜线(开始时可解析有额外斜线的请求) RemoveExtraSlash bool // 分隔符(render.Delims表示使用HTML渲染的一组左右分隔符,具体可见html/template库) delims render.Delims // 设置在Context.SecureJSON中国的json前缀 secureJsonPrefix string // 返回一个HTMLRender接口(用于渲染HTMLProduction和HTMLDebug两个结构体类型的模板) HTMLRender render.HTMLRender // html/template包中的FuncMap map[string]interface{} ,用来定义从名称到函数的映射 FuncMap template.FuncMap // 以下是gin框架内部定义的一些属性 // HandlersChain 是一个HandlerFunc 的数组(HandlerFunc其实就是一个Context的指针,Context会在下一节讲解) allNoRoute HandlersChain allNoMethod HandlersChain noRoute HandlersChain // 上述连接中有介绍 noMethod HandlersChain // 这里定义了一个可以临时存取对象的集合(sync.Pool是线程安全的,主要用来缓存为使用的item以减少GC压力,使得创建高效且线程安全的空闲队列) pool sync.Pool // methodTrees是methodTree的切片(methodTree是一个包含请求方法和node指针的结构体,node是一个管理path的节点树) trees methodTrees } -
下方还有一句:
var _ IRouter = &Engine{}通过匿名变量定义 某个接口类型的值,这样的写法,作用是,确保 Engine{} 实现了 IRouter 接口。一个技巧。 -
找到对应实现接口的方法: ServeHTTP:
// ServeHTTP conforms to the http.Handler interface. func (engine *Engine) ServeHTTP(w http.ResponseWriter, req *http.Request) { // SYNC Pool对象池的概念: 减少内存申请,并 类型断言,转换为 Context类型指针。 c := engine.pool.Get().(*Context) // 拿到对象后,下面三步才进行对象的初始化。 c.writermem.reset(w) c.Request = req //因为是结构体并且sync.pool机制不会主动重置`Context`,所以手动重置`Context` c.reset() // 关键一步,调用handleHTTPRequest函数,处理请求。 engine.handleHTTPRequest(c) engine.pool.Put(c) } -
关键的一步就是处理http请求的函数: handleHTTPRequest ,传递进去初始化好的上下文。
-
上源码:
func (engine *Engine) handleHTTPRequest(c *Context) { // 1. 获取相关数据 和 设置 httpMethod := c.Request.Method rPath := c.Request.URL.Path unescape := false if engine.UseRawPath && len(c.Request.URL.RawPath) > 0 { rPath = c.Request.URL.RawPath unescape = engine.UnescapePathValues } if engine.RemoveExtraSlash { rPath = cleanPath(rPath) } // Find root of the tree for the given HTTP method // 找到路由树 // 执行请求对应的函数,写入Response t := engine.trees for i, tl := 0, len(t); i < tl; i++ { if t[i].method != httpMethod { continue } root := t[i].root // Find route in tree value := root.getValue(rPath, c.params, unescape) if value.params != nil { c.Params = *value.params } if value.handlers != nil { c.handlers = value.handlers c.fullPath = value.fullPath c.Next() c.writermem.WriteHeaderNow() return } if httpMethod != "CONNECT" && rPath != "/" { if value.tsr && engine.RedirectTrailingSlash { redirectTrailingSlash(c) return } if engine.RedirectFixedPath && redirectFixedPath(c, root, engine.RedirectFixedPath) { return } } break } if engine.HandleMethodNotAllowed { for _, tree := range engine.trees { if tree.method == httpMethod { continue } if value := tree.root.getValue(rPath, nil, unescape); value.handlers != nil { c.handlers = engine.allNoMethod serveError(c, http.StatusMethodNotAllowed, default405Body) return } } } c.handlers = engine.allNoRoute serveError(c, http.StatusNotFound, default404Body) } -
源码解析:
- (1) 首先获得 请求方法等数据,信息,进行相关操作。
- (2)获取 gin.trees, 路由方法树。
-
这里参考之前写的路由树的,前缀树Trie, Radix树相关的内容和实现。:go语言简单实现 前缀树(Trie)与了解基数树(Radix-Tree)
-
对应的是 Engine里面的
trees methodTrees 类型。 而methodTrees 类型是这样定义的: type methodTrees []methodTree -
methodTree 是这样定义的:
// 记录当前的路由字符 和 对应的 radix或前缀树的根节点! type methodTree struct { method string root *node } -
对应的节点类型 node 为: 这和我们自己实现的前缀树基本一致,可以看到多了一些属性, 并且还具有相关 addRoute等方法。
type node struct { path string indices string wildChild bool nType nodeType priority uint32 children []*node // child nodes, at most 1 :param style node at the end of the array handlers HandlersChain fullPath string } -
我们顺藤摸瓜,前面从 methodTree 找到了 请求方法对应的树结构node节点类型。那么各个字段的含义呢?
path: 节点路经字符串“当前节点保存的 路径字符”indices(目录,索引):和children字段是对应的。保存的是 children 节点的 path字段的 首字母。在进行查找的时候,就可以通过当前字段来判断,该树的子节点是否满足后序的匹配规则。children:保存儿子节点handlersHandlersChain: 处理函数的链条。 这里寻找对应的处理函数,以及执行流程!还可以用来判断当前节点是否是正确的路由,当前节点 handlers字段为 nil 说明没有注册处理函数, 就是一个正确的 路由!!(我的想法)priority: uint32 : 优先级,表示子节点,子子节点注册的handler数量。nTypenodeType: 表示节点类型。其中的类型:type nodeType uint8 const ( static nodeType = iota // default 默认值,静态的节点。 root 表示是根节点 param 参数节点,就例如 router.GET("/user/:name", func(c *gin.Context), name := c.Param("name") 获取捕获的姓名 catchAll 表示当前节点有 匹配符 * ,匹配 )wildChildbool:节点是否是参数节点fullPathstring:完整路径
-
下面实战讲解,进行测试,以我的一个抽奖项目为例,路由组的代码是这样的:
- 当然了,每个路由组里面还有更细小的路由。
// 指定路由,加载路由 // 1. 网站首页 v1 := app.Group("/") addIndexRouters(v1, &Index) // 2. admin 后台管理路由 v2 := app.Group("/admin") // 启用中间件: BasicAuth()(验证)中间件 v2.Use(gin.BasicAuth(gin.Accounts{ "admin": "123456", // 添加一个管理员用户 })) addAdminRouters(v2, &Admin) // 3. 商品管理页 v3 := v2.Group("/gift") addAdminGiftRouters(v3, &AdminGift) // 4. 优惠券管理页 v4 := v2.Group("/code") addAdminCodeRouters(v4, &AdminCode) // 5. 中奖结果管理 v5 := v2.Group("/result") addAdminResultRouters(v5, &AdminResult) // 6. 用户管理 v6 := v2.Group("/user") addAdminUserRouters(v6, &AdminUser) // 7. ip 黑名单管理 v7 := v2.Group("/blackip") addAdminBlackipRouters(v7, &AdminBlackip) -
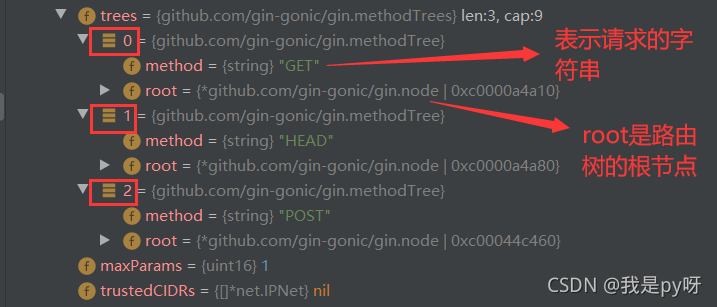
可以看到,
engin.tress的结构是这样的:我目前有 GET,GEAD,POST三种方法。
-
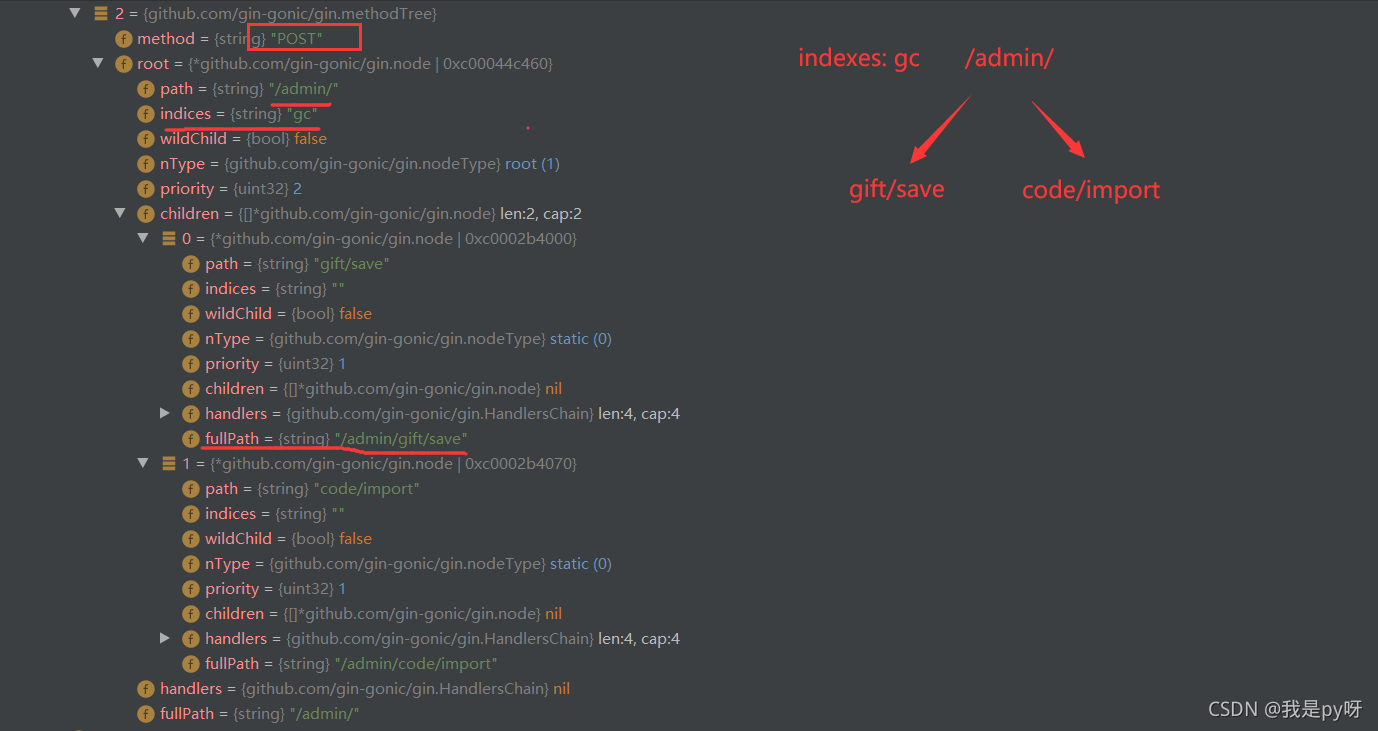
那么对应的内部 node节点如何?打开POST方法对应的路由树来看里面路由比较少,大致就是这种:
-
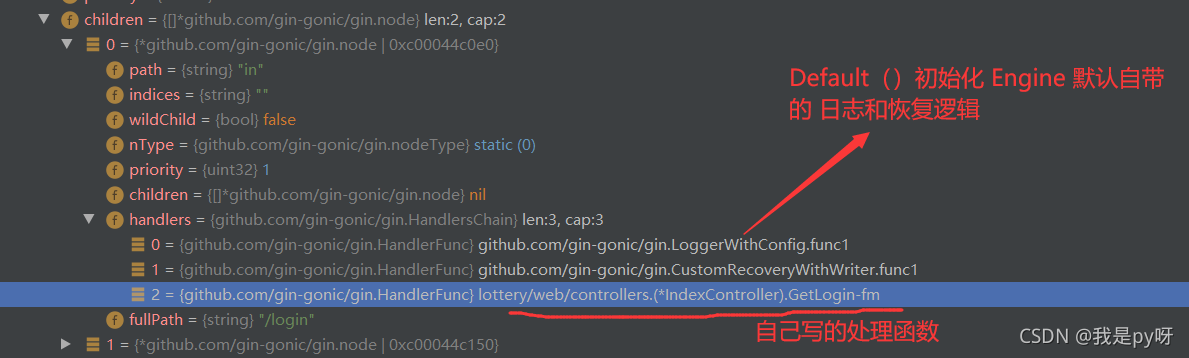
再来分析一波小的GET方法下: 可以看到对应的 “l” 的Priority 是3,说明下面有三个处理函数。三个注册的handler。
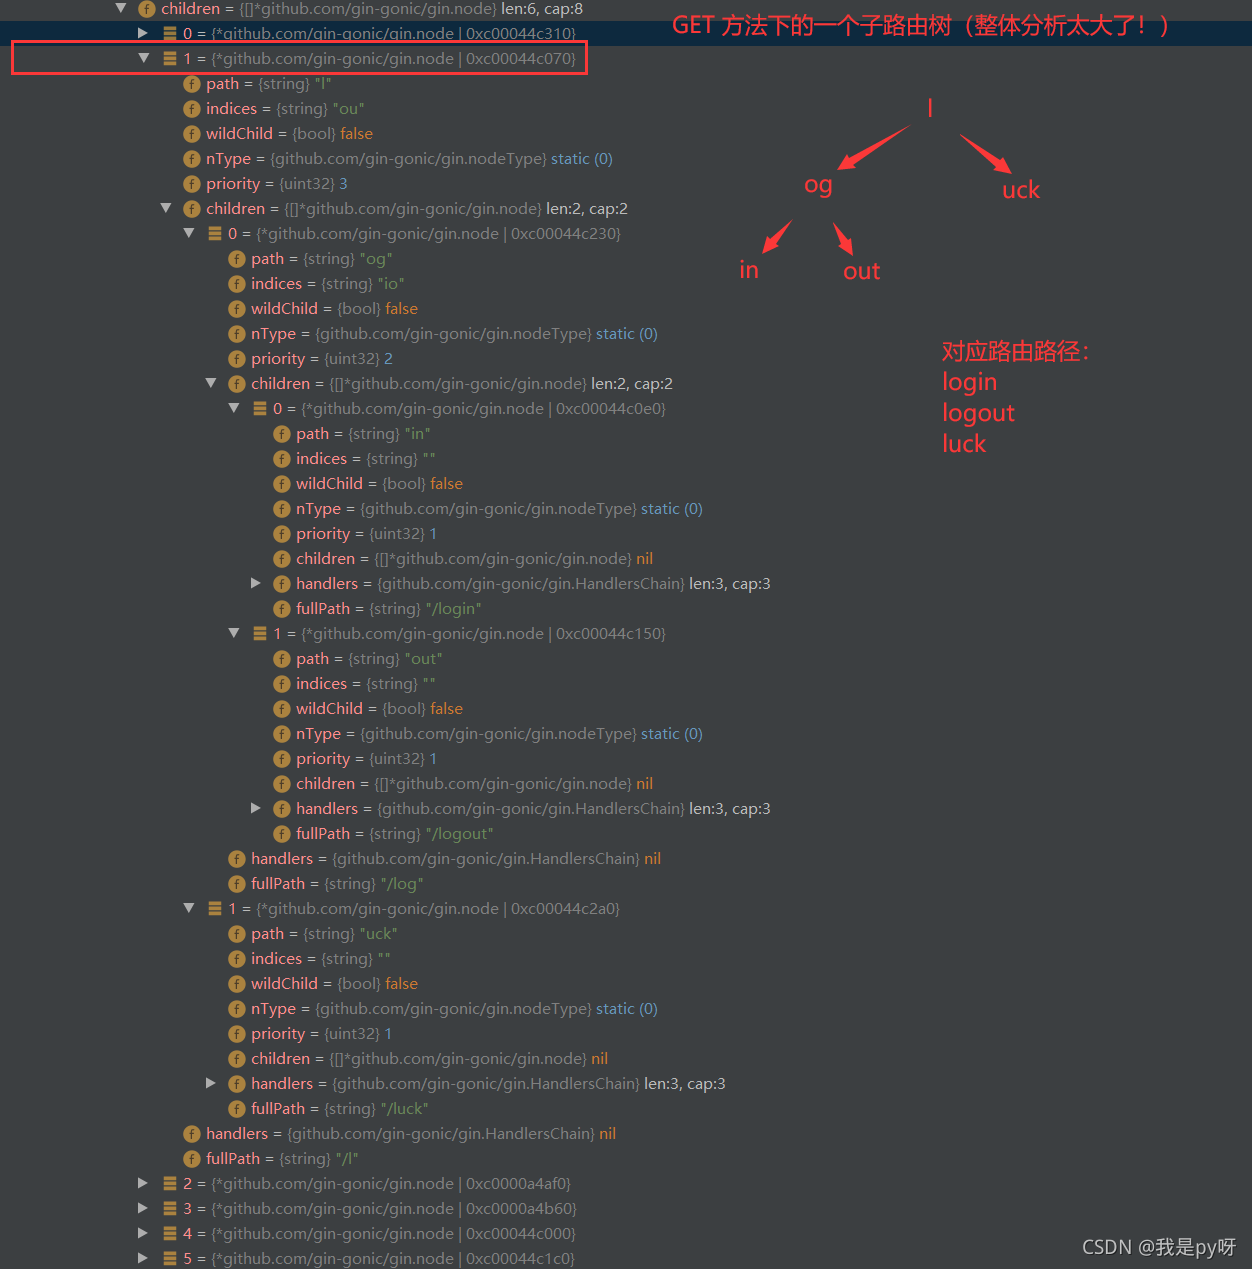
-
以 /login路由为例子,我怎么区分是否 是正确路由呢? 当节点的 handlers 为nil,说明不存在该路由!
-
总结:路由方法树
- 1 前缀树,或者说是Radix 基数树数据及结构
- 2 通过 handlers 判断是否是 尾值(是否是正确路由)
- 3 注意node节点的结构, indexes 表示子节点的 path 首字母,用于搜索。还有节点类型等一些其他的特性。 实现具体路由功能,要比 基本的数据结构radix复杂一些。
-
- (3)
遍历找到对应方法,gin中是采用slice实现的,并没有使用map结构!- 首先,这里 t 是个 slice结构,那么for遍历它寻找对应方法的操作就是 线性的!为啥要用线性的浪费时间呢? 而不使用 map 结构?
- 注意代码中比较的是 methodTree.root 字段。 它代表是的表示一个请求的方法,例如 GET,POST等的字符串。
- 在http1.0时。只有 GET,POST,OPTIONS 三种
- 1.1时有了九种,PUT,DELETE等等。
- 但是一个网站常用的请求,也就四五种,不会太多。所以这里采用线性遍历寻找,也是可以接受的! 数据规模不大,且可以
节省内存的开销。 - 另外,t := engine.trees。如何验证这个 t 是在何时进行初始化的? 内存如何分配呢? 这就又引出来一个问题了。
-
t(engine.trees) 肯定是Engine初始化的时候,进行申请的。
-
Engine 初始化有两种方法,
gin.Default() 和 gin.New() -
gin.Default 内部其实是使用了 gin.New() 并且增加了 两个中间件,日志和恢复。
-
来看下Default 源码:
// Default returns an Engine instance with the Logger and Recovery middleware already attached. func Default() *Engine { debugPrintWARNINGDefault() engine := New() engine.Use(Logger(), Recovery()) return engine } -
查看对应的New()源码,就能看到 对 Engine对象的各种初始化工作!其中有很关键的一句:
trees: make(methodTrees, 0, 9),证明了 路由方法树,不是运行时动态申请内存的,而是初始化的时候,就申请了9个单位的空间,初始化长度为 0!
-
- 这里遍历 t的过程,有个小技巧, 先进行计算出来 len(t), 后续比较直接使用变量就可以了, 避免了每次动态重新计算 len(t)。 当然,如果遍历的过程中需要 更改这个t, 就不能这样了, len() 每次执行都会动态的重新获取 len() 长度。
- 首先,这里 t 是个 slice结构,那么for遍历它寻找对应方法的操作就是 线性的!为啥要用线性的浪费时间呢? 而不使用 map 结构?
- (4) 这里讲了三点,还没分析完这个函数逻辑功能。再第四:路由匹配规则中会继续介绍。
-
- 那么主要就是看
3. 注册路由的过程
- 同样参照开篇中图片的那篇文章,调理很清晰! https://zhuanlan.zhihu.com/p/102303084,可以先看下路由大致的内容。
- 注册路由的主要逻辑有俩函数 addRoute函数 和 insertChild 方法
- 从最开始的注册路由函数看起:
// 创建路由组 v1 := app.Group("/") // 首页 rg.GET("/", indexCol.Get) // 加不加斜线都行 rg.GET("/login", indexCol.GetLogin) rg.GET("logout", indexCol.GetLogout) 简单的还可以直接创建添加路由 app := gin.Default app.bubble.GET("/todo", fun HandlerFunc)...-
路由和路由组添加调用的都是同一个 GET 方法。 还有POST,DELETE等方法,我们只看 GET,POST,都是一样的:
-
翻译中说了 : POST是路由器的一种快捷方式, 内部是调用 Handle(“POST”, path, handle) 来进行处理。
// POST is a shortcut for router.Handle("POST", path, handle). func (group *RouterGroup) POST(relativePath string, handlers ...HandlerFunc) IRoutes { return group.handle(http.MethodPost, relativePath, handlers) } // GET is a shortcut for router.Handle("GET", path, handle). func (group *RouterGroup) GET(relativePath string, handlers ...HandlerFunc) IRoutes { return group.handle(http.MethodGet, relativePath, handlers) } -
那么这是咋回事儿? 怎么突然从 Engin 的Default 对象就到了 (group *RouterGroup) 对象了呢? GET, POST, 还有创建路由组Group,都是 (group *RouterGroup)提供的! 内部还调用它的 handle 进行处理。
我们再次返回前文观察到: Engine 对象的结构中,第一行就出现了:RouterGroup这是使用了 Embedding: 内嵌 的方式扩展已有类型。-
一共有三种,前面的博客中已经讲解过了扩展已有类型:
别名,内嵌,组合三种方式。 -
所以我们创建路由和路由组的时候,使用的是 RouterGroup提供的方法!
-
那么 RouterGroup 对象的简答初始化,其实也是gin.New() 中了
RouterGroup: RouterGroup{
            Handlers: nil,
            basePath: "/",
            root:     true,
        },
-
-
继续说回处理路由,POST交给 handle方法,传递了三个参数:
func (group *RouterGroup) handle(httpMethod, relativePath string, handlers HandlersChain) IRoutes { absolutePath := group.calculateAbsolutePath(relativePath) handlers = group.combineHandlers(handlers) group.engine.addRoute(httpMethod, absolutePath, handlers) return group.returnObj() }-
POST 请求传递的多个 handlers …HandlerFunc HandlerFunc类型函数, 被handle 函数的 HandlersChain 类型接收。
-
HandlersChain 实际上就是:
type HandlersChain []HandlerFunc,还有HandlerFunc。// HandlerFunc将gin中间件使用的处理器定义为返回值 type HandlerFunc func(*Context) // HandlersChain定义一个HandlerFunc数组。 type HandlersChain []HandlerFunc -
剩下的两个参数: 一个是 http 请求方法, 一个是 相对路径。
-
分析handle 函数都干了什么:
- 1 calculateAbsolutePath通过名字可以看出来,这是计算绝对的路径地址,通过相对路径。
- 2 combineHandlers 合并group 自带的和 开发者注册的函数(handler)
func (group *RouterGroup) combineHandlers(handlers HandlersChain) HandlersChain { // 将开发者注册的 handlers 和 group 系统的一些处理handler 进行拼接。 finalSize := len(group.Handlers) + len(handlers) // 超出指定长度报错 if finalSize >= int(abortIndex) { panic("too many handlers") } // 合并操作,主要就是 copy 和 make 函数的使用 mergedHandlers := make(HandlersChain, finalSize) copy(mergedHandlers, group.Handlers) // 这一点可以,切片的切片 去复制。是个不错的技巧。 copy(mergedHandlers[len(group.Handlers):], handlers) return mergedHandlers }- 注意最后一步复制的顺序和技巧
- 另外, group 对象的 handlers是从哪里来的呢? 有个对外的方法:
Use()实际上就是添加中间件的函数。func (group *RouterGroup) Use(middleware ...HandlerFunc) IRoutes { group.Handlers = append(group.Handlers, middleware...) return group.returnObj() }
-
3 下一步拼接好的 处理handlers, 加上http 方法名字, 绝对路径传递给
addRoute方法。注意这个addRoute方法,是调用的engine 对象的。原因就是,最开始讲 engine对象的时候,其结构体中包含 trees, 路由方法树。 用于添加路由和路由方法。func (engine *Engine) addRoute(method, path string, handlers HandlersChain) { // 一系列断言操作 assert1(path[0] == '/', "path must begin with '/'") assert1(method != "", "HTTP method can not be empty") assert1(len(handlers) > 0, "there must be at least one handler") debugPrintRoute(method, path, handlers) // 通过get方法,内部也是线性for循环遍历,找到对应方法的 方法树 root := engine.trees.get(method) // 不存在就添加新的方法树根节点 if root == nil { root = new(node) // 默认其实 root 的字符必须是 "/" root.fullPath = "/" engine.trees = append(engine.trees, methodTree{method: method, root: root}) } // 调用节点的 addRoute 方法,往对应方法树内插入 root.addRoute(path, handlers) // Update maxParams // 更新 maxParams 参数 if paramsCount := countParams(path); paramsCount > engine.maxParams { engine.maxParams = paramsCount } }-
其中到了最核心的步骤,找到对应的方法树后(root,方法树的根节点,node类型)下面的插入操作就交给了 node 类中的 addRoute方法实现了。
传递参数:path: 绝对路径地址; handlers: 组合的注册handle。 -
到了这里,其实就是底层实现的Radix树, 传进去一个字符串(完整路由路径),添加到Radix树中。 源码函数比较长, 大致过程理解,但是细节还理解不是很到位~
(这一点没有理解明白) -
相关的函数功能都有在文档中解释,比较难得,重要的放到这个源码后面再去拿出来分析。
// addRoute将一个具有给定句柄的节点添加到路径。 // 不是concurrency-safe (不是并发安全的) func (n *node) addRoute(path string, handlers HandlersChain) { // 补充fullpath属性 fullPath := path // priority++ 优先级加1 n.priority++ // Empty tree // 如果是空的树,或还没有子节点:初始化是一个 "/",node类型, 调用insertChild插入 if len(n.path) == 0 && len(n.children) == 0 { // "/" 中插入path n.insertChild(path, fullPath, handlers) // 因为是空树这里将调用的节点(“/”)标记为 根节点类型。 n.nType = root return } parentFullPathIndex := 0 walk: for { //查找最长的公共前缀。 //这也暗示了公共前缀不包含':'或'*' // 因为现有的键不能包含这些字符。 // 这个 函数非常简单,就是 for循环,找到两个path的公共最长前缀,返回其长度。 // 比如 /index , /index/a 公共长度就是 /index i := longestCommonPrefix(path, n.path) // Split edge: 分裂,找到每一部分 // 分类的是当前节点。 比方当前是 "login" 新增是 “logout” // 那么当前节点按照最长前缀进行分裂 log, 增加 in, out 两个子节点。 if i < len(n.path) { // 先将当前 node 自己分开,后半截作为子节点 child := node{ path: n.path[i:], wildChild: n.wildChild, indices: n.indices, children: n.children, handlers: n.handlers, priority: n.priority - 1, fullPath: n.fullPath, } n.children = []*node{&child} // []byte for proper unicode char conversion, see #65 // 改变 当前节点为前半段 // 保存子节点的 path 首字母 n.indices = bytesconv.BytesToString([]byte{n.path[i]}) n.path = path[:i] n.handlers = nil n.wildChild = false n.fullPath = fullPath[:parentFullPathIndex+i] } // Make new node a child of this node // 和上面的逻辑是相似的,比较 len(path) // i < len(path) 说明需要进行拆分 if i < len(path) { path = path[i:] c := path[0] // '/' after param // 处理参数后面有斜杠的情况 if n.nType == param && c == '/' && len(n.children) == 1 { parentFullPathIndex += len(n.path) n = n.children[0] n.priority++ continue walk } // Check if a child with the next path byte exists // 进行检测分配, 遍历indices,看看当前节点的子节点那个满足开头匹配。 // 满足匹配后,再跳到子节点,n = n.children[i], 再次进行相关操作。 分裂或者创建。 for i, max := 0, len(n.indices); i < max; i++ { if c == n.indices[i] { parentFullPathIndex += len(n.path) i = n.incrementChildPrio(i) n = n.children[i] continue walk } } // Otherwise insert it // 子节点找到不的话,就尝试插入进去。 if c != ':' && c != '*' && n.nType != catchAll { // []byte for proper unicode char conversion, see #65 // 拼接第一个字符到 indices n.indices += bytesconv.BytesToString([]byte{c}) child := &node{ fullPath: fullPath, } // 追加子节点,做了一个append操作内部 n.addChild(child) n.incrementChildPrio(len(n.indices) - 1) n = child // 如果是 参数节点进行相应的处理 } else if n.wildChild { // inserting a wildcard node, need to check if it conflicts with the existing wildcard // 插入通配符节点时,需要检查是否与现有通配符冲突 n = n.children[len(n.children)-1] n.priority++ // Check if the wildcard matches if len(path) >= len(n.path) && n.path == path[:len(n.path)] && // Adding a child to a catchAll is not possible n.nType != catchAll && // Check for longer wildcard, e.g. :name and :names (len(n.path) >= len(path) || path[len(n.path)] == '/') { continue walk } // Wildcard conflict pathSeg := path if n.nType != catchAll { pathSeg = strings.SplitN(pathSeg, "/", 2)[0] } prefix := fullPath[:strings.Index(fullPath, pathSeg)] + n.path panic("'" + pathSeg + "' in new path '" + fullPath + "' conflicts with existing wildcard '" + n.path + "' in existing prefix '" + prefix + "'") } n.insertChild(path, fullPath, handlers) return } // Otherwise add handle to current node // 这个节点已经注册过了。 if n.handlers != nil { panic("handlers are already registered for path '" + fullPath + "'") } n.handlers = handlers n.fullPath = fullPath return } } -
核心操作就是:
(我觉得)主要的就是进行树的一个 分裂,调整,查找节点, 插入的操作由insertChild 函数完成,并对相应的通配符节点进行处理- 1 存在寻找位置插入
- 不断的判断,通过indices 字段查找,然后或者分裂当前 path。重新调整 radix树。
- 2 不存在先创建
- 3 各种判断:比如节点存在,就不用创建
- 4 对不同类型的节点进行特殊处理,比如param类型。
- 5 相应的进行各种节点的信息初始化 与 更新
-
注意:里面有个核心的插入操作:
insertChild 函数。func (n *node) insertChild(path string, fullPath string, handlers HandlersChain) { for { // Find prefix until first wildcard // 找到第一个通配符参数,一直查找前缀 // 搜索通配符段并检查名称中是否有无效字符。 // 如果没有找到通配符,则返回-1作为索引。 wildcard, i, valid := findWildcard(path) if i < 0 { // No wildcard found break } // The wildcard name must not contain ':' and '*' // 通配符名称不能包含':'和'*' if !valid { panic("only one wildcard per path segment is allowed, has: '" + wildcard + "' in path '" + fullPath + "'") } // check if the wildcard has a name // 通配符是否有名字,小于2长度没有名字, :name if len(wildcard) < 2 { panic("wildcards must be named with a non-empty name in path '" + fullPath + "'") } if wildcard[0] == ':' { // param // 对正常通配符进行相关处理 if i > 0 { // Insert prefix before the current wildcard n.path = path[:i] path = path[i:] } child := &node{ nType: param, path: wildcard, fullPath: fullPath, } n.addChild(child) n.wildChild = true n = child n.priority++ // if the path doesn't end with the wildcard, then there // will be another non-wildcard subpath starting with '/' //如果路径没有以通配符结束,那么就在那里 //将是另一个以'/'开头的非通配符子路径 if len(wildcard) < len(path) { path = path[len(wildcard):] child := &node{ priority: 1, fullPath: fullPath, } n.addChild(child) n = child continue } // Otherwise we're done. Insert the handle in the new leaf // 到这里就完成了,插入节点完成 n.handlers = handlers return } // catchAll if i+len(wildcard) != len(path) { panic("catch-all routes are only allowed at the end of the path in path '" + fullPath + "'") } if len(n.path) > 0 && n.path[len(n.path)-1] == '/' { panic("catch-all conflicts with existing handle for the path segment root in path '" + fullPath + "'") } // currently fixed width 1 for '/' i-- if path[i] != '/' { panic("no / before catch-all in path '" + fullPath + "'") } n.path = path[:i] // First node: catchAll node with empty path child := &node{ wildChild: true, nType: catchAll, fullPath: fullPath, } n.addChild(child) n.indices = string('/') n = child n.priority++ // second node: node holding the variable child = &node{ path: path[i:], nType: catchAll, handlers: handlers, priority: 1, fullPath: fullPath, } n.children = []*node{child} return } // If no wildcard was found, simply insert the path and handle // 如果没有通配符,只需要插入路径和句柄 n.path = path n.handlers = handlers n.fullPath = fullPath }- 最主要的操作就是对通配符的处理。完成插入操作。
-
1
-
-
1
-
-
4. 路由匹配
-
之前 2 一步步推理讲到 Engine 实现 ServerHTTP接口,代替 http包下的默认 muxer。 context 是在这里做的。然后讲解了核心路由匹配处理的函数
handleHTTPRequest(c)讲了部分内容,现在继续讲解,理解有限很多地方还很简陋,理不顺,后续再来补充吧: -
其中的 getvalue 函数:getValue(path string, params *Params, unescape bool),通过传递的相关参数,从路由树查找,返回了一个: nodeValue 类型的对象,而不是节点对象。
type nodeValue struct { handlers HandlersChain // 注册的路由 params *Params // 参数 tsr bool fullPath string } nodeValue holds return values of (*Node).getValue method -
后面的一段主要执行:
if value.handlers != nil {
			c.handlers = value.handlers
			c.fullPath = value.fullPath
			c.Next() // next函数,继续执行
			c.writermem.WriteHeaderNow()
			return
		}
5. 中间件
- 其实根据上面的分析,中间件的设计已经很清晰了,比较巧妙的设计。
- gin.Default() 内部默认开启两个中间件:日志 和 恢复
-
启用中间件的函数时 Use(), 它来自Engin 对象内部的 RouterGroup对象。
-
具体干了啥呢?打开源码看一下
// Use attaches a global middleware to the router. ie. the middleware attached though Use() will be // included in the handlers chain for every single request. Even 404, 405, static files... // For example, this is the right place for a logger or error management middleware. //将全局中间件附加到路由器ie。通过Use()附加的中间件将是 //每个请求都包含在处理程序链中。甚至404,405,静态文件… //例如,这是一个日志或错误管理中间件的正确位置。 func (engine *Engine) Use(middleware ...HandlerFunc) IRoutes { engine.RouterGroup.Use(middleware...) // 整合 engin.noRout, engine.noMethod ,他俩其实就是 一个注册的 handler的slice engine.rebuild404Handlers() engine.rebuild405Handlers() return engine } -
最终调用的 路有对象的 Use方法:意图很清晰,加入到 路由对象的 Handlers里去。 当调用路由的时候,有个合并操作! 将这些方法合并到对应子路由中去执行。
// Use adds middleware to the group, see example code in GitHub. func (group *RouterGroup) Use(middleware ...HandlerFunc) IRoutes { group.Handlers = append(group.Handlers, middleware...) return group.returnObj() } -
4.中介绍了 getValue,并将相应的数据,赋值给了 context对象。然后调用了一个 Next函数。 next主要做了什么?
-
next函数:按照 Handlers HandlersChain 注册函数链,进行依次调用执行。 顺序执行。
// Next should be used only inside middleware. // It executes the pending handlers in the chain inside the calling handler. // See example in GitHub. // 依次取出 注册的函数,包括视图逻辑处理函数 以及注册的中间件函数。 // 顺序执行 func (c *Context) Next() { c.index++ for c.index < int8(len(c.handlers)) { c.handlers[c.index](c) c.index++ } }- 小技巧: 如何实现非线性的调用呢?
- 注意到 Next源码里有个开始的 ++ 操作。可以再某个处理逻辑handle 里调用 c.Next()函数! 此时会依次向下执行完剩余的 handle,后才接着处理本次请求。当然了这个 调用next函数,可以一直嵌套, 后面执行的 handle 里面还可以 调用c.next(Context对象)。改变执行顺序!
- 小技巧: 如何实现非线性的调用呢?
-
讲了Next函数后, 必须要提一下Abort() 函数。代码实现超级简单,阅读过前面这里就很容易懂了! 就是更改 c.index = abortIndex。 index 是遍历 Handlers HandlersChain 的索引
- abortIndex: 是一个常量:
const abortIndex int8 = math.MaxInt8 / 2终止后序的handle的执行。
// Abort prevents pending handlers from being called. Note that this will not stop the current handler. // Let's say you have an authorization middleware that validates that the current request is authorized. // If the authorization fails (ex: the password does not match), call Abort to ensure the remaining handlers // for this request are not called. //中止处理程序被调用。注意,这不会停止当前的处理程序。 //假设你有一个授权中间件来验证当前请求是否被授权。 //如果授权失败(例如:密码不匹配),调用Abort以确保剩余的处理程序 //这个请求没有被调用。 func (c *Context) Abort() { c.index = abortIndex } func (c *Context) Abort() { c.index = abortIndex } - abortIndex: 是一个常量:
-
再来讲解 c.Set: 向接口中添加相应的数据,因为
Context对象是贯穿整个流程的,所以后面执行的 handle 可以调用当前设置的这个值,为接口类型。// Set is used to store a new key/value pair exclusively for this context. // It also lazy initializes c.Keys if it was not used previously. // Set用于为这个上下文专门存储一个新的键/值对。 //如果c.Keys以前没有被使用过,它也会延迟初始化。 func (c *Context) Set(key string, value interface{}) { // 还是线程安全的添加,加了读写锁的。 c.mu.Lock() if c.Keys == nil { c.Keys = make(map[string]interface{}) } c.Keys[key] = value c.mu.Unlock() } -
除此之外还有一个 c.Get 可以获取相应的,就不再分析了。
-
-
6. 关于context对象 和 bind
- 直接查看大佬文章吧~~~ 我还是菜鸡,这篇文章已经瞎写的有点长了,电脑太卡了。
- https://zhuanlan.zhihu.com/p/102438603
- 其实上面的 中间件后面已经讲到了一些context对象的内容了。


 被折叠的 条评论
为什么被折叠?
被折叠的 条评论
为什么被折叠?
 到【灌水乐园】发言


