1)jar包准备,以下的jar包是从spring官网下载的,我下载的是 spring-framework-4.1.7.RELEASE-dist.zip 这个压缩包
解压以后 D:\spring-framework-4.1.7.RELEASE\libs 中选择如下jar导入工程

2)当然如果只用到以上的那些jar包是无法正确启动mvc环境的,至于还依赖哪些jar,下面再慢慢讲解( 配置文件的命名和目录参考本文 第4点 中的截图 )
准备好spring官网的jar以后就需要配置 web.xml 和 spring相关xml
a. web.xml配置如下
------------------------------------------------------------------------------------------------------ <?xml version="1.0" encoding="UTF-8"?>
<web-app xmlns:xsi="http://www.w3.org/2001/XMLSchema-instance"
xmlns="http://java.sun.com/xml/ns/javaee" xmlns:web="http://java.sun.com/xml/ns/javaee/web-app_2_5.xsd"
xsi:schemaLocation="http://java.sun.com/xml/ns/javaee http://java.sun.com/xml/ns/javaee/web-app_2_5.xsd"
id="WebApp_ID" version="2.5">
<listener>
<listener-class>org.springframework.web.context.ContextLoaderListener</listener-class>
</listener>
<context-param>
<param-name>contextConfigLocation</param-name>
<param-value>WEB-INF/config/spring*.xml</param-value>
</context-param>
<servlet>
<servlet-name>DispatcherServlet</servlet-name>
<servlet-class>org.springframework.web.servlet.DispatcherServlet</servlet-class>
<init-param>
<param-name>contextConfigLocation</param-name>
<param-value>WEB-INF/config/spring-mvc.xml</param-value>
</init-param>
<load-on-startup>1</load-on-startup>
</servlet>
<!-- URL映射 -->
<servlet-mapping>
<servlet-name>DispatcherServlet</servlet-name>
<url-pattern>/</url-pattern>
</servlet-mapping>
</web-app>-----------------------------------------------------------------------------------------------------------------
b.spring-context.xml配置如下
-----------------------------------------------------------------------------------------------------------------
<?xml version="1.0" encoding="UTF-8"?>
       <beans xmlns="http://www.springframework.org/schema/beans"
       xmlns:xsi="http://www.w3.org/2001/XMLSchema-instance"
       xmlns:aop="http://www.springframework.org/schema/aop"
       xmlns:context="http://www.springframework.org/schema/context"
	   xmlns:util="http://www.springframework.org/schema/util"
	   xsi:schemaLocation="http://www.springframework.org/schema/beans
						   http://www.springframework.org/schema/beans/spring-beans.xsd
						   http://www.springframework.org/schema/aop
        				   http://www.springframework.org/schema/aop/spring-aop-4.1.xsd
						   http://www.springframework.org/schema/context
						   http://www.springframework.org/schema/context/spring-context.xsd
						   http://www.springframework.org/schema/util
						   http://www.springframework.org/schema/util/spring-util-4.1.xsd">
		<context:component-scan base-package="com.ly"/>
		<!-- 激活自动代理功能 -->
	    <aop:aspectj-autoproxy proxy-target-class="true"/>
         </beans>
-----------------------------------------------------------------------------------------------------------------
c.spring-mvc.xml 配置如下:springMVC框架 需要jar包,在返回json数据时有用。
(jackson-annotations-2.2.4.jar、jackson-core-2.2.3.jar、jackson-databind-2.2.3.jar)

-----------------------------------------------------------------------------------------------------------------
<?xml version="1.0" encoding="UTF-8"?>
<beans  xmlns="http://www.springframework.org/schema/beans"
		xmlns:mvc="http://www.springframework.org/schema/mvc"
		xmlns:xsi="http://www.w3.org/2001/XMLSchema-instance"
		xmlns:p="http://www.springframework.org/schema/p"
		xmlns:aop="http://www.springframework.org/schema/aop"
		xmlns:context="http://www.springframework.org/schema/context"
		xsi:schemaLocation="http://www.springframework.org/schema/beans
		http://www.springframework.org/schema/beans/spring-beans.xsd
		http://www.springframework.org/schema/aop
              http://www.springframework.org/schema/aop/spring-aop-4.1.xsd
		http://www.springframework.org/schema/context
		http://www.springframework.org/schema/context/spring-context.xsd
		http://www.springframework.org/schema/mvc
		http://www.springframework.org/schema/mvc/spring-mvc.xsd">
		<context:component-scan base-package="com.ly.controller">
		</context:component-scan>
		<aop:aspectj-autoproxy proxy-target-class="true"/>
		<mvc:annotation-driven>
			<mvc:message-converters register-defaults="true">
				<bean class="org.springframework.http.converter.StringHttpMessageConverter">
					<property name="supportedMediaTypes">
						<list>
							<value>text/plain;charset=UTF-8</value>
							<value>text/html;charset=UTF-8</value>
						</list>
					</property>
				</bean>

				<bean class="org.springframework.http.converter.json.MappingJackson2HttpMessageConverter">
	                    <property name="supportedMediaTypes">
	                        <list>
	                            <value>text/html; charset=UTF-8</value>
	                            <value>application/json;charset=UTF-8</value>
	                        </list>
	                    </property>
	             </bean>
			</mvc:message-converters>
		</mvc:annotation-driven>

		<!--视图名称解析器-->
		<bean class="org.springframework.web.servlet.view.InternalResourceViewResolver"
			  p:order="100" p:viewClass="org.springframework.web.servlet.view.JstlView"
			  p:prefix="/WEB-INF/views/" p:suffix=".jsp" />
	</beans>
-----------------------------------------------------------------------------------------------------------------
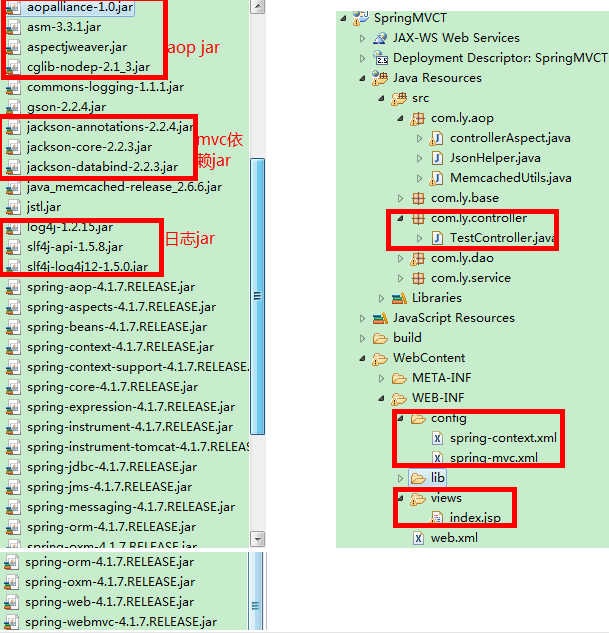
3)其他jar包
aopalliance-1.0.jar、asm-3.3.1.jar、aspectjweaver.jar、cglib-nodep-2.1_3.jar AOP织入语法
jstl.jar、standard-1.1.2.jar jsp页面显示用到
log4j-1.2.15.jar、slf4j-api-1.5.8.jar、slf4j-log4j12-1.5.0.jar、commons-logging-1.1.1.jar 系统日志需要用到的jar
剩余就是其他的功能需要的jar了
4)springMVC+AOP环境jar包的全家福以及工程结构

5)controller层的简单示例
@Controller
@Scope("prototype")
@RequestMapping("/mvctest")
public class TestController {
@Resource(name="testService")
private TestService testService;
@RequestMapping(value="/test1",method=RequestMethod.GET)
@ResponseBody
public ResultType etest1(@RequestParam(value="test") String test){
ResultType rs = new ResultType();
rs.setMessage("成功");
rs.setSuccess("1");
rs.setDate(testService.saveTest());
Map<String,Object> map = new HashMap<String,Object>();
map.put("test", rs);
return rs;
}
@RequestMapping(value="/test2",method=RequestMethod.GET)
public String test2(Model model){
String view = "index";
User user = new User();
user.setUserName("luoyi");
user.setAge(27);
model.addAttribute("userInfo",user);
return view;
}
}
6)


 436
436

 被折叠的 条评论
为什么被折叠?


