SpringBoot集成SpringSecurity - 异常处理(三)

源码地址:https://github.com/springsecuritydemo/microservice-auth-center03

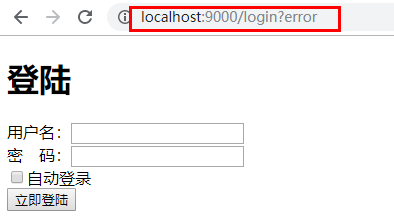
当我们登录失败的时候,SpringSecurity 帮我们跳转到了 /login?error URL,奇怪的是不管是控制台还是网页上都没有打印错误信息。

11464886-8a702143d6654227.png

这是因为首先 /login?error 是SpringSecurity 默认的失败 URL,其次如果你不自己处理这个异常,这个异常时不会被处理的。

一、常见异常

我们先来列举下一些 SpringSecurity 中常见的异常:

  • UsernameNotFoundException (用户不存在)
  • DisableException(用户已被禁用)
  • BadCredentialsException(坏的凭据)
  • LockedException(账号锁定)
  • CerdentialsExpiredException(证书过期)
  • ...
    以上列出的这些异常都是 AuthenticationException 的子类,然后我们看 SpringSecurity 是如何处理 AuthenticationException 异常的。

二、源码分析

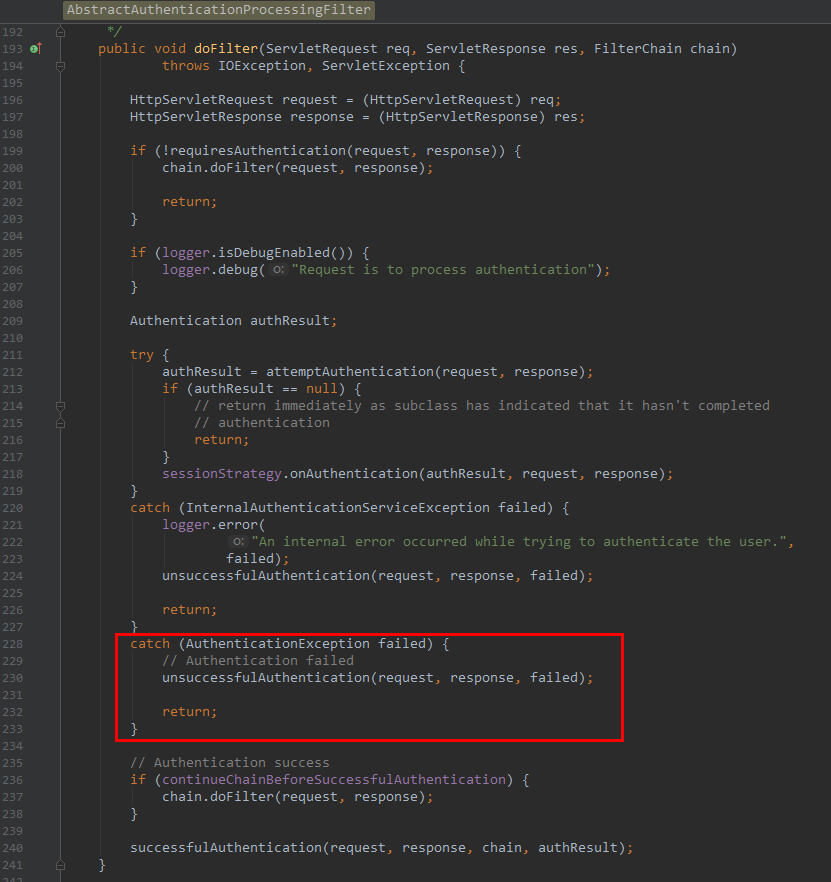
SpringSecurity的异常处理是在过滤器中进行的,我们在 AbastrctAuthenticationProcessingFilter 中找到了对 Authentication 的处理:

  • 在 doFilter() 中,捕获 AuthenticationException 异常,并交给 unsuccessfulAuthentication() 处理。


    11464886-3d79a9c35d16a904.png
  • unsuccessfulAuthentication() 中,转交给了 SimpleUrlAuthenticationFailureHandler 类的 onAuthencicationFailure() 处理。

    11464886-5bee808f9e6b76e3.png

  • 在 onAuthenticationFailure() 中,首先判断有没有设置 defaultFailureUrl

    a. 如果没有设置,直接返回 401 错误,即 HttpStatus.UNAUTHORIZED 的值。
    b. 如果设置了,首先执行 saveException() 方法。然后判断 forwardToDestination 是否为服务器调整,默认使用重定向即客户端跳转。

11464886-db57d1e842f65ea2.png
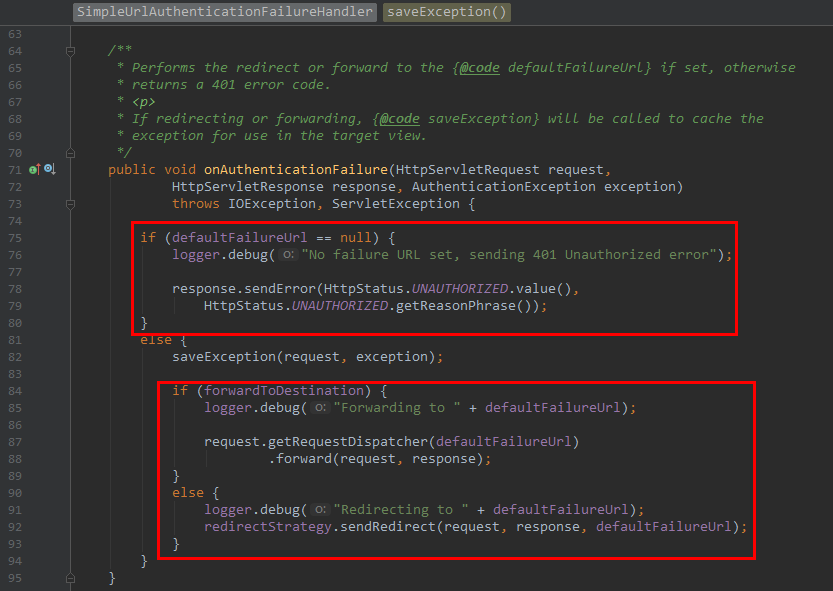
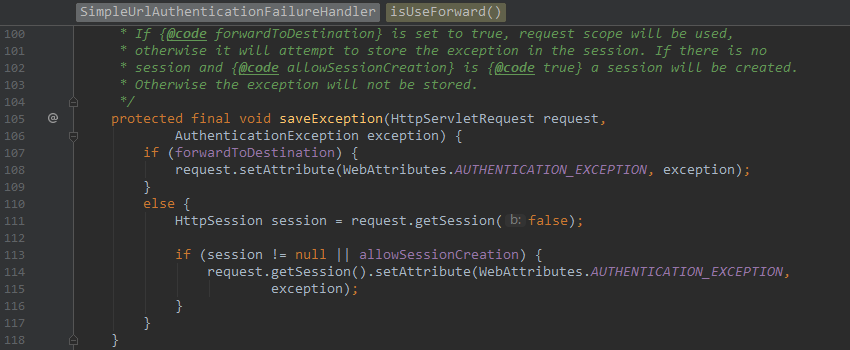
  • 在 saveException() 方法中,首先判断 forwardToDestination,如果使用服务器跳转则写入Request,客户端跳转则写入 Session。写入名为 WebAttributes.AUTHENTICATION_EXCEPTION 常量对应值SPRING_SECURITY_LAST_EXCEPTION,值为 AuthenticationException 对象。
    11464886-97e8cb95c2b433fc.png

至此 SpringSecurity 完成了异常处理,总结下流程:

–> AbstractAuthenticationProcessingFilter.doFilter()
–> AbstractAuthenticationProcessingFilter.unsuccessfulAuthentication()
–> SimpleUrlAuthenticationFailureHandler.onAuthenticationFailure()
–> SimpleUrlAuthenticationFailureHandler.saveException()

三、处理异常

上面通过源码看着挺复杂,但真正处理起来SpringSecurity为我们提供了方便的方式,我们只需要指定错误的url,然后在该方法中对异常进行处理即可。

  • 指定错误url ,在WebSecurityConfig 中添加 .failureUrl("/login/error")
 @Override
    protected void configure(HttpSecurity http) throws Exception {
        http.authorizeRequests()
                // 如果有允许匿名的url,填在下面
//                .antMatchers().permitAll()
                .anyRequest().authenticated()
                .and()
                // 设置登陆页
                .formLogin().loginPage("/login")
                // 设置登陆成功url
                .defaultSuccessUrl("/").permitAll()
                // 设置登录失败url
                .failureUrl("/login/error")
                // 自定义登陆用户名和密码参数,默认为username和password
//                .usernameParameter("username")
//                .passwordParameter("password")
                .and()
                .logout().permitAll()
                // 自动登录
                .and().rememberMe()
                .tokenRepository(persistentTokenRepository())
                // 有效时间,单位:s
                .tokenValiditySeconds(60)
                .userDetailsService(userDetailsService);

        // 关闭CSRF跨域
        http.csrf().disable();
    }
  • 在 Controller 中编写 loginError方法完成异常处理操作:
 @GetMapping("/login/error")
    @ResponseBody
    public Result loginError(HttpServletRequest request) {
        AuthenticationException authenticationException = (AuthenticationException) request.getSession().getAttribute(WebAttributes.AUTHENTICATION_EXCEPTION);
        log.info("authenticationException={}", authenticationException);
        Result result = new Result();
        result.setCode(201);

        if (authenticationException instanceof UsernameNotFoundException || authenticationException instanceof BadCredentialsException) {
            result.setMsg("用户名或密码错误");
        } else if (authenticationException instanceof DisabledException) {
            result.setMsg("用户已被禁用");
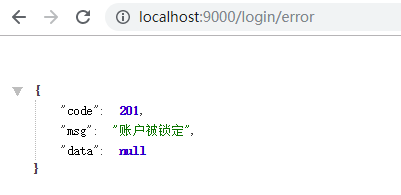
        } else if (authenticationException instanceof LockedException) {
            result.setMsg("账户被锁定");
        } else if (authenticationException instanceof AccountExpiredException) {
            result.setMsg("账户过期");
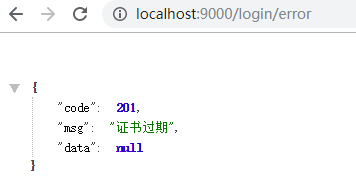
        } else if (authenticationException instanceof CredentialsExpiredException) {
            result.setMsg("证书过期");
        } else {
            result.setMsg("登录失败");
        }
        return result;
    }

四、运行项目

首先我们修改 CustomUserDetailsService loadUserByUsername() 方法的返回值:
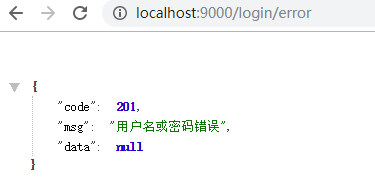
11464886-67f2c037c3afebcb.png

  1. 输入错误的用户名或密码:


    11464886-cf4fcc8d2733ef51.png
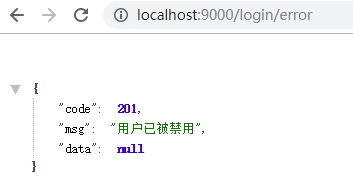
  2. 修改返回值:enable 为 false


    11464886-db8c5a23787f7f58.png

    11464886-1b413975a3db5a9f.png
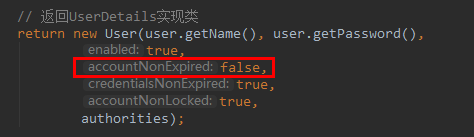
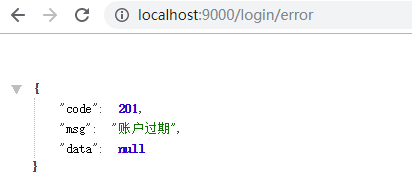
  3. 修改返回值:accountNonExpired 为 false


    11464886-e9eeedaa1c456014.png

    11464886-98bb1b606fb5fd62.png
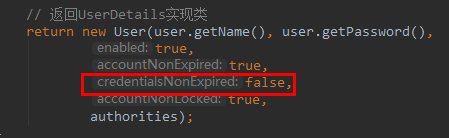
  4. 修改返回值:credentialsNonExpired 为 false


    11464886-b7d500ecea672441.png

    11464886-012fb669fa01ae6f.png
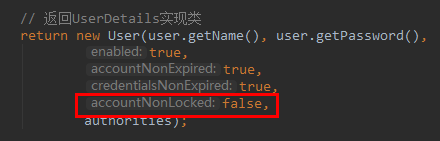
  5. 修改返回值:accountNonLocked 为 false


    11464886-720b9a490c90b419.png

    11464886-ef515a5c2c75a152.png

五、存在问题

细心的同学再完成上面功能是会发现,当我们输入的用户名不存在时,不会抛出UserNameNotFoundException,而是抛出 BadCredentialsException这个异常,如果有需要区分 用户名不存在和密码错误的,可参考https://blog.csdn.net/wzl19870309/article/details/70314085

  • 1
    点赞
  • 5
    收藏
    觉得还不错? 一键收藏
  • 0
    评论
要将Spring Security与数据库集成,首先需要添加以下依赖项: ``` <dependency> <groupId>org.springframework.boot</groupId> <artifactId>spring-boot-starter-security</artifactId> </dependency> <dependency> <groupId>org.springframework.security</groupId> <artifactId>spring-security-data</artifactId> </dependency> <dependency> <groupId>org.springframework.security</groupId> <artifactId>spring-security-test</artifactId> <scope>test</scope> </dependency> <dependency> <groupId>org.springframework.security</groupId> <artifactId>spring-security-web</artifactId> </dependency> <dependency> <groupId>org.springframework.security</groupId> <artifactId>spring-security-config</artifactId> </dependency> <dependency> <groupId>org.springframework.security</groupId> <artifactId>spring-security-core</artifactId> </dependency> ``` 然后,需要创建一个UserDetails实现类,并实现UserDetailsService接口。这个类将从数据库中获取用户详细信息,并将其返回给Spring Security。 接下来,需要在SecurityConfig类中配置AuthenticationManagerBuilder,以使用上面实现的UserDetailsService来获取用户详细信息。例如,以下代码片段展示了如何将用户详细信息从数据库中获取并进行身份验证: ``` @Configuration @EnableWebSecurity public class SecurityConfig extends WebSecurityConfigurerAdapter { @Autowired private UserDetailsService userDetailsService; @Autowired public void configureGlobal(AuthenticationManagerBuilder auth) throws Exception { auth.userDetailsService(userDetailsService).passwordEncoder(passwordEncoder()); } @Bean public PasswordEncoder passwordEncoder() { return new BCryptPasswordEncoder(); } @Override protected void configure(HttpSecurity http) throws Exception { http.authorizeRequests() .antMatchers("/admin/**").hasRole("ADMIN") .antMatchers("/user/**").hasAnyRole("ADMIN", "USER") .antMatchers("/**").permitAll() .and().formLogin().loginPage("/login").permitAll() .and().logout().logoutSuccessUrl("/login?logout").permitAll() .and().exceptionHandling().accessDeniedPage("/403"); } } ``` 在这里,我们使用了BCryptPasswordEncoder作为密码编码器,并配置了一个HTTP安全性对象,以指定需要哪些角色才能访问受保护的URL。我们还指定了登录页面和注销成功后跳转的URL,以及拒绝访问页面的URL。 最后,我们需要在数据库中存储用户详细信息。这可以通过使用JdbcTemplate和SQL查询来实现。以下是一个示例查询,用于从数据库中检索用户详细信息: ``` @Override public UserDetails loadUserByUsername(String username) throws UsernameNotFoundException { String sql = "SELECT username, password, enabled FROM users WHERE username = ?"; List<User> users = jdbcTemplate.query(sql, new String[]{username}, (rs, rowNum) -> new User( rs.getString("username"), rs.getString("password"), rs.getBoolean("enabled"), true, true, true, AuthorityUtils.createAuthorityList("ROLE_USER"))); if (users.isEmpty()) { throw new UsernameNotFoundException("User " + username + " not found."); } User user = users.get(0); return new org.springframework.security.core.userdetails.User( user.getUsername(), user.getPassword(), user.isEnabled(), true, true, true, user.getAuthorities()); } ``` 在这里,我们查询名为“users”的数据库表,并使用给定的用户名查找用户。如果找到用户,则创建一个新的UserDetails对象,并将其返回给Spring Security。否则,我们将抛出一个UsernameNotFoundException异常。 总的来说,将Spring Security和数据库集成非常简单。只需要实现UserDetailsService接口,配置AuthenticationManagerBuilder和SecurityConfig,并在数据库中存储用户详细信息即可。

“相关推荐”对你有帮助么?

  • 非常没帮助
  • 没帮助
  • 一般
  • 有帮助
  • 非常有帮助
提交
评论
添加红包

请填写红包祝福语或标题

红包个数最小为10个

红包金额最低5元

当前余额3.43前往充值 >
需支付:10.00
成就一亿技术人!
领取后你会自动成为博主和红包主的粉丝 规则
hope_wisdom
发出的红包
实付
使用余额支付
点击重新获取
扫码支付
钱包余额 0

抵扣说明:

1.余额是钱包充值的虚拟货币,按照1:1的比例进行支付金额的抵扣。
2.余额无法直接购买下载,可以购买VIP、付费专栏及课程。

余额充值