


目录
一、准备搭建环境的目标
笔者在https://mp.csdn.net/postedit/82226297,已经介绍了如何配置独立的认证中心和SSO客户端,以及完成配套的资源服务器配置。但是,在实际生产环境中使用会存在一些安全问题。例如所有微服务的真实地址和使用的真实端口都被暴露给了用户,容易被不法之徒进行非法攻击,再对外服务时如果做隔离,对每个服务都需要做单独的配置,无论是通过NGINX代理服务或硬件网关等方式处理,工作都很繁琐,当有成百的微服务部署时,这个工程量可想而知多么浩大。另外,当所有微服务都要在调用前后进行一些通用的处理时,通过微服务网关添加过滤器进行预处理也是极为方便的事。因此利用SpringCloud+Zuul来配置统一的微服务网关,达到上述需求。
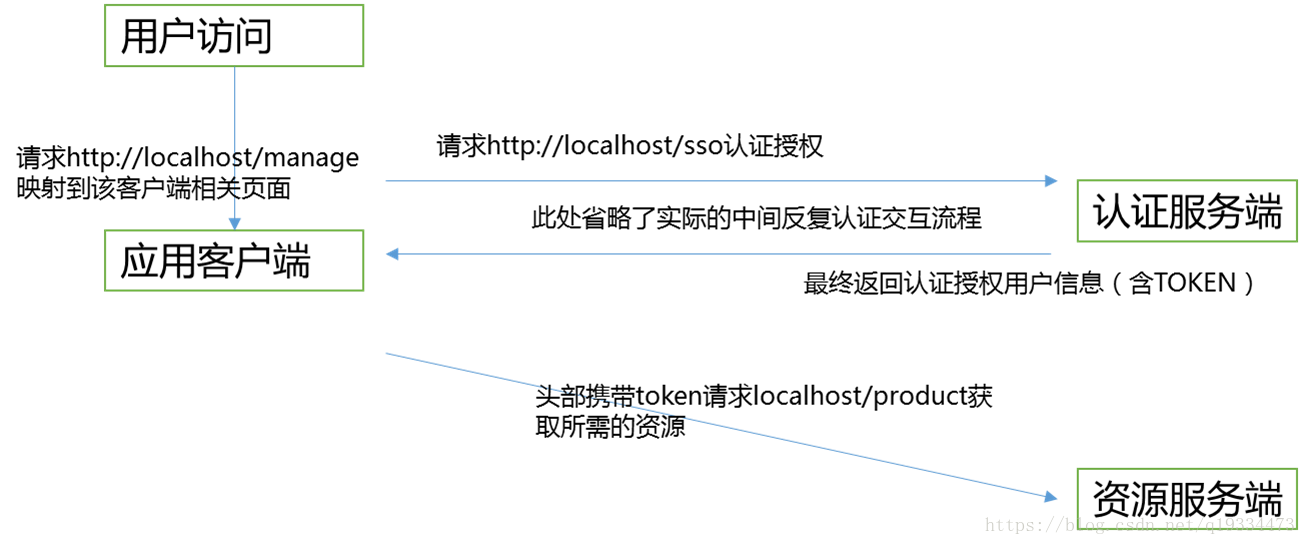
例如当前有下列相关资源
认证服务端 http://localhost:8000
应用客户端 http://localhost:8080
资源服务端 http://localhost:7779
访问逻辑需下图:

使用zuul微服务网关后访问实例
首先可在ZUUL将微服务路径进行映射
认证服务端 http://localhost:8000 ===> http://localhost/sso
应用客户端 http://localhost:8080 ===> http://localhost/manage
资源服务端 http://localhost:7779 ===> http://localhost/product
需要新增加微服务网关的服务
微服务网关 开启默认的80或443端口(实际上访问localhost)
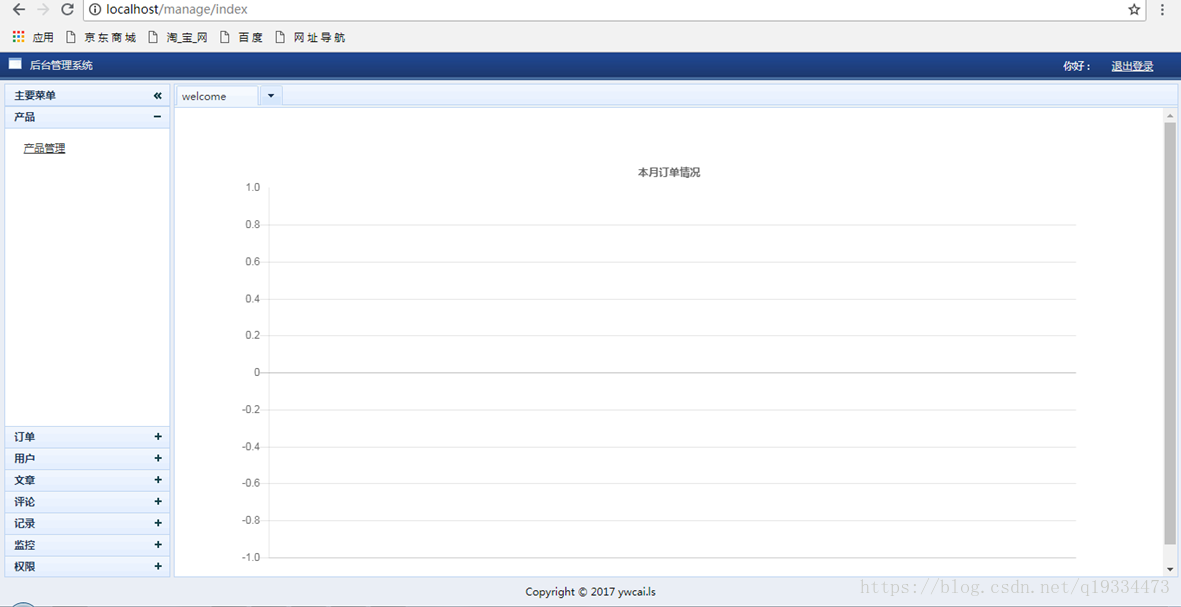
预期的加入微服务网关后使用示例情况如下图:
开启微服务网关后,实现服务实际地址向虚拟地址的映射,所有对虚拟地址的操作均可以透明反应到真实的微服务上。
二、zuul微服务网关主要配置
首先是需要引入pom的依赖
<project xmlns="http://maven.apache.org/POM/4.0.0" xmlns:xsi="http://www.w3.org/2001/XMLSchema-instance"

      xsi:schemaLocation="http://maven.apache.org/POM/4.0.0 http://maven.apache.org/maven-v4_0_0.xsd">

      <modelVersion>4.0.0</modelVersion>

      <parent>

           <groupId>org.springframework.boot</groupId>

           <artifactId>spring-boot-starter-parent</artifactId>

           <version>1.5.13.RELEASE</version>

           <relativePath></relativePath>

      </parent>

      <artifactId>gateway</artifactId>

      <packaging>jar</packaging>

      <name>gateway</name>

      <properties>

           <project.build.sourceEncoding>UTF-8</project.build.sourceEncoding>

           <project.reporting.outputEncoding>UTF-8</project.reporting.outputEncoding>

           <java.version>1.8</java.version>

      </properties>

      <dependencyManagement>

           <dependencies>

                 <dependency>

                      <groupId>org.springframework.cloud</groupId>

                      <artifactId>spring-cloud-dependencies</artifactId>

                      <version>Dalston.SR5</version>

                      <type>pom</type>

                      <scope>import</scope>

                 </dependency>

           </dependencies>

      </dependencyManagement>

      <dependencies>

           <dependency>

                 <groupId>org.springframework.boot</groupId>

                 <artifactId>spring-boot-starter-thymeleaf</artifactId>

           </dependency>

           <dependency>

                 <groupId>org.springframework.boot</groupId>

                 <artifactId>spring-boot-starter-web</artifactId>

           </dependency>

           <dependency>

                 <groupId>org.springframework.cloud</groupId>

                 <artifactId>spring-cloud-starter-eureka</artifactId>

           </dependency>

           <dependency>

                 <groupId>org.springframework.cloud</groupId>

                 <artifactId>spring-cloud-starter-config</artifactId>

           </dependency>

           <dependency>

                 <groupId>org.springframework.cloud</groupId>

                 <artifactId>spring-cloud-starter-zuul</artifactId>

           </dependency>

           <dependency>

                 <groupId>org.springframework.cloud</groupId>

                 <artifactId>spring-cloud-starter-hystrix</artifactId>

           </dependency>

           <dependency>

                 <groupId>com.google.code.gson</groupId>

                 <artifactId>gson</artifactId>

           </dependency>

      </dependencies>

      <build>

           <plugins>

                 <plugin>

                      <groupId>org.springframework.boot</groupId>

                      <artifactId>spring-boot-maven-plugin</artifactId>

                      <configuration>

                            <fork>true</fork>

                      </configuration>

                 </plugin>

           </plugins>

      </build>

</project>
===========接下来编写入口程序===========
@SpringBootApplication
@EnableZuulProxy
public class GatwayApplication {
public static void main(String[] args) {
SpringApplication.run(GatwayApplication.class, args);
}
}
很简单,只需要增加一个开启@EnableZuulProxy注解的配置即可
============接下来配置zuul的属性配置文件即可============
#关闭弹出的默认认证登录框
security.basic.enabled=false
#忽略框架默认的服务映射路径
zuul.ignoredServices='*'
#不忽略框架与权限相关的头信息
zuul.ignoreSecurityHeaders=false
#不忽略任何头部信息,所有header都转发到下游的资源服务器
zuul.sensitiveHeaders=
#以下是自定义服务与路径的映射关系,也可以通过path和url直接映射
zuul.product.serviceId=product
zuul.product.path=/product/**
zuul.sso.serviceId=sso
zuul.sso.path=/sso/**
zuul.manage.serviceId=manage
zuul.manage.path=/manage/**
#网关的session名字,建议每个微服务都单独命名
server.session.cookie.name= GATWAY_SESSION
server.port=80
spring.application.name=gatway
#配置注册中心的地址,以便根据serviceID去发现这些service
eureka.instance.hostname=localhost
eureka.client.serviceUrl.defaultZone=http://localhost:7771/eureka
OK,如此简单,微服务配置既完成了。
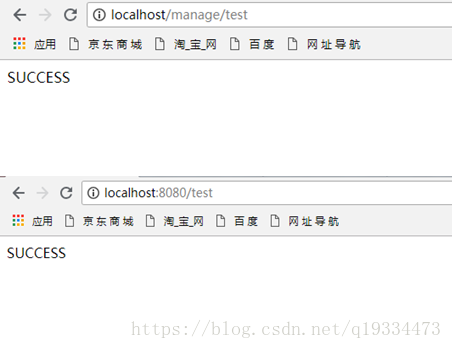
如果微服务没有权限验证,通过映射的地址:例如
在浏览器输入http://localhost/manage/index即可访问到http://localhost:8080/index相同的页面信息了。
如下所示访问http://localhost/manage/index
在访问http://localhost:8080/index

都返回了正确的、真实的资源页面。访问REST服务接口也是同样。
三、Zuul微服务网关默认配置的坑
当访问的微服务某一个页面若发生重定向,重定向会把真实的URL地址和真实的端口暴露在地址栏中,且登录认证成功后也无法正常回调到需要鉴权的应用页面。如下面流转逻辑示例:
我们的理想如下图:

但现实很残酷,实际情况是这样:

查了下网上解决方案,说的要在配置文件中加上如下属性:
zuul.addHostHeader=true
加上上面这个配置后,情况变得更槽糕了,情况如下图逻辑所示

显然这个返回有问题,并没有将当前服务的前缀加载Host后面。

实际上,zuul网关是在这里做了一个向后台实际微服务请求的动作,并重新组装成了返回给客户端的Response。
经过断点发现,当请求的页面发生重定向,并且配置zuul.addHostHeader=true后,返回reponse的header中location地址会直接将真实地址的Host:port替换为网关的Host:port。例如返回的真实地址是localhost:8000/login,会直接被替换为localhost/login。但由于localhost:8000/login实际应该映射到localhost/sso/login,因此造成了返回地址404-Not-Found(但笔者实在没有找到这个替换的动作在哪里执行的)
下面说下笔者如何填这个坑,可能办法有点土,但能解决实际问题。
四、重定向无法获取正确路径的填坑过程
解决思路
微服务网关对后台服务资源的代理请求均是在RibbonRoutingFilter这个过滤器中实现的,具体业务处理方法为
@Override
public Object run() {
RequestContext context = RequestContext.getCurrentContext();
this.helper.addIgnoredHeaders();
try {
RibbonCommandContext commandContext = buildCommandContext(context);
ClientHttpResponse response = forward(commandContext);
setResponse(response);
return response;
}
catch (ZuulException ex) {
throw new ZuulRuntimeException(ex);
}
catch (Exception ex) {
throw new ZuulRuntimeException(ex);
}
}
只要覆写这个方法,将微服务返回的Response进行处理后再提交给客户端即可。当然覆写后,要用自定义的过滤器来替换掉原来注册的过滤器。
具体改造方案如下:
======首先新建一个过滤器,直接继承自RibbonRoutingFilter=======
package ywcai.ls.gateway;

//开启这个注解,zuul会在配置时自动添加至过滤器链

@Component

public class FixRibbonRoutingFilter extends RibbonRoutingFilter{

//实例化过滤器需要的辅助类,在自动化配置中已经有实例,直接注解注入即可

@Autowired

ProxyRequestHelper helper;

//实例化过滤器需要的工厂类,在自动化配置中已经有实例,直接注解注入即可

@Autowired

RibbonCommandFactory<?> ribbonCommandFactory;

//如果重定向之前没有页面,则给一个默认的地址

String defaultSuccessUrl="/index";

//辅助方法,下面会介绍

      public void setDefaultSuccessUrl(String url)

      {

           if(url.equals("/")||url.equals(""))

           {

                 return ;

           }

           this.defaultSuccessUrl=url.startsWith("/")?url:"/"+url;

      }

//构造类,集成付方法即可

      public FixRibbonRoutingFilter(ProxyRequestHelper helper, RibbonCommandFactory<?> ribbonCommandFactory) {

           super(helper, ribbonCommandFactory,Collections.emptyList());

           // TODO Auto-generated constructor stub

      }

//辅助方法类,下面会介绍

      private void addPathCache(String requestPath,String requestServiceId )

      {

           if(requestPath.equals("/")||requestPath.equals(""))

           {

                 requestPath=defaultSuccessUrl;

           }

           HttpSession cache=RequestContext.getCurrentContext().getRequest().getSession();

           if(!isHasCache(requestPath))

           {

                 cache.setAttribute(requestPath,requestServiceId);

           }

      }

//辅助方法类,判断是否有缓存

      private boolean isHasCache(String requestPath)

      {

           HttpSession cache=RequestContext.getCurrentContext().getRequest().getSession();

           return cache.getAttribute(requestPath)!=null?true:false;

      }

//辅助方法类,下面会介绍

      private String getServiceIdAndRemove(String requestPath)

      {

           HttpSession cache=RequestContext.getCurrentContext().getRequest().getSession();

           String serviceId="";

           if(isHasCache(requestPath))

           {

                 serviceId= (String) cache.getAttribute(requestPath);

                 cache.removeAttribute(requestPath);

           }

           return serviceId;

      }

//辅助方法类,组装正确的重定向地址

      private void assembleRealPath(ClientHttpResponse response, URI location,

                 String nowPath,String serviceId) {

           int nowPort=location.getPort()<=0?80:location.getPort();

           String newPath=

                      location.getScheme()+"://"+location.getHost()+":"

                                  +nowPort+"/"+serviceId+nowPath;

      newPath=location.getQuery()==null?newPath:(newPath+"?"+location.getQuery());

      newPath=location.getFragment()==null?newPath:(newPath+"#"+location.getFragment());

           URI newLocation=null;

           try {

                 newLocation = new URI(newPath);

           } catch (URISyntaxException e) {

                 // TODO Auto-generated catch block

                 e.printStackTrace();

           }

           response.getHeaders().setLocation(newLocation);

      }

//核心业务逻辑,其他都不变,增加对reponse的处理逻辑即可

      @Override

      public Object run() {

           // TODO Auto-generated method stub

           RequestContext context = RequestContext.getCurrentContext();

           this.helper.addIgnoredHeaders();

           try {

                 RibbonCommandContext commandContext = buildCommandContext(context);

//获取重定向前访问的url的资源路径,这个地址是不包含host的

                 String preUrl=commandContext.getUri();

                 //如果现在被重定向到的是登录页面,则缓存访问前一刻资源的路径和服务ID,并且只缓存记录这个SESSION访问的第一个ServiceID

                 if(preUrl.equals("/login"))

                 {

//记录登录时的serviceID作为默认的serviceID

      addPathCache(defaultSuccessUrl,commandContext.getServiceId());

                 }

                 ClientHttpResponse response = forward(commandContext);

//下面是具体的reponse处理逻辑

                 URI location=response.getHeaders().getLocation();

      if(response.getStatusCode()==HttpStatus.FOUND&&location!=null)

                 {


                      String nowPath=location.getPath();

                      if(nowPath.equals("/login"))

                      {

      //如果是被重定向了,则记录之前的路径

                 String serviceId=commandContext.getServiceId();

                 addPathCache(preUrl,serviceId);

                 assembleRealPath(response,location,nowPath,  serviceId);

                      }

                      else if(isHasCache(nowPath))

                      {

//如果是缓存过这个页面,则获取缓存路径重新封装并重定向到缓存位置

               String serviceId=getServiceIdAndRemove(nowPath);

               assembleRealPath(response,location,nowPath,serviceId);

                      }


                      else if(nowPath.equals("/")||nowPath.equals(""))

                      {

//如果资源是"/"或为空,则代表是直接在浏览器输入login页面登录的,转到默认页面。

               String serviceId=getServiceIdAndRemove(defaultSuccessUrl);
               assembleRealPath(response,location,defaultSuccessUrl,serviceId);

                      }

                      //其他情况则什么也不做

                      else

                      {

                      }

                 }

                 setResponse(response);

                 return response;

           }

           catch (ZuulException ex) {

                 throw new ZuulRuntimeException(ex);

           }

           catch (Exception ex) {

                 throw new ZuulRuntimeException(ex);

           }

      }

}
======然后在启动类中将原来的RibbonRoutingFilter剔除======
package ywcai.ls.gateway;

@SpringBootApplication

@EnableZuulProxy

public class GatwayApplication {

      //RibbonRoutingFilter

      public static void main(String[] args) {

           // TODO Auto-generated method stub

           SpringApplication.run(GatwayApplication.class, args);

           removeDefaultRibbonFilter();

      }

      private static void removeDefaultRibbonFilter() {

//只需要删除系统的ribbonRoutingFilter即可,自定义的会自动注入。

           FilterRegistry r=FilterRegistry.instance();

           r.remove("ribbonRoutingFilter");

      }

}
==============很简单,看下改造后的效果==============
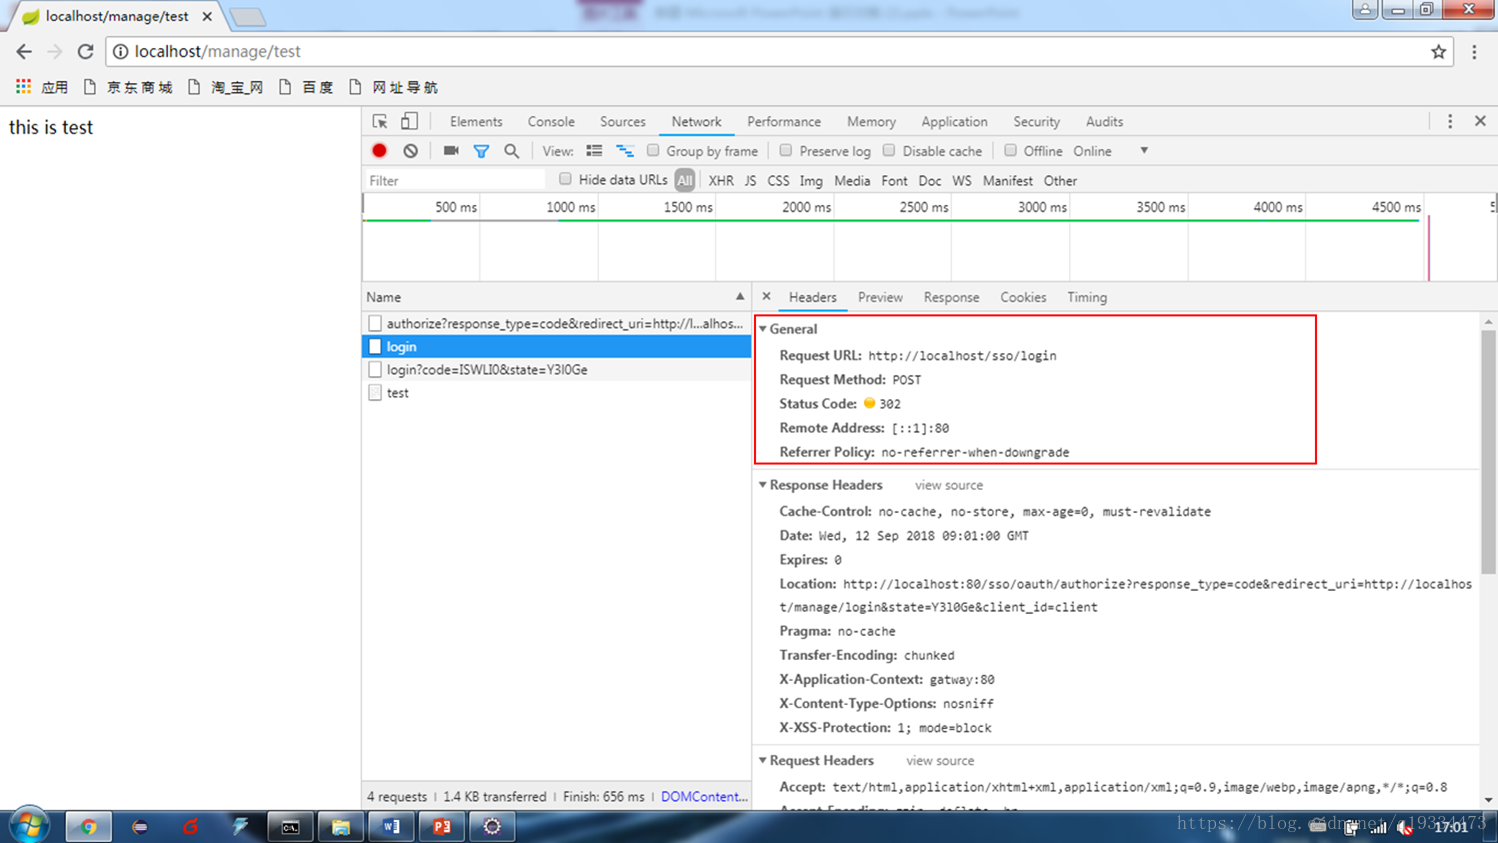
访问localhost/manage/test
经过多次重定向后,最后定向到认证中心的login页面-Localhost/sso/login
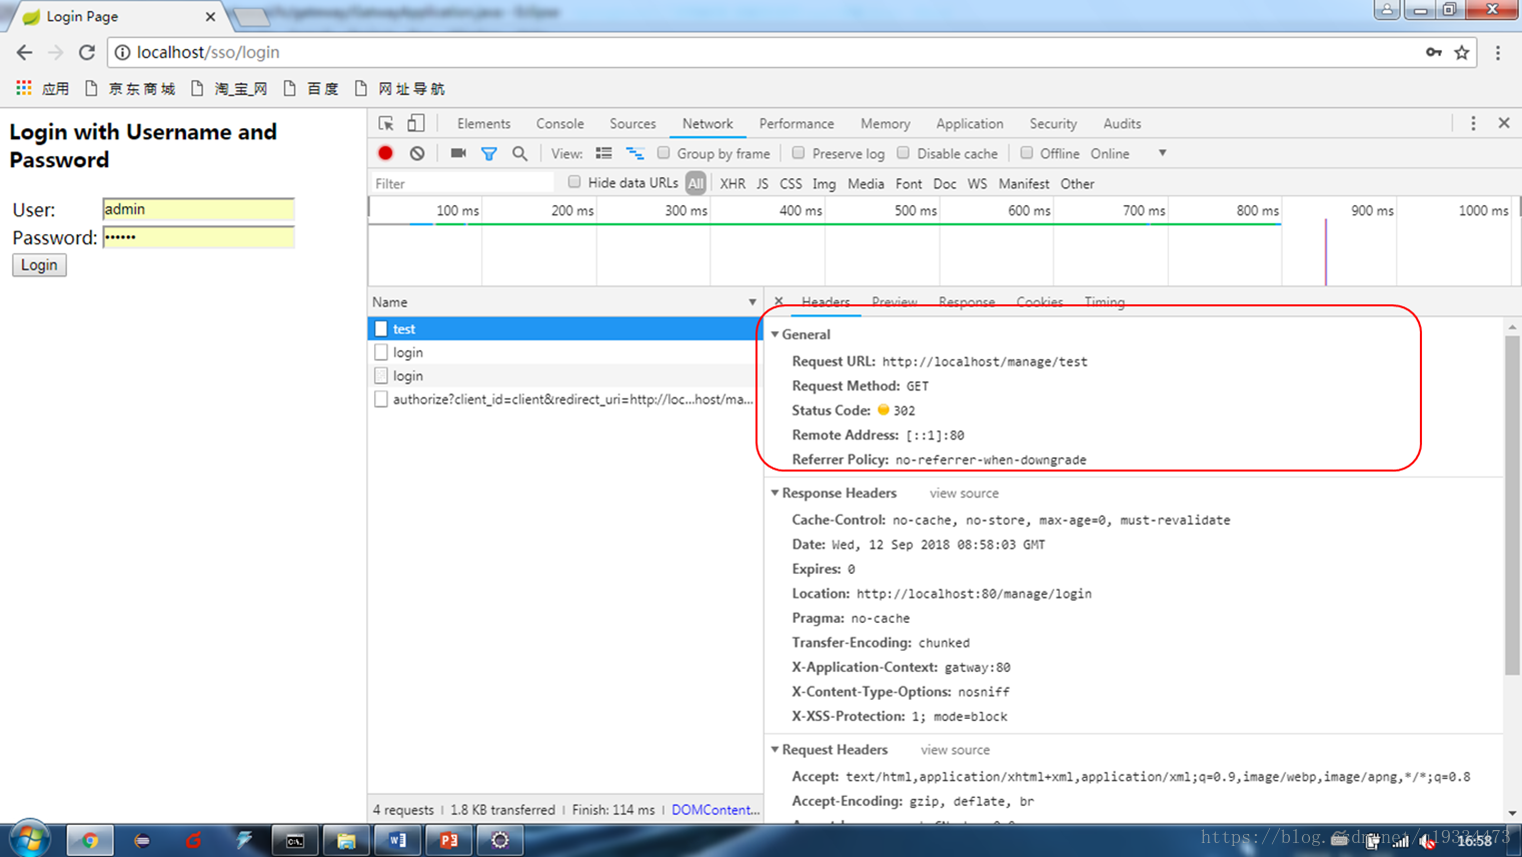
提交账号密码后,又经过多次认证,重定向。返回到了第一次我想要访问的页面-locahlost/manage/test
五、关于熔断和超时设置的问题
设置熔断的时间,如果发生了熔断,默认为进行一次请求重发。
这个配置建议在网关和微服务都需要设置,否则会有一个默认值生效
hystrix.command.default.execution.isolation.thread.timeoutInMilliseconds=40000
设置ribbon的网络请求超时时间。
ribbon.ReadTimeout=30000
ribbon.ConnectTimeout=30000
建议在网关和微服务也都进行配置
如果本身是微服务A,又访问了其他的微服务B,那这两个配置会对A造成影响,微服务B超时会引起微服务A报超时错误。
总的来说,就是时间设置较小的设置会影响另外的配置。
一般熔断超时时间应该设置的比ribbon的网络请求超时时间长。
相关源码请查看作者git https://github.com/ywcai/


 428
428


 被折叠的 条评论
为什么被折叠?
被折叠的 条评论
为什么被折叠?
 到【灌水乐园】发言


