


Web Service 是什么?
说白了,就是提供服务接口,请求方调用接口获取数据。是跨语言、跨平台、可远程调用。举个例子:c# 语言发布的web service,使用java或php都可以进行调用。
Web Service 术语
1.WSDL(web service definition language)
简单的说,就是以.wdsl命名的文件,文件内容为xml格式的数据,里面描述了这个web service各种信息
2.SOAP(simple object access protocal)
简单的说,就是基于xml的http请求与响应,soap是请求或响应数据格式的规范,具体可以去w3cshool学习soap规范
3.SEI(WebService EndPoint Interface)
简单的说,就是服务端发布的web service的接口地址
综上所述,我对Web Service理解为:特殊格式http请求,为什么?
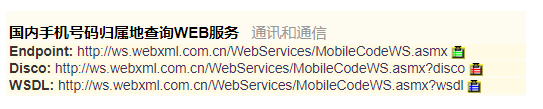
1.我们先在网上找一个web service服务,http://www.webxml.com.cn/zh_cn/web_services.aspx 这上面提供很多服务,我们选择其中一个
2.打开eclipse


由于点击那个source也不是很明显,这里我直接给出请求与响应报文
POST /WebServices/MobileCodeWS.asmx HTTP/1.1
Host: ws.webxml.com.cn
Content-Type: text/xml; charset=utf-8
Content-Length: length
SOAPAction: "http://WebXml.com.cn/getMobileCodeInfo"

<?xml version="1.0" encoding="utf-8"?>
<soap:Envelope xmlns:xsi="http://www.w3.org/2001/XMLSchema-instance" xmlns:xsd="http://www.w3.org/2001/XMLSchema" xmlns:soap="http://schemas.xmlsoap.org/soap/envelope/">
  <soap:Body>
    <getMobileCodeInfo xmlns="http://WebXml.com.cn/">
      <mobileCode>13629779205</mobileCode>
      <userID></userID>
    </getMobileCodeInfo>
  </soap:Body>
</soap:Envelope>
HTTP/1.1 200 OK
Content-Type: text/xml; charset=utf-8
Content-Length: length
<?xml version="1.0" encoding="utf-8"?>
<soap:Envelope xmlns:xsi="http://www.w3.org/2001/XMLSchema-instance" xmlns:xsd="http://www.w3.org/2001/XMLSchema" xmlns:soap="http://schemas.xmlsoap.org/soap/envelope/">
<soap:Body>
<getMobileCodeInfoResponse xmlns="http://WebXml.com.cn/">
<getMobileCodeInfoResult>13629779205:重庆 重庆 重庆移动神州行卡</getMobileCodeInfoResult>
</getMobileCodeInfoResponse>
</soap:Body>
</soap:Envelope>其他报文样例,请自行打开http://ws.webxml.com.cn/WebServices/MobileCodeWS.asmx?op=getMobileCodeInfo查看
使用JDK 开发Web Service 服务端和客户端
1.创建服务端代码
package cn.fg.ws.demo.jdk;
import javax.jws.WebMethod;
import javax.jws.WebParam;
import javax.jws.WebService;
import javax.xml.ws.Endpoint;
@WebService
public class Hello {
@WebMethod
public String sayName(@WebParam(name = "name") String name) {
return "my name is " + name;
}
@WebMethod
public String sayAge(@WebParam(name = "age") int age) {
return "my age is " + age;
}
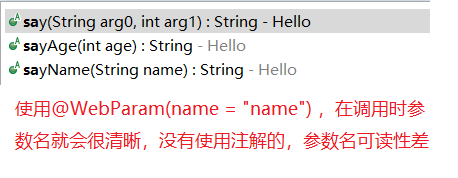
/**
* @WebParam 该注解可用可不用,其中name可以指定参数名称,如果不指定,则客户端调用时,显示的参数名为q0,q1,可读性要差些
*/
@WebMethod
public String say(String name, int age) {
return "my name is " + name + "and age is " + age;
}
//通过main方法发布web service服务,后面会讲解使用web项目怎么发布
public static void main(String[] args) {
String address = "http://192.168.1.100:8899/ws"; //设置一个web servie 的访问地址,不要设置localhsot和127.0.0.1
Endpoint.publish(address, new Hello()); //发布服务,这就所谓的SEI(WebService EndPoint Interface)
}
}
2.创建客户端代码
//使用jdk目录下的wsimport在命令行中输入如下命令
//如果配置了hava环境变量,可以在cmd中直接这么写,否则请cd到jdk的bin目录中在使用
wsimport -keep http://192.168.1.100:8899/ws?wsdl


//如果对方给的是一个wsdl文件
wsimport -keep d:\ws.wsdl

#为生成的代码指定包名,不指定的话默认为web Service 服务端的包名
wsimport -keep -p cn.fg.test http://192.168.1.100:8899/ws?wsdl

#wsimport 只支持soap1.1的代码生成,对于使用soap1.2发布的web Service无法生成代码
然后将生成的代码拷贝到项目中

这么多的类我该如何使用呢?
方式一:根据eclipse的web Service explorer

方式二:看wsdl文件内容

编写调用代码
package ws.clent.jdk.demo;

import cn.fg.ws.demo.jdk.Hello;
import cn.fg.ws.demo.jdk.HelloService;

public class MyTest {

	public static void main(String[] args) {
		HelloService factory = new HelloService();
		Hello hello = factory.getHelloPort();
		System.out.println(hello.say("张三", 18));
		System.out.println(hello.sayName("王五"));
		System.out.println(hello.sayAge(20));
	}

}
重点看HelloService类
package cn.fg.ws.demo.jdk;

import java.net.MalformedURLException;
import java.net.URL;
import javax.xml.namespace.QName;
import javax.xml.ws.Service;
import javax.xml.ws.WebEndpoint;
import javax.xml.ws.WebServiceClient;
import javax.xml.ws.WebServiceException;
import javax.xml.ws.WebServiceFeature;


/**
 * This class was generated by the JAX-WS RI.
 * JAX-WS RI 2.2.9-b130926.1035
 * Generated source version: 2.2
 *
 */
@WebServiceClient(name = "HelloService", targetNamespace = "http://jdk.demo.ws.fg.cn/", wsdlLocation = "http://192.168.1.100:8899/ws?wsdl")
public class HelloService
    extends Service
{

    //省略部分代码

    static {
        URL url = null;
        WebServiceException e = null;
        try {
            //@WebServiceClient注解里面wsdlLocation可以不要,没什么影响,只要保证这里的地址正确就可以了
            //这里就是我们请求的webService地址,根据实际环境更改
            url = new URL("http://192.168.1.100:8899/ws?wsdl");
        } catch (MalformedURLException ex) {
            e = new WebServiceException(ex);
        }
        HELLOSERVICE_WSDL_LOCATION = url;
        HELLOSERVICE_EXCEPTION = e;
    }

    //省略部分代码

}
Web程序怎么启动Web Service ?
package cn.fg.ws.demo.jdk;

import javax.servlet.ServletContextEvent;
import javax.servlet.ServletContextListener;
import javax.servlet.annotation.WebListener;
import javax.xml.ws.Endpoint;

@WebListener
public class WebServicePublishListener implements ServletContextListener  {

	private Endpoint endpoint;

	@Override
	public void contextDestroyed(ServletContextEvent arg0) {
		if(this.endpoint.isPublished()){
			 endpoint.stop();
		 }
	}

	@Override
	public void contextInitialized(ServletContextEvent arg0) {
                //这里不能和Tomcat端口一致,否则会包端口被占用,如果要和Tomcat端口一致,后面会讲解 apache cxf 开发web service
		String address = "http://192.168.1.100:8899/ws";
		this.endpoint = Endpoint.publish(address, new Hello());
	}

}
使用Apache CXF 开发Web Service
1.创建服务端代码
<!-- maven 引用jar包 -->

<!-- 使用jaxws规范发布webservice -->
<dependency>
	<groupId>org.apache.cxf</groupId>
	<artifactId>cxf-rt-frontend-jaxws</artifactId>
	<version>3.1.18</version>
</dependency>
<!-- 使用自带的jetty独立发布服务,后面会讲解怎么随Tomcat发布服务 -->
<dependency>
	<groupId>org.apache.cxf</groupId>
	<artifactId>cxf-rt-transports-http-jetty</artifactId>
	<version>3.1.18</version>
</dependency>
//仍然创建一个Hello类,代码同上面一模一样
@WebService
public class Hello {
//省略代码
}//发布的代码也一模一样
public static void main(String[] args) {
String address = "http://192.168.1.100:8899/ws";
Endpoint.publish(address, new Hello());
//Endpoint.publish(address, new Hello(),new LoggingFeature()); //增加日志特征,和下面的拦截器是一样的
//或者使用cxf的类发布服务
/*JaxWsServerFactoryBean factory = new JaxWsServerFactoryBean();
factory.setAddress("http://192.168.1.100:8899/ws");
factory.getInInterceptors().add(new LoggingInInterceptor()); //添加入访日志拦截器
factory.getOutInterceptors().add(new LoggingOutInterceptor()); //添加出访日志拦截器
factory.setServiceBean(new Hello());
factory.create();*/
}
2. 创建客户端代码
这里我们使用cxf提供的wsdl2java命令行工具生成客户端代码,当然用wsimport也是可以的,不顾wsdl2java支持soap1.2和更多数据类型(如果方法返回值是Map,则wsimport会报错的),到官网 http://cxf.apache.org/download.html 下载release 版本

在 apache-cxf-3.2.12 的bin目录下找到wsdl2java,使用如下命令
#和wsimport类似,更多参数请参考官网
wsdl2java -keep -p ws.test http://192.168.1.100:8899/ws?wsdl
将生成好的代码拷贝到项目中

//测试代码也一模一样
public static void main(String[] args) {
		HelloService factory = new HelloService();
		Hello hello = factory.getHelloPort();
		System.out.println(hello.say("张三", 18));
		System.out.println(hello.sayName("王五"));
		System.out.println(hello.sayAge(20));
	}
3.使用cxf客户端代理调用服务端
package ws.cxf.demo;

import javax.jws.WebMethod;
import javax.jws.WebParam;
import javax.jws.WebService;

//先定义一个和服务端一致的接口
//如果服务端直接把接口文件拿过来使用这种调用方式很方便,因为包名接口名方法及方法参数都需要和服务端一致
@WebService
public interface Hello {

	@WebMethod
	String sayName(@WebParam(name="name")String name);、

    //方法可以不用写全,需要调哪个就写哪个

}
//调用代码
public static void main(String[] args) {
		JaxWsProxyFactoryBean factory = new JaxWsProxyFactoryBean();
		factory.setAddress("http://192.168.1.100:8899/ws");
		factory.setServiceClass(Hello.class);
                //客户端也是可以添加拦截器的
                factory.getInInterceptors().add(new LoggingInInterceptor());
		factory.getOutInterceptors().add(new LoggingOutInterceptor());
		Hello helloService = factory.create(Hello .class);
		System.out.println(helloService.sayName("aaaaaaaa"));
	}
使用Apache CXF 整合Spring
<!-- 引入jar包 -->

<dependency>
	<groupId>org.apache.cxf</groupId>
	<artifactId>cxf-rt-frontend-jaxws</artifactId>
	<version>3.1.18</version>
</dependency>

<dependency>
	<groupId>org.apache.cxf</groupId>
	<artifactId>cxf-rt-transports-http</artifactId>
	<version>3.1.18</version>
</dependency>

<dependency>
	<groupId>org.springframework</groupId>
	<artifactId>spring-web</artifactId>
	<version>4.3.10.RELEASE</version>
</dependency>
<!-- web.xml -->
<context-param>
<param-name>contextConfigLocation</param-name>
<param-value>classpath:spring-cxf.xml</param-value>
</context-param>
<listener>
<listener-class>org.springframework.web.context.ContextLoaderListener</listener-class>
</listener>
<!-- 配置webservice的servlet访问路径 -->
<servlet>
<servlet-name>CXFServlet</servlet-name>
<servlet-class>org.apache.cxf.transport.servlet.CXFServlet</servlet-class>
</servlet>
<servlet-mapping>
<servlet-name>CXFServlet</servlet-name>
<url-pattern>/ws/*</url-pattern>
</servlet-mapping><!-- spring-cxf.xml -->
<?xml version="1.0" encoding="UTF-8"?>
<beans xmlns="http://www.springframework.org/schema/beans"
xmlns:xsi="http://www.w3.org/2001/XMLSchema-instance"
xmlns:jaxws="http://cxf.apache.org/jaxws"
xsi:schemaLocation=" http://www.springframework.org/schema/beans http://www.springframework.org/schema/beans/spring-beans.xsd
http://cxf.apache.org/jaxws http://cxf.apache.org/schemas/jaxws.xsd">
<!-- Hello.java 里的内容和上面是一样的 -->
<jaxws:endpoint implementor="ws.cxf.demo.Hello" address="/hello" >
<!-- 配置日志拦截器 -->
<jaxws:inInterceptors>
<bean class="org.apache.cxf.interceptor.LoggingInInterceptor"></bean>
</jaxws:inInterceptors>
<jaxws:outInterceptors>
<bean class="org.apache.cxf.interceptor.LoggingOutInterceptor"></bean>
</jaxws:outInterceptors>
</jaxws:endpoint>
<!-- 下面这几种配置服务端的方式都可以,配置几个就是发布几个webservice -->
<!-- 省略拦截器的配置,和上面是一样的 -->
<jaxws:server address="/hello2">
<jaxws:serviceBean>
<bean class="ws.cxf.demo.Hello2"></bean>
</jaxws:serviceBean>
</jaxws:server>、
<jaxws:server address="/hello3" serviceClass="ws.cxf.demo.Hello3"></jaxws:server>
</beans>
访问地址:http://192.168.1.100:8080/ws-cxf-spring-server/ws/hello?wsdl
编写使用cxf调用服务端代码
先定义一个和服务端一致的接口
package ws.cxf.demo;

import javax.jws.WebMethod;
import javax.jws.WebParam;
import javax.jws.WebService;

//如果服务端直接把接口文件拿过来使用这种调用方式很方便,因为包名接口名方法及方法参数都需要和服务端一致
@WebService
public interface Hello {

	@WebMethod
	String sayName(@WebParam(name = "name") String name);
}
spring-cxf.xml
<?xml version="1.0" encoding="UTF-8"?>
<beans xmlns="http://www.springframework.org/schema/beans"
	xmlns:xsi="http://www.w3.org/2001/XMLSchema-instance"
	xmlns:jaxws="http://cxf.apache.org/jaxws"
	xsi:schemaLocation=" http://www.springframework.org/schema/beans http://www.springframework.org/schema/beans/spring-beans.xsd
	http://cxf.apache.org/jaxws http://cxf.apache.org/schemas/jaxws.xsd">

	<!-- 必须要设置id,否则注入时会找不到 -->
	<jaxws:client id="hello" address="http://192.168.1.100:8899/ws" serviceClass="ws.cxf.demo.Hello"></jaxws:client>


</beans>
测试代码
package cn.ws.test;

import org.junit.Test;
import org.junit.runner.RunWith;
import org.springframework.beans.factory.annotation.Autowired;
import org.springframework.test.context.ContextConfiguration;
import org.springframework.test.context.junit4.SpringJUnit4ClassRunner;

import ws.cxf.demo.Hello;

@RunWith(SpringJUnit4ClassRunner.class)
@ContextConfiguration({"classpath:spring-cxf.xml"})
public class MyTest {

	@Autowired
	Hello hello2;  //这里可以随便取名,可以不用写hello

	@Test
	public void test1(){
		System.out.println(hello2.sayName("zhangsan"));
	}
}
根据wsdl描述文件创建web service服务端代码
在开发过程中,如果三方的网络不通或没有测试数据时,我们可以自己通过三方给的wsdl文件,创建服务端代码,模拟测试。这里我们使用eclipse自带的axis创建。
1. file -> new -> web service (如果没有就在other中查找)

然后一直下一步,保持默认,直到完成。以下是创建好后的服务端代码

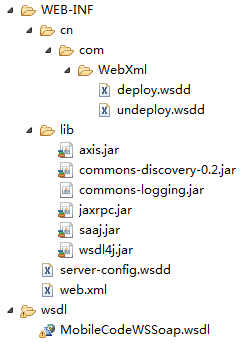
2.将lib中的jar引入到工程中,否则生成代码会找不到jar包。然后找到xxxxWSSoapImpl修改接口的返回值
package cn.com.WebXml;

public class MobileCodeWSSoapImpl implements cn.com.WebXml.MobileCodeWSSoap{
    public java.lang.String getMobileCodeInfo(java.lang.String mobileCode, java.lang.String userID) throws java.rmi.RemoteException {
        return null;  //这里返回模拟数据
    }

    public java.lang.String[] getDatabaseInfo() throws java.rmi.RemoteException {
        return null;
    }

}
3.web.xml 中被增加了servlet的配置,实际我们只需要/services/*这个路径的访问就够了,其他可以删除
<servlet>
    <display-name>Apache-Axis Servlet</display-name>
    <servlet-name>AxisServlet</servlet-name>
    <servlet-class>org.apache.axis.transport.http.AxisServlet</servlet-class>
  </servlet>
  <servlet-mapping>
    <servlet-name>AxisServlet</servlet-name>
    <url-pattern>/servlet/AxisServlet</url-pattern>
  </servlet-mapping>
  <servlet-mapping>
    <servlet-name>AxisServlet</servlet-name>
    <url-pattern>*.jws</url-pattern>
  </servlet-mapping>
  <servlet-mapping>
    <servlet-name>AxisServlet</servlet-name>
    <url-pattern>/services/*</url-pattern>
  </servlet-mapping>
  <servlet>
    <display-name>Axis Admin Servlet</display-name>
    <servlet-name>AdminServlet</servlet-name>
    <servlet-class>org.apache.axis.transport.http.AdminServlet</servlet-class>
    <load-on-startup>100</load-on-startup>
  </servlet>
  <servlet-mapping>
    <servlet-name>AdminServlet</servlet-name>
    <url-pattern>/servlet/AdminServlet</url-pattern>
  </servlet-mapping>
4. 访问http://127.0.0.1:8080/test-web-01/services,会列出所有的服务


 287
287


 被折叠的 条评论
为什么被折叠?
被折叠的 条评论
为什么被折叠?
 到【灌水乐园】发言


