


Springboot
springboot优点

Maven设置
<mirrors>
      <mirror>
        <id>nexus-aliyun</id>
        <mirrorOf>central</mirrorOf>
        <name>Nexus aliyun</name>
        <url>http://maven.aliyun.com/nexus/content/groups/public</url>
      </mirror>
  </mirrors>

  <profiles>
         <profile>
              <id>jdk-1.8</id>
              <activation>
                <activeByDefault>true</activeByDefault>
                <jdk>1.8</jdk>
              </activation>
              <properties>
                <maven.compiler.source>1.8</maven.compiler.source>
                <maven.compiler.target>1.8</maven.compiler.target>
                <maven.compiler.compilerVersion>1.8</maven.compiler.compilerVersion>
              </properties>
         </profile>
  </profiles>
HelloWorld入门
import org.springframework.boot.SpringApplication;
import org.springframework.boot.autoconfigure.SpringBootApplication;

/**
 * 主程序类
 */
@SpringBootApplication
public class spring001 {
    public static void main(String[] args) {
        SpringApplication.run(spring001.class,args);
    }
}
import org.springframework.web.bind.annotation.RequestMapping;
import org.springframework.web.bind.annotation.RestController;

//@ResponseBody  //会以字符串方式返回,直接表示写给浏览器,而不是跳转到页面
//@Controller

@RestController
public class HelloController {

    @RequestMapping("/hello")       //映射请求-hello
    public String handle01(){
        return "hello springboot2";
    }
}
打包成jar包运行
https://docs.spring.io/spring-boot/docs/current/reference/html/getting-started.html#getting-started.first-application.executable-jar
依赖管理


自动配置特性


@Configuration详解


import com.newpractice.boot.bean.User;
import com.newpractice.boot.config.MyConfig;
import org.springframework.boot.SpringApplication;
import org.springframework.boot.autoconfigure.SpringBootApplication;
import org.springframework.context.ConfigurableApplicationContext;
import org.springframework.context.annotation.ComponentScan;

/**
 * 主程序类
 */
@SpringBootApplication
@ComponentScan(basePackages = "com.newpractice.boot")	//这里搞了很久,如果不弄这个注解就会没法扫描到Bean所在的类文件
public class spring001 {
    public static void main(String[] args) {
        ConfigurableApplicationContext run = SpringApplication.run(spring001.class, args);
        MyConfig bean = run.getBean(MyConfig.class);

        User user = bean.user01();
        User user1 = bean.user01();
        System.out.println(user == user1);

    }
}
import com.newpractice.boot.bean.User;
import org.springframework.context.annotation.Bean;
import org.springframework.context.annotation.Configuration;

@Configuration
public class MyConfig {
    @Bean
    public User user01() {
        return new User("张三",18);
    }

}
自动配置【源码分析】
@SpringBootConfiguration
@EnableAutoConfiguration
@ComponentScan(excludeFilters = { @Filter(type = FilterType.CUSTOM, classes = TypeExcludeFilter.class),
		@Filter(type = FilterType.CUSTOM, classes = AutoConfigurationExcludeFilter.class) })
@Configuration表示一个配置类,因此@SpringBootConfiguration表示该类也是一个配置类
@ComponentScan前面说过了,是包扫描,等于@SpringBootConfiguration(scanBasePackage=“xxx…”)
@EnableAutoConfiguration
@AutoConfigurationPackage
@Import(AutoConfigurationImportSelector.class)
public @interface EnableAutoConfiguration {
@Import(AutoConfigurationPackages.Registrar.class)
public @interface AutoConfigurationPackage {
利用Registrar给容器导入一系列组件
将指定的一个包下的所有组件都导入进来–>就是原来的@SpringBootConfiguration所在的类所在的包下的所有组件
@Override			//Registrar
public void registerBeanDefinitions(AnnotationMetadata metadata, BeanDefinitionRegistry registry) {
	register(registry, new PackageImports(metadata).getPackageNames().toArray(new String[0]));
}
初始加载自动配置类
getAutoConfigurationEntry(annotationMetadata) //给容器中批量导入一些组件
List<String> configurations = getCandidateConfigurations(annotationMetadata, attributes); //获取所有需要导入到容器中的配置类
List<String> configurations = SpringFactoriesLoader.loadFactoryNames(getSpringFactoriesLoaderFactoryClass(),
				getBeanClassLoader())
Map<String, List<String>> loadSpringFactories(@Nullable ClassLoader classLoader) //得到所有的组件
从META-INF/spring.factories加载一个文件,默认扫描当前系统所有META-INF/spring.factories位置的文件
spring-boot-autoconfigure-2.3.4.RELEASE.jar包里也有META-INF/spring.factories
文件里面写死了一旦spring-boot启动,就要给容器加载所有的配置类
ps:
int count = run.getBeanDefinitionCount();
System.out.println(count);      //容器中有多少个组件
虽然127个场景的所有自动配置启动的时候默认全部加载,但是最终会按需配置(按照ConditionOnClass来看有没有相应的类决定是否启用相应的组件,不用就没有导入相应的类,也就会再相应的字段报红)
总结:
springboot先加载所有的自动配置类 xxxx-AutoConfiguration
每个自动配置类按照条件进行生效,默认都会绑定配置文件指定的值
生效的配置类就会给容器中装配很多组件
只要容器中有这些组件,相当于这些功能就有了。
主要用户有自己配置的,就以用户配置的为先。
主要容器中有这些组件,相当于这些功能就有了
定制化配置:
用户直接自己@Bean替换底层的组件
用户去看这个组件是获取的配置文件什么值就去修改。
xxxxAutoConfiguration—>组件—>xxxProperties里面拿值—>application.properties
@Import
@Import({User.class, DBHelper.class})
@Configuration
public class MyConfig {
    @Bean
    public User user01() {
        return new User("张三",18);
    }

}
这样的话在容器中自动创建相应的类,从而在getBean的时候就可以找到相应的bean对象
@SpringBootConfiguration
@EnableAutoConfiguration
@ComponentScan("com.newpractice.boot")
public class spring001 {
    public static void main(String[] args) {
        ConfigurableApplicationContext run = SpringApplication.run(spring001.class, args);
        DBHelper bean = run.getBean(DBHelper.class);
        System.out.println(bean);
    }
}
@Conditional
@Configuration
//@ConditionalOnBean(name = "tom")      tom不存在的时候,一个组件都不会在容器中创建
//@ConditionalOnMissingBean(name = "tom")        没有tom的时候才会注册
public class MyConfig {

    @ConditionalOnBean(name = "pet01")  //当条件成立的时候,相关的组件才会被注册在容器中
    @Bean
    public User user01() {
        User user = new User("张三",18);
        user.setOwnPet(pet01());
        return user;
    }


//    @Bean("tom")
    public Pet pet01() {
        return new Pet("小猫");
    }
}
import org.springframework.boot.SpringApplication;
import org.springframework.boot.SpringBootConfiguration;
import org.springframework.boot.autoconfigure.EnableAutoConfiguration;
import org.springframework.context.ConfigurableApplicationContext;
import org.springframework.context.annotation.ComponentScan;

/**
 * 主程序类
 */
@SpringBootConfiguration
@EnableAutoConfiguration
@ComponentScan("com.newpractice.boot")
public class spring001 {
    public static void main(String[] args) {
        ConfigurableApplicationContext run = SpringApplication.run(spring001.class, args);

        boolean isTrue = run.containsBean("user01");
        System.out.println(isTrue);
        boolean isTrue1 = run.containsBean("tom");
        System.out.println(isTrue1);
    }
}
@ImportResource
@ImportResource("classpath:beans.xml")
public class MyConfig {

}
将xml的信息导入spring的配置文件
@ConfigurationProperties
import org.springframework.boot.context.properties.ConfigurationProperties;
import org.springframework.stereotype.Component;


/**
 * 只有在容器中的组件才可以用Springboot提供的强大功能
 */
@Component
@ConfigurationProperties(prefix = "mycar")		//poperties文件中属性的前缀
public class Car {
    private String brand;
    private int price;

    public Car() {
    }

    public Car(String brand, int price) {
        this.brand = brand;
        this.price = price;
    }

    public String getBrand() {
        return brand;
    }

    public void setBrand(String brand) {
        this.brand = brand;
    }

    public int getPrice() {
        return price;
    }

    public void setPrice(int price) {
        this.price = price;
    }

    @Override
    public String toString() {
        return "Car{" +
                "brand='" + brand + '\'' +
                ", price=" + price +
                '}';
    }
}
import com.newpractice.boot.bean.Car;
import org.springframework.beans.factory.annotation.Autowired;
import org.springframework.web.bind.annotation.RequestMapping;
import org.springframework.web.bind.annotation.RestController;

//@ResponseBody  //会以字符串方式返回,直接表示写给浏览器,而不是跳转到页面
//@Controller

@RestController
public class HelloController {

    @Autowired  //容器注入
    Car car;

    @RequestMapping("/car")
    public Car car() {
        return car;
    }

    @RequestMapping("/hello")       //映射请求-hello
    public String handle01(){
        return "hello springboot2";
    }
}
server.port=8888			/*properties文件*/
mycar.brand=MAXI
mycar.price=10
ps:另一种方法
@Configuration
@EnableConfigurationProperties(Car.class)		//相比前面的方法多的注解	1.开启Car配置绑定功能 2.把Car这个组件自动配置到容器中,也就是相当于不用写Component注解了(如下),这样的好处就是在引用别人的类的时候,不需要增加一个Component注解
public class MyConfig {

}
//@Component		相比与前面的方法,少了这个注解,也就是没强调是springboot的组件
@ConfigurationProperties(prefix = "mycar")
public class Car {

}
springboot应用应该如何编写

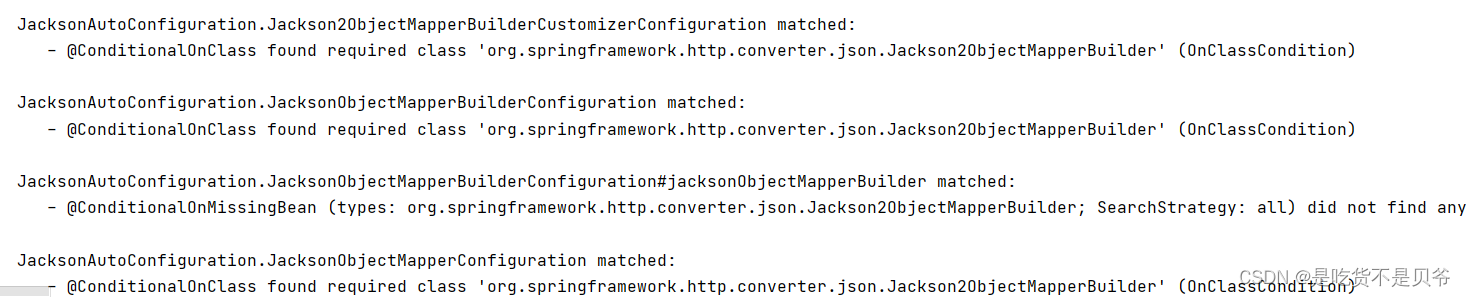
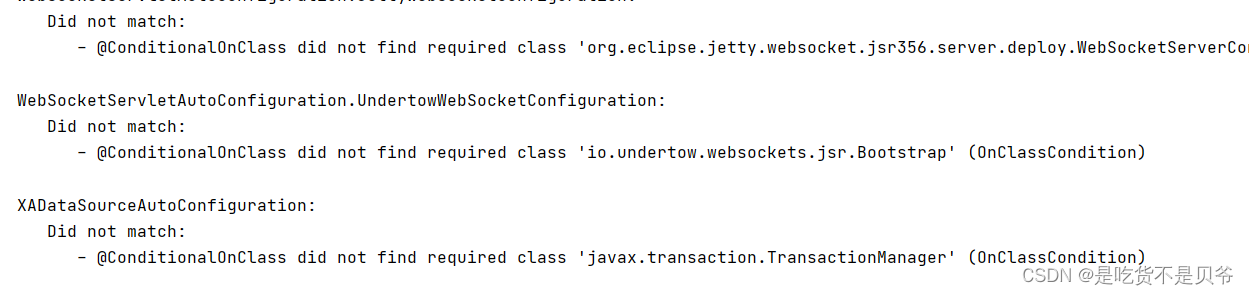
debug=true
properties里面的这个代码可以开启debug模式,在console可以看到哪些类没开启使用,哪些使用了(使用具备了哪些条件)
Lombok
简化javaBean的创建,比如一些构造方法以及toString方法
spring-boot-starter-parent
->spring-boot-dependencies
这里面搜索Lombok(ctrl+F),查看版本号
然后再下一条搜索
<dependency>
  <groupId>org.projectlombok</groupId>
  <artifactId>lombok</artifactId>
  <version>1.18.12</version>
</dependency>
然后在相应的Bean类加注解 @Data(setter和getter、toString)、@ToString(toString方法)、@AllArgsConstructor(有参构造)、@NoArgsConstructor(无参构造)、@EqualsAndHashCode(Equals和HashCode方法),这样就只需要输入相应的属性值。但是,很多人说这个在去实习工作的时候一般不允许使用,先看看吧,也不难,到时候用到看看就可以
@Data
@ToString		//这里不加也可以,因为有@Data了
//@Component
@EqualsAndHashCode
@AllArgsConstructor
@NoArgsConstructor
@ConfigurationProperties(prefix = "mycar")
public class Car {
    private String brand;
    private int price;
}
用这个的缺点就是,你用了,别人没用就会报错。
@Slf4j
@Slf4j
@RestController
public class HelloController {

    @Autowired  //容器注入
    Car car;

    @RequestMapping("/car")
    public Car car() {
        return car;
    }

    @RequestMapping("/hello")       //映射请求-hello
    public String handle01(){
        log.info("滴滴滴...");
        return "hello springboot2";
    }
}
这就是日志记录器,就不用sout了,可以在运行的时候显示日志信息。

dev-tools
<dependency>
    <groupId>org.springframework.boot</groupId>
    <artifactId>spring-boot-devtools</artifactId>
    <optional>true</optional>
</dependency>
ctrl+F9 热部署,其实就是restart,如果要非restart热部署,就得用付费的。
如果是静态页面也不会看到重启过程
事实上,不算热更新,而是快速重启一下
Spring Initalilizr(重要)项目初始化向导
创建项目时候有个sprng initializr,就是可以快速创建项目,里面有自己选的功能依赖,不需要自己写。
src->resources->static(静态资源),templates(页面)
yaml
在运行的时候注意把关乎数据库的注掉,不然要配置,而且https的话网址会报错。
import com.example.initial.bean.Car;
import org.springframework.beans.factory.annotation.Autowired;
import org.springframework.web.bind.annotation.RequestMapping;
import org.springframework.web.bind.annotation.RestController;

@RestController
public class HellowController {
    @Autowired
    Car car;

    @RequestMapping("/car")
    public Car car() {
        return car;
    }
}
import lombok.Data;
import org.springframework.boot.context.properties.ConfigurationProperties;
import org.springframework.stereotype.Component;

import java.util.List;
import java.util.Map;
import java.util.Set;

@Data
@Component
@ConfigurationProperties(prefix = "car")
public class Car {
    private String userName;
    private int age;
    private int price;
    private String brand;
    private List<String> interests;
    private Map<String,Integer> score;
    private Map<String, Set<ComponentAt>> allComponents;
}
import lombok.Data;

@Data
public class ComponentAt {
    private String name;
    private int usedYear;
    private String wrong;
}
car:
  userName: zhangsan \n 李四    #单引号会将n作为字符串输出,双引号会将\n作为换行输出,双引号不会转义,单引号会转义
  age: 18
  brand: bench
  price: 0
# interests: [篮球,足球,排球,羽毛球]
  interests:
    - 篮球
    - 足球
    - 排球
    - 羽毛球
# score:
#    english: 80
#    math: 40
#    chinese: 20
  score: {english:80,math:40,chinese:20}    #这里不需要有空格,参照的是
  allComponents:
    Components:
      - name: 螺丝
        usedYear: 30
        wrong: middle
      - {name: 螺母,usedYear: 20,wrong: low}    #这里要有空格
annotation processor
<dependency>
	<groupId>org.springframework.boot</groupId>
	<artifactId>spring-boot-configuration-processor</artifactId>
	<optional>true</optional>
</dependency>
这个在使用yml的时候就有提示了
注意这样的话yml里的-n表示的就是N,因此也是对的
虽然教程说要使用相应的依赖信息将configuration-processor在打包过程中排除,但是官方文档已经没了,试了一下,发现变成默认不将它打包进去。
web场景
静态资源规则与定制化
 这里面的public,resources,static以及MTA-INF.resources为静态目录
要访问只需要项目根路径+静态资源名即可访问.
原理:静态映射/**。
请求进来,先去找Controller看能不能处理。不能处理的所有请求将都交给静态资源处理。静态资源也都找不到就404.
静态资源访问前缀:默认为无前缀
在yml里输入前缀信息,从而可以实现某些时候过滤静态资源的目的。
spring:
  mvc:
    static-path-pattern: /res/**	#这里的**是指静态资源名,如图片。xx.jpg,会导致welcome page,favicon功能失效
webjar
https://www.webjars.org/
有一些常用的web的jar包
访问地址为根目录+webjars/**…
后面的地址要按照依赖里面的包路径。
welcome与favicon功能
静态资源路径下 index.html
可以配置静态资源路径(事实上,这个在最新的springboot已经不用了,被淘汰了)
但是不可以配置静态资源的访问前缀。否则导致index.html不能默认访问。
静态资源原理
SpringBoot启动默认加载 xxxAutoConfiguration类(自动配置类)
SpringMVC功能的自动配置类WebMvcAutoConfiguration,生效
@org.springframework.context.annotation.Configuration(proxyBeanMethods = false)
@org.springframework.boot.autoconfigure.condition.ConditionalOnWebApplication(type = org.springframework.boot.autoconfigure.condition.ConditionalOnWebApplication.Type.SERVLET)
@org.springframework.boot.autoconfigure.condition.ConditionalOnClass({javax.servlet.Servlet.class, org.springframework.web.servlet.DispatcherServlet.class, org.springframework.web.servlet.config.annotation.WebMvcConfigurer.class})
@org.springframework.boot.autoconfigure.condition.ConditionalOnMissingBean({org.springframework.web.servlet.config.annotation.WebMvcConfigurationSupport.class})
@org.springframework.boot.autoconfigure.AutoConfigureOrder(-2147483638)
@org.springframework.boot.autoconfigure.AutoConfigureAfter({org.springframework.boot.autoconfigure.web.servlet.DispatcherServletAutoConfiguration.class, org.springframework.boot.autoconfigure.task.TaskExecutionAutoConfiguration.class, org.springframework.boot.autoconfigure.validation.ValidationAutoConfiguration.class})
public class WebMvcAutoConfiguration {
@org.springframework.context.annotation.Configuration(proxyBeanMethods = false)
@org.springframework.context.annotation.Import({org.springframework.boot.autoconfigure.web.servlet.WebMvcAutoConfiguration.EnableWebMvcConfiguration.class})
@org.springframework.boot.context.properties.EnableConfigurationProperties({org.springframework.boot.autoconfigure.web.servlet.WebMvcProperties.class, org.springframework.boot.autoconfigure.web.WebProperties.class})
@org.springframework.core.annotation.Order(0)
public static class WebMvcAutoConfigurationAdapter implements org.springframework.web.servlet.config.annotation.WebMvcConfigurer, org.springframework.web.context.ServletContextAware {
配置文件的相关属性和xxx进行了绑定。WebMvcProperties和spring.mvc绑定
扩展知识:配置类只有一个有参构造器
//有参构造器所有的参数的值都会从容器中确定
public static class WebMvcAutoConfigurationAdapter implements org.springframework.web.servlet.config.annotation.WebMvcConfigurer, org.springframework.web.context.ServletContextAware {
        private static final org.apache.commons.logging.Log logger;
        private final org.springframework.boot.autoconfigure.web.WebProperties.Resources resourceProperties;
        private final org.springframework.boot.autoconfigure.web.servlet.WebMvcProperties mvcProperties;
        private final org.springframework.beans.factory.ListableBeanFactory beanFactory;
        private final org.springframework.beans.factory.ObjectProvider<org.springframework.boot.autoconfigure.http.HttpMessageConverters> messageConvertersProvider;
        private final org.springframework.beans.factory.ObjectProvider<org.springframework.boot.autoconfigure.web.servlet.DispatcherServletPath> dispatcherServletPath;
        private final org.springframework.beans.factory.ObjectProvider<org.springframework.boot.web.servlet.ServletRegistrationBean<?>> servletRegistrations;
        private final org.springframework.boot.autoconfigure.web.servlet.WebMvcAutoConfiguration.ResourceHandlerRegistrationCustomizer resourceHandlerRegistrationCustomizer;
        private javax.servlet.ServletContext servletContext;
resources:
	add-mappings: false  //禁用所有静态资源


 被折叠的 条评论
为什么被折叠?
被折叠的 条评论
为什么被折叠?
 到【灌水乐园】发言


