


前言:这是在慕课网上学习剑指Java面试-Offer直通车时所做的笔记,主要供本人复习之用.
目录
4.2 使用Thread类的join()阻塞当前线程以等待子线程处理完毕
4.3 通过Callable接口实现:通过FutureTask Or 线程池获取
7.1 锁池(EntryList)和等待池(WaitSet)
第一章 进程和线程的区别
1.1 进程和线程的由来

1.2 进程与线程的区别
进程是资源分配的最小单位,线程是cpu调度的最小单位.
进程是资源分配的基本单位,所有与进程有关的资源都记录在进程控制块PCB中以表示进程拥有这些资源或者正在使用它们,进程也是抢占处理机的调度单位,它拥有完整的虚拟内存地址空间,当进程发生调度时,不同的进程拥有不同的地址空间,而同一进程内的不同线程共享同一地址空间.与进程相对应,线程与资源分配无关,它属于某一个进程,并与进程内的其它线程共享进程的资源

线程只由堆栈寄存器,程序计数器和TCB组成.寄存器用来存储线程内的局部变量,但不能存储其它线程的相关变量,通常一个进程中可以包含若干个线程,它们可以利用进程中的资源.

总结:
对一些要同时运行,又要共享某些变量的并发操作,只能用线程不能用进程,独立的线程有一个程序运行的入口,顺序执行序列和程序运行的出口,但是线程不能独立运行,必须依附于某个应用程序当中,由应用程序提供对多个线程的执行控制.

1.3 Java进程和线程的关系
java作为与平台无关的编程语言,必然会对操作系统提供的功能进一步封装成与平台无关的接口供程序员使用,进程与线程作为系统核心概念的一部分,无疑也是如此.
每运行一个java程序会产生一个java进程,每个java进程可能包含一个或者多个线程.
每个java进程对应一个JVM实例,每个JVM实例唯一对应一个堆,每个线程都有自己私有的栈,多个线程共享JVM里的堆.实际上进程类似于投资者,它们手握资源,而真正拿资源去干活的是线程.
java采用的是单线程编程模型,即自己的程序中如果没有主动创建线程,程序会自动创建一个线程,通常称为主线程.因此,在进行ui编程时,要注意将耗时的操作放在子线程中进程以避免阻塞主线程.
当java程序启动时,主线程立刻运行,主线程的重要性体现在两个方面,第一个是它是产生其它子线程的线程,第二个是它通常需要最后完成执行.
1.4 证明java程序存在主线程
补充:一个程序是一个可执行的文件,一个进程则是执行中程序的实例.
public class CurrentThreadDemo {
    public static void main(String[] args) {
        System.out.println("Current Thread: "+Thread.currentThread().getName());
    }
}
输出结果:Current Thread: main,表明是有主线程的.
既然java采用的是单线程编程模型,是不是意味着JVM虚拟机也是单线程呢,值得注意的是虽然只有一个线程来执行任务,并不代表JVM中只有一个线程,JVM实例在创建的时候同时会创建很多其它的线程,比如gc.所以JVM是多线程,由于java线程是真正干活的人,下面我们主要是分析java的线程,进程为辅.
第二章 Thread中start和run方法的区别
2.1 实际现象
运行下面的main方法
public class ThreadTest {
    private static void attack(){
        System.out.println("Fight");
        System.out.println("Current Thread: "+Thread.currentThread().getName());
    }
    public static void main(String[] args) {
        Thread t = new Thread(){
            public void run () {
                attack();
            }
        };
        System.out.println("Current Thread: "+Thread.currentThread().getName());
        t.run();
    }
}
输出为:
Current Thread: main
Fight
Current Thread: main
将t.run()改为t.start(),输出为:
Current Thread: main
Fight
Current Thread: Thread-0
我们发现调用run会延用主线程来执行方法,调用start则会用一个非main的线程来执行方法.
2.2 源码分析
点进start,发现如下源码,点击start0,发现其是一个native方法.
public synchronized void start() {
        if (threadStatus != 0)
            throw new IllegalThreadStateException();
        group.add(this);

        boolean started = false;
        try {
            start0();
            started = true;
        } finally {
            try {
                if (!started) {
                    group.threadStartFailed(this);
                }
            } catch (Throwable ignore) {

            }
        }
    }

private native void start0();
native会调用外部非java的源码,我们可以去网站上去查询.
打开源码图1,我们发现的是start0调用的是 JVM_StartThread方法.

此方法引自jvm.h,我们进入jvm.h,找到JVM_StartThread方法,其中有源码如图2所示.向方法中传入了thread_entry参数.

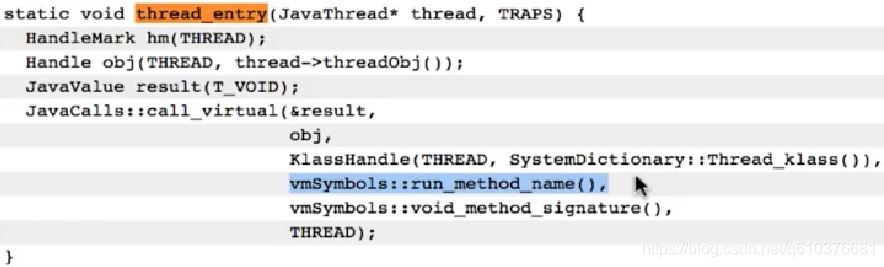
打开thread_entry如图3所示,发现其call_virtual虚拟机,并且传入了run_method_name,也就是说其最后new一个线程,并用线程去执行run方法中的内容.
总结:


第三章 Thread和Runnable是什么关系
先回归本质,Thread是一个类,Runnable是一个接口.
我们可以打开其源码,发现Thread类实现了Runnable接口,进入Runnable接口发现其中只有一个抽象的run方法,也就说明了这个接口并不具备多线程的特性,是依赖Thread中的start的方法去创建一个子线程,再在子线程中调用一个thread实现好了的run方法去执行相应的业务逻辑.才能让类具备多线程的特性.
public
class Thread implements Runnable {
    /* Make sure registerNatives is the first thing <clinit> does. */
    private static native void registerNatives();
    static {
        registerNatives();
    }
...
}
@FunctionalInterface
public interface Runnable {
public abstract void run();
}3.1 使用Thread实现多线程
public class MyThread extends Thread {
    private String name;
    public MyThread(String name){
        this.name = name;
    }
    @Override
    public void run(){
        for (int i =0;i<10;i++){
            System.out.println("Thread start: "+this.name+" ,i="+i);
        }
    }
}
public class ThreadDemo {
    public static void main(String[] args) {
        MyThread mt1 = new MyThread("Thread1");
        MyThread mt2 = new MyThread("Thread2");
        MyThread mt3 = new MyThread("Thread3");
        mt1.start();
        mt2.start();
        mt3.start();
    }
}
输出:
Thread start: Thread1 ,i=0
Thread start: Thread3 ,i=0
Thread start: Thread2 ,i=0
Thread start: Thread3 ,i=1
Thread start: Thread1 ,i=1
Thread start: Thread3 ,i=2
Thread start: Thread2 ,i=1
Thread start: Thread3 ,i=3
Thread start: Thread1 ,i=2
Thread start: Thread3 ,i=4
Thread start: Thread2 ,i=2
Thread start: Thread3 ,i=5
Thread start: Thread1 ,i=3
....省略
3.2 使用Runnable实现多线程
由于Runnable里面没有start方法,只有Thread里面才有,而我们的Thread里面是有一个构造函数的,如代码1所示.构造函数里面可以传入Runnable的子类实例的,也就是说我们可以通过Thread类启动Runnable实现多线程.
//代码1
public Thread(Runnable target) {
        init(null, target, "Thread-" + nextThreadNum(), 0);
    }
MyRunnable:
public class MyRunnable implements Runnable {
    private String name;
    public MyRunnable(String name){
        this.name = name;
    }
    @Override
    public void run() {
        for (int i =0;i<10;i++){
            System.out.println("Thread start: "+this.name+" ,i="+i);
        }
    }
}
因为MyRunnable中并没有start方法,所以要用Tread来进行实例化.
RunnableDemo:
public class RunnableDemo {
    public static void main(String[] args) {
        MyRunnable mr1 = new MyRunnable("Runnable1");
        MyRunnable mr2 = new MyRunnable("Runnable2");
        MyRunnable mr3 = new MyRunnable("Runnable3");
        Thread t1 = new Thread(mr1);
        Thread t2 = new Thread(mr2);
        Thread t3 = new Thread(mr3);
        t1.start();
        t2.start();
        t3.start();
    }
}
输出:
Thread start: Runnable1 ,i=0
Thread start: Runnable3 ,i=0
Thread start: Runnable2 ,i=0
Thread start: Runnable3 ,i=1
Thread start: Runnable1 ,i=1
Thread start: Runnable3 ,i=2
...省略
可以看到页成功实现了多线程.
总结:

第四章 如何处理线程的返回值
因为有的程序的执行是依赖于子任务的返回值的,当子任务交给子线程去完成时,是需要获取到它们的返回值的,实现子线程返回值的方法有三种
4.1 主线程等待法
运行如下代码,
public class CycleWait implements Runnable {
    private String value;
    @Override
    public void run() {
        try {
            Thread.currentThread().sleep(5000);
        }catch (Exception e){
            e.printStackTrace();
        }
        value = "we hava data now";
    }
    public static void main(String[] args) {
        CycleWait cycleWait = new CycleWait();
        Thread t = new Thread(cycleWait);
        t.start();
        System.out.println("value : "+cycleWait.value);
    }
}
输出为:value : null
面对这样的情况,我们可以让主线程等待.当返回值为空时就进入到了死循环中,一直等到有返回值才停止.
public class CycleWait implements Runnable {
    private String value;
    @Override
    public void run() {
        try {
            Thread.currentThread().sleep(5000);
        }catch (Exception e){
            e.printStackTrace();
        }
        value = "we hava data now";
    }
    public static void main(String[] args) throws InterruptedException {
        CycleWait cycleWait = new CycleWait();
        Thread t = new Thread(cycleWait);
        t.start();
        while (cycleWait.value==null){
            Thread.currentThread().sleep(100);
        }
        System.out.println("value : "+cycleWait.value);
    }
}
运行结果:5s后得到返回value : we hava data now
4.2 使用Thread类的join()阻塞当前线程以等待子线程处理完毕
主线程等待法实现起来比较简单,缺点是要自己实现循环等待的逻辑,当需要等待的变量一多,代码便会显得异常的臃肿,更关键的是需要循环多久是不确定的,无法做到精准的控制,这里逻辑是如果没有值就等待100ms,如果这100ms内有值我们是没有办法的,所以我们可以使用第二种也就是标题上的方法.
Thread中,join()方法的作用让父线程等待子线程完成后,才能继续向下运行。
public class CycleWait implements Runnable {
    private String value;
    @Override
    public void run() {
        try {
            Thread.currentThread().sleep(5000);
        }catch (Exception e){
            e.printStackTrace();
        }
        value = "we hava data now";
    }
    public static void main(String[] args) throws InterruptedException {
        CycleWait cycleWait = new CycleWait();
        Thread t = new Thread(cycleWait);
        t.start();
        t.join();
        System.out.println("value : "+cycleWait.value);
    }
}
4.3 通过Callable接口实现:通过FutureTask Or 线程池获取
join方法虽然能做到比主线程等待法更精准的控制,实现起来更简单,但缺点是其力度不够细,比如3.1中的代码块,我们想让mt1线程的run方法中的i变量值为5的时候执行mt2线程,这就不行,所以我们可以第三种也就是题目中的方法.
在jdk5之前,线程是没有返回值的,为了有返回值的方法颇费周折或者想别的不是多线程的方法绕过,现在java有了可返回值的任务,即实现了Callable接口的任务,执行Callable任务后可以获得一个Future对象,在该对象上调用get就可以获取到Callable任务返回的Object了,关于通过Callable接口实现的方式获取线程的返回值,我们可以通过以下两种方式实现,第一种是FutureTask,第二种是线程池获取.
Callable的源码:
@FunctionalInterface
public interface Callable<V> {
    V call() throws Exception;
}
4.3.1 FutureTask返回值
MyCallable:
public class MyCallable implements Callable<String> {

    @Override
    public String call() throws Exception {
        String value = "test";
        System.out.println("Ready to work");
        Thread.currentThread().sleep(5000);
        System.out.println("task done");
        return value;
    }
}
写demo之前先来看一下源码解析.
FutureTask源码解析:
可以看到FutureTask间接实现了Runnable接口,表明可以被Thread实例化.
public class FutureTask<V> implements RunnableFuture<V> {
...省略
}
public interface RunnableFuture<V> extends Runnable, Future<V> {
void run();
}构造函数:
public FutureTask(Callable<V> callable) {
if (callable == null)
throw new NullPointerException();
this.callable = callable;
this.state = NEW; // ensure visibility of callable
}isDone用来判断传给它的Callable的实现类的call方法是否已经执行完成
public boolean isDone() {
return state != NEW;
}无参的get方法用来阻塞当前调用它的线程
public V get() throws InterruptedException, ExecutionException {
int s = state;
if (s <= COMPLETING)
s = awaitDone(false, 0L);
return report(s);
}有参的get方法,会设置一个超时时间如果在规定的时间内没有接收到call方法里的value就会抛出异常.
public V get(long timeout, TimeUnit unit)
throws InterruptedException, ExecutionException, TimeoutException {
if (unit == null)
throw new NullPointerException();
int s = state;
if (s <= COMPLETING &&
(s = awaitDone(true, unit.toNanos(timeout))) <= COMPLETING)
throw new TimeoutException();
return report(s);
}FutureTaskDemo:
public class FutureTaskDemo {
public static void main(String[] args) throws ExecutionException, InterruptedException {
FutureTask<String> task = new FutureTask<>(new MyCallable());
new Thread(task).start();
if(!task.isDone()){
System.out.println("task has not finished ,please wait!");
}
System.out.println("未被阻塞");
System.out.println("task return: "+task.get());
System.out.println("被阻塞");
}
}输出为:
task has not finished ,please wait!
未被阻塞
Ready to work
task done
task return: test
被阻塞4.3.2 线程池获取返回值
Future是一个接口,里面有上面提到的get,isDone等方法.FutureTask是实现了Future接口中的方法的.
public interface Future<V> {
...
}
public class FutureTask<V> implements RunnableFuture<V> {
...
}
public interface RunnableFuture<V> extends Runnable, Future<V> {
    void run();
}
ThreadPoolDemo
public class ThreadPoolDemo {
    public static void main(String[] args) {
    //创建线程池
    ExecutorService newCachedThreadPool = Executors.newCachedThreadPool();
    //提交任务
    Future<String> future = newCachedThreadPool.submit(new MyCallable());
    if(!future.isDone()){
        System.out.println("task has not finished ,please wait!");
    }
    System.out.println("未被阻塞");

    try {
        System.out.println("task return: "+future.get());
        System.out.println("被阻塞");
    } catch (InterruptedException e) {
        e.printStackTrace();
    } catch (ExecutionException e) {
        e.printStackTrace();
    } finally {
        newCachedThreadPool.shutdown();
    }
    }
}
使用线程池的好处:我们可以提交多个实现了Callable方法的类,去让线程池并发的处理结果.这样方便于我们做统一的管理.
补充:如何给run方法传参?
构造函数传参,成员变量传参,回调函数传参.
第五章 线程的状态
可以看到Thread中有一个枚举类,有线程的六个状态.
 public enum State {

        NEW,

        RUNNABLE,

        BLOCKED,

        WAITING,

        TIMED_WAITING,

        TERMINATED;
    }
5.1 新建(new)
线程创建后尚未启动,即新创建了一个线程对象,还没有调用start方法.该线程将会处于new的状态.
5.2 运行(Runnable)
包含Running和ready,处于此状态的线程可能正在运行或者等待cpu为它分配执行时间.
线程对象创建后,调用了对象的start方法后就处于Runnable状态了,由于该状态分为两个子状态Running和ready,处于ready状态的线程位于可运行线程之中,等待被线程调度选中获取cpu的使用权,等获取了cpu的使用权之后就变成了running状态.
5.3 无限等待(Waiting)
不会被分配CPU执行时间,需要显示被唤醒.

5.4 限期等待(Timed Waiting)
无需等待其它线程显式唤醒,在一定时间后会由系统自动唤醒.

5.5 阻塞(Blocked)
阻塞状态等待获取一个排它锁,这个事件将在另一个线程放弃这个锁的时候发生.与等待状态的区别,等待状态是等待一段时间或者有唤醒动作的时候发生,在线程等待进入同步区域的时候,线程将进入blocked状态,比如说当某个线程进入synchronized关键字修饰的方法或者代码块,即获取锁去执行的时候,其它想进入此方法或者代码块的线程就只能等着,它们状态就是blocked.
5.6 结束(Terminated)
已终止线程的状态,线程已经结束执行,当线程的run方法或者主线程的main方法完成时,我们就认为它终止了,这个线程对象也许是活的,但是它已经不是一个单独执行的线程,线程一旦终止了就不能再复生.在一个终止的线程上调用start方法,会抛出异常.
执行下面的代码,会发现报错,表明我们的对象虽然是活的,但是调用start也不能让线程重新取执行了.
public class ThreadTest {
    private static void attack(){
        System.out.println("Fight");
        System.out.println("Current Thread: "+Thread.currentThread().getName());
    }

    public static void main(String[] args) throws InterruptedException {
        Thread t = new Thread(){
            public void run () {
                attack();
            }
        };
        System.out.println("Current Thread: "+Thread.currentThread().getName());
        t.start();
        t.join();
        t.start();
    }
}
结果:
Current Thread: main
Fight
Current Thread: Thread-0
Exception in thread "main" java.lang.IllegalThreadStateException
	at java.lang.Thread.start(Thread.java:708)
	at com.interview.javabasic.thread.ThreadTest.main(ThreadTest.java:19)

Process finished with exit code 1
第六章 sleep和wait的区别
区别1: sleep是Thread类的方法,wait是Object类中定义的方法
Thread:
public static native void sleep(long millis) throws InterruptedException;Object:
可以看到无参的wait最终调用的也是有参的wait.有参的wait是native的
public final void wait() throws InterruptedException {
        wait(0);
    }
public final native void wait(long timeout) throws InterruptedException;
区别2: sleep()方法在任何地方都可以使用,wait()方法只能在synchronized方法或者synchronized块中使用.
区别3(最本质的区别):
Thread.sleep不会导致锁行为的改变,即如果当前线程是拥有锁的,Thread.sleep不会让线程释放锁,而只会主动让出cpu,让出cpu之后,cpu就能执行其它任务了,因此调用Thread.sleep不会影响锁的相关行为.
Object.wait不仅会让出CPU,还会释放已经占有的同步锁资源.以便其它正在等待该资源的线程得到该资源,进而取运行.
实例:
public class WaitSleepDemo {
    public static void main(String[] args) {
        final Object lock = new Object();
        new Thread(new Runnable() {
            @Override
            public void run() {
                System.out.println("thread A is waiting to get lock");
                synchronized (lock){
                    try {
                        System.out.println("thread A get lock");
                        Thread.sleep(20);
                        System.out.println("thread A do wait  method");
                        lock.wait(1000);
                        System.out.println("thread A is done");
                    } catch (InterruptedException e){
                        e.printStackTrace();
                    }

                }
            }
        }).start();
        try {
            Thread.sleep(10);
        } catch (InterruptedException e){
            e.printStackTrace();
        }
        new Thread(new Runnable() {
            @Override
            public void run() {
                System.out.println("thread B is waiting to get lock");
                synchronized (lock){
                    try {
                        System.out.println("thread B get lock");
                        System.out.println("thread B is sleeping 10 ms");
                        Thread.sleep(10);
                        System.out.println("thread B is done");
                    } catch (InterruptedException e){
                        e.printStackTrace();
                    }

                }
            }
        }).start();
    }
}
输出:
thread A is waiting to get lock
thread A get lock
thread B is waiting to get lock
thread A do wait  method
thread B get lock
thread B is sleeping 10 ms
thread B is done
thread A is done
解释:
先是Thread A执行到thread A is waiting to get lock,执行到了之后开始sleep.由于20ms是大于10ms的,所以我们的线程b就开始执行了,执行到thread B is waiting to get lock时候由于需要去获取lock的同步锁,此时同步锁已经被A获取了,因此B只能去等待,一旦A执行了wait之后我们发现B就紧接着去进行了,也就是B获取到了同步锁,A调用wait的时候释放掉了已经获取到的lock.同时也让出了cpu,让B有了执行的机会,B得到锁之后就会继续执行里面的逻辑.直到执行完成.执行完之后B释放锁,A获得锁然后继续去执行(A只要通过wait让出锁,就只能通过再次获得锁再运行,跟wait的时间没关系).
第七章 notify和nofityall
wait方法除了可以向上面那样设定时间来唤醒,还可以通过notify或者notifyall去唤醒,
例子:
我们调用lock.wait()使A陷入无限期等待,在B中通过notify与notifyall唤醒A.
public class WaitSleepDemo {
    public static void main(String[] args) {
        final Object lock = new Object();
        new Thread(new Runnable() {
            @Override
            public void run() {
                System.out.println("thread A is waiting to get lock");
                synchronized (lock){
                    try {
                        System.out.println("thread A get lock");
                        Thread.sleep(20);
                        System.out.println("thread A do wait  method");
                        lock.wait();
                        System.out.println("thread A is done");
                    } catch (InterruptedException e){
                        e.printStackTrace();
                    }

                }
            }
        }).start();
        try {
            Thread.sleep(10);
        } catch (InterruptedException e){
            e.printStackTrace();
        }
        new Thread(new Runnable() {
            @Override
            public void run() {
                System.out.println("thread B is waiting to get lock");
                synchronized (lock){
                    try {
                        System.out.println("thread B get lock");
                        System.out.println("thread B is sleeping 10 ms");
                        Thread.sleep(10);
                        System.out.println("thread B is done");
                        lock.notify();
                        //lock.notifyAll();
                    } catch (InterruptedException e){
                        e.printStackTrace();
                    }

                }
            }
        }).start();
    }
}
7.1 锁池(EntryList)和等待池(WaitSet)
要了解它们的区别首先要了解锁池与等待池
对于java虚拟机中运行程序的每个对象来说两个池,锁池和等待池,这两个池又与object,基类的wait,notify,notifyAll,以及synchronized相关.
锁池:

等待池:

如果很多线程同时竞争锁,那么优先级高的线程竞争到锁的概率会更大,假若某线程没有竞争到该对象锁,它就会留在锁池中,不会进入到等待池中.竞争到对象锁的线程会继续向下去执行.直到执行完synchronized代码块或者遇到了异常才会释放掉对象锁.所以说锁池和等待池都是针对对象而言的.
7.2 notify和notifyAll的区别

7.3 实例
package com.interview.javabasic.thread;

public class NotificationDemo {
    private volatile boolean go = false;

    public static void main(String args[]) throws InterruptedException {
        final NotificationDemo test = new NotificationDemo();

        Runnable waitTask = new Runnable(){

            @Override
            public void run(){
                try {
                    test.shouldGo();
                } catch (InterruptedException e) {
                    e.printStackTrace();
                }
                System.out.println(Thread.currentThread().getName() + " finished Execution");
            }
        };

        Runnable notifyTask = new Runnable(){

            @Override
            public void run(){
                test.go();
                System.out.println(Thread.currentThread().getName() + " finished Execution");
            }
        };

        Thread t1 = new Thread(waitTask, "WT1"); //will wait
        Thread t2 = new Thread(waitTask, "WT2"); //will wait
        Thread t3 = new Thread(waitTask, "WT3"); //will wait
        Thread t4 = new Thread(notifyTask,"NT1"); //will notify

        //starting all waiting thread
        t1.start();
        t2.start();
        t3.start();

        //pause to ensure all waiting thread started successfully
        Thread.sleep(200);

        //starting notifying thread
        t4.start();

    }
    /*
     * wait and notify can only be called from synchronized method or bock
     */
    private synchronized void shouldGo() throws InterruptedException {
        while(go != true){
            System.out.println(Thread.currentThread()
                    + " is going to wait on this object");
            wait(); //release lock and reacquires on wakeup
            System.out.println(Thread.currentThread() + " is woken up");
        }
        go = false; //resetting condition
    }

    /*
     * both shouldGo() and go() are locked on current object referenced by "this" keyword
     */
    private synchronized void go() {
        while (go == false){
            System.out.println(Thread.currentThread()
                    + " is going to notify all or one thread waiting on this object");

            go = true; //making condition true for waiting thread
            //notify(); // only one out of three waiting thread WT1, WT2,WT3 will woke up
            notifyAll(); // all waiting thread  WT1, WT2,WT3 will woke up
        }

    }
}
当为notify()时输出为:
Thread[WT1,5,main] is going to wait on this object
Thread[WT3,5,main] is going to wait on this object
Thread[WT2,5,main] is going to wait on this object
Thread[NT1,5,main] is going to notify all or one thread waiting on this object
NT1 finished Execution
Thread[WT1,5,main] is woken up
WT1 finished Execution
//手动停止
当为notifyAll()时输出为:
Thread[WT3,5,main] is going to wait on this object
Thread[WT2,5,main] is going to wait on this object
Thread[NT1,5,main] is going to notify all or one thread waiting on this object
NT1 finished Execution
Thread[WT2,5,main] is woken up
Thread[WT3,5,main] is woken up
Thread[WT3,5,main] is going to wait on this object
WT2 finished Execution
Thread[WT1,5,main] is woken up
Thread[WT1,5,main] is going to wait on this object
//手动停止
第八章 yield函数

yield是一种hint,yield对锁不会有影响.
实例:
使用线程循环输出,如果每次运行到5发现都会换另一个线程,表明yield是强制的,否则不是.
public class YieldDemo {
    public static void main(String[] args) {
        Runnable yieldTask = new Runnable() {
            @Override
            public void run() {
                for (int i = 1; i <= 10; i++) {
                    System.out.println(Thread.currentThread().getName() + i);
                    if (i == 5) {
                        Thread.yield();
                    }
                }
            }
        };
        Thread t1 = new Thread(yieldTask, "A");
        Thread t2 = new Thread(yieldTask, "B");
        t1.start();
        t2.start();
    }

}
结果比较多,就不列举了,总之多次执行结果说明yield不会强制转换线程,只是一个暗示.
第九章 interrupt函数
如何中断线程,以前通过调用线程实例的stop()方法停止线程,而stop方法是可以由一个线程去停止另外一个线程,这种方法太过暴力而且是不安全的,比如说线程A调用线程B的stop方法,调用这个方法时线程A其实并不知道线程B的具体情况,这种突然间的停止会导致线程B的一些清理工作无法完成.还有就是执行stop()方法后线程B会立即释放锁,这可能会引发数据不同步的问题.基于以上情况stop()被抛弃了,基于以上情况的还有线程实例的suspend()与resume方法都被抛弃了.
目前使用的方法是interrupt,通知线程应该中断了,它的作用其实也不是中断线程,而是与yield类似通过通知线程应该被中断了,它也是一种hint,到底是中断还是继续进行应该由线程自己处理.
具体来说,当对一个线程使用interrupt方法时:

因此需要被调用的线程配合中断:
1.在正常运行任务时,经常检查本线程的中断标志位,如果被设置了中断标志就自行停止线程.
2.在调用阻塞方法的时候,正确处理InterruptException的异常,例如在catch异常后结束线程.
实例:
public class InterruptDemo {
    public static void main(String[] args) throws InterruptedException {
        Runnable interruptTask = new Runnable() {
            @Override
            public void run() {
                int i = 0;
                try {
                    //在正常运行任务时,经常检查本线程的中断标志位,如果被设置了中断标志就自行停止线程
                    while (!Thread.currentThread().isInterrupted()) {
                        Thread.sleep(100); // 休眠100ms
                        i++;
                        System.out.println(Thread.currentThread().getName() + " (" + Thread.currentThread().getState() + ") loop " + i);
                    }
                } catch (InterruptedException e) {
                    //在调用阻塞方法时正确处理InterruptedException异常。(例如,catch异常后就结束线程。)
                    System.out.println(Thread.currentThread().getName() + " (" + Thread.currentThread().getState() + ") catch InterruptedException.");
                }
            }
        };
        Thread t1 = new Thread(interruptTask, "t1");
        System.out.println(t1.getName() +" ("+t1.getState()+") is new.");

        t1.start();                      // 启动“线程t1”
        System.out.println(t1.getName() +" ("+t1.getState()+") is started.");

        // 主线程休眠300ms,然后主线程给t1发“中断”指令。
        Thread.sleep(300);
        t1.interrupt();
        System.out.println(t1.getName() +" ("+t1.getState()+") is interrupted.");

        // 主线程休眠300ms,然后查看t1的状态。
        Thread.sleep(300);
        System.out.println(t1.getName() +" ("+t1.getState()+") is interrupted now.");
    }
}
输出为如下,出现异常时因为线程正在sleep时被interrupt了,也可能不出现异常.
t1 (NEW) is new.
t1 (RUNNABLE) is started.
t1 (RUNNABLE) loop 1
t1 (RUNNABLE) loop 2
t1 (TIMED_WAITING) is interrupted.
t1 (RUNNABLE) catch InterruptedException.
t1 (TERMINATED) is interrupted now.


 523
523


 被折叠的 条评论
为什么被折叠?
被折叠的 条评论
为什么被折叠?
 到【灌水乐园】发言


