


最近兼容到2.2甚至以下的版本,使用到了ActionBar,查看android官方解释看起来是个很简单的问题,不过本人走了点弯路,本文总结了一些遇到的问题与大家共勉。当然了你可以继续使用Android开源项目ActionBarSherlock,来实现兼容方式,不过既然Android官方有兼容包推出,那最好使用官方的嘛。首先把你的SDK升级到API-18,确认你的SDK中extras目录V7子目录有appcompat文件夹。
Android官网具体使用步骤(针对于Eclipse):
Create a library project based on the support library code:
- Make sure you have downloaded the Android Support Library using the SDK Manager.
- Create a library project and ensure the required JAR files are included in the project's build path:
- Select File > Import.
- Select Existing Android Code Into Workspace and click Next.
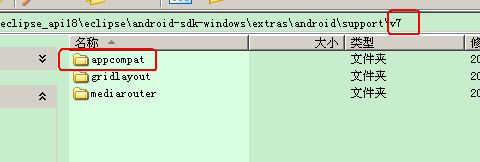
- Browse to the SDK installation directory and then to the Support Library folder. For example, if you are adding the
appcompatproject, browse to<sdk>/extras/android/support/v7/appcompat/. - Click Finish to import the project. For the v7 appcompat project, you should now see a new project titled android-support-v7-appcompat.
- In the new library project, expand the
libs/folder, right-click each.jarfile and select Build Path > Add to Build Path. For example, when creating the the v7 appcompat project, add both theandroid-support-v4.jarandandroid-support-v7-appcompat.jarfiles to the build path. - Right-click the project and select Build Path > Configure Build Path.
- In the Order and Export tab, check the
.jarfiles you just added to the build path, so they are available to projects that depend on this library project. For example, theappcompatproject requires you to export both theandroid-support-v4.jarandandroid-support-v7-appcompat.jarfiles. - Uncheck Android Dependencies.
- Click OK to complete the changes.
You now have a library project for your selected Support Library that you can use with one or more application projects.
Add the library to your application project:
- In the Project Explorer, right-click your project and select Properties.
- In the Library pane, click Add.
- Select the library project and click OK. For example, the
appcompatproject should be listed as android-support-v7-appcompat. - In the properties window, click OK.
Once your project is set up with the support library, here's how to add the action bar:
- Create your activity by extending
ActionBarActivity. - Use (or extend) one of the
Theme.AppCompatthemes for your activity. For example:<span class="tag" style="color: rgb(0, 0, 136);"><activity</span><span class="pln" style="color: rgb(0, 0, 0);"> </span><span class="atn" style="color: rgb(136, 34, 136);">android:theme</span><span class="pun" style="color: rgb(102, 102, 0);">=</span><span class="atv" style="color: rgb(0, 136, 0);">"@style/Theme.AppCompat.Light"</span><span class="pln" style="color: rgb(0, 0, 0);"> ... </span><span class="tag" style="color: rgb(0, 0, 136);">></span>
Now your activity includes the action bar when running on Android 2.1 (API level 7) or higher.
On API level 11 or higher
The action bar is included in all activities that use the Theme.Holo theme (or one of its descendants), which is the default theme when either the targetSdkVersion or minSdkVersion attribute is set to "11" or higher. If you don't want the action bar for an activity, set the activity theme to Theme.Holo.NoActionBar.
官方解释就这么多,但是大家难免走一些弯路:
1、我直接将android-support-v4.jar android-support-v7-appcompat.jar,放入到我的目标工程不就完事了嘛?!还整一堆步骤那么麻烦,那你就错了,看起来编译没错,实际运行的时候你会越到如下错误:
java.lang.RuntimeException: Unable to start activity ComponentInfo{jh.com.testandroidlayout/jh.com.testandroidlayout.navigator.NaviViewPagerActivity}: java.lang.IllegalStateException: You need to use a Theme.AppCompat theme (or descendant) with this activity.
这个时候你仔细看看,发现原来继承自ActionBarActivity的类必须指定固定的集中Theme风格,而这些Theme风格是需要导入V7中的appcompat LIB库工程,编译后再引用才能引用使用。
黑色
android:theme="@style/Theme.AppCompat"
或浅色
android:theme="@style/Theme.AppCompat.Light"

但是我的应用工程在执行如下步骤后apply:
- In the Project Explorer, right-click your project and select Properties.
- In the Library pane, click Add.
- Select the library project and click OK. For example, the
appcompatproject should be listed as android-support-v7-appcompat.

经过一番来回实验以后才发现原来需要将你的应用工程也要放在与android-support-v7-appcompat放在同一个workspace 中才可以。最后环境搭建成功,你可以尽情使用ActionBarActivity啦。
补充:
注意使用了 actionbaractivtiy,menu layout的布局使用的xml标签alpha,你看看你是不是正确
<item
android:id="@+id/menu_settings"
android:orderInCategory="100"
alpha:showAsAction="never"
android:title="settings"/>
同时记得引入res-auto
<menu xmlns:android="http://schemas.android.com/apk/res/android" xmlns:alpha="http://schemas.android.com/apk/res-auto">
参考:
http://snailz.diandian.com/post/2014-01-22/40060824622
http://blog.csdn.net/hkg1pek/article/details/9473265
http://blog.csdn.net/appte/article/details/11712591
http://blog.csdn.net/shuzui1985/article/details/20528305


 2528
2528

 被折叠的 条评论
为什么被折叠?
被折叠的 条评论
为什么被折叠?
 到【灌水乐园】发言


