


withContext
除了可以在 GlobalScope.launch {}、GlobalScope.async {} 创建协程时设置协程调度器,
与
async {...}.await()相比withContext的内存开销更低,因此对于使用async之后立即调用await的情况,应当优先使用withContext。
withTimeout
Kotlin 协程提供了 withTimeout 函数设置超时取消。如果运行超时,取消后会抛出 TimeoutCancellationException 异常。抛出异常的情况下回影响到其他协程,这时候可以使用 withTimeoutOrNull 函数,它会在超时的情况下返回 null 而不抛出异常。
runBlocking {
val result = withContext(coroutineContext) {
withTimeoutOrNull(500) {
delay(1000)
“hello”
}
}
println(result)
}
// 输出结果
hello
yield
如果想要解决上面示例中的问题可以使用 yield 函数。它的作用在于检查所在协程的状态,如果已经取消,则抛出取消异常予以响应。此外它还会尝试出让线程的执行权,给其他协程提供执行机会。
在上面示例中添加 yield 函数:
if (System.currentTimeMillis() >= nextPrintTime) {
yield()
println(“job: I’m sleeping ${i++} …”)
nextPrintTime += 500L
}
// 输出结果
job: I’m sleeping 0 …
job: I’m sleeping 1 …
job: I’m sleeping 2 …
main: I’m tired of waiting!
main: Now I can quit.
协程的作用域
协程作用域:协程作用域主要用于明确协程之间的父子关系,以及对于取消或者异常处理等方面的传播行为。
协程作用域包括以下三种:
-
顶级作用域:没有父协程的协程所在的作用域为顶级作用域。 -
协同作用域:协程中启动新的协程,新协程为所在协程的子协程,这种情况下子协程所在的作用域默认为协同作用域。此时子协程抛出的未捕获异常将传递给父协程处理,父协程同时也会被取消。 -
主从作用域:与协程作用域在协程的父子关系上一致,区别在于处于该作用域下的协程出现未捕获的异常时不会将异常向上传递给父协程。
父子协程间的关系:
-
父协程被取消,则所有子协程均被取消。
-
父协程需要等待子协程执行完毕之后才会最终进入完成状态,不管父协程自身的协程体是否已经执行完毕。
-
子协程会继承父协程的协程上下文元素,如果自身有相同
key的成员,则覆盖对应的key,覆盖的效果仅限自身范围内有效。
声明顶级作用域:GlobalScope.launch {}、runBlocking {}
声明协同作用域:coroutineScope {}
声明主从作用域:supervisorScope {}
coroutineScope {} 和 supervisorScope {} 是挂起函数所以它们只能在协程作用域中或挂起函数中调用。
coroutineScope {} 和 supervisorScope {} 的区别在于 SupervisorCoroutine 重写了 childCancelled() 函数使异常不会向父协程传递。
协程并发
通过上文的介绍可以了解到协程其实就是执行在线程上的代码片段,所以线程的并发处理都可以用在协程上,比如 synchorinzed、CAS 等。而协程本身也提供了两种方式处理并发:
-
Mutex:互斥锁; -
Semaphore:信号量。
Mutex
Mutex 类似于 synchorinzed,协程竞争时将协程包装为 LockWaiter 使用双向链表存储。Mutex 还提供了 withLock 扩展函数,以简化使用:
runBlocking {
val mutex = Mutex()
var counter = 0
repeat(10000) {
GlobalScope.launch {
mutex.withLock {
counter ++
}
}
}
Thread.sleep(500) //暂停一会儿等待所有协程执行结束
println(“The final count is $counter”)
}
Semaphore
Semaphore 用以限制访问特定资源的协程数量。
runBlocking {
val semaphore = Semaphore(1)
var counter = 0
repeat(10000) {
GlobalScope.launch {
semaphore.withPermit {
counter ++
}
}
}
Thread.sleep(500) //暂停一会儿等待所有协程执行结束
println(“The final count is $counter”)
}
注意:只有在
permits = 1时才和Mutex功能相同。
源码分析
suspend
我们来看 suspend 修饰函数和修饰 lambda 的区别。
挂起函数:
suspend fun suspendFun() {
}
编译成 java 代码如下:
@Nullable
public final Object suspendFun(@NotNull Continuation $completion) {
return Unit.INSTANCE;
}
可以看到挂起函数其实隐藏着一个 Continuation 协程实例参数,而这个参数其实就来源于协程体或者其他挂起函数,因此挂起函数只能在协程体内或其他函数内调用了。
suspend 修饰 lambda 表达式:
suspend {}
// 反编译结果如下
Function1 var2 = (Function1)(new Function1((Continuation)null) {
int label;
@Nullable
public final Object invokeSuspend(@NotNull Object $result) {
switch(this.label) {
case 0:
return Unit.INSTANCE;
default:
}
}
@NotNull
public final Continuation create(@NotNull Continuation completion) {
Function1 var2 = new (completion);
return var2;
}
public final Object invoke(Object var1) {
return (()this.create((Continuation)var1)).invokeSuspend(Unit.INSTANCE);
}
});
suspend lambda 实际会被编译成 SuspendLambda 的子类。suspendLambda 的继承关系如下图:
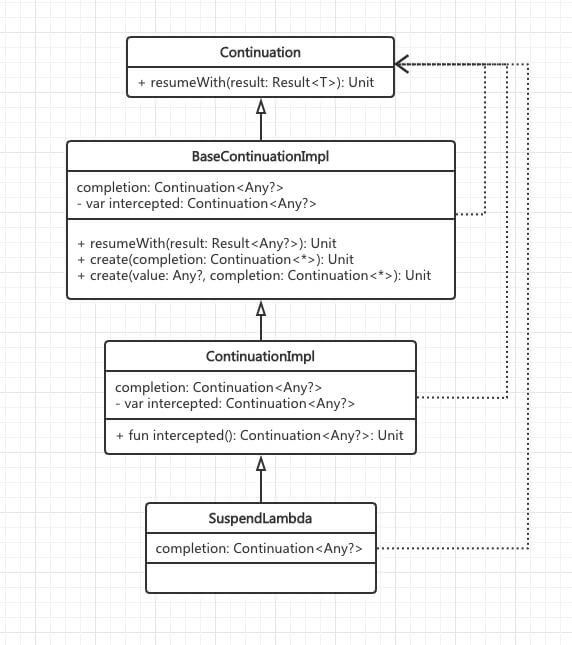
通过反编译的代码可以发现我们在协程体内编写的代码最终是在 invokeSuspend 函数内执行的。而在 BaseContinuationImpl 内实现了 Continuation 协程接口的 resumeWidth 函数,并在其内调用了 invokeSuspend 函数。
suspend 关键字的介绍先到这里,接下来我们看协程是如何创建并运行的。
协程是如何被创建的
文件地址
kotlin.coroutines.Continuation.kt。
Continuation.kt 文件基本属于协程的基础核心了,搞懂了它也就相当于搞懂了协程的基础原理。
-
协程接口的定义;
-
唤醒或启动协程的函数;
-
四种创建协程的函数;
-
帮助获取协程内的协程实例对象的函数。
首先是协程的接口声明,非常简单:
/**
- 协程接口,T 表示在最后一个挂起点恢复时的返回值类型
*/
public interface Continuation {
/**
- 协程上下文
*/
public val context: CoroutineContext
/**
- 这个函数的功能有很多,它可以启动协程,也可以恢复挂点,还可以作为最后一次挂起点恢复时输出协程的结果
*/
public fun resumeWith(result: Result)
}
协程接口声明之后 Continuation.kt 文件提供了两个调用 resumeWith 函数的函数:
public inline fun Continuation.resume(value: T): Unit =
resumeWith(Result.success(value))
public inline fun Continuation.resumeWithException(exception: Throwable): Unit =
resumeWith(Result.failure(exception))
这两个函数除了传参一成功一失败,它们的功能是一模一样的,都是直接调用了 resumeWith 函数。相当于是 resumeWith 函数的封装。
再然后就是四种创建协程的方式了:
public fun (suspend () -> T).createCoroutine(
completion: Continuation
): Continuation =
SafeContinuation(createCoroutineUnintercepted(completion).intercepted(), COROUTINE_SUSPENDED)
public fun <R, T> (suspend R.() -> T).createCoroutine(
receiver: R,
completion: Continuation
): Continuation =
SafeContinuation(createCoroutineUnintercepted(receiver, completion).intercepted(), COROUTINE_SUSPENDED)
public fun (suspend () -> T).startCoroutine(
completion: Continuation
) {
createCoroutineUnintercepted(completion).intercepted().resume(Unit)
}
public fun <R, T> (suspend R.() -> T).startCoroutine(
receiver: R,
completion: Continuation
) {
createCoroutineUnintercepted(receiver, completion).intercepted().resume(Unit)
}
这四种方式可以说是相似度超高,createCoroutine 和 startCoroutine 最大的区别在于,通过 createCoroutine 创建的协程需要掉用 resume 函数启动,而 startCoroutine 函数内部已经默认调用了 resume 函数。那我们先用第一种方式创建一个协程:
// 创建协程
val continuation = suspend {
println(“In Coroutine”)
}.createCoroutine(object : Continuation {
override fun resumeWith(result: Result) {
println(result)
}
override val context = EmptyCoroutineContext
})
// 启动协程
continuation.resume(Unit)
调用 createCoroutine 函数创建协程时传入了 Continuation 协程的匿名类对象,诶?好像有点不对,为什么创建协程的时候要传一个协程实例进去,直接用不就成了。想知道为什么的话,那就需要看看 createCoroutine 到底做了什么操作了。
SafeContinuation(createCoroutineUnintercepted(completion).intercepted(), COROUTINE_SUSPENDED)
首先调用的是 createCoroutineUnintercepted 函数,它的源码可以在 kotlin.coroutines.intrinsics.IntrinsicsJvm.kt 内找到:
public actual fun (suspend () -> T).createCoroutineUnintercepted(
completion: Continuation
): Continuation {
val probeCompletion = probeCoroutineCreated(completion)
return if (this is BaseContinuationImpl)
create(probeCompletion)
else
createCoroutineFromSuspendFunction(probeCompletion) {
(this as Function1<Continuation, Any?>).invoke(it)
}
}
probeCoroutineCreated函数内直接将参数返回了,并且通过断点的方式,它的返回值和completion传参是一样的,所以这里先忽略它。
通过断点会发现 (this is BaseContinuationImpl) 判断的返回值是 true 这也就间接证明了上文中 suspend lambda 和 BaseContinuationImpl 的继承关系。最后返回的是 create(Continuation) 函数的返回值,这里可以发现作为参数传入的 Continuation 变量被 suspend lambda 包裹了一层,然后返回,相当于 suspend lambda 成为了 Continuation 的代理。
到这里 createCoroutineUnintercepted(completion) 的含义就搞明白了:
将
object : Continuation<Unit> {}创建的协程实例传入suspend lambda,由其代理协程执行操作。
紧接着又调用了 intercepted 函数,intercepted 函数声明也在 IntrinsicsJvm.kt 文件内:
public actual fun Continuation.intercepted(): Continuation = (this as? ContinuationImpl)?.intercepted() ?: this
接着看 ContinuationImpl 的 intercepted 函数:
public fun intercepted(): Continuation<Any?> =
intercepted
?: (context[ContinuationInterceptor]?.interceptContinuation(this) ?: this)
.also { intercepted = it }
其中 context[ContinuationInterceptor]?.interceptContinuation(this) 这句代码涉及到协程拦截器的概念,下文会详细分析。这里可以先简单介绍一下,协程拦截器和协程其实也是代理的关系。所以 intercepted() 可以理解为如果协程上下文中添加了协程拦截器,那么就返回协程拦截器,不然就返回 suspend lambda 实例本身,而它们都实现了 Continuation 接口。
先做一个小结,通过上文的介绍基本就清楚了,createCoroutine、startCoroutine 函数其实不是用来创建协程的,协程实例就是它们的传参,它们是为协程添加代理的。
createCoroutineUnintercepted(completion).intercepted()
通过上面的代码,为协程添加了代理,分别是 suspend lambda 和协程拦截器。这时候通过协程实例调用 resumeWith 函数时会先执行两层代理内实现的 resumeWith 函数逻辑,最终才会执行到协程的 resumeWith 函数输出最终结果。
在 createCoroutine 函数内,在添加两层代理之后又添加了一层代理,SafeContinuation。SafeContinuation 内部使用协程的三种状态,并配合 CAS 操作,保证当前返回的 SafeContinuation 实例对象仅能调用一次 resumeWith 函数,多次调用会报错。
-
UNDECIDED:初始状态 -
COROUTINE_SUSPENDED:挂起状态 -
RESUMED:恢复状态
协程是如何被挂起又是如何被恢复的
那为什么协程要这么做,很麻烦不是?要弄清楚这个问题先来看 BaseContinuationImpl 的 resumeWith 函数实现吧。
public final override fun resumeWith(result: Result<Any?>) {
var current = this
var param = result
while (true) {
probeCoroutineResumed(current)
with(current) {
val completion = completion!!
val outcome: Result<Any?> =
try {
val outcome = invokeSuspend(param)
if (outcome === COROUTINE_SUSPENDED) return
Result.success(outcome)
} catch (exception: Throwable) {
Result.failure(exception)
}
releaseIntercepted() // this state machine instance is terminating
if (completion is BaseContinuationImpl) {
current = completion
param = outcome
} else {
// top-level completion reached – invoke and return
completion.resumeWith(outcome)
return
}
}
}
}
当调用 resume(Unit) 启动协程时,由于代理的存在会调用到 BaseContinuationImpl 的 resumeWith() 函数,函数内会执行 invokeSuspend() 函数,也就说我们所说的协程体。
查看如下代码的 invokeSuspend 函数:
suspend {5}
// 反编译后的 invokeSuspend 函数
public final Object invokeSuspend(@NotNull Object $result) {
Object var2 = IntrinsicsKt.getCOROUTINE_SUSPENDED();
switch(this.label) {
case 0:
ResultKt.throwOnFailure($result);
return Boxing.boxInt(5);
default:
throw new IllegalStateException(“call to ‘resume’ before ‘invoke’ with coroutine”);
}
}
可以看到这里直接返回了最终的结果 5,接着在 ContinuationImpl.resumeWith 函数内最终调用
completion.resumeWith(outcome)
输出协程的最终结果。
这是协程执行同步代码的过程,可以看到在整个过程中,ContinuationImpl 好像并没有起到什么作用,那接着来看在协程体内执行异步代码:
suspend {
suspendFunc()
}
suspend fun suspendFunc() = suspendCoroutine { continuation ->
thread {
Thread.sleep(1000)
continuation.resume(5)
}
}
// 反编译后
public final Object invokeSuspend(@NotNull Object $result) {
Object var2 = IntrinsicsKt.getCOROUTINE_SUSPENDED();
Object var10000;
switch(this.label) {
case 0:
ResultKt.throwOnFailure($result);
this.label = 1;
var10000 = DeepKotlin3Kt.suspendFunc(this);
if (var10000 == var2) {
return var2;
}
break;
case 1:
ResultKt.throwOnFailure($result);
var10000 = $result;
break;
default:
throw new IllegalStateException(“call to ‘resume’ before ‘invoke’ with coroutine”);
}
return var10000;
}
public static final Object suspendFunc(@NotNull Continuation $completion) {
boolean var1 = false;
boolean var2 = false;
boolean var3 = false;
SafeContinuation var4 = new SafeContinuation(IntrinsicsKt.intercepted($completion));
Continuation continuation = (Continuation)var4;
int var6 = false;
ThreadsKt.thread d e f a u l t ( f a l s e , f a l s e , ( C l a s s L o a d e r ) n u l l , ( S t r i n g ) n u l l , 0 , ( F u n c t i o n 0 ) ( n e w D e e p K o t l i n 3 K t default(false, false, (ClassLoader)null, (String)null, 0, (Function0)(new DeepKotlin3Kt default(false,false,(ClassLoader)null,(String)null,0,(Function0)(newDeepKotlin3KtsuspendFunc02$2$1(continuation)), 31, (Object)null);
Object var10000 = var4.getOrThrow();
if (var10000 == IntrinsicsKt.getCOROUTINE_SUSPENDED()) {
DebugProbesKt.probeCoroutineSuspended($completion);
}
return var10000;
}
resume 函数启动协程,invokeSuspend 函数第一次执行时 this.label == 0 执行 case 0 代码,this.label 变量赋值为 1, 然后判断如果 if (var10000 == var2) 为 true 那么 invokeSuspend 函数返回 var2,也就是 COROUTINE_SUSPENDED 标识,在 resumeWith 函数内,判断如果 invokeSuspend 函数的返回值为 COROUTINE_SUSPENDED 则 reture。这也就是协程的挂起过程。
当线程执行结束,调用 resume 函数恢复协程时再次执行到 invokeSuspend 函数,这时 this.label == 1,执行 case 1 代码,直接返回结果 5。那在 resumeWith 函数内,这时就不会执行 return 了,最终会调用协程的 resumeWith 函数输出最终的结果,这也就是协程的恢复过程。
通过了解协程运行流程可以发现 ContinuationImpl 其实是协程挂起和恢复逻辑的真正执行者。也正是因为协程挂起和恢复逻辑的存在,所以我们可以像编写同步代码一样调用异步代码:
suspend {
println(“Coroutine start”)
println(“Coroutine: ${System.currentTimeMillis()}”)
val resultFun = suspendThreadFun()
println(“Coroutine: suspendThreadFun- r e s u l t F u n − resultFun- resultFun−{System.currentTimeMillis()}”)
val result = suspendNoThreadFun()
println(“Coroutine: suspendNoThreadFun- r e s u l t − result- result−{System.currentTimeMillis()}”)
}.startCoroutine(object : Continuation {
override val context = EmptyCoroutineContext
override fun resumeWith(result: Result) {
println(“Coroutine End: $result”)
}
})
suspend fun suspendThreadFun() = suspendCoroutine { continuation ->
thread {
Thread.sleep(1000)
自我介绍一下,小编13年上海交大毕业,曾经在小公司待过,也去过华为、OPPO等大厂,18年进入阿里一直到现在。
深知大多数初中级安卓工程师,想要提升技能,往往是自己摸索成长,但自己不成体系的自学效果低效又漫长,而且极易碰到天花板技术停滞不前!
因此收集整理了一份《2024年最新Android移动开发全套学习资料》送给大家,初衷也很简单,就是希望能够帮助到想自学提升又不知道该从何学起的朋友,同时减轻大家的负担。


由于文件比较大,这里只是将部分目录截图出来,每个节点里面都包含大厂面经、学习笔记、源码讲义、实战项目、讲解视频
如果你觉得这些内容对你有帮助,可以添加下面V无偿领取!(备注Android)

最后
都说三年是程序员的一个坎,能否晋升或者提高自己的核心竞争力,这几年就十分关键。
技术发展的这么快,从哪些方面开始学习,才能达到高级工程师水平,最后进阶到Android架构师/技术专家?我总结了这 5大块;
我搜集整理过这几年阿里,以及腾讯,字节跳动,华为,小米等公司的面试题,把面试的要求和技术点梳理成一份大而全的“ Android架构师”面试 Xmind(实际上比预期多花了不少精力),包含知识脉络 + 分支细节。
《Android架构视频+BAT面试专题PDF+学习笔记》


网上学习 Android的资料一大堆,但如果学到的知识不成体系,遇到问题时只是浅尝辄止,不再深入研究,那么很难做到真正的技术提升。希望**这份系统化的技术体系**对大家有一个方向参考。
verride val context = EmptyCoroutineContext
override fun resumeWith(result: Result) {
println(“Coroutine End: $result”)
}
})
suspend fun suspendThreadFun() = suspendCoroutine { continuation ->
thread {
Thread.sleep(1000)
自我介绍一下,小编13年上海交大毕业,曾经在小公司待过,也去过华为、OPPO等大厂,18年进入阿里一直到现在。
深知大多数初中级安卓工程师,想要提升技能,往往是自己摸索成长,但自己不成体系的自学效果低效又漫长,而且极易碰到天花板技术停滞不前!
因此收集整理了一份《2024年最新Android移动开发全套学习资料》送给大家,初衷也很简单,就是希望能够帮助到想自学提升又不知道该从何学起的朋友,同时减轻大家的负担。
[外链图片转存中…(img-NVJjCOj0-1711188566070)]
[外链图片转存中…(img-IJu72DFY-1711188566070)]
[外链图片转存中…(img-Uugk6QfH-1711188566071)]
[外链图片转存中…(img-BR2OhB73-1711188566071)]
由于文件比较大,这里只是将部分目录截图出来,每个节点里面都包含大厂面经、学习笔记、源码讲义、实战项目、讲解视频
如果你觉得这些内容对你有帮助,可以添加下面V无偿领取!(备注Android)
[外链图片转存中…(img-iFvjKPxv-1711188566071)]
最后
都说三年是程序员的一个坎,能否晋升或者提高自己的核心竞争力,这几年就十分关键。
技术发展的这么快,从哪些方面开始学习,才能达到高级工程师水平,最后进阶到Android架构师/技术专家?我总结了这 5大块;
我搜集整理过这几年阿里,以及腾讯,字节跳动,华为,小米等公司的面试题,把面试的要求和技术点梳理成一份大而全的“ Android架构师”面试 Xmind(实际上比预期多花了不少精力),包含知识脉络 + 分支细节。
《Android架构视频+BAT面试专题PDF+学习笔记》
[外链图片转存中…(img-my8UCYsY-1711188566072)]
[外链图片转存中…(img-USZXhxwa-1711188566072)]
[外链图片转存中…(img-BFLYFLGc-1711188566072)]
网上学习 Android的资料一大堆,但如果学到的知识不成体系,遇到问题时只是浅尝辄止,不再深入研究,那么很难做到真正的技术提升。希望**这份系统化的技术体系**对大家有一个方向参考。
2021年虽然路途坎坷,都在说Android要没落,但是,不要慌,做自己的计划,学自己的习,竞争无处不在,每个行业都是如此。相信自己,没有做不到的,只有想不到的。祝大家2021年万事大吉。


 610
610


 被折叠的 条评论
为什么被折叠?
被折叠的 条评论
为什么被折叠?
 到【灌水乐园】发言


