


从浅入深 学习 SpringCloud 微服务架构(十七)–Spring Cloud config(2)
一、springcloudConfig 入门案例:搭建 config 服务端
1、登录 码云:https://gitee.com/
1)点击右上角 【+】 再点击【新建仓库】
仓库名称:config-repostory
公开
勾选【设置模板(添加 Readme,lssue,Pull Request 模板文件)】
2)点击 【创建】。
2、把 生产者 子工程 product_service (子模块)中的 配置文件 application.yml 文件,复制两份,分别命名为:并修改端口号为:9001, 9002, 然后上传至 gitee 仓库中。
1)文件命名规则:
- {application}–{profile}.yml
- {application}–{profile}.properties
- application 为应用名称,profile 指开发环境(用于区分开发环境,测试环境,生产环境等)。
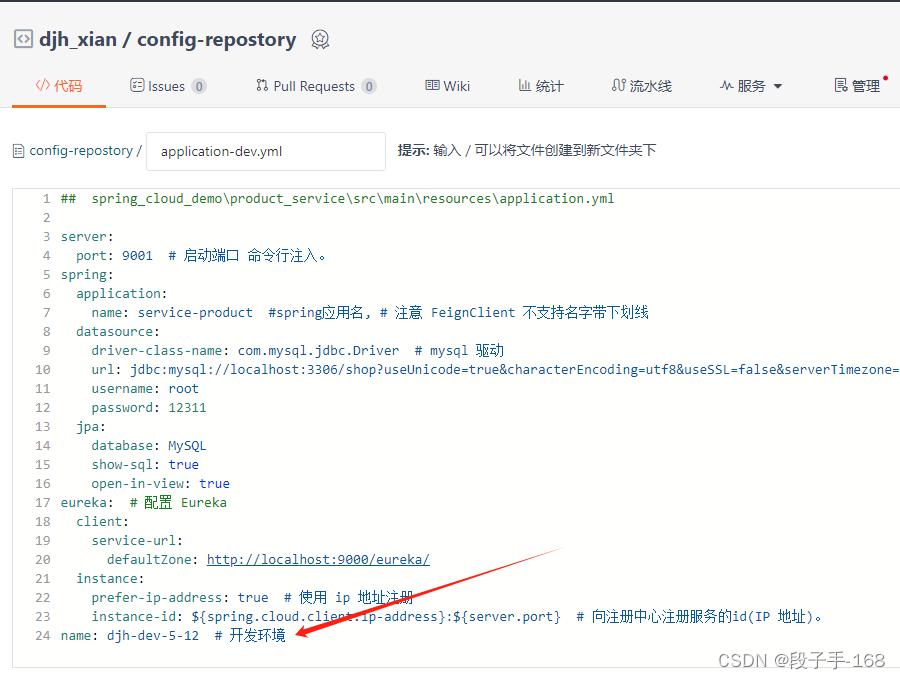
2)application-dev.yml
##  spring_cloud_demo\product_service\src\main\resources\application-dev.yml

server:
  port: 9001  # 启动端口 命令行注入。
spring:
  application:
    name: service-product  #spring应用名, # 注意 FeignClient 不支持名字带下划线
  datasource:
    driver-class-name: com.mysql.jdbc.Driver  # mysql 驱动
    url: jdbc:mysql://localhost:3306/shop?useUnicode=true&characterEncoding=utf8&useSSL=false&serverTimezone=Asia/Shanghai
    username: root
    password: 12311
  jpa:
    database: MySQL
    show-sql: true
    open-in-view: true
eureka:  # 配置 Eureka
  client:
    service-url:
      defaultZone: http://localhost:9000/eureka/
  instance:
    prefer-ip-address: true  # 使用 ip 地址注册
    instance-id: ${spring.cloud.client.ip-address}:${server.port}  # 向注册中心注册服务的id(IP 地址)。
name: djh-dev  # 开发环境
3)application-pro.yml
##  spring_cloud_demo\product_service\src\main\resources\application-pro.yml

server:
  port: 9002  # 启动端口 命令行注入。
spring:
  application:
    name: service-product  #spring应用名, # 注意 FeignClient 不支持名字带下划线
  datasource:
    driver-class-name: com.mysql.jdbc.Driver  # mysql 驱动
    url: jdbc:mysql://localhost:3306/shop?useUnicode=true&characterEncoding=utf8&useSSL=false&serverTimezone=Asia/Shanghai
    username: root
    password: 12311
  jpa:
    database: MySQL
    show-sql: true
    open-in-view: true
eureka:  # 配置 Eureka
  client:
    service-url:
      defaultZone: http://localhost:9000/eureka/
  instance:
    prefer-ip-address: true  # 使用 ip 地址注册
    instance-id: ${spring.cloud.client.ip-address}:${server.port}  # 向注册中心注册服务的id(IP 地址)。
name: djh-pro  # 生产环境
4)码云:https://gitee.com/ 的 config-repostory 仓库中,点击【文件】,再点击【上传】
把 application-dev.yml ,和 application-pro.yml 传上去。
提交信息:2024-5-11-1
点击【提交】。
3、Spring Cloud Config:入门案例–搭建 config 服务端–在父工程 spring_cloud_demo 下,创建子工程 config_service(子模块)
3.1 创建 子工程 config_service(子模块)
	--> 右键 spring_cloud_demo 父工程
	--> Modules
	--> Maven
	--> Groupld : ( djh.it )
		Artifactld : ( config_service )
		Version : 1.0-SNAPSHOT
	--> Next
	--> Module name: ( config_service )
		Content root : ( spring_cloud_demo\config_service)
		Module file location: ( spring_cloud_demo\config_service )
	--> Finish
3.2 在 子工程 config_service (子模块)中的 pom.xml 中导入依赖
<?xml version="1.0" encoding="UTF-8"?>
<project xmlns="http://maven.apache.org/POM/4.0.0"
         xmlns:xsi="http://www.w3.org/2001/XMLSchema-instance"
         xsi:schemaLocation="http://maven.apache.org/POM/4.0.0 http://maven.apache.org/xsd/maven-4.0.0.xsd">
    <parent>
        <artifactId>spring_cloud_demo</artifactId>
        <groupId>djh.it</groupId>
        <version>1.0-SNAPSHOT</version>
    </parent>
    <modelVersion>4.0.0</modelVersion>

    <artifactId>config_service</artifactId>

    <dependencies>
        <dependency>
            <groupId>org.springframework.cloud</groupId>
            <artifactId>spring-cloud-starter-config</artifactId>
        </dependency>
        <dependency>
            <groupId>org.springframework.cloud</groupId>
            <artifactId>spring-cloud-config-server</artifactId>
        </dependency>
    </dependencies>
</project>
<!-- spring_cloud_demo\config_service\pom.xml -->
3.3 在 子工程 config_service (子模块)中,创建启动类 ConfigServerApplication.java
/**
 *   spring_cloud_demo\config_service\src\main\java\djh\it\config\ConfigServerApplication.java
 *
 *   2024-5-11 启动类 ConfigServerApplication.java
 */

package djh.it.config;

import org.springframework.boot.SpringApplication;
import org.springframework.boot.autoconfigure.SpringBootApplication;
import org.springframework.cloud.config.server.EnableConfigServer;

@SpringBootApplication
@EnableConfigServer
public class ConfigServerApplication {
    public static void main(String[] args) {
        SpringApplication.run(ConfigServerApplication.class, args);
    }
}
3.4 在 子工程 config_service (子模块)中,创建配置文件 application.yml
##  spring_cloud_demo\config_service\src\main\resources\application.yml

server:
  port: 10000  # 启动端口 命令行注入。
spring:
  application:
    name: config-server  #spring应用名, # 注意 FeignClient 不支持名字带下划线
  cloud:
    config:
      server:
        git:
          uri: https://gitee.com/djh-xian/config-repostory.git
4、运行启动类 ConfigServerApplication.java,进行测试
浏览器地址栏输入:localhost:10000/product-dev.yml 会显示配置文件内容。

二、springcloudConfig 入门案例:客户端改造,动态获取配置信息
1、在 product_service 子工程(子模块)的 pom.xml 中,引入依赖坐标。
<?xml version="1.0" encoding="UTF-8"?>
<project xmlns="http://maven.apache.org/POM/4.0.0"
         xmlns:xsi="http://www.w3.org/2001/XMLSchema-instance"
         xsi:schemaLocation="http://maven.apache.org/POM/4.0.0 http://maven.apache.org/xsd/maven-4.0.0.xsd">
    <parent>
        <artifactId>spring_cloud_demo</artifactId>
        <groupId>djh.it</groupId>
        <version>1.0-SNAPSHOT</version>
    </parent>
    <modelVersion>4.0.0</modelVersion>

    <artifactId>product_service</artifactId>

    <dependencies>
        <!-- springcloudgateway 的内部是通过 netty + webflux 实现。
            webflux 实现和 springmvc 存在冲突,需要注销掉父工程中的 web 依赖,在各子模块中导入 web 依赖。
          -->
        <dependency>
            <groupId>org.springframework.boot</groupId>
            <artifactId>spring-boot-starter-web</artifactId>
        </dependency>
        <dependency>
            <groupId>mysql</groupId>
            <artifactId>mysql-connector-java</artifactId>
            <!--            <version>5.1.32</version>-->
            <version>8.0.26</version>
        </dependency>
        <dependency>
            <groupId>org.springframework.boot</groupId>
            <artifactId>spring-boot-starter-data-jpa</artifactId>
        </dependency>
        <!-- 引入 EurekaClient 依赖坐标 -->
        <dependency>
            <groupId>org.springframework.cloud</groupId>
            <artifactId>spring-cloud-starter-netflix-eureka-client</artifactId>
        </dependency>
        <!-- 引入 sleuth 链路追踪 -->
        <dependency>
            <groupId>org.springframework.cloud</groupId>
            <artifactId>spring-cloud-starter-sleuth</artifactId>
        </dependency>
        <!-- 引入 zipkin 依赖坐标 -->
        <dependency>
            <groupId>org.springframework.cloud</groupId>
            <artifactId>spring-cloud-starter-zipkin</artifactId>
        </dependency>
        <!-- 引入 rabbit 相关 依赖坐标 -->
        <dependency>
            <groupId>org.springframework.cloud</groupId>
            <artifactId>spring-cloud-sleuth-zipkin</artifactId>
        </dependency>
        <dependency>
            <groupId>org.springframework.amqp</groupId>
            <artifactId>spring-rabbit</artifactId>
        </dependency>
         <!-- 引入 动态获取配置信息 相关依赖坐标  -->
        <dependency>
            <groupId>org.springframework.cloud</groupId>
            <artifactId>spring-cloud-starter-config</artifactId>
        </dependency>
    </dependencies>
</project>
<!-- spring_cloud_demo\product_service\pom.xml -->
2、在 product_service 子工程(子模块)中,删除 application.yml 配置文件,创建 bootstrap.yml 配置文件,让它从 gitee 中动态拉取 application.yml 配置文件。
##  spring_cloud_demo\product_service\src\main\resources\bootstrap.yml

spring:
 cloud:
   config:
     name: application  # 应用名称,需要对应 gitee 中配置文件名称的前半部分
     profile: dev   # 开发环境
     label: master  # gitee 中的分支
     uri: http://localhost:10000  # config-server 的请求地址。
3、启动 product_service(9001), eureka_service, config_server 三个子项目的启动类,进行测试。
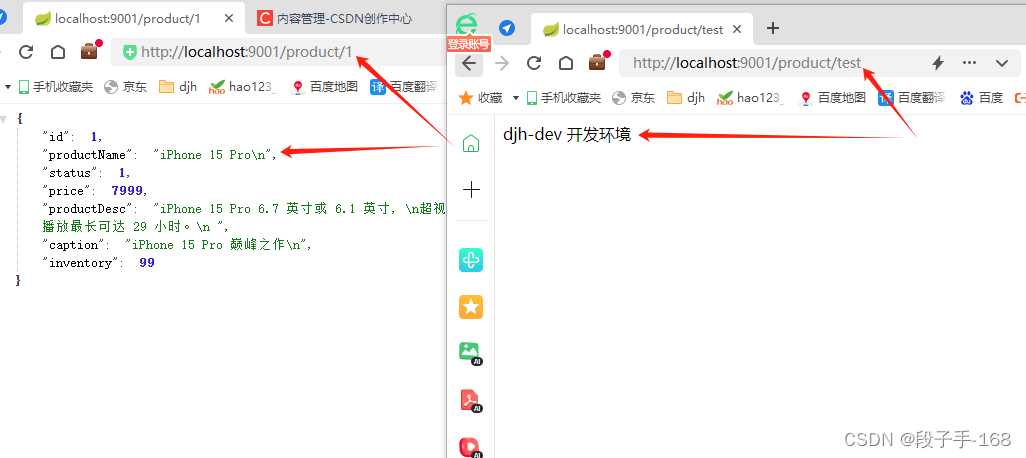
浏览器地址栏输入:localhost:9001/product/1 会显示从 MySQL 摘取的数据内容。
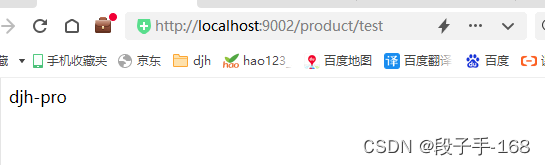
浏览器地址栏输入:localhost:9001/product/test 会显示:djh-dev
4、更改 product_service 子工程(子模块)的 bootstrap.yml 配置文件,使用 pro 生产环境。
##  spring_cloud_demo\product_service\src\main\resources\bootstrap.yml

spring:
 cloud:
   config:
     name: application  # 应用名称,需要对应 gitee 中配置文件名称的前半部分
     # profile: dev   # 开发环境
     profile: pro   # 生产环境
     label: master  # gitee 中的分支
     uri: http://localhost:10000  # config-server 的请求地址。
5、再次启动 product_service(9002), eureka_service, config_server 三个子项目的启动类,重新进行测试。
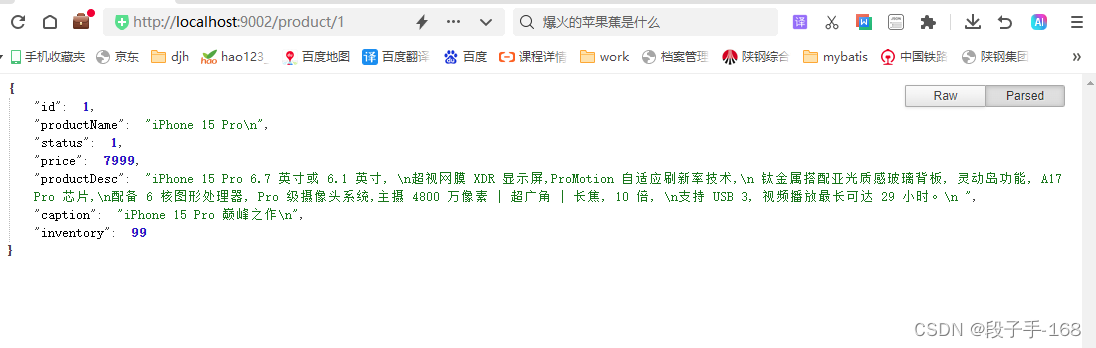
浏览器地址栏输入:localhost:9002/product/1 会显示从 MySQL 摘取的数据内容。
浏览器地址栏输入:localhost:9002/product/test 会显示:djh-pro
三、springcloudConfig 入门案例:手动刷新数据
1、在 product_service 子工程(子模块)的 pom.xml 中,引入依赖坐标。
<?xml version="1.0" encoding="UTF-8"?>
<project xmlns="http://maven.apache.org/POM/4.0.0"
         xmlns:xsi="http://www.w3.org/2001/XMLSchema-instance"
         xsi:schemaLocation="http://maven.apache.org/POM/4.0.0 http://maven.apache.org/xsd/maven-4.0.0.xsd">
    <parent>
        <artifactId>spring_cloud_demo</artifactId>
        <groupId>djh.it</groupId>
        <version>1.0-SNAPSHOT</version>
    </parent>
    <modelVersion>4.0.0</modelVersion>

    <artifactId>product_service</artifactId>

    <dependencies>
        <!-- springcloudgateway 的内部是通过 netty + webflux 实现。
            webflux 实现和 springmvc 存在冲突,需要注销掉父工程中的 web 依赖,在各子模块中导入 web 依赖。
          -->
        <dependency>
            <groupId>org.springframework.boot</groupId>
            <artifactId>spring-boot-starter-web</artifactId>
        </dependency>
        <dependency>
            <groupId>mysql</groupId>
            <artifactId>mysql-connector-java</artifactId>
            <!--            <version>5.1.32</version>-->
            <version>8.0.26</version>
        </dependency>
        <dependency>
            <groupId>org.springframework.boot</groupId>
            <artifactId>spring-boot-starter-data-jpa</artifactId>
        </dependency>
        <!-- 引入 EurekaClient 依赖坐标 -->
        <dependency>
            <groupId>org.springframework.cloud</groupId>
            <artifactId>spring-cloud-starter-netflix-eureka-client</artifactId>
        </dependency>
        <!-- 引入 sleuth 链路追踪 -->
        <dependency>
            <groupId>org.springframework.cloud</groupId>
            <artifactId>spring-cloud-starter-sleuth</artifactId>
        </dependency>
        <!-- 引入 zipkin 依赖坐标 -->
        <dependency>
            <groupId>org.springframework.cloud</groupId>
            <artifactId>spring-cloud-starter-zipkin</artifactId>
        </dependency>
        <!-- 引入 rabbit 相关 依赖坐标 -->
        <dependency>
            <groupId>org.springframework.cloud</groupId>
            <artifactId>spring-cloud-sleuth-zipkin</artifactId>
        </dependency>
        <dependency>
            <groupId>org.springframework.amqp</groupId>
            <artifactId>spring-rabbit</artifactId>
        </dependency>
        <!-- 引入 动态获取配置信息 相关依赖坐标  -->
        <dependency>
            <groupId>org.springframework.cloud</groupId>
            <artifactId>spring-cloud-starter-config</artifactId>
        </dependency>
        <!-- 引入 手动刷新数据 相关依赖坐标  -->
        <dependency>
            <groupId>org.springframework.boot</groupId>
            <artifactId>spring-boot-starter-actuator</artifactId>
        </dependency>
    </dependencies>
</project>
<!-- spring_cloud_demo\product_service\pom.xml -->
2、修改 product_service 子工程(子模块)的 Controller 类 ProductController.java 添加动态刷新数据。
/**
 *  spring_cloud_demo\product_service\src\main\java\djh\it\product\controller\ProductController.java
 *
 *  2024-5-11 商品的 controller 类 ProductController.java
 */
package djh.it.product.controller;

import djh.it.product.domain.Product;
import djh.it.product.service.ProductService;
import org.springframework.beans.factory.annotation.Autowired;
import org.springframework.beans.factory.annotation.Value;
import org.springframework.cloud.context.config.annotation.RefreshScope;
import org.springframework.web.bind.annotation.*;

@RestController
@RequestMapping("/product")
@RefreshScope  //开启动态刷新
public class ProductController {

    @Autowired
    private ProductService productService;

    @Value("${name}")
    private String name;

    @RequestMapping(value = "/{id}", method = RequestMethod.GET)
    public Product findById(@PathVariable Long id){
       return productService.findById(id);
    }

    @RequestMapping(value = "/test")
    public String test (){
        return name;
    }

}
3、修改 product_service 子工程(子模块)的 bootstrap.yml 配置文件,添加 动态刷新的请求路径端点配置。
##  spring_cloud_demo\product_service\src\main\resources\bootstrap.yml

spring:
 cloud:
   config:
     name: application  # 应用名称,需要对应 gitee 中配置文件名称的前半部分
     profile: dev   # 开发环境
     # profile: pro   # 生产环境
     label: master  # gitee 中的分支
     uri: http://localhost:10000  # config-server 的请求地址。
# 开启动态刷新的请求路径端点
management:
  endpoints:
    web:
      exposure:
        include: refresh
4、再次启动 product_service(9001), eureka_service, config_server 三个子项目的启动类,重新进行测试。
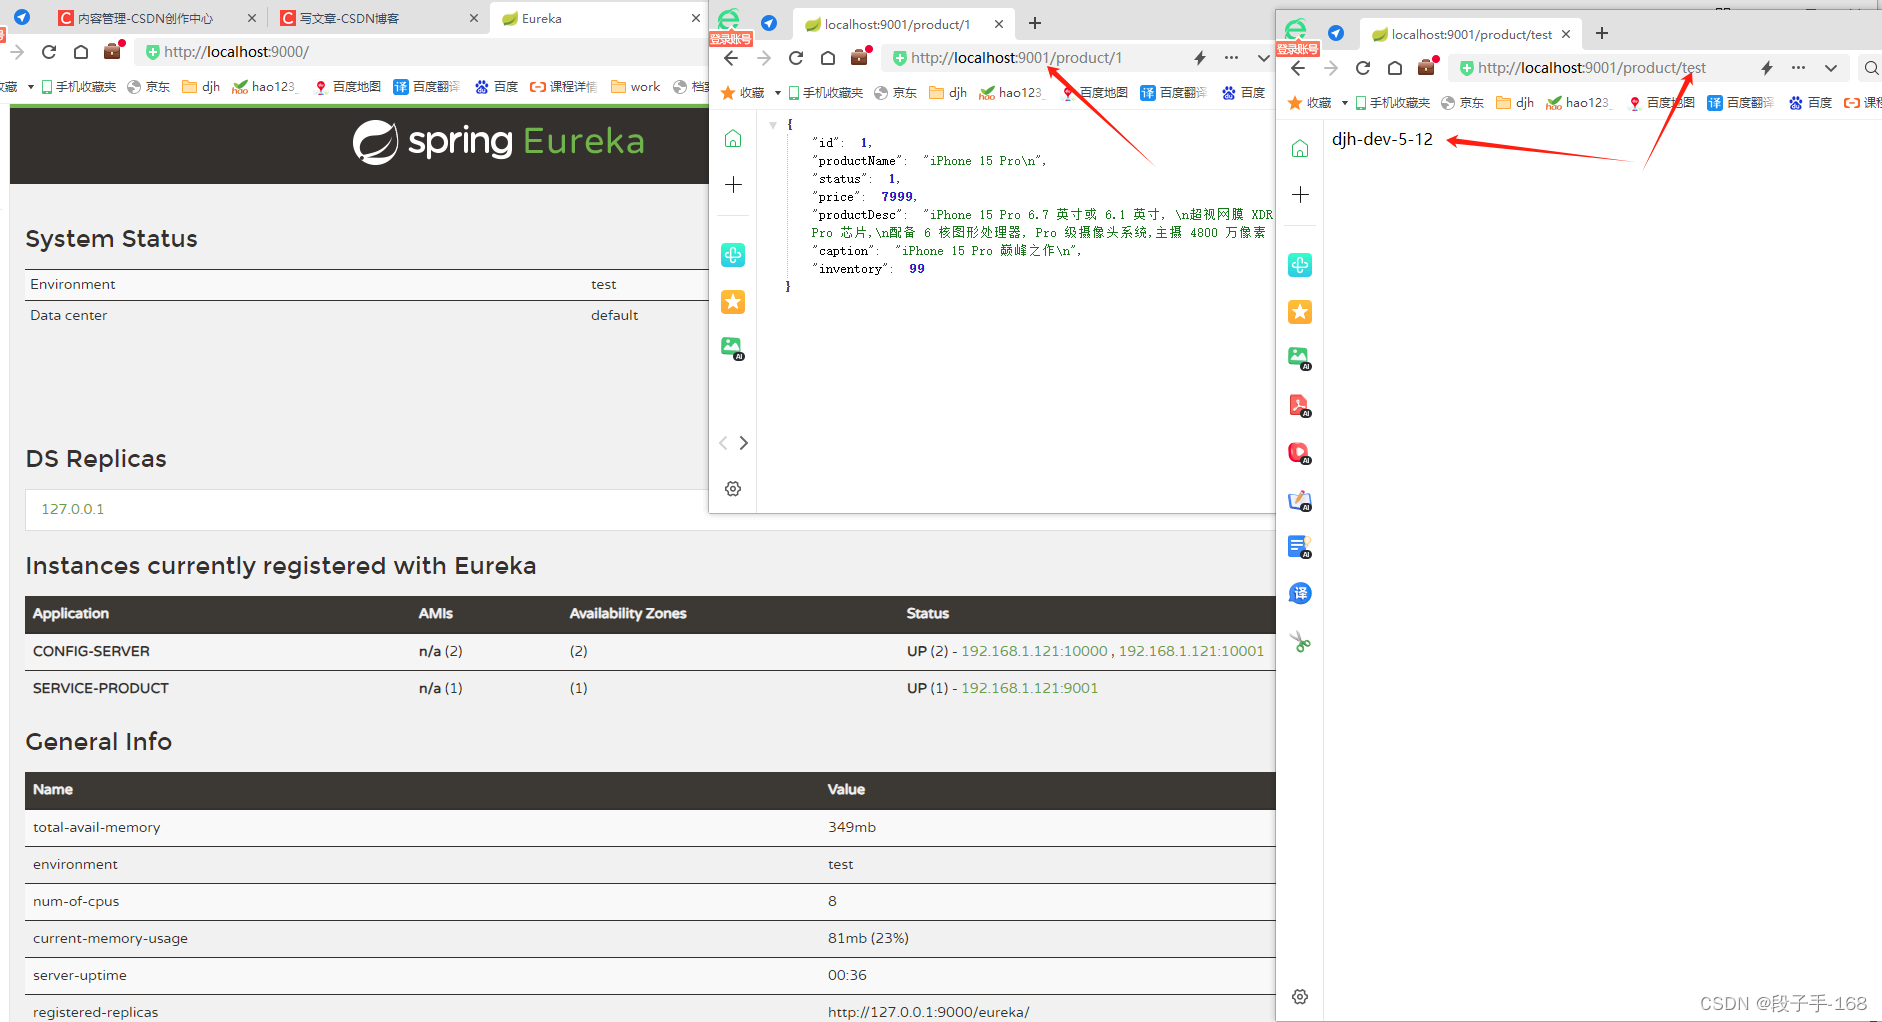
1)浏览器地址栏输入:localhost:9001/product/1 会显示从 MySQL 摘取的数据内容。
浏览器地址栏输入:localhost:9001/product/test 会显示:djh-dev
2)登录 码云:https://gitee.com/ 的 config-repostory 仓库中,点击application.yml 文件,再点击【编辑】,修改内容: name: djh-dev 开发环境,不注释汉字了。
提交信息:2024-5-11-1
点击【提交】。
3)浏览器地址栏输入:localhost:9001/product/1 会显示从 MySQL 摘取的数据内容。
浏览器地址栏输入:localhost:9001/product/test 会显示:djh-dev 没有更新。
4)打开 Postman 软件,POST 请求地址:http://localhost:9001/actuator/refresh 刷新缓存后。
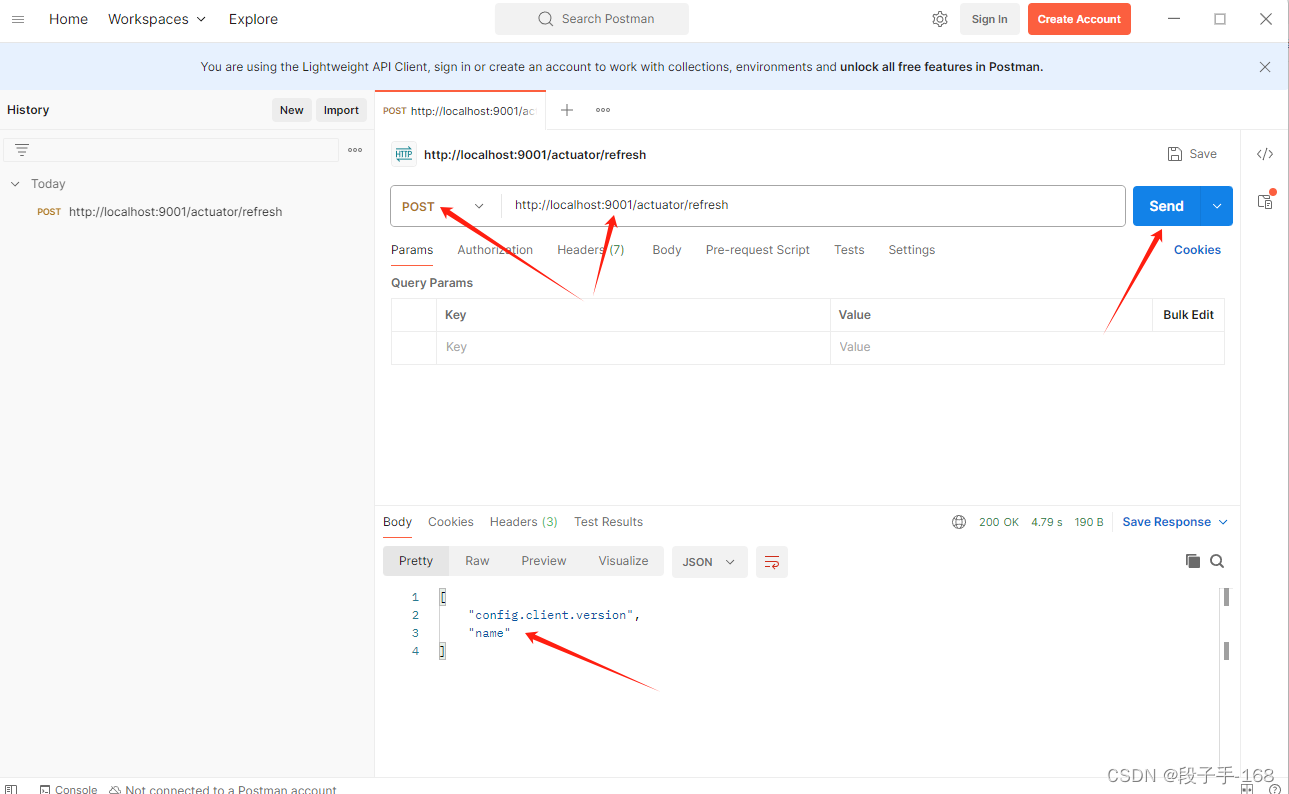
5)浏览器地址栏输入:localhost:9001/product/1 会显示从 MySQL 摘取的数据内容。
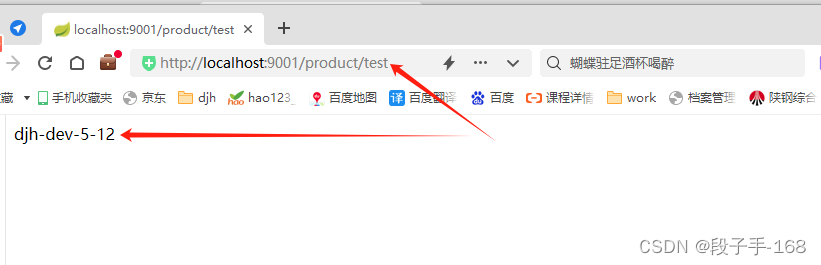
浏览器地址栏输入:localhost:9001/product/test 不用重新启动 product_service 启动类,
会动态刷新数据显示:djh-dev-5-12。
四、springcloudConfig 高可用-上
1、在 config_service 子工程(子模块)的 pom.xml 文件中,导入 springcloudConfig 高可用相关依赖坐标。
<?xml version="1.0" encoding="UTF-8"?>
<project xmlns="http://maven.apache.org/POM/4.0.0"
         xmlns:xsi="http://www.w3.org/2001/XMLSchema-instance"
         xsi:schemaLocation="http://maven.apache.org/POM/4.0.0 http://maven.apache.org/xsd/maven-4.0.0.xsd">
    <parent>
        <artifactId>spring_cloud_demo</artifactId>
        <groupId>djh.it</groupId>
        <version>1.0-SNAPSHOT</version>
    </parent>
    <modelVersion>4.0.0</modelVersion>

    <artifactId>config_service</artifactId>

    <dependencies>
        <dependency>
            <groupId>org.springframework.cloud</groupId>
            <artifactId>spring-cloud-config-server</artifactId>
        </dependency>
        <!-- springcloudConfig 高可用 -->
        <dependency>
            <groupId>org.springframework.cloud</groupId>
            <artifactId>spring-cloud-bus</artifactId>
        </dependency>
        <dependency>
            <groupId>org.springframework.cloud</groupId>
            <artifactId>spring-cloud-stream-binder-rabbit</artifactId>
        </dependency>
        <!-- 引入 EurekaClient 依赖坐标 -->
        <dependency>
            <groupId>org.springframework.cloud</groupId>
            <artifactId>spring-cloud-starter-netflix-eureka-client</artifactId>
        </dependency>
        <!-- 引入 动态获取配置信息 相关依赖坐标  -->
        <dependency>
            <groupId>org.springframework.cloud</groupId>
            <artifactId>spring-cloud-starter-config</artifactId>
        </dependency>
        <!-- 引入 手动刷新数据 相关依赖坐标  -->
        <dependency>
            <groupId>org.springframework.boot</groupId>
            <artifactId>spring-boot-starter-actuator</artifactId>
        </dependency>
    </dependencies>
</project>
<!-- spring_cloud_demo\config_service\pom.xml -->
2、在 config_service 子工程(子模块)的 application.yml 文件中,添加 eureka 配置。
##  spring_cloud_demo\config_service\src\main\resources\application.yml

server:
  port: 10001  # 启动端口 命令行注入。
spring:
  application:
    name: config-server  #spring应用名, # 注意 FeignClient 不支持名字带下划线
  cloud:
    config:
      server:
        git:
          uri: https://gitee.com/djh-xian/config-repostory.git
eureka: # 配置 eureka_server
  client:
    service-url: # 配置暴露给 EurekaClient 的请求地址
      defaultZone: http://127.0.0.1:9000/eureka/  # 配置高可用时,须配置为另一个 EurekaServerApplication 的端口号,如:8000
  instance:
    prefer-ip-address: true  # 使用 ip 地址注册
    instance-id: ${spring.cloud.client.ip-address}:${server.port}
3、在 idea 的 RunDashboard 面板,复制一个 ConfigServerApplication 模拟高可用, 更名为 ConfigServerApplication(2),application.yml 启动端口改为 10001。
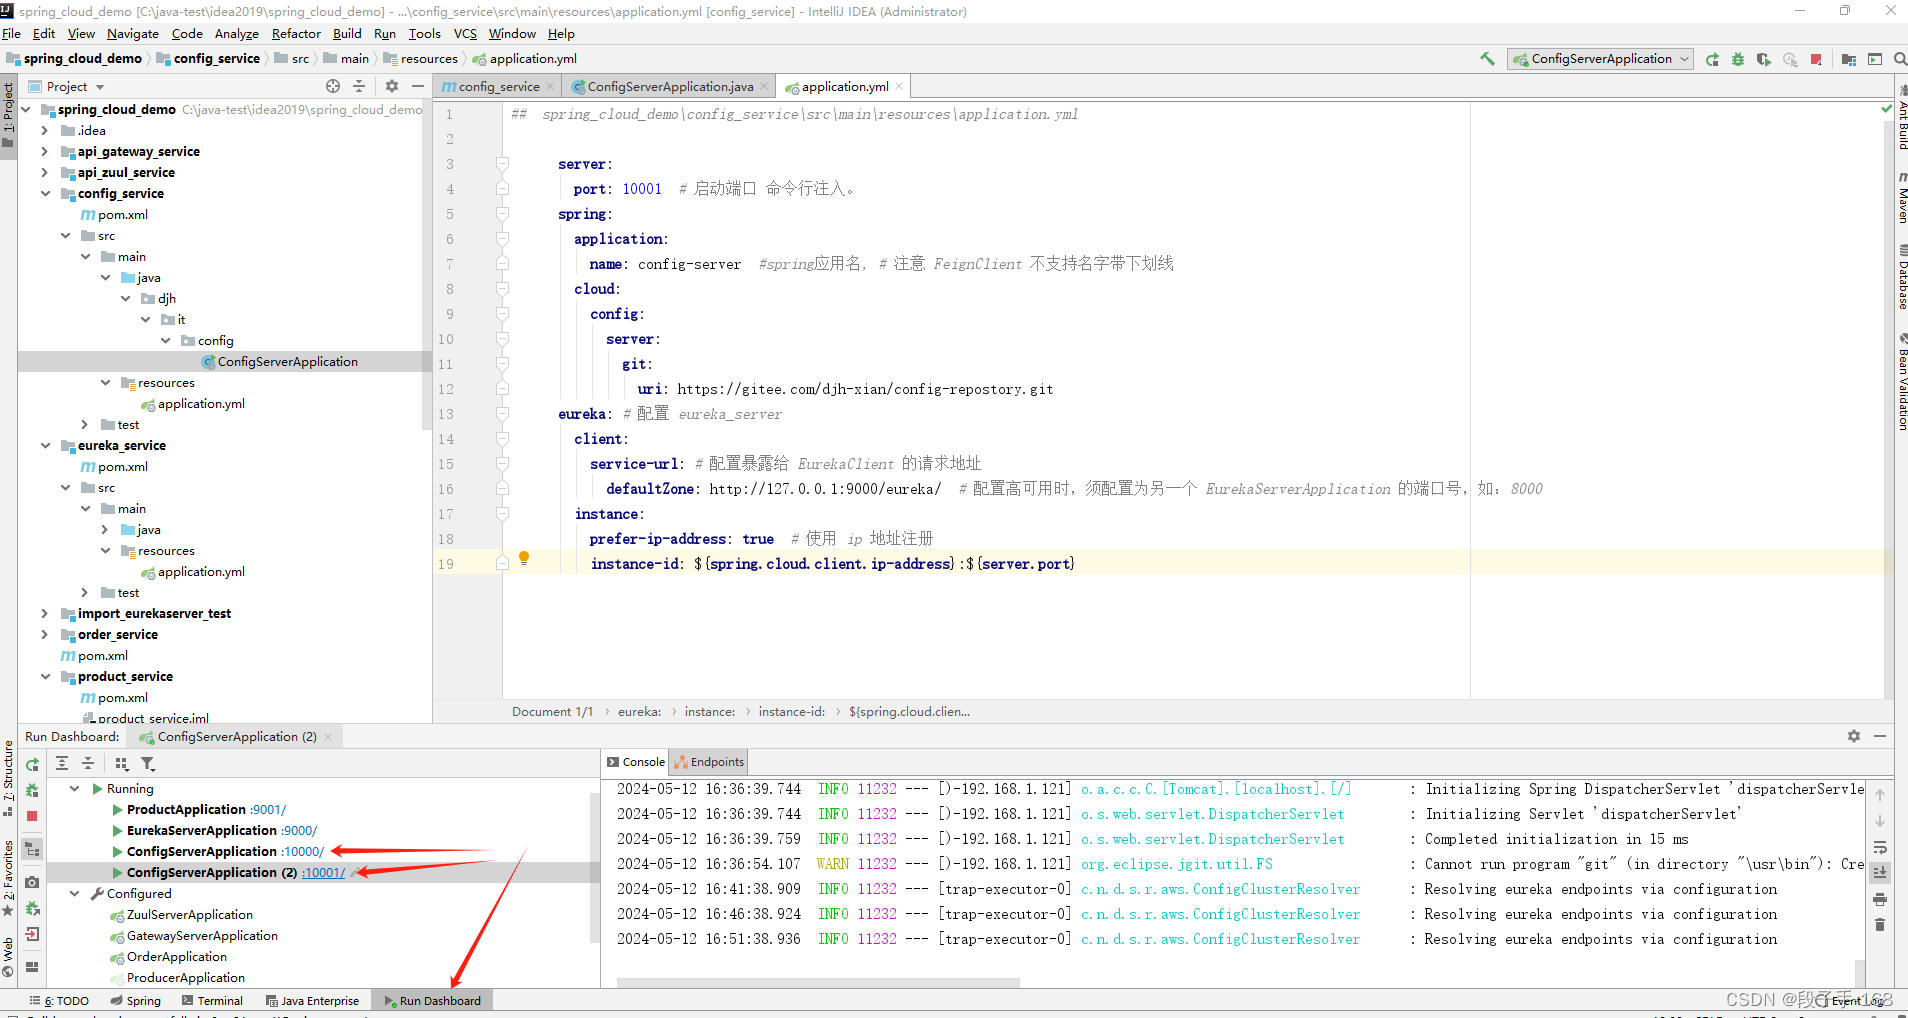
4、启动 product_service(9001), eureka_service, config_server(ConfigServerApplication,ConfigServerApplication(2))四个启动类,进行测试。
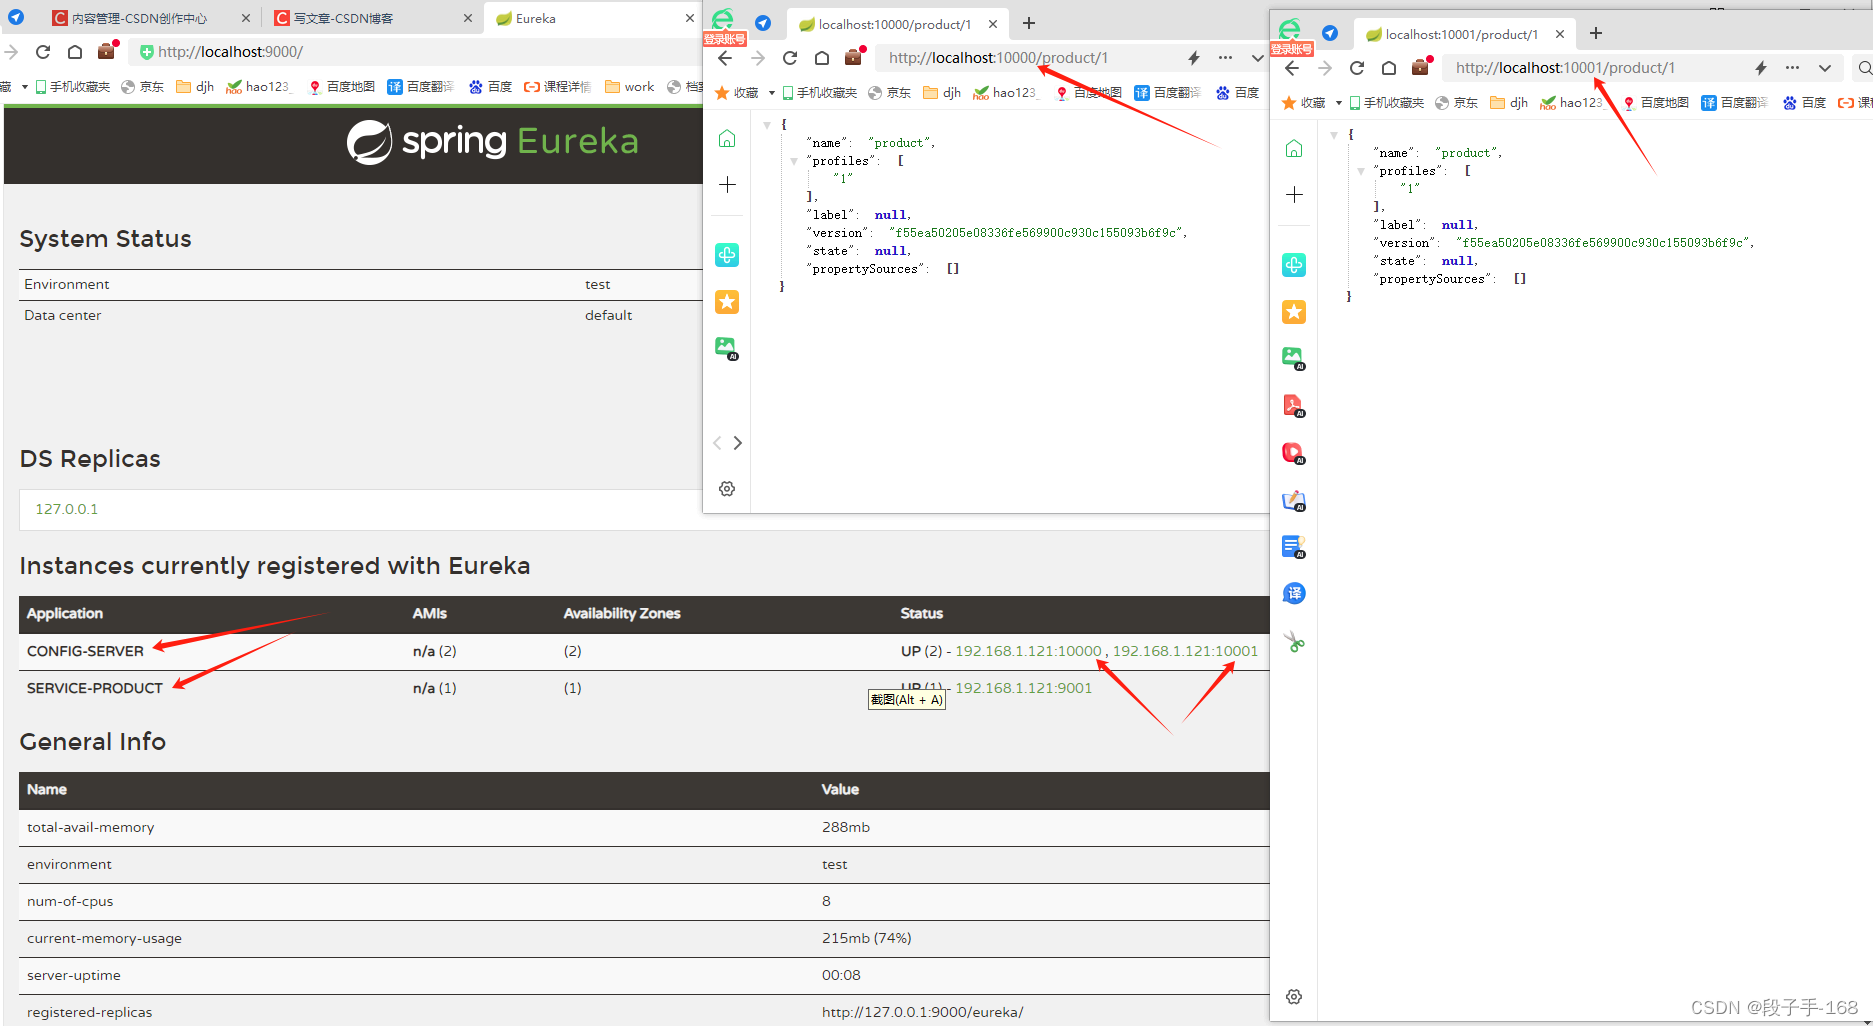
1)浏览器地址栏输入:localhost:9000 登录到 eureka 注册中心,发现 2 个微服务,其中 config-server 有两个端口(10000,10001)。
2)浏览器地址栏输入:localhost:10000/product/1
浏览器地址栏输入:localhost:10001/product/1 都能获取到数据。
五、springcloudConfig 高可用-下
1、在 product_service 子工程(子模块)的 bootstrap.yml 文件中,添加 Eureka 服务发现。
##  spring_cloud_demo\product_service\src\main\resources\bootstrap.yml

spring:
 cloud:
   config:
     name: application  # 应用名称,需要对应 gitee 中配置文件名称的前半部分
     profile: dev   # 开发环境
     # profile: pro   # 生产环境
     label: master  # gitee 中的分支
     # uri: http://localhost:10000  # config-server 的请求地址。
     discovery:   # 通过注册中心获取 config-server 配置
       enabled: true
       service-id: config-server  #服务名

# 开启动态刷新的请求路径端点
management:
  endpoints:
    web:
      exposure:
        include: refresh
eureka:  # 配置 Eureka
  client:
    service-url:
      defaultZone: http://localhost:9000/eureka/
  instance:
    prefer-ip-address: true  # 使用 ip 地址注册
    instance-id: ${spring.cloud.client.ip-address}:${server.port}  # 向注册中心注册服务的id(IP 地址)。
2、启动 product_service(9001), eureka_service, config_server(ConfigServerApplication,ConfigServerApplication(2))四个启动类,进行测试。
1)浏览器地址栏输入:localhost:9001/prodcut/1
浏览器地址栏输入:localhost:9001/prodcut/test 都可以正常访问。
2)说明:两个 config-server 都注册到 Eureka, 微服务 Product_service 可以通过 Eureka 注册中心,获取信息,这样,即使 有一个 config-server 挂掉,也不会影响获取数据。
六、springcloudConfig:结合消息总线 bus 动态修改配置文件信息
1、消息总线 bus
在微服务架构中,通常会使用轻量级的消息代理来构建一个共用的消息主题来连接各个微服务实例,它广播的消息会被所有在注册中心的微服务实例监听和消费,也称消息总线。SpringCloud 中也有对应的解决方案,SpringCloud Bus 将分布式的节点用轻量的消息代理连接起来可以很容易搭建消息总线,配合 SpringCloud config 实现微服务应用配置信息的动态更新
2、根据下图我们可以看出利用 Spring Cloud Bus 做配置更新的步骤:
- 提交代码触发 post 请求给 bus/refresh。
- server 端接收到请求并发送给 Spring Cloud Bus。
- Spring Cloud bus 接到消息并通知给其它客户端。
- 其它客户端接收到通知,请求 Server 端获取最新配置。
- 全部客户端均获取到最新的配置。
3、在 config_service 子工程(子模块)的 pom.xml 文件中,导入 消息总线 依赖坐标。
<?xml version="1.0" encoding="UTF-8"?>
<project xmlns="http://maven.apache.org/POM/4.0.0"
         xmlns:xsi="http://www.w3.org/2001/XMLSchema-instance"
         xsi:schemaLocation="http://maven.apache.org/POM/4.0.0 http://maven.apache.org/xsd/maven-4.0.0.xsd">
    <parent>
        <artifactId>spring_cloud_demo</artifactId>
        <groupId>djh.it</groupId>
        <version>1.0-SNAPSHOT</version>
    </parent>
    <modelVersion>4.0.0</modelVersion>

    <artifactId>config_service</artifactId>

    <dependencies>
        <dependency>
            <groupId>org.springframework.cloud</groupId>
            <artifactId>spring-cloud-config-server</artifactId>
        </dependency>
        <!-- springcloudConfig 高可用 -->
        <!-- 引入 消息总线的 依赖 -->
        <dependency>
            <groupId>org.springframework.cloud</groupId>
            <artifactId>spring-cloud-bus</artifactId>
        </dependency>
        <dependency>
            <groupId>org.springframework.cloud</groupId>
            <artifactId>spring-cloud-stream-binder-rabbit</artifactId>
        </dependency>
        <!-- 引入 EurekaClient 依赖坐标 -->
        <dependency>
            <groupId>org.springframework.cloud</groupId>
            <artifactId>spring-cloud-starter-netflix-eureka-client</artifactId>
        </dependency>
        <!-- 引入 动态获取配置信息 相关依赖坐标  -->
        <dependency>
            <groupId>org.springframework.cloud</groupId>
            <artifactId>spring-cloud-starter-config</artifactId>
        </dependency>
        <!-- 引入 手动刷新数据 相关依赖坐标  -->
        <dependency>
            <groupId>org.springframework.boot</groupId>
            <artifactId>spring-boot-starter-actuator</artifactId>
        </dependency>
    </dependencies>
</project>
<!-- spring_cloud_demo\config_service\pom.xml -->
4、在 config_service 子工程(子模块)的 application.yml 文件中,添加 消息总线 配置。
##  spring_cloud_demo\config_service\src\main\resources\application.yml

server:
  port: 10000  # 启动端口 命令行注入。
spring:
  application:
    name: config-server  #spring应用名, # 注意 FeignClient 不支持名字带下划线
  cloud:
    config:
      server:
        git:
          uri: https://gitee.com/djh-xian/config-repostory.git
  # 配置消息总线
  rabbitmq:
    host: 127.0.0.1
    port: 5672
    username: guest
    password: guest
management:
  endpoints:
    web:
      exposure:
        include: bus-refresh  # 暴露的端点
eureka: # 配置 eureka_server
  client:
    service-url: # 配置暴露给 EurekaClient 的请求地址
      defaultZone: http://127.0.0.1:9000/eureka/  # 配置高可用时,须配置为另一个 EurekaServerApplication 的端口号,如:8000
  instance:
    prefer-ip-address: true  # 使用 ip 地址注册
    instance-id: ${spring.cloud.client.ip-address}:${server.port}
5、在 product_service 子工程(子模块)的 pom.xml 中,引入 消息总线 依赖坐标。
<?xml version="1.0" encoding="UTF-8"?>
<project xmlns="http://maven.apache.org/POM/4.0.0"
         xmlns:xsi="http://www.w3.org/2001/XMLSchema-instance"
         xsi:schemaLocation="http://maven.apache.org/POM/4.0.0 http://maven.apache.org/xsd/maven-4.0.0.xsd">
    <parent>
        <artifactId>spring_cloud_demo</artifactId>
        <groupId>djh.it</groupId>
        <version>1.0-SNAPSHOT</version>
    </parent>
    <modelVersion>4.0.0</modelVersion>

    <artifactId>product_service</artifactId>

    <dependencies>
        <!-- springcloudgateway 的内部是通过 netty + webflux 实现。
            webflux 实现和 springmvc 存在冲突,需要注销掉父工程中的 web 依赖,在各子模块中导入 web 依赖。
          -->
        <dependency>
            <groupId>org.springframework.boot</groupId>
            <artifactId>spring-boot-starter-web</artifactId>
        </dependency>
        <dependency>
            <groupId>mysql</groupId>
            <artifactId>mysql-connector-java</artifactId>
            <!--            <version>5.1.32</version>-->
            <version>8.0.26</version>
        </dependency>
        <dependency>
            <groupId>org.springframework.boot</groupId>
            <artifactId>spring-boot-starter-data-jpa</artifactId>
        </dependency>
        <!-- 引入 EurekaClient 依赖坐标 -->
        <dependency>
            <groupId>org.springframework.cloud</groupId>
            <artifactId>spring-cloud-starter-netflix-eureka-client</artifactId>
        </dependency>
        <!-- 引入 sleuth 链路追踪 -->
        <dependency>
            <groupId>org.springframework.cloud</groupId>
            <artifactId>spring-cloud-starter-sleuth</artifactId>
        </dependency>
        <!-- 引入 zipkin 依赖坐标 -->
        <dependency>
            <groupId>org.springframework.cloud</groupId>
            <artifactId>spring-cloud-starter-zipkin</artifactId>
        </dependency>
        <!-- 引入 rabbit 相关 依赖坐标 -->
        <dependency>
            <groupId>org.springframework.cloud</groupId>
            <artifactId>spring-cloud-sleuth-zipkin</artifactId>
        </dependency>
        <dependency>
            <groupId>org.springframework.amqp</groupId>
            <artifactId>spring-rabbit</artifactId>
        </dependency>
        <!-- 引入 动态获取配置信息 相关依赖坐标  -->
        <dependency>
            <groupId>org.springframework.cloud</groupId>
            <artifactId>spring-cloud-starter-config</artifactId>
        </dependency>
        <!-- 引入 手动刷新数据 相关依赖坐标  -->
        <dependency>
            <groupId>org.springframework.boot</groupId>
            <artifactId>spring-boot-starter-actuator</artifactId>
        </dependency>
        <!-- 引入 消息总线的 依赖 -->
        <dependency>
            <groupId>org.springframework.cloud</groupId>
            <artifactId>spring-cloud-bus</artifactId>
        </dependency>
        <dependency>
            <groupId>org.springframework.cloud</groupId>
            <artifactId>spring-cloud-stream-binder-rabbit</artifactId>
        </dependency>
    </dependencies>
</project>
<!-- spring_cloud_demo\product_service\pom.xml -->
6、在 product_service 子工程(子模块)的 bootstrap.yml 文件中,删除掉 动态刷新 配置。
##  spring_cloud_demo\product_service\src\main\resources\bootstrap.yml

spring:
 cloud:
   config:
     name: application  # 应用名称,需要对应 gitee 中配置文件名称的前半部分
     profile: dev   # 开发环境
     # profile: pro   # 生产环境
     label: master  # gitee 中的分支
     # uri: http://localhost:10000  # config-server 的请求地址。
     discovery:   # 通过注册中心获取 config-server 配置
       enabled: true
       service-id: config-server  #服务名
eureka:  # 配置 Eureka
  client:
    service-url:
      defaultZone: http://localhost:9000/eureka/
  instance:
    prefer-ip-address: true  # 使用 ip 地址注册
    instance-id: ${spring.cloud.client.ip-address}:${server.port}  # 向注册中心注册服务的id(IP 地址)。
7、修改 gitee.com 服务器上的配置文件 application-pro.yml,添加 消息总线 配置。
## spring_cloud_demo\product_service\src\main\resources\application.yml
server:
port: 9001 # 启动端口 命令行注入。
spring:
application:
name: service-product #spring应用名, # 注意 FeignClient 不支持名字带下划线
datasource:
driver-class-name: com.mysql.jdbc.Driver # mysql 驱动
url: jdbc:mysql://localhost:3306/shop?useUnicode=true&characterEncoding=utf8&useSSL=false&serverTimezone=Asia/Shanghai
username: root
password: 12311
jpa:
database: MySQL
show-sql: true
open-in-view: true
# 配置消息总线
rabbitmq:
host: 127.0.0.1
port: 5672
username: guest
password: guest
eureka: # 配置 Eureka
client:
service-url:
defaultZone: http://localhost:9000/eureka/
instance:
prefer-ip-address: true # 使用 ip 地址注册
instance-id: ${spring.cloud.client.ip-address}:${server.port} # 向注册中心注册服务的id(IP 地址)。
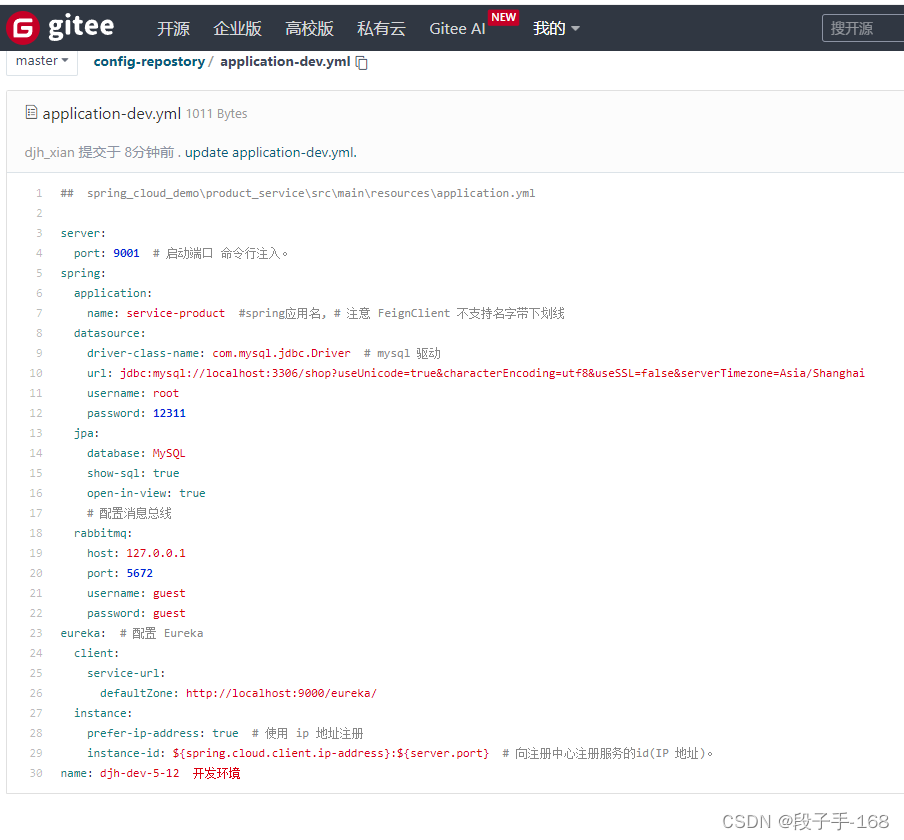
name: djh-dev-5-12 # 开发环境
8、启动 product_service, eureka_service, config_server(ConfigServerApplication,ConfigServerApplication(2))四个启动类,进行测试。
1)浏览器地址栏输入:localhost:10000/application-dev.yml 正常访问到 gitee 服务器上的配置文件。
2)浏览器地址栏输入:http://localhost:9001/product/1
浏览器地址栏输入:localhost:9001/prodcut/test 都可以正常访问 。
3)登录 码云:https://gitee.com/ 的 config-repostory 仓库中,点击 application-dev.yml 文件,再点击【编辑】,修改内容: name: djh-dev 开发环境,不注释汉字了。
提交信息:2024-5-11-1
点击【提交】。
3)
浏览器地址栏输入:localhost:9001/product/1 会显示从 MySQL 摘取的数据内容。
浏览器地址栏输入:localhost:9001/product/test 会显示:djh-dev-5-12 没有更新。
4)打开 Postman 软件,POST 请求地址:http://localhost:10000/actuator/bus-refresh 向消息总线刷新数据。
5)
浏览器地址栏输入:localhost:9001/product/1 会显示从 MySQL 摘取的数据内容。
浏览器地址栏输入:localhost:9001/product/test 不用重新启动 product_service 启动类,
会更新数据显示:djh-dev-5-12 开发环境。

上一节关联链接请点击:
# 从浅入深 学习 SpringCloud 微服务架构(十七)–Spring Cloud config(1)


 3236
3236


 被折叠的 条评论
为什么被折叠?
被折叠的 条评论
为什么被折叠?
 到【灌水乐园】发言


