


Pulsar 之 Functions
Pulsar Functions
Pulsar Functions是什么?
Pulsar Functions是一个运行在Pulsar之上的无服务器计算框架
Pulsar Functions是一个运行在Pulsar之上的无服务器计算框架,并以以下方式处理消息:
- 使用来自一个或多个主题的消息
- 对消息应用用户定义的处理逻辑
- 将消息的输出发布到其他主题
下图说明了函数计算过程中的三个步骤:
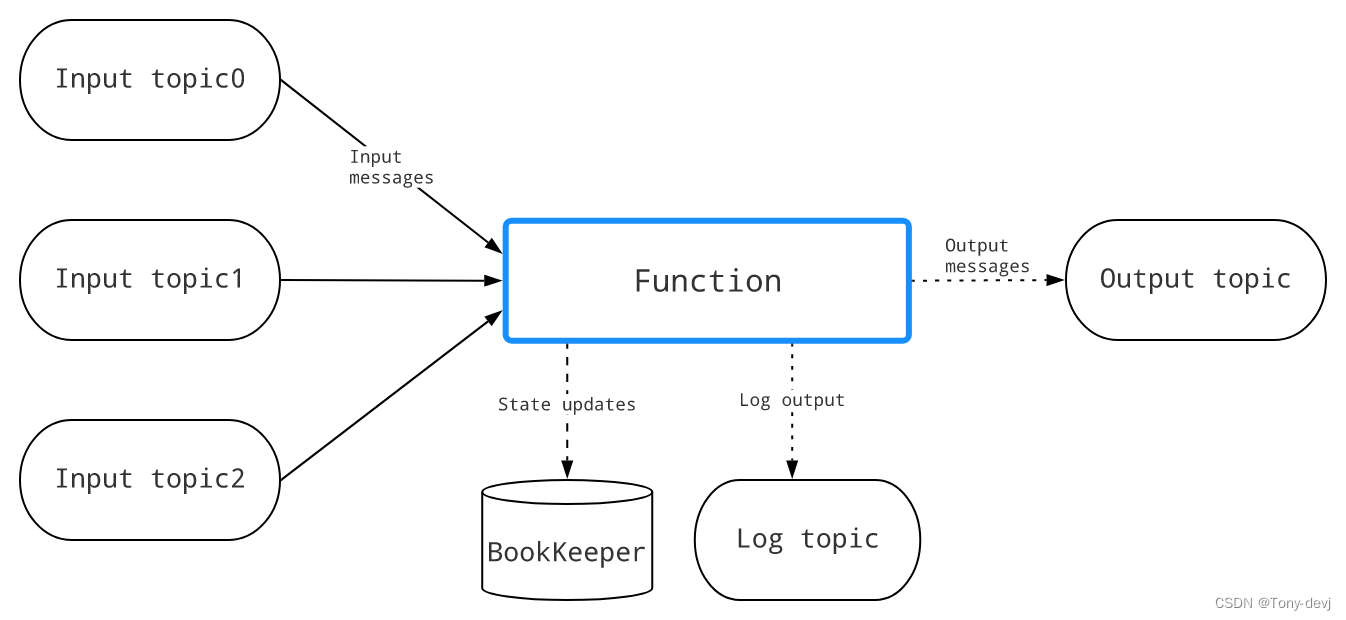
每次函数接收到消息时,它都会完成以下消费-应用-发布步骤:
- 使用来自一个或多个输入主题的消息
- 将定制的(用户提供的)处理逻辑应用到消息
- 发布消息的输出,包括
- 将输出消息写入Pulsar中的输出主题
- 将日志写入日志主题(如果已配置)以进行调试
- 将状态更新写入BookKeeper(如果已配置)
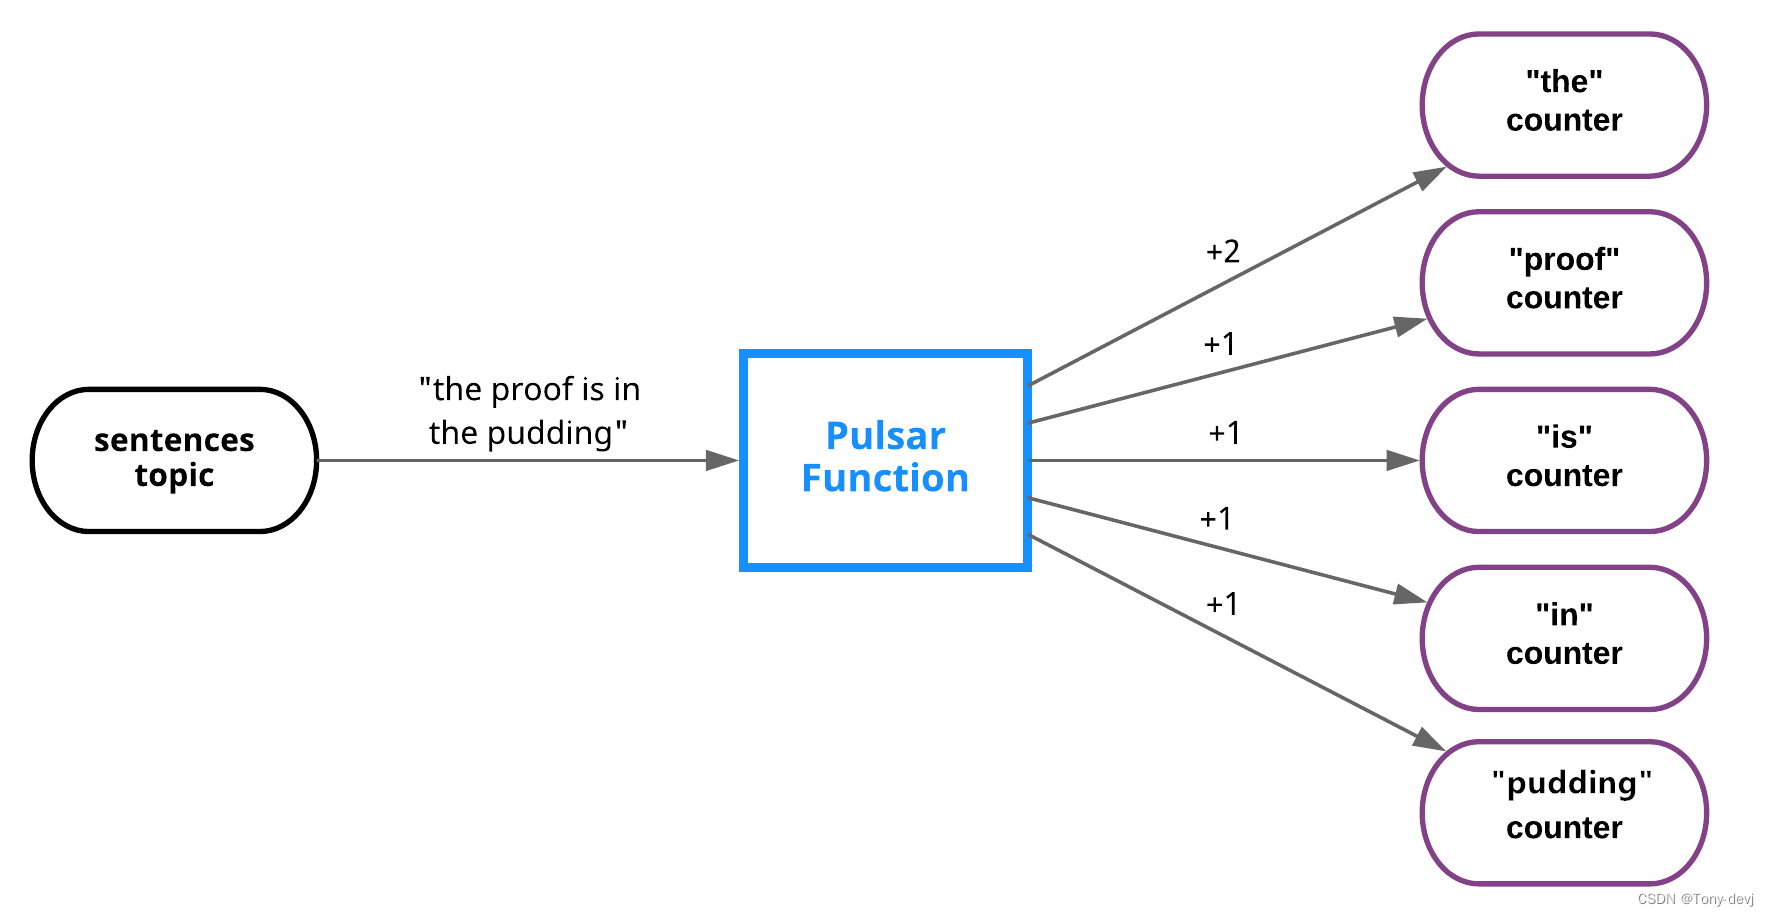
我们可以用Java、Python和Go编写函数。例如,您可以使用Pulsar Functions来设置以下处理链.
- Python函数监听原始语句主题并“消毒”传入字符串(删除多余的空白并将所有字符转换为小写),然后将结果发布到已消毒的语句主题
- Java函数监听经过处理的句子主题,计算每个单词在指定时间窗口内出现的次数,并将结果发布到结果主题
- Python函数监听结果主题并将结果写入MySQL表
为什么使用Pulsar Functions?
Pulsar函数在将消息路由到消费者之前对消息执行简单的计算。这些lambda风格的功能是专门设计的,并与Pulsar集成在一起。
该框架在Pulsar集群上提供了一个简单的计算框架,并负责发送和接收消息的底层细节。我们只需要关注业务逻辑。
Pulsar函数使我们的组织能够最大限度地发挥数据的价值,并享受数据的好处:
- 简化部署和操作——无需部署单独的流处理引擎(SPE),如Apache Storm、Apache Heron或Apache Flink,即可创建数据管道
- 无服务器计算(当您使用Kubernetes运行时)
- 最大化开发人员的生产力
- 故障排除简单
实例
-
该图显示了实现经典单词计数用例的过程:
-
该图演示了实现基于内容的路由用例的过程:
外链图片转存失败,源站可能有防盗链机制,建议将图片保存下来直接上传
完全限定函数名
每个函数都有一个完全限定函数名(FQFN),具有指定的租户、命名空间和函数名。使用FQFN,我们可以在不同的名称空间中使用相同的函数名创建多个函数。
tenant/namespace/name
函数实例
函数实例是函数执行框架的核心元素,由以下元素组成:
- 消费来自不同输入主题的消息的消费者的集合
- 调用函数的执行程序
- 将函数的结果发送到输出主题的生产者

一个函数可以有多个实例,每个实例执行一个函数的副本。可以在配置文件中指定实例数
函数实例中的使用者使用FQFN作为订阅者名,以基于订阅类型在多个实例之间实现负载平衡。订阅类型可以在函数级别指定
每个函数都有一个单独的FQFN状态存储。我们可以指定一个状态接口,以便在BookKeeper中持久化中间结果。其他用户可以查询函数的状态并提取这些结果
函数worker
函数worker是一个逻辑组件,用于在Pulsar Functions的集群模式部署中监视、编排和执行单个函数
在函数工作者中,每个函数实例都可以作为线程或进程执行,具体取决于所选的配置。或者,如果Kubernetes集群可用,则可以在Kubernetes中以StatefulSets的形式生成函数
下图说明了函数工作者的内部架构和工作流:
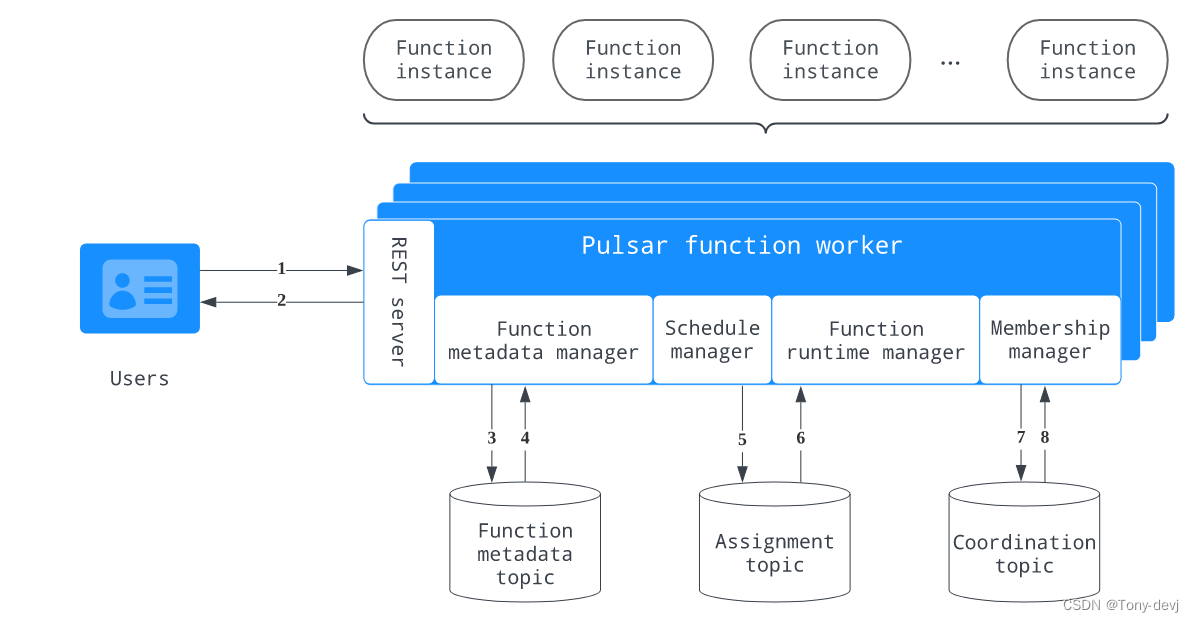
函数工作者形成了一个工作者节点集群,其工作流程描述如下:
- 用户向REST服务器发送请求以执行函数实例
- REST服务器响应请求并将请求传递给功能元数据管理器
- 函数元数据管理器将请求更新写入函数元数据主题。它还跟踪所有与元数据相关的消息,并使用函数元数据主题持久化函数的状态更新
- 函数元数据管理器从函数元数据主题读取更新,并触发调度管理器计算分配
- 日程管理器将作业更新写入作业主题
- 函数运行时管理器侦听分配主题,读取分配更新,并更新其内部状态,该状态包含所有工作人员的所有分配的全局视图。如果更新更改了工作对象上的赋值,函数运行时管理器将通过启动或停止函数实例的执行来具体化新的赋值
- 成员管理器要求协调主题选举一个领导工作者。所有工作人员都订阅故障转移订阅中的协调主题,但活动的工作人员成为领导者并执行分配,从而保证该主题只有一个活动消费者
- 成员管理器从协调主题读取更新
Functions 运行时
函数实例是在运行时内调用的,许多实例可以并行运行。Pulsar支持三种不同成本和隔离保证的函数运行时类型,以最大限度地提高部署灵活性
下表概述了三种类型的函数运行时:
| 类型 | 描述 |
|---|---|
| 线程运行(Thread runtime) | 每个实例都作为一个线程运行,由于线程模式的代码是用Java编写的,所以它只适用于Java实例。当函数以线程模式运行时,它与函数工作者运行在同一个Java虚拟机(JVM)上 |
| 进程运行时(process runtime) | 每个实例都作为一个进程运行,当函数以进程模式运行时,它运行在函数工作者运行的同一台机器上 |
| K8s运行时(Kubernetes runtime) | 函数由worker以Kubernetes StatefulSet的形式提交,每个函数实例作为pod运行。Pulsar支持在启动函数时向Kubernetes StatefulSets和服务添加标签,这有助于选择目标Kubernetes对象 |
处理保证和订阅类型
Pulsar提供了三种不同的消息传递语义,我们可以将它们应用于一个函数。根据ack时间节点确定不同的传递语义实现
| 传递语义 | 描述 | 采用的订阅类型 |
|---|---|---|
| 最多传送一次 | 发送到函数的每个消息都将尽最大努力处理。不能保证信息是否会被处理 当我们选择这个语义时,autoAck配置必须设置为true,否则启动将失败(autoAck配置将在将来的版本中被弃用) Ack时间节点:函数处理之前 | Shared |
| 至少一次递送 默认 | 发送到函数的每个消息都可以被处理多次(以防处理失败或重新交付) 如果创建函数时没有指定–processing-guaranteed标志,则该函数提供至少一次交付保证 Ack时间节点:发送消息到输出后 | Shared |
| 一次有效交付 | 发送到函数的每条消息都可以被处理多次,但它只有一个输出。重复的消息将被忽略 有效地在至少一次处理和有保证的服务器端重复数据删除的基础上实现一次。这意味着一个状态更新可以发生两次,但是相同的状态更新只应用一次,另一个重复的状态更新在服务器端被丢弃 Ack时间节点:发送消息到输出后 | Failover |
| 人工投放 | 当我们选择这个语义时,框架不会执行任何ack操作,我们需要在函数中调用context.getCurrentRecord().ack()方法来手动执行ack操作 Ack时间节点:在函数方法中自定义 | Shared |
- 默认情况下,Pulsar函数提供至少一次交付保证。如果创建函数时没有为–processingGuarantees标志提供值,则该函数提供至少一次保证
- 在Pulsar函数中不可用独占订阅类型,因为
- 如果只有一个实例,exclusive等于故障转移
- 如果有多个实例,exclusive可能会在函数重新启动时崩溃并重新启动。在这种情况下,排他不等于故障转移。因为当主使用者断开连接时,所有未被确认的和后续的消息将被传递到队列中的下一个使用者
- 要将订阅类型从共享更改为密钥共享,可以使用pulse-admin中的保留密钥排序选项。
bin/pulsar-admin functions create \
  --name my-effectively-once-function \
  --processing-guarantees EFFECTIVELY_ONCE \
update:
bin/pulsar-admin functions update \
  --processing-guarantees ATMOST_ONCE \
上下文
Java、Python和Go sdk提供了对函数可以使用的上下文对象的访问。这个上下文对象为函数提供了各种各样的信息和功能,包括
- 函数的名称和ID
- 消息的消息ID。每条消息都会自动分配一个ID
- 消息的键、事件时间、属性和分区键
- 消息被发送到的主题的名称
- 与函数相关联的所有输入主题以及输出主题的名称
- 用于SerDe的类的名称
- 与函数关联的租户和命名空间
- 运行该函数的函数实例的ID
- 函数的版本
- 函数使用的记录器对象,用于创建日志消息
- 访问通过CLI提供的任意用户配置值
- 用于记录度量的接口
- 用于在状态存储器中存储和检索状态的接口
- 将新消息发布到任意主题的函数
- 用于确认正在处理的消息的函数(如果禁用了自动ack)
- (Java)一个函数来获得pulsar管理客户端
- (Java)创建一个Record的函数,该函数返回从Context和输入Record中获取的默认值
函数消息类型
- Schema Registry:Pulsar有一个内置的模式注册表,并与流行的模式类型捆绑在一起,如Avro、JSON和Protobuf。Pulsar Functions可以利用来自输入主题的现有模式信息并派生输入类型。模式注册表也适用于输出主题。
- SerDe:Pulsar函数在向Pulsar主题发布数据或从Pulsar主题消费数据时使用SerDe(序列化和反序列化)。SerDe在默认情况下的工作方式取决于对特定函数使用的语言(Java或Python)。但是,在这两种语言中,我们都可以为更复杂的、特定于应用程序的类型编写自定义SerDe逻辑。
Window function
目前,窗口函数仅在Java中可用,并且不支持MANUAL和effective-once delivery语义
窗口函数是跨数据窗口(即事件流的有限子集)执行计算的函数。如下图所示,流被划分为“桶”,其中可以应用函数
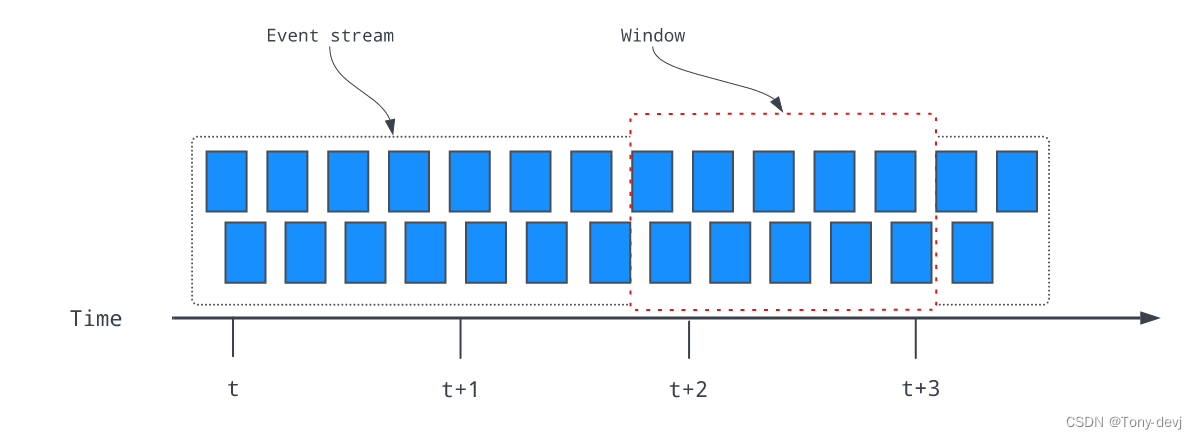
函数的数据窗口定义涉及两个策略:
- 驱逐策略:控制在窗口中收集的数据量
- 触发策略:控制何时触发一个函数并执行该函数以根据清除策略处理窗口中收集的所有数据
触发策略和驱逐策略都由时间或计数驱动:
同时支持处理时间和事件时间:
- 处理时间是根据函数实例构建和处理窗口时的壁时间定义的。窗口完整性的判断很简单,我们不必担心数据到达混乱
- 事件时间是根据事件记录附带的时间戳定义的。它保证了事件时间的正确性,但也提供了更多的数据缓冲和有限的完整性保证
window的类型
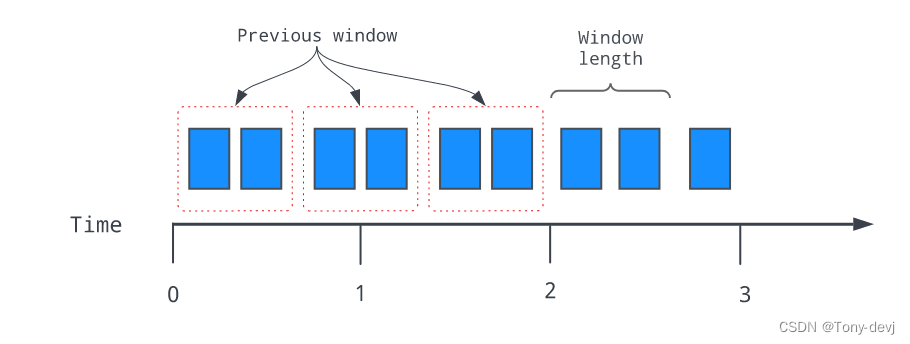
根据相邻的两个窗口是否可以共享公共事件,窗口可以分为以下两种类型:
- 轮转:轮转窗口将元素分配给具有指定时间长度或计数的窗口。轮转窗口的驱逐策略总是基于窗口已满。因此,我们只需要指定触发器策略,基于计数或基于时间,在具有基于计数的触发策略的滚动窗口中,
如以下示例所示,触发策略被设置为2。当窗口中有两个项目时,无论时间如何,都会触发并执行每个函数
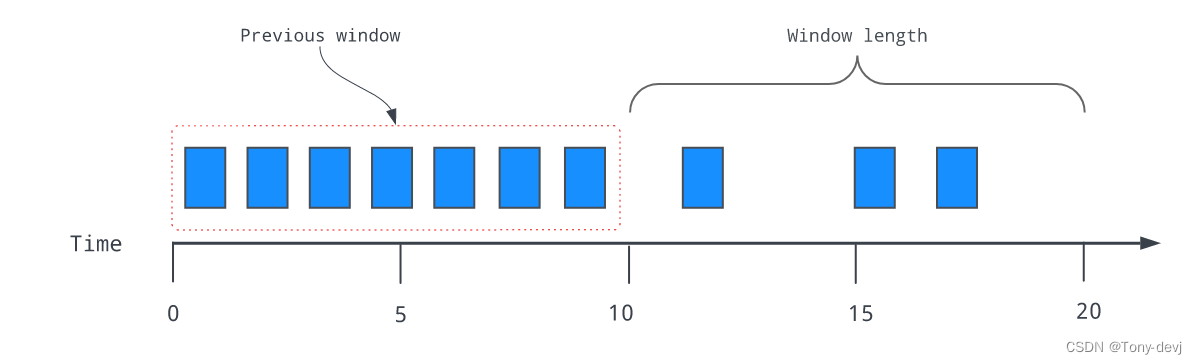
相反,如下面的示例所示,滚动窗口的窗口长度为10秒,这意味着当10秒的时间间隔过去时,函数将被触发,而不管窗口中有多少事件:
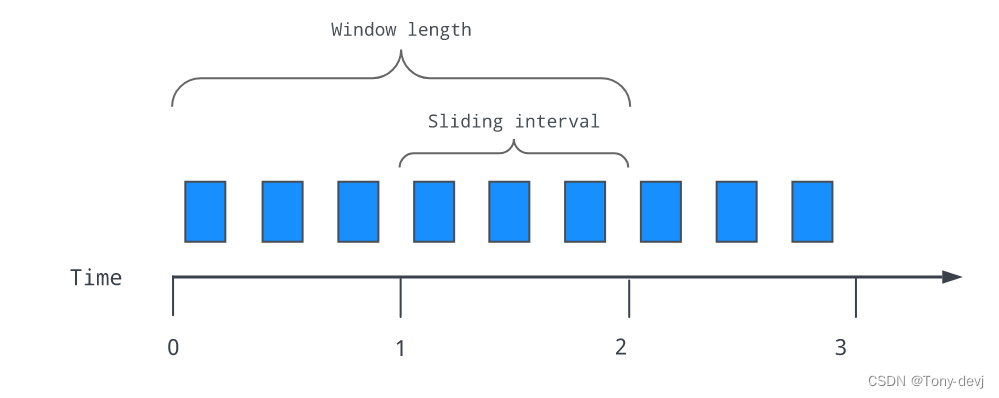
- 滑动:滑动窗口方法通过设置清除策略来限制保留用于处理的数据量,并使用滑动间隔设置触发器策略来定义固定的窗口长度。如果滑动间隔小于窗口长度,则存在数据重叠,这意味着同时落入相邻窗口的数据将被多次用于计算。
如下面的示例所示,窗口长度为2秒,这意味着任何超过2秒的数据都将被清除,不会在计算中使用。滑动间隔被配置为1秒,这意味着该函数每秒执行一次,以处理整个窗口长度内的数据:
快速开始
- 添加functionsworker配置(conf/standalone.conf):
functionsWorkerEnabled=true
- 启动pulsar
./bin/pulsar standalone
- 检查是否是否启动
telnet localhost 6650
- 检查functions 集群
./bin/pulsar-admin functions-worker get-cluster
{
  "workerId" : "c-standalone-fw-localhost-8080",
  "workerHostname" : "localhost",
  "port" : 8080
}
- 确认公共tenant是否存在(public):
./bin/pulsar-admin tenants list
public
pulsar
sample
- 确认默认的namespaces是否存在(default):
./bin/pulsar-admin namespaces list public
public/default
public/functions
- 确认table 服务有没有启动成功
telnet localhost 4181
- 创建一个测试租户和namespaces
./bin/pulsar-admin tenants create test
public
pulsar
sample
test
./bin/pulsar-admin namespaces create test/test-namespace
test/test-namespace
- 开始创建functions,通过提供的example进行创建(免得写yaml文件)
./bin/pulsar-admin functions create --function-config-file examples/example-function-config.yaml --jar examples/api-examples.jar
Created successfully
- 查询functions的配置
./bin/pulsar-admin functions get --tenant test --namespace test-namespace --name example
{
  "tenant": "test",
  "namespace": "test-namespace",
  "name": "example",
  "className": "org.apache.pulsar.functions.api.examples.ExclamationFunction",
  "inputSpecs": {
    "test_src": {
      "isRegexPattern": false,
      "schemaProperties": {},
      "consumerProperties": {},
      "poolMessages": false
    }
  },
  "output": "test_result",
  "producerConfig": {
    "useThreadLocalProducers": false,
    "batchBuilder": ""
  },
  "processingGuarantees": "ATLEAST_ONCE",
  "retainOrdering": false,
  "retainKeyOrdering": false,
  "forwardSourceMessageProperty": true,
  "userConfig": {
    "PublishTopic": "test_result"
  },
  "runtime": "JAVA",
  "autoAck": true,
  "parallelism": 1,
  "resources": {
    "cpu": 1.0,
    "ram": 1073741824,
    "disk": 10737418240
  },
  "cleanupSubscription": true,
  "subscriptionPosition": "Latest"
}
- 查询functions的状态
./bin/pulsar-admin functions status --tenant test --namespace test-namespace --name example
{
  "numInstances" : 1,
  "numRunning" : 1,
  "instances" : [ {
    "instanceId" : 0,
    "status" : {
      "running" : true,
      "error" : "",
      "numRestarts" : 0,
      "numReceived" : 0,
      "numSuccessfullyProcessed" : 0,
      "numUserExceptions" : 0,
      "latestUserExceptions" : [ ],
      "numSystemExceptions" : 0,
      "latestSystemExceptions" : [ ],
      "averageLatency" : 0.0,
      "lastInvocationTime" : 0,
      "workerId" : "c-standalone-fw-localhost-8080"
    }
  } ]
}
- 订阅一个output topic为test_result
./bin/pulsar-client consume -s test-sub -n 0 test_result
- 生产一个输入主题为test_src
./bin/pulsar-client produce -m "test-message-`date`" -n 10 test_src
- 消费端会消费当前这个消息
2023-03-24T17:41:29,306+0800 [pulsar-client-io-1-1] INFO  com.scurrilous.circe.checksum.Crc32cIntChecksum - SSE4.2 CRC32C provider initialized
----- got message -----
key:[null], properties:[__pfn_input_msg_id__=CNbSARAAIAAwAQ==, __pfn_input_topic__=persistent://public/default/test_src], content:test-message-Fri Mar 24 17:41:22 CST 2023!
----- got message -----
key:[null], properties:[__pfn_input_msg_id__=CNbSARABIAAwAQ==, __pfn_input_topic__=persistent://public/default/test_src], content:test-message-Fri Mar 24 17:41:22 CST 2023!
----- got message -----
key:[null], properties:[__pfn_input_msg_id__=CNbSARACIAAwAQ==, __pfn_input_topic__=persistent://public/default/test_src], content:test-message-Fri Mar 24 17:41:22 CST 2023!
----- got message -----
key:[null], properties:[__pfn_input_msg_id__=CNbSARADIAAwAQ==, __pfn_input_topic__=persistent://public/default/test_src], content:test-message-Fri Mar 24 17:41:22 CST 2023!
----- got message -----
key:[null], properties:[__pfn_input_msg_id__=CNbSARAEIAAwAQ==, __pfn_input_topic__=persistent://public/default/test_src], content:test-message-Fri Mar 24 17:41:22 CST 2023!
----- got message -----
key:[null], properties:[__pfn_input_msg_id__=CNbSARAFIAAwAQ==, __pfn_input_topic__=persistent://public/default/test_src], content:test-message-Fri Mar 24 17:41:22 CST 2023!
----- got message -----
key:[null], properties:[__pfn_input_msg_id__=CNbSARAGIAAwAQ==, __pfn_input_topic__=persistent://public/default/test_src], content:test-message-Fri Mar 24 17:41:22 CST 2023!
----- got message -----
key:[null], properties:[__pfn_input_msg_id__=CNbSARAHIAAwAQ==, __pfn_input_topic__=persistent://public/default/test_src], content:test-message-Fri Mar 24 17:41:22 CST 2023!
----- got message -----
key:[null], properties:[__pfn_input_msg_id__=CNbSARAIIAAwAQ==, __pfn_input_topic__=persistent://public/default/test_src], content:test-message-Fri Mar 24 17:41:22 CST 2023!
----- got message -----
key:[null], properties:[__pfn_input_msg_id__=CNbSARAJIAAwAQ==, __pfn_input_topic__=persistent://public/default/test_src], content:test-message-Fri Mar 24 17:41:22 CST 2023!
2023-03-24T17:41:36,948+0800 [pulsar-timer-6-1] INFO  org.apache.pulsar.client.impl.ConsumerStatsRecorderImpl - [test_result] [test-sub] [c48f6] Prefetched messages: 0 --- Consume throughput received: 0.17 msgs/s --- 0.00 Mbit/s --- Ack sent rate: 0.17 ack/s --- Failed messages: 0 --- batch messages: 0 ---Failed acks: 0
启用有状态的函数
Pulsar的独立模式为有状态函数提供了BookKeeper table 服务
- 创建一个example/example-stateful-function-config.yaml
tenant: "test"
namespace: "test-namespace"
name: "word_count"
className: "org.apache.pulsar.functions.api.examples.WordCountFunction"
inputs: ["test_wordcount_src"] # this function will read messages from these topics
autoAck: true
parallelism: 1
- 创建一个有状态的functions
./bin/pulsar-admin functions create --function-config-file examples/example-stateful-function-config.yaml --jar examples/api-examples.jar
Created successfully
- 查看函数信息
bin/pulsar-admin functions get --tenant test --namespace test-namespace --name word_count
{
  "tenant": "test",
  "namespace": "test-namespace",
  "name": "word_count",
  "className": "org.apache.pulsar.functions.api.examples.WordCountFunction",
  "inputSpecs": {
    "test_wordcount_src": {
      "isRegexPattern": false,
      "schemaProperties": {},
      "consumerProperties": {},
      "poolMessages": false
    }
  },
  "producerConfig": {
    "useThreadLocalProducers": false,
    "batchBuilder": ""
  },
  "processingGuarantees": "ATLEAST_ONCE",
  "retainOrdering": false,
  "retainKeyOrdering": false,
  "forwardSourceMessageProperty": true,
  "userConfig": {},
  "runtime": "JAVA",
  "autoAck": true,
  "parallelism": 1,
  "resources": {
    "cpu": 1.0,
    "ram": 1073741824,
    "disk": 10737418240
  },
  "cleanupSubscription": true,
  "subscriptionPosition": "Latest"
}
- 查看functions状态
./bin/pulsar-admin functions status --tenant test --namespace test-namespace --name word_count
{
  "numInstances" : 1,
  "numRunning" : 1,
  "instances" : [ {
    "instanceId" : 0,
    "status" : {
      "running" : true,
      "error" : "",
      "numRestarts" : 0,
      "numReceived" : 0,
      "numSuccessfullyProcessed" : 0,
      "numUserExceptions" : 0,
      "latestUserExceptions" : [ ],
      "numSystemExceptions" : 0,
      "latestSystemExceptions" : [ ],
      "averageLatency" : 0.0,
      "lastInvocationTime" : 0,
      "workerId" : "c-standalone-fw-localhost-8080"
    }
  } ]
}
- 查询带有hello键的函数的状态表。该操作监视与hello相关的更改
./bin/pulsar-admin functions querystate --tenant test --namespace test-namespace --name word_count -k hello -w
这样会不断的监听数据
key 'hello' doesn't exist.
key 'hello' doesn't exist.
key 'hello' doesn't exist.
key 'hello' doesn't exist.
key 'hello' doesn't exist.
key 'hello' doesn't exist.
key 'hello' doesn't exist.
key 'hello' doesn't exist.
key 'hello' doesn't exist.
key 'hello' doesn't exist.
key 'hello' doesn't exist.
key 'hello' doesn't exist.
.....
- 输入主题test_wordcount_src生成10条带有hello的消息,hello的值更新为10
./bin/pulsar-client produce -m "hello" -n 10 test_wordcount_src
{
  "key": "hello",
  "numberValue": 10,
  "version": 9
}
{
  "key": "hello",
  "numberValue": 10,
  "version": 9
}
.....
- 再产生十条hello的数据进行,让numbervalue变为20
./bin/pulsar-client produce -m "hello" -n 10 test_wordcount_src
{
  "key": "hello",
  "numberValue": 20,
  "version": 19
}
{
  "key": "hello",
  "numberValue": 20,
  "version": 19
}
{
  "key": "hello",
  "numberValue": 20,
  "version": 19
}
......
使用Pulsar Window functions
窗函数是脉冲星函数的一种特殊形式
- 创建一个window functions
./bin/pulsar-admin functions create --function-config-file examples/example-window-function-config.yaml --jar examples/api-examples.jar
这里会报错,因为yaml指定的function 的name为example,与我们之前的创建重复了,所以有如下错误:
Function example already exists
- 修改yaml文件如下:
tenant: "test"
namespace: "test-namespace"
name: "example_window"
className: "org.apache.pulsar.functions.api.examples.AddWindowFunction"
inputs: ["test_src_window"]
userConfig:
  "PublishTopic": "test_result_window"

output: "test_result_window"
autoAck: true
parallelism: 1
windowConfig:
  windowLengthCount: 10
  slidingIntervalCount: 5
就可以创建成功了,Created successfully
- 查询functions信息
./bin/pulsar-admin functions get --tenant test --namespace test-namespace --name example_window
{
  "tenant": "test",
  "namespace": "test-namespace",
  "name": "example_window",
  "className": "org.apache.pulsar.functions.api.examples.AddWindowFunction",
  "inputSpecs": {
    "test_src_window": {
      "isRegexPattern": false,
      "schemaProperties": {},
      "consumerProperties": {},
      "poolMessages": false
    }
  },
  "output": "test_result_window",
  "producerConfig": {
    "useThreadLocalProducers": false,
    "batchBuilder": ""
  },
  "processingGuarantees": "ATLEAST_ONCE",
  "retainOrdering": false,
  "retainKeyOrdering": false,
  "forwardSourceMessageProperty": true,
  "userConfig": {
    "PublishTopic": "test_result_window"
  },
  "runtime": "JAVA",
  "autoAck": false,
  "parallelism": 1,
  "resources": {
    "cpu": 1.0,
    "ram": 1073741824,
    "disk": 10737418240
  },
  "windowConfig": {
    "windowLengthCount": 10,
    "slidingIntervalCount": 5,
    "actualWindowFunctionClassName": "org.apache.pulsar.functions.api.examples.AddWindowFunction"
  },
  "cleanupSubscription": true,
  "subscriptionPosition": "Latest"
}
- 查询functions的状态
./bin/pulsar-admin functions status --tenant test --namespace test-namespace --name example_window
{
  "numInstances" : 1,
  "numRunning" : 1,
  "instances" : [ {
    "instanceId" : 0,
    "status" : {
      "running" : true,
      "error" : "",
      "numRestarts" : 0,
      "numReceived" : 0,
      "numSuccessfullyProcessed" : 0,
      "numUserExceptions" : 0,
      "latestUserExceptions" : [ ],
      "numSystemExceptions" : 0,
      "latestSystemExceptions" : [ ],
      "averageLatency" : 0.0,
      "lastInvocationTime" : 0,
      "workerId" : "c-standalone-fw-localhost-8080"
    }
  } ]
}
- 创建一个输出topic test_result_window
./bin/pulsar-client consume -s test-sub -n 0 test_result_window
- 创建一个输入topic test_src_window
./bin/pulsar-client produce -m "3" -n 10 test_src_window
- 消费端显示
----- got message -----
key:[null], properties:[], content:15
----- got message -----
key:[null], properties:[], content:30
设置Functions Workers
我们有两种方式设置Functions Workers:
- 使用brokers 运行function workers
- 在进程或线程模式下运行函数时,不需要资源隔离
- 将function workers配置为在Kubernetes上运行函数(Kubernetes解决资源隔离问题)
- 隔离使用function workers:当我们想隔离函数和broker
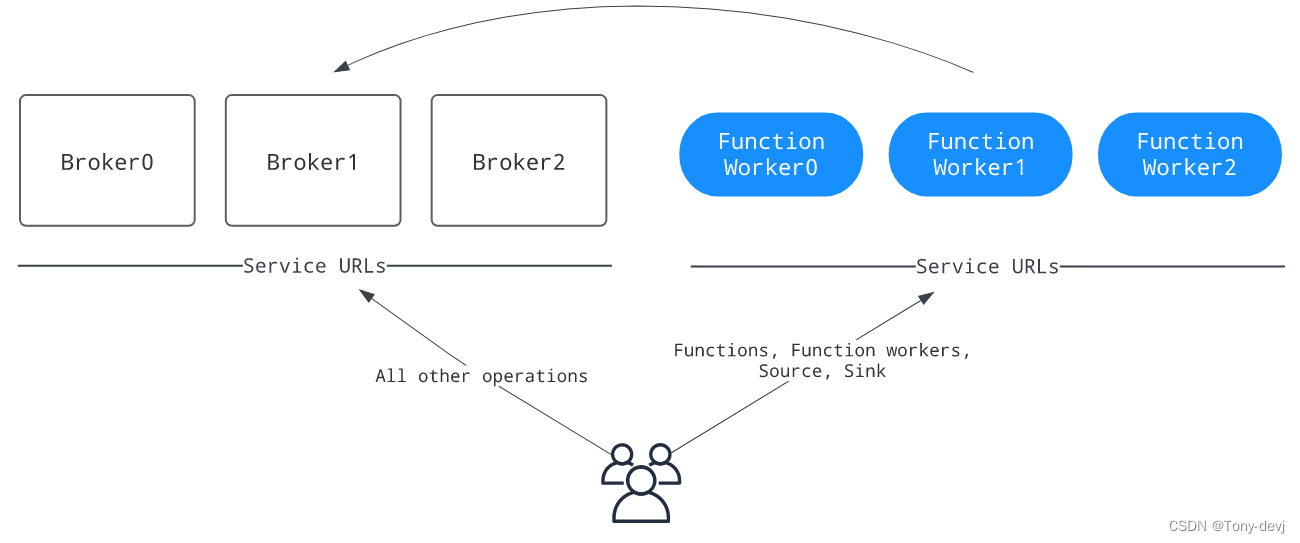
使用brokers 运行function workers
下图演示了与broker一起运行的函数工作者的部署:
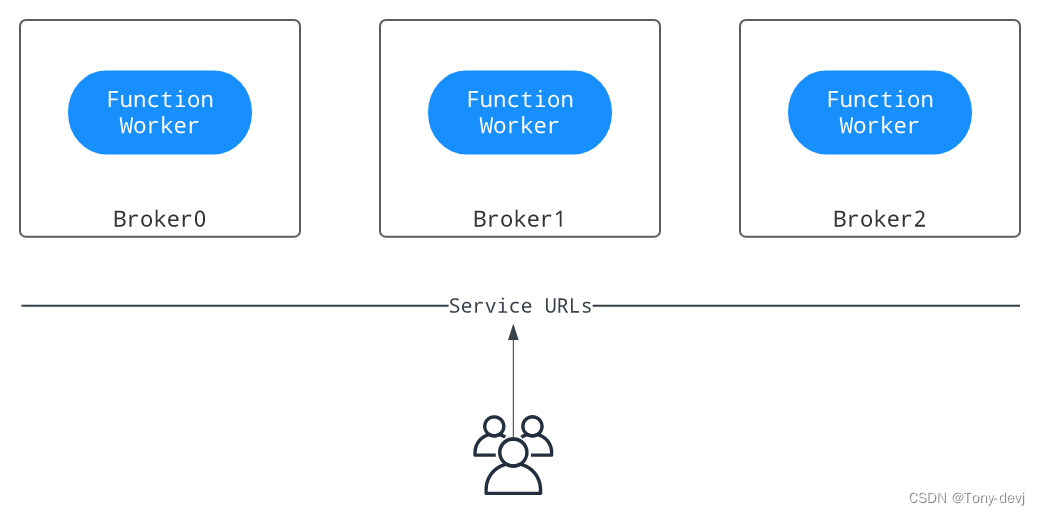
图中的service url表示Pulsar client和Pulsar admin用来连接到Pulsar集群的Pulsar服务url
在brokers开启function workers运行
在conf/broker.conf文件(conf/standalone.conf for pulsar standalone)中,将functionsWorkereNabled设置为true
functionsWorkerEnabled=true
在brokers配置function workers
在与run-with-brokers模式下,大多数function workers的设置是从我们的代理配置继承的(例如,配置存储设置,认证设置等)
我们可以根据我们的需求配置conf/functions_worker.yml文件来自定义其他workers设置
提示优化点:
- 要确保生产部署(具有多个代理的集群)中的高可用性,请将numFunctionPackageReplicas设置为与代理的数量相等。仅在单节点集群部署时,默认值为“1”
- 在运行时初始化分布式日志元数据(initializedDlogMetadata = true),可以通过bin/pulsar initialize-cluster-metadata 命令进行初始化
在BookKeeper集群上启用身份验证时,需要为function workers配置以下身份验证设置:
- bookkeeperClientAuthenticationPlugin:BookKeeper客户端的认证插件名
- bookkeeperClientAuthenticationParametersName:BookKeeper客户端的认证插件参数,包括名称和值
- bookkeeperClientAuthenticationParameters:BookKeeper客户端认证插件参数
启动function worker以与代理一起运行
一旦正确配置了function workers,就可以启动代理
要验证每个worker是否正在运行,可以使用以下命令:
curl <broker-ip>:8080/admin/v2/worker/cluster
如果返回活动function workers的列表,则意味着它们已经成功启动。回显信息如下所示:
[{"workerId":"<worker-id>","workerHostname":"<worker-hostname>","port":8080}]
隔离运行function workers
下图说明了function workers如何在不同的机器中作为单独的进程运行:
图中的service url表示Pulsar client和Pulsar admin用来连接到Pulsar集群的Pulsar服务url
配置
需要进行隔离运行function worker ,需要设置functionsWorkerEnabled=false(conf/broker.conf)
配置相关参数
配置worker所需的参数(conf/functions_worker.yml):
- workerId:工作节点的标识,在集群中是唯一的。类型是字符串
- workerHostname:工作节点的主机名
- workerPort:工作服务器侦听的端口。如果不进行自定义,则保持默认值。设置为null可以禁用明文端口
- workerPortTls:工作服务器侦听的TLS端口。如果不进行自定义,则保持默认值
当访问函数工作者来管理函数时,pulse-admin CLI或任何客户端应该使用配置的workerHostname和workerPort来生成–admin-url
配置函数包参数
配置numFunctionPackageReplicas用来存储功能包的副本数量(conf/functions_worker.yml)
要确保生产部署中的高可用性,请将numFunctionPackageReplicas设置为与bookies数量相等。仅在单节点集群部署时,默认值为“1”
配置函数的元数据参数
为函数元数据配置所需的参数(conf/functions_worker.yml):
- pulsarServiceUrl:代理集群的Pulsar服务URL
- pulsarWebServiceUrl:代理集群的Pulsar web服务URL
- pulsarFunctionsCluster:将该值设置为Pulsar集群名称(same as the clusterName setting in the conf/broker.conf file)
如果在代理集群上启用了身份验证,则必须为函数工作者配置以下身份验证设置,以便与代理通信:
- brokerClientAuthenticationEnabled:是否启用函数工作者用于与代理通信的代理客户端身份验证
- clientAuthenticationPlugin:工作服务中使用的Pulsar客户端使用的身份验证插件
- clientAuthenticationParameters:工作服务中使用的Pulsar客户端使用的身份验证参数
启用安全设置
当我们在配置了身份验证的集群中单独运行函数worker时,我们的函数worker需要与代理通信并验证传入的请求。因此,我们需要配置代理进行身份验证和授权所需的属性
我们必须为服务器配置工作人员身份验证和授权功能,以便对传入请求进行身份验证,并配置经过身份验证的客户端与代理通信
使用token认证时,需要配置以下属性(conf/function-worker.yml):
brokerClientAuthenticationPlugin: org.apache.pulsar.client.impl.auth.AuthenticationToken
brokerClientAuthenticationParameters: file:///etc/pulsar/token/admin-token.txt
configurationMetadataStoreUrl: zk:zookeeper-cluster:2181 # auth requires a connection to zookeeper
authenticationProviders:
 - "org.apache.pulsar.broker.authentication.AuthenticationProviderToken"
authorizationEnabled: true
authenticationEnabled: true
superUserRoles:
  - superuser
  - proxy
properties:
  tokenSecretKey: file:///etc/pulsar/jwt/secret # if using a secret token, key file must be DER-encoded
  tokenPublicKey: file:///etc/pulsar/jwt/public.key # if using public/private key tokens, key file must be DER-encoded
我们可以设置如下的安全策略:
- 启用TLS加密
- 启用认证providers
- 启用授权providers
- 启用端到端加密
启用TLS加密
useTLS: true
pulsarServiceUrl: pulsar+ssl://localhost:6651/
pulsarWebServiceUrl: https://localhost:8443

tlsEnabled: true
tlsCertificateFilePath: /path/to/functions-worker.cert.pem
tlsKeyFilePath:         /path/to/functions-worker.key-pk8.pem
tlsTrustCertsFilePath:  /path/to/ca.cert.pem

// The path to trusted certificates used by the Pulsar client to authenticate with Pulsar brokers
brokerClientTrustCertsFilePath: /path/to/ca.cert.pem
启用认证providers
- 要在函数工作者上启用身份验证提供程序,请将authenticationProviders参数替换为我们希望启用的提供程序:
authenticationEnabled: true
authenticationProviders: [provider1, provider2]
- 对于mTLS身份验证提供程序,按照下面的示例添加所需的设置:
brokerClientAuthenticationPlugin: org.apache.pulsar.client.impl.auth.AuthenticationTls
brokerClientAuthenticationParameters: tlsCertFile:/path/to/admin.cert.pem,tlsKeyFile:/path/to/admin.key-pk8.pem

authenticationEnabled: true
authenticationProviders: ['org.apache.pulsar.broker.authentication.AuthenticationProviderTls']
- 对于SASL身份验证提供者,在属性下添加saslJaasClientAllowedIds和saslJaasServerSectionName
properties:
  saslJaasClientAllowedIds: .*pulsar.*
  saslJaasServerSectionName: Broker
- 对于令牌身份验证提供程序,在属性下添加所需的设置:
properties:
  tokenSecretKey:       file://my/secret.key
  # If using public/private
  # tokenPublicKey:     file://path/to/public.key
密钥文件必须是DER(区分编码规则)编码的
启用授权providers
要对函数工作者启用授权,请完成以下步骤:
- 在functions_worker.yml中配置authorizationEnabled, authorizationProvider和configurationMetadataStoreUrl。身份验证提供程序连接到configurationMetadataStoreUrl以接收名称空间策略
authorizationEnabled: true
authorizationProvider: org.apache.pulsar.broker.authorization.PulsarAuthorizationProvider
configurationMetadataStoreUrl: <meta-type>:<configuration-metadata-store-url>
- 配置超级用户角色列表。超级用户角色可以访问任何管理API
superUserRoles:
  - role1
  - role2
  - role3
配置BookKeeper授权
如果在BookKeeper集群上启用了身份验证,则需要为函数工作者配置以下BookKeeper身份验证设置:
- bookkeeperClientAuthenticationPlugin:BookKeeper客户端的认证插件名
- bookkeeperClientAuthenticationParametersName:BookKeeper客户端的认证插件参数,包括名称和值
- bookkeeperClientAuthenticationParameters:BookKeeper客户端认证插件参数
启动函数工作者
在启动函数工作者之前,请确保配置了函数运行时
我们可以使用pulse-daemon CLI工具在后台启动函数工作:
bin/pulsar-daemon start functions-worker
要在前台启动一个函数工作者,可以使用pulse-admin CLI,如下所示:
bin/pulsar functions-worker
为独立的功能工作者配置代理
当我们在一个单独的集群中运行函数工作者时,admin rest endpoints被分成两个集群,如下图所示。function、function-worker、source和sink现在由工作者集群提供服务,
而所有其他剩余端点由代理集群提供服务。这要求我们在pulse-admin CLI中相应地使用正确的服务URL。为了解决这种不便,我们可以启动一个代理集群,作为管理服务的中央入口点,用于路由管理rest请求
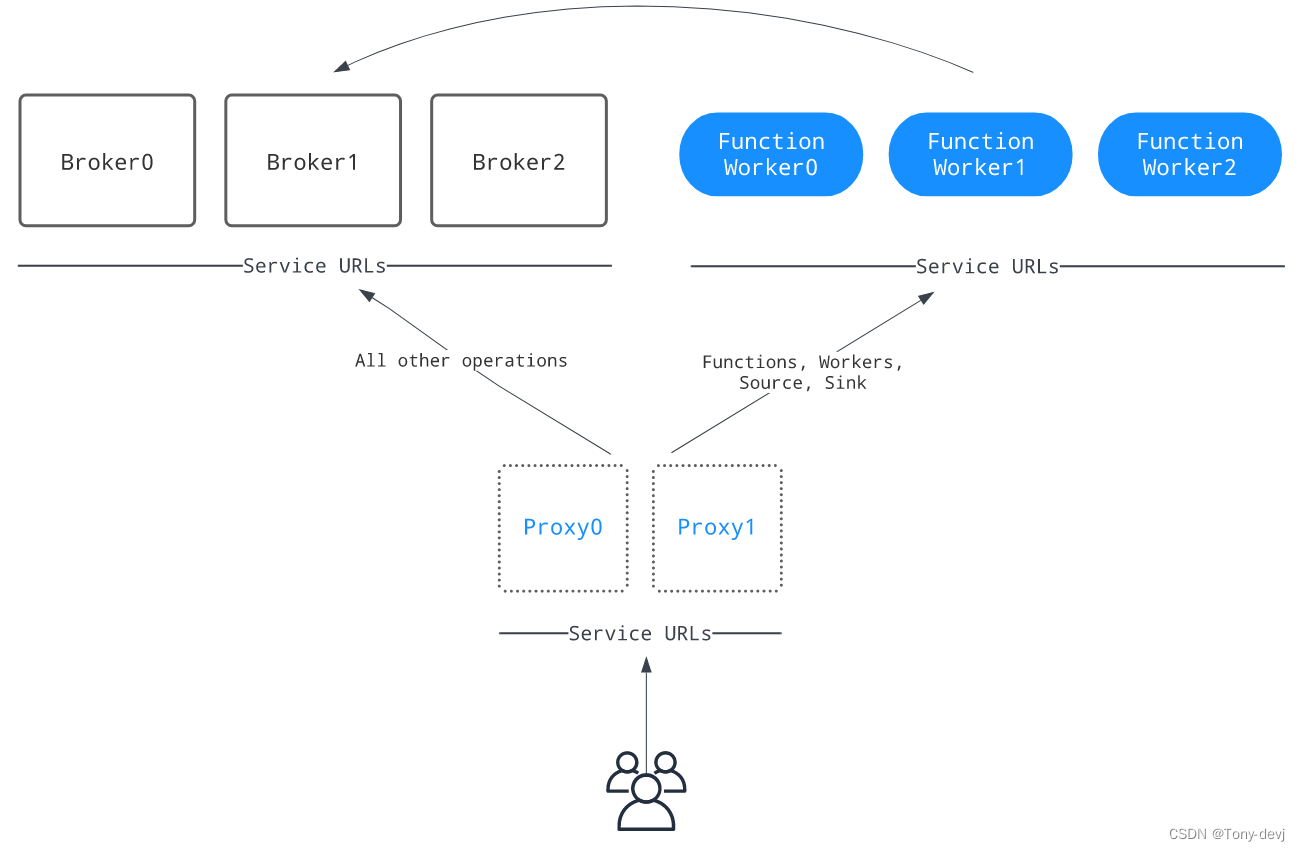
启用代理,将与函数相关的管理请求路由到函数工作者,我们需要做如下配置(conf/proxy.conf):
functionWorkerWebServiceURL=<pulsar-functions-worker-web-service-url>
functionWorkerWebServiceURLTLS=<pulsar-functions-worker-web-service-url>
配置临时文件路径
函数工作者使用JVM中的java.io.tmpdir作为默认的临时文件路径,它也用作每个NAR包的默认提取文件路径。NAR包需要一个本地文件路径来提取并加载到Java类加载器
如果希望将NAR包的默认提取文件路径更改到另一个目录,可以在functions_worker.yml中添加以下参数和所需的目录。配置取决于我们使用的函数运行时
- Thread runtime/Process runtime:narExtractionDirectory
- Kubernetes runtime:functionRuntimeFactoryConfigs.narExtractionDirectory
启用有状态函数
当需要Pulsar函数的有状态api时,例如putState()和queryState()相关的接口,我们需要在函数工作者中启用有状态函数特性
- 在BookKeeper中启用streamStorage服务。目前,该服务使用的是NAR包,因此需要在conf/bookkeeper.conf中配置:
##################################################################
##################################################################
# Settings below are used by stream/table service
##################################################################
##################################################################

### Grpc Server ###

# the grpc server port to listen on. default is 4181
storageserver.grpc.port=4181

### Dlog Settings for table service ###

#### Replication Settings
dlog.bkcEnsembleSize=3
dlog.bkcWriteQuorumSize=2
dlog.bkcAckQuorumSize=2

### Storage ###

# local storage directories for storing table ranges data (e.g. rocksdb sst files)
storage.range.store.dirs=data/bookkeeper/ranges

# whether the storage server capable of serving readonly tables. default is false.
storage.serve.readonly.tables=false

# the cluster controller schedule interval, in milliseconds. default is 30 seconds.
storage.cluster.controller.schedule.interval.ms=30000
- 启动bookie后,通过以下方法检查streamStorage服务是否启动成功
telnet localhost 4181
- 配置stateStorageServiceUrl 在conf/functions_worker.yml文件中,bk-service-url是指向BookKeeper表服务的服务URL
stateStorageServiceUrl: bk://<bk-service-url>:4181
为地理复制集群配置功能工作者
当使用地理复制运行多个集群时,需要为每个集群使用不同的函数名称空间。否则,所有函数共享一个名称空间,并可能跨集群调度分配
例如,如果我们有两个集群:east-1和west-1,我们可以分别在conf/functions_worker.yml文件中配置,这确保了两个不同职能的worker使用不同的主题集进行内部协调
pulsarFunctionsCluster: east-1
pulsarFunctionsNamespace: public/functions-east-1
pulsarFunctionsCluster: west-1
pulsarFunctionsNamespace: public/functions-west-1
故障排除
Error message: Namespace missing local cluster name in clusters list
Failed to get partitioned topic metadata: org.apache.pulsar.client.api.PulsarClientException$BrokerMetadataException: Namespace missing local cluster name in clusters list: local_cluster=xyz ns=public/functions clusters=[standalone]
当发生以下任何情况时,将显示错误消息:
- 代理以functionsWorkerEnabled=true启动,但是pulsarFunctionsCluster 在conf/functions_worker.yml没有设置正确的集群
- 设置一个地理复制的Pulsar集群,使用functionsWorkerEnabled=true,当一个集群中的代理运行良好时,另一个集群中的代理运行不好
应变方法
如果发生上述任何一种情况,请按照下面的说明解决问题:
- 通过设置functionsWorkerEnabled=false禁用函数工作者,并重新启动代理
- 获取当前集群列表public/functions命名空间
bin/pulsar-admin namespaces get-clusters public/functions
- 检查集群是否在集群列表中。如果不是,添加它并更新列表
bin/pulsar-admin namespaces set-clusters --clusters <existing-clusters>,<new-cluster> public/functions
- 集群设置成功后,通过设置functionsWorkerEnabled=true启用函数工作者
- 为pulsarFunctionsCluster参数设置正确的集群名称(conf/functions_worker.yml)
- 重启代理
Pulsar 配置Function runtime
配置thread runtime
我们可以在conf/functions_worker.yml文件中使用线程运行时的默认配置
如果需要自定义更多参数,如线程组名称,请参考以下示例:
functionRuntimeFactoryClassName: org.apache.pulsar.functions.runtime.thread.ThreadRuntimeFactory
functionRuntimeFactoryConfigs:
  threadGroupName: "Your Function Container Group"
要设置线程运行时的客户机内存限制,可以配置pulsarClientMemoryLimit:
functionRuntimeFactoryConfigs:
#  pulsarClientMemoryLimit
# # the max memory in bytes the pulsar client can use
#   absoluteValue:
# # the max memory the pulsar client can use as a percentage of max direct memory set for JVM
#   percentOfMaxDirectMemory:
如果同时设置了absoluteValue和percentOfMaxDirectMemory,则使用较小的值.
配置process runtime
我们可以在配置文件conf/functions_worker.yml文件中使用流程运行时的默认配置
如果需要自定义更多参数,请参考以下示例:
functionRuntimeFactoryClassName: org.apache.pulsar.functions.runtime.process.ProcessRuntimeFactory
functionRuntimeFactoryConfigs:
  # the directory for storing the function logs
  logDirectory:
  # change the jar location only when you put the java instance jar in a different location
  javaInstanceJarLocation:
  # change the python instance location only when you put the python instance jar in a different location
  pythonInstanceLocation:
  # change the extra dependencies location:
  extraFunctionDependenciesDir:
配置Kubernetes runtime
当函数工作者生成并应用Kubernetes清单时,Kubernetes运行时工作。由函数工作者生成的清单包括:
- 默认情况下,StatefulSet清单有一个带有多个副本的pod。这个数由函数的并行度决定。pod在pod启动时下载函数有效负载(通过函数工作者REST API)。如果配置了函数运行时,pod的容器映像是可配置的。
- a Service(用于与pod通信)
- 用于验证凭证的Secret(当适用时)。Kubernetes运行时支持秘钥。我们可以创建一个Kubernetes秘钥,并将其作为pod中的环境变量公开
配置基本设置
为了快速配置Kubernetes运行时,可以在conf/functions_worker.yml文件中使用KubernetesRuntimeFactoryConfig的默认设置
如果你已经使用Helm chart在Kubernetes上建立了一个Pulsar集群,这意味着函数工作者也已经在Kubernetes上建立了,你可以使用与函数工作者运行的pod关联的serviceAccount。
否则,我们可以通过将functionRuntimeFactoryConfigs设置为k8Uri来配置函数工作者与Kubernetes集群通信
集成 Kubernetes 密钥
Kubernetes中的Secret是一个保存一些机密数据(如密码、令牌或密钥)的对象。当我们在部署函数的Kubernetes名称空间中创建一个Secret时,函数可以安全地引用和分发它。
要启用该特性,请将配置文件conf/functions-worker.yml的secretsProviderConfiguratorClassName设置为org.apache.pulsar.functions.secretsproviderconfigurator.KubernetesSecretsProviderConfigurator
例如,我们将一个函数部署到pulsar-func Kubernetes名称空间,并且有一个名为database-creds的密钥名称和一个字段名password,我们希望将其作为一个名为DATABASE_PASSWORD的环境变量挂载到pod中。下面的配置允许函数引用密钥并将该值作为pod中的环境变量挂载
tenant: "mytenant"
namespace: "mynamespace"
name: "myfunction"
inputs: [ "persistent://mytenant/mynamespace/myfuncinput" ]
className: "com.company.pulsar.myfunction"

secrets:
  # the secret will be mounted from the `password` field in the `database-creds` secret as an env var called `DATABASE_PASSWORD`
  DATABASE_PASSWORD:
    path: "database-creds"
    key: "password"
启用token认证
当我们使用令牌身份验证、TLS加密或自定义身份验证来保护与Pulsar集群的通信时,Pulsar将我们的证书颁发机构(CA)传递给客户端,以便客户端可以使用我们的签名证书对集群进行身份验证
要为Pulsar集群启用身份验证,需要通过实现org.apache.pulsar.functions.auth.KubernetesFunctionAuthProvider接口,为运行函数的pod指定一种机制来对代理进行身份验证
对于令牌身份验证,Pulsar包含了上述接口的实现,用于分发CA。函数工作者捕获部署(或更新)函数的令牌,将其保存为密钥,并将其装入pod
在配置文件conf/function-worker.yml中配置functionAuthProviderClassName:
functionAuthProviderClassName: org.apache.pulsar.functions.auth.KubernetesSecretsTokenAuthProvider
对于TLS或自定义身份验证,我们可以实现org.apache.pulsar.functions.auth.KubernetesFunctionAuthProvider接口或使用替代机制
如果用于部署函数的令牌有到期日期,则可能需要在到期后重新部署函数
自定义 Kubernetes 运行时
自定义Kubernetes运行时允许我们自定义由运行时创建的Kubernetes资源,包括如何生成清单,如何将经过身份验证的数据传递到pods,以及如何集成密钥secrets
需要在配置文件conf/functions-worker.yml配置runtimeCustomizerClassName,使用全限定类名
函数API提供了一个名为customRuntimeOptions的标志,该标志被传递给org.apache.pulsar.functions.runtime.KubernetesManifestCustomizer 接口。
去实例化KubernetesManifestCustomizer,可以在配置文件conf/functions-worker.yml中设置runtimeCustomizerConfig
runtimeCustomizerConfig在所有函数中都是相同的。如果同时提供runtimeCustomizerConfig和customRuntimeOptions,则需要决定如何在KubernetesManifestCustomizer接口的实现中管理这两个配置
Pulsar包含一个用runtimeCustomizerConfig初始化的内置实现。它允许我们将JSON文档作为customRuntimeOptions传递,并添加某些属性。
要使用这个内置实现,将runtimeCustomizerClassName设置为org.apache.pulsar.functions.runtime.kubernetes.BasicKubernetesManifestCustomizer
如果同时提供了runtimeCustomizerConfig和customRuntimeOptions并且存在冲突,BasicKubernetesManifestCustomizer使用customRuntimeOptions覆盖runtimeCustomizerConfig
customRuntimeOptions配置实例:
{
  "jobName": "jobname", // the k8s pod name to run this function instance
  "jobNamespace": "namespace", // the k8s namespace to run this function in
  "extractLabels": {           // extra labels to attach to the statefulSet, service, and pods
    "extraLabel": "value"
  },
  "extraAnnotations": {        // extra annotations to attach to the statefulSet, service, and pods
    "extraAnnotation": "value"
  },
  "nodeSelectorLabels": {      // node selector labels to add on to the pod spec
    "customLabel": "value"
  },
  "tolerations": [             // tolerations to add to the pod spec
    {
      "key": "custom-key",
      "value": "value",
      "effect": "NoSchedule"
    }
  ],
  "resourceRequirements": {  // values for cpu and memory should be defined as described here: https://kubernetes.io/docs/concepts/configuration/manage-compute-resources-container
    "requests": {
      "cpu": 1,
      "memory": "4G"
    },
    "limits": {
      "cpu": 2,
      "memory": "8G"
    }
  }
}
如何定义pulsar资源名称时运行pulsar在Kubernetes
如果我们在Kubernetes上运行Pulsar Functions或连接器,则需要遵循Kubernetes命名约定来定义Pulsar资源的名称,无论我们使用哪个管理界面
Kubernetes需要一个RFC 1123中定义的可以用作DNS子域名的名称。Pulsar支持比Kubernetes命名惯例更多的合法字符
如果我们使用Kubernetes不支持的特殊字符创建Pulsar资源名称(例如,在Pulsar名称空间名称中包含冒号),Kubernetes运行时将Pulsar对象名称转换为符合RFC 1123格式的Kubernetes资源标签。
因此,我们可以使用Kubernetes运行时运行函数或连接器。Pulsar对象名称转换为Kubernetes资源标签的规则如下:
- 截短至63个字符
- 将以下字符替换为破折号(-):
- 非字母数字字符
- 下划线
- .
- 将开头和结尾的非字母数字字符替换为0
自定义 Java 运行时选项
此设置仅适用于进程运行时和Kubernetes运行时
为函数工作者启动的每个进程向JVM命令行传递附加参数,我们可以配置additionalJavaRuntimeArguments 参数在conf/functions_worker.yml配置文件中
- 添加 JVM 参数, 如: -XX:+ExitOnOutOfMemoryError
- 传递自定义系统属性,如:-Dlog4j2.formatMsgNoLookups
additionalJavaRuntimeArguments: ['-XX:+ExitOnOutOfMemoryError','-Dfoo=bar']
如何部署Pulsar 函数
部署函数有两种模式:
- 集群模式:我们可以向Pulsar集群提交一个函数,该集群将负责运行该函数
- 单机模式:我们可以确定函数在本地机器上运行的位置
前期准备
- 在自己的机器上本地运行一个独立集群
- 在Kubernetes、Amazon Web Services、bare metal等上运行Pulsar集群
CLI 的默认参数
我们可以在pulse-admin CLI下使用功能相关的命令来部署功能。pulsar提供了多种命令,例如:
- create:集群模式下部署function
- trigger: 用于trigger函数
CLI下需要配置的参数及默认值如下表所示:
| 参数 | 默认值 |
|---|---|
| 函数名称 | N/A,可以为函数名指定任何值 |
| Tenant | N/A,可以为函数名指定任何值 |
| Namespace | N/A,可以为函数名指定任何值 |
| Output topic | {input topic}-{function name}-output 如果函数的输入主题名是incoming且函数名是exclamation,则输出主题名是incoming-exclamation-output。 |
| Processing guarantees | ATLEAST_ONCE |
| Pulsar service URL | pulsar://localhost:6650 |
以create命令为例。下面的函数具有函数名(MyFunction)、租户(public)、命名空间(default)、订阅类型(SHARED)、处理保证(至少一次)的默认值,和Pulsar服务URL:pulsar://localhost:6650
bin/pulsar-admin functions create \
  --jar my-pulsar-functions.jar \
  --classname org.example.MyFunction \
  --inputs my-function-input-topic1,my-function-input-topic2
在localrun模式下部署函数
在localrun模式下部署函数时,它将运行在我们在笔记本电脑上输入命令的机器上,或者运行在AWS EC2实例中
可以使用localrun命令运行函数的单个实例。要运行多个实例,可以多次使用localrun命令
以localrun命令的使用示例如下:
bin/pulsar-admin functions localrun \
  --py myfunc.py \
  --classname myfunc.SomeFunction \
  --inputs persistent://public/default/input-1 \
  --output persistent://public/default/output-1
在localrun模式下,Java函数使用线程运行时;Python和Go函数使用进程运行时。
默认情况下,该函数通过本地代理服务URL连接到运行在同一台机器上的Pulsar集群。如果希望将其连接到非本地Pulsar集群,可以使用–brokerServiceUrl标志指定不同的代理服务URL
bin/pulsar-admin functions localrun \
  --broker-service-url pulsar://my-cluster-host:6650 \
  # Other function parameters
在集群模式下部署函数
在集群模式下部署函数会将函数上传到函数worker,这意味着函数是由该worker调度的
在集群模式下部署功能,使用create命令:
bin/pulsar-admin functions create \
  --py myfunc.py \
  --classname myfunc.SomeFunction \
  --inputs persistent://public/default/input-1 \
  --output persistent://public/default/output-1
当需要更新运行在集群模式下的函数时,使用update命令:
bin/pulsar-admin functions update \
  --py myfunc.py \
  --classname myfunc.SomeFunction \
  --inputs persistent://public/default/new-input-topic \
  --output persistent://public/default/new-output-topic
将资源分配给函数实例
在集群模式下运行函数时,可以指定可以分配给每个函数实例的资源
下表概述了可以分配给函数实例的资源:
| 资源 | 规定 | 支持运行时 |
|---|---|---|
| CPU | cpu核数 | Kubernetes |
| RAM | 内存 | Kubernetes |
| Disk space | 磁盘空间 | Kubernetes |
例如,下面的命令为一个函数分配8个内核、8GB RAM和10GB磁盘空间:
bin/pulsar-admin functions create \
  --jar target/my-functions.jar \
  --classname org.example.functions.MyFunction \
  --cpu 8 \
  --ram 8589934592 \
  --disk 10737418240
启用并行处理
在集群模式下,我们可以指定并行度(要运行的实例数量)以启用一个函数的并行处理
实例1:
在部署函数时指定create命令的–parallelism标志
bin/pulsar-admin functions create \
  --parallelism 3 \
  # Other function info
对于已存在的函数,可以使用update命令调整并行度。
实例2:
在通过YAML部署函数配置时指定并行度参数:
# function-config.yaml
parallelism: 3
inputs:
  - persistent://public/default/input-1
output: persistent://public/default/output-1
# other parameters
对于已存在的函数,可以使用update命令调整并行度:
bin/pulsar-admin functions update \
  --function-config-file function-config.yaml
启用端到端加密
要执行端到端加密,我们可以在pulse-admin CLI中使用应用程序配置的公钥和私钥对指定--producer-config和--input-specs
只有拥有有效密钥的使用者才能解密加密的消息
加密/解密的相关配置 CryptoConfig包含了两个ProducerConfig 和inputSpecs,关于CryptoConfig的具体可配置字段如下:
public class CryptoConfig {
    private String cryptoKeyReaderClassName;
    private Map<String, Object> cryptoKeyReaderConfig;

    private String[] encryptionKeys;
    private ProducerCryptoFailureAction producerCryptoFailureAction;

    private ConsumerCryptoFailureAction consumerCryptoFailureAction;
}
- producerCryptoFailureAction:定义生产者在加密数据失败时采取的操作。可用的选项有FAIL或SEND
- consumerCryptoFailureAction:定义使用者在未能解密接收到的数据时所采取的操作。可用的选项有FAIL、DISCARD或CONSUME
启用包管理服务
包管理服务支持版本管理和简化升级和回滚用于函数、接收器和源的进程。在不同的名称空间中使用相同的函数、接收器和源时,可以将它们上传到公共包管理系统
启用包管理服务后,可以将功能包上传到服务并获取包URL。因此,您可以通过设置–jar、–py或–go到包URL来创建函数
缺省情况下,关闭包管理服务。在集群中启用它,需要在conf/broker.conf配置如下:
enablePackagesManagement=true
packagesManagementStorageProvider=org.apache.pulsar.packages.management.storage.bookkeeper.BookKeeperPackagesStorageProvider
packagesReplicas=1
packagesManagementLedgerRootPath=/ledgers
要确保生产部署(具有多个代理的集群)中的高可用性,请将packagesReplicas设置为与broker数量相等。仅在单节点集群部署时,默认值为“1”
使用内置函数
与内置连接器类似,被打包为NAR的Java函数代码放在函数工作者的函数目录中,在启动时加载,并可以在创建函数时引用
例如,如果你有一个内置函数的名称exclamation 在Pulsar-io.yaml,你可以创建一个函数实例:
bin/pulsar-admin functions create \
  --function-type exclamation \
  --inputs persistent://public/default/input-1 \
  --output persistent://public/default/output-1
触发一个函数
触发函数意味着通过CLI向其中一个输入主题生成消息来调用函数。可以在任何时候使用trigger命令触发某个函数
使用pulsar-admin CLI,我们可以向函数发送消息,而无需使用pulsar-client工具或特定于语言的客户端库
要了解如何触发函数,可以从一个Python函数开始,该函数根据输入返回一个简单的字符串,如下所示:
# myfunc.py
def process(input):
    return "This function has been triggered with a value of {0}".format(input)
- 在集群模式下执行此函数
bin/pulsar-admin functions create \
  --tenant public \
  --namespace default \
  --name myfunc \
  --py myfunc.py \
  --classname myfunc \
  --inputs persistent://public/default/in \
  --output persistent://public/default/out
- 使用pulsar-client consume命令指定使用者在输出主题上侦听来自myfunc函数的消息
bin/pulsar-client consume persistent://public/default/out \
  --subscription-name my-subscription \
  --num-messages 0 # Listen indefinitely
- 触发函数
bin/pulsar-admin functions trigger \
  --tenant public \
  --namespace default \
  --name myfunc \
  --trigger-value "hello world"
在trigger命令中,topic信息是不需要的。只需要指定函数的基本信息,如租户、命名空间、函数名等
如何开发Pulsar 函数
使用API
我们可以使用Java,Python和Go的API进行开发Pulsar function
使用原生API
语言原生接口提供了一种简单而干净的编写Java/Python函数,通过向所有传入字符串添加感叹号并将输出字符串发布到主题。它没有外部依赖。
package org.tony.pulsar.function.develop;

import java.util.function.Function;

/**
 * 通过原生api开发function
 * @author Tony
 */
public class JavaNativeFunction implements Function<String,String> {

    @Override
    public String apply(String s) {
        return String.format("%s!",s);
    }
}
使用Pulsar SDK开发
SDK指定了一个包含上下文对象作为参数的功能接口
package org.tony.pulsar.function.develop;

import org.apache.pulsar.functions.api.Context;
import org.apache.pulsar.functions.api.Function;

/**
 * 通过pulsar sdk开发pulsar function
 * @author Tony
 */
public class JavaPulsarSdkDevelopFunction implements Function<String,String> {
    @Override
    public String process(String input, Context context) throws Exception {
        return String.format("%s!",input);
    }
}
函数的返回类型可以包装在Record泛型中,这使您可以更好地控制输出消息,例如主题、模式、属性等。使用Context::newOutputRecordBuilder方法来构建这个Record输出
package org.tony.pulsar.function.develop;

import org.apache.pulsar.client.api.Schema;
import org.apache.pulsar.functions.api.Context;
import org.apache.pulsar.functions.api.Function;
import org.apache.pulsar.functions.api.Record;

import java.util.HashMap;
import java.util.Map;

/**
 * 包装返回类型
 * @author Tony
 */
public class JavaPulsarSdkRecordFunction implements Function<String, Record<String>> {
    @Override
    public Record<String> process(String input, Context context) throws Exception {
        String output = String.format("%s!",input);
        Map<String,String> properties = new HashMap<>(context.getCurrentRecord().getProperties());
        context.getCurrentRecord().getTopicName().ifPresent(topic-> properties.put("input_topic",topic));
        return context.newOutputRecordBuilder(Schema.STRING).value(output).properties(properties).build();
    }
}
使用Pulsar 扩展SDK开发(JAVA)
这个扩展的Pulsar Functions SDK提供了两个额外的接口来初始化和释放外部资源
- 通过使用initialize接口,可以初始化外部资源,这些资源只需要在函数实例启动时进行一次初始化
- 通过使用close接口,可以在函数实例关闭时关闭所引用的外部资源
下面的示例使用了Pulsar Functions SDK for Java的扩展接口,在函数实例启动时初始化RedisClient,并在函数实例关闭时释放它:
import org.apache.pulsar.functions.api.Context;
import org.apache.pulsar.functions.api.Function;
import io.lettuce.core.RedisClient;

public class InitializableFunction implements Function<String, String> {
    private RedisClient redisClient;

    private void initRedisClient(Map<String, Object> connectInfo) {
        redisClient = RedisClient.create(connectInfo.get("redisURI"));
    }

    /**
     * init的时候的操作逻辑
     * @param context
     */
    @Override
    public void initialize(Context context) {
        Map<String, Object> connectInfo = context.getUserConfigMap();
        redisClient = initRedisClient(connectInfo);
    }

    @Override
    public String process(String input, Context context) {
        String value = client.get(key);
        return String.format("%s-%s", input, value);
    }

    /**
     * 关闭的时候的操作逻辑
     */
    @Override
    public void close() {
        redisClient.close();
    }
}
传递用户定义的配置
我们在运行和升级函数的时候,可以通过--user-config传递相关的配置,格式为json格式,key/value的形式
bin/pulsar-admin functions create \
  # Other function configs
  --user-config '{"word-of-the-day":"verdure"}'
我们在java中可以这样使用:
import org.apache.pulsar.functions.api.Context;
import org.apache.pulsar.functions.api.Function;
import org.slf4j.Logger;

import java.util.Optional;

public class UserConfigFunction implements Function<String, Void> {
    @Override
    public void apply(String input, Context context) {
        Logger LOG = context.getLogger();
        Optional<String> wotd = context.getUserConfigValue("word-of-the-day");
        if (wotd.isPresent()) {
            LOG.info("The word of the day is {}", wotd);
        } else {
            LOG.warn("No word of the day provided");
        }
        return null;
    }
}
使用指标监控函数
要确保正在运行的函数在任何时候都是健康的,可以配置函数将任意指标发布到可查询的指标接口
注意:使用Java或Python的语言原生接口无法向Pulsar发布指标和统计信息
可以使用内置指标和自定义指标来监视函数:
- 使用内置的函数度量。Pulsar Functions公开了可收集和用于监视Java、Python和Go函数运行状况的指标。
- 设置您的自定义指标。除了内置的度量之外,Pulsar还允许我们为Java和Python函数定制度量。函数工作者自动向Prometheus收集用户定义的指标,你可以在Grafana中检查它们
下面是一个示例,说明了如何通过在每个键的基础上使用Context对象来定制Java、Python和Go函数的指标。
例如,可以为process-count键设置一个指标,并在函数每次处理消息时为eleven-count键设置另一个指标:
import org.apache.pulsar.functions.api.Context;
import org.apache.pulsar.functions.api.Function;

public class MetricRecorderFunction implements Function<Integer, Void> {
    @Override
    public void apply(Integer input, Context context) {
        // Records the metric 1 every time a message arrives
        context.recordMetric("hit-count", 1);

        // Records the metric only if the arriving number equals 11
        if (input == 11) {
            context.recordMetric("elevens-count", 1);
        }

        return null;
    }
}
启用函数安全
如果我们需要启用安全设置,我们需要在function workers中启用安全设置
配置function workers
要使用上下文中的secret api,我们需要为函数工作者设置以下两个参数:
- secretsProviderConfiguratorClassName
- secretsProviderConfiguratorConfig
Pulsar Functions提供了两种类型的SecretsProviderConfigurator实现,它们都可以直接用作secretsProviderConfiguratorClassName的值
- org.apache.pulsar.functions.secretsproviderconfigurator.DefaultSecretsProviderConfigurator:这是一个secrets提供程序的基本版本,它在ClearTextSecretsProvider中连接到函数实例。
- org.apache.pulsar.functions.secretsproviderconfigurator.KubernetesSecretsProviderConfigurator:它使用Kubernetes内置的secrets,并将它们绑定为函数容器中的环境变量(通过EnvironmentBasedSecretsProvider),以确保secrets在运行时对函数可用
function workers使用org.apache.pulsar.functions.secretsproviderconfigurator.SecretsProviderConfigurator接口在启动函数实例时选择SecretsProvider类名及其相关配置
函数实例使用org.apache.pulsar.functions.secretsprovider.SecretsProvider接口来获取Secrets。SecretsProvider使用的实现由SecretsProviderConfigurator决定
一旦设置了SecretsProviderConfigurator,我们就可以使用上下文对象获取secrets,如下所示:
import org.apache.pulsar.functions.api.Context;
import org.apache.pulsar.functions.api.Function;
import org.slf4j.Logger;

public class GetSecretValueFunction implements Function<String, Void> {

    @Override
    public Void process(String input, Context context) throws Exception {
        Logger LOG = context.getLogger();
        String secretValue = context.getSecret(input);

        if (!secretValue.isEmpty()) {
            LOG.info("The secret {} has value {}", intput, secretValue);
        } else {
            LOG.warn("No secret with key {}", input);
        }

        return null;
    }
}
配置状态存储
Pulsar函数使用Apache BookKeeper作为状态存储接口。Pulsar集成了BookKeeper表服务来存储函数的状态。例如,WordCount函数可以通过state api将其计数器的状态存储到BookKeeper表服务中。
状态是键值对,其中一个键是一个字符串和它的值是任意二进制数据,计数器被存储为64位的二进制。键的作用域为单个函数,并在该函数的实例之间共享
调用状态 API
Pulsar函数公开了用于改变和访问状态的api
- 增量计数器:可以使用incrCounter将给定键的计数器增加给定的量。如果密钥不存在,则创建一个新key
void incrCounter(String key, long amount);
要异步增加计数器,可以使用incrCounterAsync
CompletableFuture<Void> incrCounterAsync(String key, long amount);
- 检索计数器:可以使用getCounter来检索被incrCounter改变的给定键的计数器
long getCounter(String key);
要异步检索由incrCounterAsync改变的计数器
CompletableFuture<Long> getCounterAsync(String key);
- 更新状态:除了计数器 API,Pulsar也提供了修改状态的api
void putState(String key, ByteBuffer value);
要异步更新给定键的状态,可以使用putStateAsync
CompletableFuture<Void> putStateAsync(String key, ByteBuffer value);
- 检索状态:可以使用getState来检索给定键的状态
ByteBuffer getState(String key);
要异步检索给定键的状态,可以使用getStateAsync
CompletableFuture<ByteBuffer> getStateAsync(String key);
- 删除状态:计数器和二进制值共享相同的键空间,因此此API将删除其中任何一种类型
void deleteState(String key);
通过 CLI 查询状态
除了使用State api将函数的状态存储在Pulsar的状态存储中并从存储中检索它之外,我们还可以使用CLI命令查询函数的状态
bin/pulsar-admin functions querystate \
    --tenant <tenant> \
    --namespace <namespace> \
    --name <function-name> \
    --state-storage-url <bookkeeper-service-url> \
    --key <state-key> \
    [---watch]
WordCountFunction的例子演示了如何在脉冲星函数中存储状态:
- 函数使用正则表达式\.将接收到的字符串拆分为多个单词
- 对于每个单词,该函数通过incrCounter(key, amount)将counter加1
import org.apache.pulsar.functions.api.Context;
import org.apache.pulsar.functions.api.Function;

import java.util.Arrays;

public class WordCountFunction implements Function<String, Void> {
    @Override
    public Void process(String input, Context context) throws Exception {
        Arrays.asList(input.split("\\.")).forEach(word -> context.incrCounter(word, 1));
        return null;
    }
}
调用pulsar admin api
使用Java SDK的Pulsar函数可以访问Pulsar管理客户端,这允许Pulsar管理客户端管理对Pulsar集群的API调用
下面是如何使用从函数上下文中公开的Pulsar管理客户端的示例:
import org.apache.pulsar.client.admin.PulsarAdmin;
import org.apache.pulsar.functions.api.Context;
import org.apache.pulsar.functions.api.Function;

/**
 * In this particular example, for every input message,
 * the function resets the cursor of the current function's subscription to a
 * specified timestamp.
 */
public class CursorManagementFunction implements Function<String, String> {

    @Override
    public String process(String input, Context context) throws Exception {
        PulsarAdmin adminClient = context.getPulsarAdmin();
        if (adminClient != null) {
            String topic = context.getCurrentRecord().getTopicName().isPresent() ?
                    context.getCurrentRecord().getTopicName().get() : null;
            String subName = context.getTenant() + "/" + context.getNamespace() + "/" + context.getFunctionName();
            if (topic != null) {
                // 1578188166 below is a random-pick timestamp
                adminClient.topics().resetCursor(topic, subName, 1578188166);
                return "reset cursor successfully";
            }
        }
        return null;
    }
}
使我们的函数能够访问Pulsar管理客户端,需要在conf/functions_worker.yml设置exposeAdminClientEnabled=true
要测试它是否启用,可以使用命令pulsar-admin functions localrun,并带标志–web-service-url,如下所示:
bin/pulsar-admin functions localrun \
 --jar my-functions.jar \
 --classname my.package.CursorManagementFunction \
 --web-service-url http://pulsar-web-service:8080 \
 # Other function configs
使用schema注册
Pulsar有一个内置的模式注册表,并与流行的模式类型捆绑在一起,如Avro、JSON和Protobuf。Pulsar Functions可以利用来自输入主题的现有模式信息并派生输入类型。模式注册表也适用于输出主题
使用SerDe进行序列化和反序列化
当向Pulsar主题发布数据或从Pulsar主题消费数据时,Pulsar函数使用SerDe(序列化和反序列化)。
默认情况下,SerDe的工作方式取决于我们为特定函数使用的语言(Java或Python)。
但是,在这两种语言中,我们都可以为更复杂的、特定于应用程序的类型编写自定义SerDe逻辑
以下基本Java类型是内置的,默认情况下支持Java函数:string、double、integer、float、long、short和byte。要自定义Java类型,需要实现以下接口:
public interface SerDe<T> {
    T deserialize(byte[] input);
    byte[] serialize(T input);
}
SerDe以以下方式处理Java函数:
- 如果输入和输出主题具有模式,则Pulsar Functions将为SerDe使用该模式
- 如果输入或输出主题不存在,则Pulsar Functions采用以下规则确定SerDe:
- 如果指定了模式类型,则Pulsar Functions使用指定的模式类型
- 如果指定了SerDe,则Pulsar Functions使用指定的SerDe,并且输入和输出主题的模式类型是字节
- 如果既没有指定Schema类型也没有指定SerDe,则Pulsar Functions使用内置的SerDe。对于非基本模式类型,内置的SerDe以JSON格式序列化和反序列化对象
例如,假设我们正在编写一个处理tweet对象的函数。我们可以参考下面的Java中的Tweet类示例:
public class Tweet {
    private String username;
    private String tweetContent;

    public Tweet(String username, String tweetContent) {
        this.username = username;
        this.tweetContent = tweetContent;
    }

    // Standard setters and getters
}
要在函数之间直接传递Tweet对象,需要提供一个自定义SerDe类。在下面的例子中,Tweet对象基本上是字符串,用户名和Tweet内容由|分隔:
package com.example.serde;

import org.apache.pulsar.functions.api.SerDe;

import java.util.regex.Pattern;

public class TweetSerde implements SerDe<Tweet> {

    public Tweet deserialize(byte[] input) {
        String s = new String(input);
        String[] fields = s.split(Pattern.quote("|"));
        return new Tweet(fields[0], fields[1]);
    }

    public byte[] serialize(Tweet input) {
        return "%s|%s".format(input.getUsername(), input.getTweetContent()).getBytes();
    }
}
要将定制的SerDe应用于特定函数,我们需要:
- 将Tweet和TweetSerde类打包到一个JAR中
- 在部署函数时,指定JAR和SerDe类名的路径
下面是使用create命令通过应用自定义SerDe来部署函数的示例:
bin/pulsar-admin functions create \
  --jar /path/to/your.jar \
  --output-serde-classname com.example.serde.TweetSerde \
  # Other function attributes
注意:自定义SerDe类必须打包到函数jar中。
调试Pulsar Functions
使用捕获的 stderr 进行调试
要调试函数启动失败的原因,可以查看logs/functions/<tenant>/<namespace>/<function>/<function>-<instance>.log文件
使用单元测试进行调试
与任何具有输入和输出的函数一样,我们可以以与测试任何其他函数类似的方式测试Pulsar function
Pulsar使用TestNG进行测试
例如,如果您通过Java的语言本地接口编写了以下函数:
import java.util.function.Function;

public class JavaNativeExclamationFunction implements Function<String, String> {
   @Override
   public String apply(String input) {
       return String.format("%s!", input);
   }
}
我们可以编写一个简单的单元测试来测试该函数:
@Test
public void testJavaNativeExclamationFunction() {
   JavaNativeExclamationFunction exclamation = new JavaNativeExclamationFunction();
   String output = exclamation.apply("foo");
   Assert.assertEquals(output, "foo!");
}
下面的示例是通过Java SDK编写的:
import org.apache.pulsar.functions.api.Context;
import org.apache.pulsar.functions.api.Function;

public class ExclamationFunction implements Function<String, String> {
   @Override
   public String process(String input, Context context) {
       return String.format("%s!", input);
   }
}
我们可以编写一个单元测试来测试这个函数并模拟Context参数,如下所示:
@Test
public void testExclamationFunction() {
   ExclamationFunction exclamation = new ExclamationFunction();
   String output = exclamation.process("foo", mock(Context.class));
   Assert.assertEquals(output, "foo!");
}
localrun模式进行调试
在localrun模式下,函数消耗并生成实际数据到Pulsar集群,并反映该函数在Pulsar集群中的运行方式。这提供了一种测试函数的方法,并允许我们在本地机器上作为线程启动函数实例,以便于调试
使用localrun模式进行调试仅适用于Pulsar 2.4.0或更高版本中的Java函数
在使用localrun模式之前,我们需要添加以下依赖项:
<dependency>
    <groupId>org.apache.pulsar</groupId>
    <artifactId>pulsar-functions-local-runner-original</artifactId>
    <version>${pulsar.version}</version>
</dependency>

<dependency>
    <groupId>com.google.protobuf</groupId>
    <artifactId>protobuf-java</artifactId>
    <version>3.21.9</version>
</dependency>
例如,我们可以以以下方式运行函数:
FunctionConfig functionConfig = new FunctionConfig();
functionConfig.setName(functionName);
functionConfig.setInputs(Collections.singleton(sourceTopic));
functionConfig.setClassName(ExclamationFunction.class.getName());
functionConfig.setRuntime(FunctionConfig.Runtime.JAVA);
functionConfig.setOutput(sinkTopic);

LocalRunner localRunner = LocalRunner.builder().functionConfig(functionConfig).build();
localRunner.start(true);
我们可以使用IDE调试函数。设置断点并手动步进函数以使用实际数据进行调试:
下面的代码示例展示了如何在localrun模式下运行函数
public class ExclamationFunction implements Function<String, String> {

    @Override
    public String process(String s, Context context) throws Exception {
        return s + "!";
    }

    public static void main(String[] args) throws Exception {
        FunctionConfig functionConfig = new FunctionConfig();
        functionConfig.setName("exclamation");
        functionConfig.setInputs(Collections.singleton("input"));
        functionConfig.setClassName(ExclamationFunction.class.getName());
        functionConfig.setRuntime(FunctionConfig.Runtime.JAVA);
        functionConfig.setOutput("output");

        LocalRunner localRunner = LocalRunner.builder().functionConfig(functionConfig).build();
        localRunner.start(false);
    }
}
使用日志主题进行调试
使用Pulsar Functions时,可以将函数中预定义的日志生成到指定的日志主题,并配置消费者消费该日志主题的消息
例如,下面的函数根据输入的字符串是否包含单词danger记录warning级别或info级别的日志:
import org.apache.pulsar.functions.api.Context;
import org.apache.pulsar.functions.api.Function;
import org.slf4j.Logger;

public class LoggingFunction implements Function<String, Void> {
    @Override
    public void apply(String input, Context context) {
        Logger LOG = context.getLogger();
        String messageId = new String(context.getMessageId());

        if (input.contains("danger")) {
            LOG.warn("A warning was received in message {}", messageId);
        } else {
            LOG.info("Message {} received\nContent: {}", messageId, input);
        }

        return null;
    }
}
如示例中所示,我们可以通过context.getLogger()获取记录器,并将记录器分配给slf4j的LOG变量,这样我们就可以使用LOG变量在函数中定义所需的日志
同时,我们需要指定可以生成日志的主题。示例如下:
bin/pulsar-admin functions create \
  --log-topic persistent://public/default/logging-function-logs \
  # Other function configs
发布到日志主题的消息包含以下几个属性:
- loglevel:日志消息的级别
- Fqn:推送此日志消息的完全限定函数名
- instance:推送日志的功能实例ID
使用Functions CLI进行调试
使用Pulsar函数CLI,我们可以使用以下子命令调试Pulsar函数
get
status
list
trigger
- get:要获取关于函数的信息,可以像下面这样指定–fqfn
./bin/pulsar-admin functions get public/default/ExclamationFunctio6
或者,我们可以指定–name、–namespace和–tenant,如下所示:
./bin/pulsar-admin functions get \
    --tenant public \
    --namespace default \
    --name ExclamationFunctio6
如下所示,get命令显示了关于ExclamationFunctio6函数的输入、输出、运行时和其他信息。
{
  "tenant": "public",
  "namespace": "default",
  "name": "ExclamationFunctio6",
  "className": "org.example.test.ExclamationFunction",
  "inputSpecs": {
    "persistent://public/default/my-topic-1": {
      "isRegexPattern": false
    }
  },
  "output": "persistent://public/default/test-1",
  "processingGuarantees": "ATLEAST_ONCE",
  "retainOrdering": false,
  "userConfig": {},
  "runtime": "JAVA",
  "autoAck": true,
  "parallelism": 1
}
- list:列出在特定租户和命名空间下运行的所有Pulsar 函数
bin/pulsar-admin functions list \
    --tenant public \
    --namespace default
- status:查询函数的状态
./bin/pulsar-admin functions status \
    --tenant public \
    --namespace default \
    --name ExclamationFunctio6
- stats:获取函数的当前状态
bin/pulsar-admin functions stats \
    --tenant public \
    --namespace default \
    --name ExclamationFunctio6
- trigger:用提供的值触发指定函数
./bin/pulsar-admin functions trigger \
    --tenant public \
    --namespace default \
    --name ExclamationFunctio6 \
    --topic persistent://public/default/my-topic-1 \
    --trigger-value "hello pulsar functions"
打包Java Functions
打包Java函数有两种方法,即uber JAR和NAR
如果我们计划打包和分发我们的函数以供其他人使用,那么我们有义务对自己的代码进行适当的许可和版权保护。
请记住将许可证和版权添加到代码使用的所有库和我们的发行版中。
如果使用NAR方法,NAR插件会自动在生成的NAR包中创建一个DEPENDENCIES文件,其中包括函数的所有库的适当许可和版权
以jar包的方式打包
要将Java函数打包为JAR,请完成以下步骤:
- 用pom文件创建一个新的maven项目。在下面的代码示例中,mainClass的值是我们的包名
<?xml version="1.0" encoding="UTF-8"?>
<project xmlns="http://maven.apache.org/POM/4.0.0"
         xmlns:xsi="http://www.w3.org/2001/XMLSchema-instance"
         xsi:schemaLocation="http://maven.apache.org/POM/4.0.0 http://maven.apache.org/xsd/maven-4.0.0.xsd">
    <modelVersion>4.0.0</modelVersion>

    <groupId>java-function</groupId>
    <artifactId>java-function</artifactId>
    <version>1.0-SNAPSHOT</version>

    <dependencies>
        <dependency>
            <groupId>org.apache.pulsar</groupId>
            <artifactId>pulsar-functions-api</artifactId>
            <version>2.11.1</version>
        </dependency>
    </dependencies>

    <build>
        <plugins>
            <plugin>
                <artifactId>maven-assembly-plugin</artifactId>
                <configuration>
                    <appendAssemblyId>false</appendAssemblyId>
                    <descriptorRefs>
                        <descriptorRef>jar-with-dependencies</descriptorRef>
                    </descriptorRefs>
                    <archive>
                        <manifest>
                            <mainClass>org.example.test.ExclamationFunction</mainClass>
                        </manifest>
                    </archive>
                </configuration>
                <executions>
                    <execution>
                        <id>make-assembly</id>
                        <phase>package</phase>
                        <goals>
                            <goal>assembly</goal>
                        </goals>
                    </execution>
                </executions>
            </plugin>
            <plugin>
                <groupId>org.apache.maven.plugins</groupId>
                <artifactId>maven-compiler-plugin</artifactId>
                <version>3.11.0</version>
                <configuration>
                    <release>17</release>
                </configuration>
            </plugin>
        </plugins>
    </build>

</project>
- 打包java Function
mvn package
Java函数打包完成后,会自动创建target 目录。打开target目录,检查是否有类似于java-function-1.0-SNAPSHOT.jar的JAR包
- 将打包的jar文件复制到Pulsar映像中
 docker exec -it [CONTAINER ID] /bin/bash
 docker cp <path of java-function-1.0-SNAPSHOT.jar>  CONTAINER ID:/pulsar
- 使用以下命令运行Java函数
./bin/pulsar-admin functions localrun \
    --classname org.example.test.ExclamationFunction \
    --jar java-function-1.0-SNAPSHOT.jar \
    --inputs persistent://public/default/my-topic-1 \
    --output persistent://public/default/test-1 \
    --tenant public \
    --namespace default \
    --name JavaFunction
要将Java函数打包为NAR,请完成以下步骤:
- 用pom文件创建一个新的maven项目
<?xml version="1.0" encoding="UTF-8"?>
<project xmlns="http://maven.apache.org/POM/4.0.0"
         xmlns:xsi="http://www.w3.org/2001/XMLSchema-instance"
         xsi:schemaLocation="http://maven.apache.org/POM/4.0.0 http://maven.apache.org/xsd/maven-4.0.0.xsd">
    <modelVersion>4.0.0</modelVersion>

    <groupId>java-function</groupId>
    <artifactId>java-function</artifactId>
    <version>1.0-SNAPSHOT</version>

    <dependencies>
        <dependency>
            <groupId>org.apache.pulsar</groupId>
            <artifactId>pulsar-functions-api</artifactId>
            <version>2.11.1</version>
        </dependency>
    </dependencies>

    <build>
        <plugins>
            <plugin>
                <groupId>org.apache.nifi</groupId>
                <artifactId>nifi-nar-maven-plugin</artifactId>
                <version>1.2.0</version>
            </plugin>
            <plugin>
                <groupId>org.apache.maven.plugins</groupId>
                <artifactId>maven-compiler-plugin</artifactId>
                <version>3.11.0</version>
                <configuration>
                    <release>17</release>
                </configuration>
            </plugin>
        </plugins>
    </build>

</project>
我们也可以创建pulsar-io.yaml文件在resources/META-INF/services,在下面的代码示例中,functionClass的值是函数类名。该名称是函数作为内置函数部署时使用的名称
name: java-function
description: my java function
functionClass: org.example.test.ExclamationFunction
- 打包java Function
mvn package
Java函数打包完成后,会自动创建target 目录。打开target目录,检查是否有类似于java-function-1.0-SNAPSHOT.nar的NAR包
- 将打包的nar文件复制到Pulsar映像中
docker cp <path of java-function-1.0-SNAPSHOT.nar> CONTAINER ID:/pulsar
- 使用以下命令运行Java函数
./bin/pulsar-admin functions localrun \
    --jar java-function-1.0-SNAPSHOT.nar \
    --inputs persistent://public/default/my-topic-1 \
    --output persistent://public/default/test-1 \
    --tenant public \
    --namespace default \
    --name JavaFunction
Pulsar Functions CLI and YAML 配置
Pulsar functions YAML配置
可以使用预定义的YAML文件来配置功能。下表概述了所需的字段和参数:
| 字段名 | 类型 | 相关命令参数 | 描述 |
|---|---|---|---|
| runtimeFlags | String | N/A | 我们想传递给运行时的任何标志(仅适用于进程和Kubernetes运行时) |
| tenant | String | –tenant | 函数的租户 |
| namespace | String | –namespace | 函数的命名空间 |
| name | String | –name | 函数的名称 |
| className | String | –classname | 函数的类名 |
| functionType | String | –function-type | 函数的类型 |
| inputs | List | -i, --inputs | 函数的输入主题。可以将多个主题指定为逗号分隔的列表 |
| customSerdeInputs | Map<String,String> | –custom-serde-inputs | 从输入主题到SerDe类名的映射 |
| topicsPattern | String | –topics-pattern | 要从名称空间下的主题列表中使用的主题模式,注意:–input和–topic-pattern互斥。对于Java函数,需要在–custom-serde-inputs中为模式添加SerDe类名 |
| customSchemaInputs | Map<String,String> | –custom-schema-inputs | 从输入主题到模式属性的映射 |
| customSchemaOutputs | Map<String,String> | –custom-schema-outputs | 从输出主题到模式属性的映射 |
| inputSpecs | Map<String,ConsumerConfig> | –input-specs | 从输入到自定义配置的映射 |
| output | String | -o, --output | 函数的输出主题。如果不指定,则不输出 |
| producerConfig | ProducerConfig | –producer-config | 生产者的自定义配置 |
| outputSchemaType | String | -st, --schema-type | 用于消息输出的内置模式类型或自定义模式类名称 |
| outputSerdeClassName | String | –output-serde-classname | 用于消息输出的SerDe类 |
| logTopic | String | –log-topic | 生成函数日志的主题 |
| processingGuarantees | String | –processing-guarantees | 应用于函数的处理保证(交付语义)。可用值:至少一次,最多一次,有效一次,手动 |
| retainOrdering | Boolean | –retain-ordering | 函数是否按顺序消费和处理消息 |
| retainKeyOrdering | String | –retain-key-ordering | 函数是否按键顺序消费和处理消息 |
| batchBuilder | String | –batch-builder | 使用 producerConfig.batchBuilder 替换. 注意:batchBuilder将很快在代码中弃用 |
| forwardSourceMessageProperty | Boolean | –forward-source-message-property | 在处理过程中是否将输入消息的属性转发到输出主题。设置为false时,表示关闭转发功能 |
| userConfig | Map<String,Object> | –user-config | 用户定义的配置键/值 |
| secrets | Map<String,Object> | –secrets | 从secretName到对象的映射,这些对象封装了底层秘密提供程序获取secrets的方式 |
| runtime | String | N/A | 函数的运行时。取值:java、python、go |
| autoAck | Boolean | –auto-ack | 框架是否自动确认消息,在未来的版本中将弃用此配置。如果指定传递语义,框架将自动确认消息。如果我们不希望框架自动ack消息,请将processinGassurances设置为MANUAL |
| maxMessageRetries | Int | –max-message-retries | 在放弃之前重试处理消息的次数 |
| deadLetterTopic | String | –dead-letter-topic | 用于存储未成功处理的消息的主题 |
| subName | String | –subs-name | 如果需要,输入主题消费者使用的脉冲星源订阅的名称 |
| parallelism | Int | –parallelism | 函数的并行性因子,即要运行的函数实例的数量 |
| resources | Resources | N/A | N/A |
| fqfn | String | –fqfn | 函数的完全限定函数名(FQFN) |
| windowConfig | WindowConfig | N/A | N/A |
| timeoutMs | Long | –timeout-ms | 消息超时(以毫秒为单位) |
| jar | String | –jar | 函数(用Java编写)的JAR文件的路径。它还支持worker可以下载包的URL路径,包括HTTP、HTTPS、file(文件协议,假设文件已经存在于worker主机上)和function(来自包管理服务的包URL) |
| py | String | –py | 主python/python wheel 文件的路径(用python编写)。它还支持工人可以从HTTP,HTTPS,FILE(文件协议)和功能(Package URL中的文件协议)中下载软件包的URL路径(文件协议) |
| go | String | –go | 函数的主Go可执行二进制文件的路径(用Go语言编写)。它还支持worker可以下载包的URL路径,包括HTTP、HTTPS、file(文件协议,假设文件已经存在于worker主机上)和function(来自包管理服务的包URL) |
| cleanupSubscription | Boolean | N/A | 当函数被删除时,是否应该删除函数创建或使用的订阅 |
| customRuntimeOptions | String | –custom-runtime-options | 对选项进行编码以自定义运行时的字符串 |
| maxPendingAsyncRequests | Int | –max-message-retries | 每个实例挂起的最大异步请求数,以避免大量并发请求 |
| exposePulsarAdminClientEnabled | Boolean | N/A | Pulsar管理客户端是否公开给函数上下文。缺省情况下,禁用该功能 |
| subscriptionPosition | String | –subs-position | 用于从指定位置消费消息的pulsar源订阅的位置。默认值为“Latest” |
ConsumerConfig配置
| 字段名 | 类型 | 相关命令参数 | 描述 |
|---|---|---|---|
| schemaType | String | N/A | N/A |
| serdeClassName | String | N/A | N/A |
| isRegexPattern | Boolean | N/A | N/A |
| schemaProperties | Map<String,String> | N/A | N/A |
| consumerProperties | Map<String,String> | N/A | N/A |
| receiverQueueSize | Int | N/A | N/A |
| cryptoConfig | CryptoConfig | N/A | |
| poolMessages | Boolean | N/A | N/A |
ProducerConfig配置
| 字段名 | 类型 | 相关命令参数 | 描述 |
|---|---|---|---|
| maxPendingMessages | Int | N/A | 用于保存等待从代理接收确认的消息的队列的最大大小 |
| maxPendingMessagesAcrossPartitions | Int | N/A | 跨所有分区的maxPendingMessages的数量 |
| useThreadLocalProducers | Boolean | N/A | N/A |
| cryptoConfig | CryptoConfig | N/A | |
| batchBuilder | String | –batch-builder | 批量construction方法的类型。取值为DEFAULT和KEY_BASED。默认值为DEFAULT |
Resources配置
| 字段名 | 类型 | 相关命令参数 | 描述 |
|---|---|---|---|
| cpu | double | –cpu | 需要为每个函数实例分配的核心CPU(仅适用于Kubernetes运行时) |
| ram | Long | –ram | 需要分配每个功能实例的字节中的RAM(仅适用于process/kubernetes运行时) |
| disk | Long | –disk | 每个函数实例需要分配的磁盘字节数(仅适用于Kubernetes运行时) |
WindowConfig配置
| 字段名 | 类型 | 相关命令参数 | 描述 |
|---|---|---|---|
| windowLengthCount | Int | –window-length-count | 每个窗口的消息数 |
| windowLengthDurationMs | Long | –window-length-duration-ms | 每个窗口的持续时间(毫秒) |
| slidingIntervalCount | Int | –sliding-interval-count | 窗口滑动后的消息数 |
| slidingIntervalDurationMs | Long | –sliding-interval-duration-ms | 窗口滑动的持续时间 |
| lateDataTopic | String | N/A | N/A |
| maxLagMs | Long | N/A | N/A |
| watermarkEmitIntervalMs | Long | N/A | N/A |
| timestampExtractorClassName | String | N/A | N/A |
| actualWindowFunctionClassName | String | N/A | N/A |
CryptoConfig配置
| 字段名 | 类型 | 相关命令参数 | 描述 |
|---|---|---|---|
| cryptoKeyReaderClassName | String | N/A | |
| cryptoKeyReaderConfig | Map<String, Object> | N/A | N/A |
| encryptionKeys | String[] | N/A | N/A |
| producerCryptoFailureAction | ProducerCryptoFailureAction | N/A | N/A |
| consumerCryptoFailureAction | ConsumerCryptoFailureAction | N/A | N/A |
例子
tenant: "public"
namespace: "default"
name: "config-file-function"
inputs:
  - "persistent://public/default/config-file-function-input-1"
  - "persistent://public/default/config-file-function-input-2"
output: "persistent://public/default/config-file-function-output"
jar: "function.jar"
parallelism: 1
resources:
  cpu: 8
  ram: 8589934592
autoAck: true
userConfig:
  foo: "bar"
Window Function 上下文
Java SDK提供了对可由Window 函数使用的Window 上下文对象的访问。这个上下文对象为脉冲星窗口函数提供了大量的信息和功能,如下所示
- Spec:Spec包含函数的基本信息
- 与函数关联的所有输入主题和输出主题的名称
- 与该功能关联的租户和命名空间
- pulsar window function的名称、ID和版本
- 调用window function的实例数
- 运行window function的Pulsar函数实例ID
- 输出模式的内置类型或自定义类名
获取input topics:
public class GetInputTopicsWindowFunction implements WindowFunction<String, Void> {
    @Override
    public Void process(Collection<Record<String>> inputs, WindowContext context) throws Exception {
        Collection<String> inputTopics = context.getInputTopics();
        System.out.println(inputTopics);

        return null;
    }

}
获取 output topics:
public class GetOutputTopicWindowFunction implements WindowFunction<String, Void> {
    @Override
    public Void process(Collection<Record<String>> inputs, WindowContext context) throws Exception {
        String outputTopic = context.getOutputTopic();
        System.out.println(outputTopic);

        return null;
    }
}
获取tenant:
public class GetTenantWindowFunction implements WindowFunction<String, Void> {
    @Override
    public Void process(Collection<Record<String>> inputs, WindowContext context) throws Exception {
        String tenant = context.getTenant();
        System.out.println(tenant);

        return null;
    }

}
获取命名空间:
public class GetNamespaceWindowFunction implements WindowFunction<String, Void> {
    @Override
    public Void process(Collection<Record<String>> inputs, WindowContext context) throws Exception {
        String ns = context.getNamespace();
        System.out.println(ns);

        return null;
    }

}
获取函数名:
public class GetNameOfWindowFunction implements WindowFunction<String, Void> {
    @Override
    public Void process(Collection<Record<String>> inputs, WindowContext context) throws Exception {
        String functionName = context.getFunctionName();
        System.out.println(functionName);

        return null;
    }

}
获取函数id:
public class GetFunctionIDWindowFunction implements WindowFunction<String, Void> {
    @Override
    public Void process(Collection<Record<String>> inputs, WindowContext context) throws Exception {
        String functionID = context.getFunctionId();
        System.out.println(functionID);

        return null;
    }

}
获取函数版本:
public class GetVersionOfWindowFunction implements WindowFunction<String, Void> {
    @Override
    public Void process(Collection<Record<String>> inputs, WindowContext context) throws Exception {
        String functionVersion = context.getFunctionVersion();
        System.out.println(functionVersion);

        return null;
    }

}
获取实例id:
public class GetInstanceIDWindowFunction implements WindowFunction<String, Void> {
    @Override
    public Void process(Collection<Record<String>> inputs, WindowContext context) throws Exception {
        int instanceId = context.getInstanceId();
        System.out.println(instanceId);

        return null;
    }

}
获取实例数:
public class GetNumInstancesWindowFunction implements WindowFunction<String, Void> {
    @Override
    public Void process(Collection<Record<String>> inputs, WindowContext context) throws Exception {
        int numInstances = context.getNumInstances();
        System.out.println(numInstances);

        return null;
    }

}
获取output schema type:
public class GetOutputSchemaTypeWindowFunction implements WindowFunction<String, Void> {

    @Override
    public Void process(Collection<Record<String>> inputs, WindowContext context) throws Exception {
        String schemaType = context.getOutputSchemaType();
        System.out.println(schemaType);

        return null;
    }
}
- Logger:window function使用的日志对象,可用于创建窗口函数日志消息
使用Java SDK的Pulsar window functions可以访问SLF4j Logger对象,该对象可用于在所选日志级别生成日志
import java.util.Collection;
import org.apache.pulsar.functions.api.Record;
import org.apache.pulsar.functions.api.WindowContext;
import org.apache.pulsar.functions.api.WindowFunction;
import org.slf4j.Logger;

public class LoggingWindowFunction implements WindowFunction<String, Void> {
    @Override
    public Void process(Collection<Record<String>> inputs, WindowContext context) throws Exception {
        Logger log = context.getLogger();
        for (Record<String> record : inputs) {
            log.info(record + "-window-log");
        }
        return null;
    }

}
如果需要函数生成日志,请在创建或运行函数时指定日志主题:
bin/pulsar-admin functions create \
  --jar my-functions.jar \
  --classname my.package.LoggingFunction \
  --log-topic persistent://public/default/logging-function-logs \
  # Other function configs
- User config:访问任意用户配置值
当我们运行或更新使用SDK创建的Pulsar函数时,可以使用–user-config标志将任意键/值对传递给它们。键/值对必须指定为JSON
bin/pulsar-admin functions create \
  --name word-filter \
 --user-config '{"forbidden-word":"rosebud"}' \
  # Other function configs
我们可以使用以下api获取window function的用户定义信息
getUserConfigMap:
/**
 * Get a map of all user-defined key/value configs for the function.
 *
 * @return The full map of user-defined config values
 */
Map<String, Object> getUserConfigMap();
getUserConfigValue:
/**
 * Get any user-defined key/value.
 *
 * @param key The key
 * @return The Optional value specified by the user for that key.
 */
Optional<Object> getUserConfigValue(String key);
getUserConfigValueOrDefault:
/**
 * Get any user-defined key/value or a default value if none is present.
 *
 * @param key
 * @param defaultValue
 * @return Either the user config value associated with a given key or a supplied default value
 */
Object getUserConfigValueOrDefault(String key, Object defaultValue);
Java SDK上下文对象使我们可以通过命令行访问向Pulsar窗口函数提供的键/值对(作为JSON)
对于传递给Java窗口函数的所有密钥/值对,键和值都是字符串。要将该值设置为不同的类型,我们需要从字符串类型中对其进行验证
bin/pulsar-admin functions create \
   --user-config '{"word-of-the-day":"verdure"}' \
  # Other function configs
每次调用该函数时,UserConfigFunction都会记录字符串“今日单词是绿色的”(这意味着每次消息到达时)。
只有当通过多种方式(如命令行工具或REST API)使用新的配置值更新函数时,word-of-the-day的用户配置才会更改
import org.apache.pulsar.functions.api.Context;
import org.apache.pulsar.functions.api.Function;
import org.slf4j.Logger;

import java.util.Optional;

public class UserConfigWindowFunction implements WindowFunction<String, String> {
    @Override
    public String process(Collection<Record<String>> input, WindowContext context) throws Exception {
        Optional<Object> whatToWrite = context.getUserConfigValue("WhatToWrite");
        if (whatToWrite.get() != null) {
            return (String)whatToWrite.get();
        } else {
            return "Not a nice way";
        }
    }
}
如果没有提供值,则可以访问整个用户配置映射或设置默认值
// Get the whole config map
Map<String, String> allConfigs = context.getUserConfigMap();

// Get value or resort to default
String wotd = context.getUserConfigValueOrDefault("word-of-the-day", "perspicacious");
- Routing:pulsar window function支持路由。pulsar window function根据发布接口向任意主题发送消息
可以使用context.publish()接口发布任意数量的结果
public class PublishWindowFunction implements WindowFunction<String, Void> {
    @Override
    public Void process(Collection<Record<String>> input, WindowContext context) throws Exception {
        String publishTopic = (String) context.getUserConfigValueOrDefault("publish-topic", "publishtopic");
        String output = String.format("%s!", input);
        context.publish(publishTopic, output);

        return null;
    }

}
- Metrics:记录指标的接口
Pulsar window function可以将任意的度量发布到度量接口,并可以查询
注意:如果Pulsar window functions使用Java的语言原生接口,则该函数无法向Pulsar发布度量和统计信息
我们可以在每个键的基础上使用上下文对象记录指标:
import java.util.Collection;
import org.apache.pulsar.functions.api.Record;
import org.apache.pulsar.functions.api.WindowContext;
import org.apache.pulsar.functions.api.WindowFunction;


/**
 * Example function that wants to keep track of
 * the event time of each message sent.
 */
public class UserMetricWindowFunction implements WindowFunction<String, Void> {
    @Override
    public Void process(Collection<Record<String>> inputs, WindowContext context) throws Exception {

        for (Record<String> record : inputs) {
            if (record.getEventTime().isPresent()) {
                context.recordMetric("MessageEventTime", record.getEventTime().get().doubleValue());
            }
        }

        return null;
    }
}
- State storage:在状态存储器中存储和检索状态的接口
pulsar window function使用Apache BookKeeper作为状态存储接口。Apache Pulsar安装(包括独立安装)包括BookKeeper bookies的部署
Apache Pulsar集成了Apache BookKeeper表服务来存储函数的状态。例如,WordCount函数可以通过Pulsar Functions状态api将其计数器状态存储到BookKeeper表服务中
状态是键值对,其中键是字符串,值是任意的二进制数据,将示例存储为64位大型二进制值。键的范围为单个pulsar function,并在该function的实例之间共享
目前,Pulsar window function公开Java API来访问、更新和管理状态。当我们使用Java SDK函数时,可以在上下文对象中使用这些api
| Java API | 描述 |
|---|---|
| incrCounter | 增加按键引用的内置分布式计数器 |
| getCounter | 获取键的计数器值 |
| putState | 更新键的状态值 |
我们可以使用以下api来访问、更新和管理Java窗口函数中的状态:
incrCounter:
/**
 * Increment the built-in distributed counter referred by key
 * @param key The name of the key
 * @param amount The amount to be incremented
 */
void incrCounter(String key, long amount);
getCounter:
/**
 * Retrieve the counter value for the key.
 *
 * @param key name of the key
 * @return the amount of the counter value for this key
 */
long getCounter(String key);
putState:
/**
 * Update the state value for the key.
 *
 * @param key name of the key
 * @param value state value of the key
 */
void putState(String key, ByteBuffer value);


 1575
1575

 被折叠的 条评论
为什么被折叠?
被折叠的 条评论
为什么被折叠?
 到【灌水乐园】发言


