


前言
在17年时,本人在开始接触Spring Cloud体系构建微服务系统建设时,通过Spring Cloud Config开始认识分布式配置中心。Spring Cloud Config支持多种数据存储方式,可以使用git、mysql等作为库源,与Spring Boot集成成本非常低。但是其也存在如下一些问题:
- config client组件缺乏mvc工程的兼容,特别对低版本Spring项目而言。
- 缺乏对使用者友好的UI操作界面,同类型产品Apollo在这一点上做更好。
- 安全机制无法满足微服务系统的需要,Spring Security只能提供简单安全机制。
- 缺乏高阶特性,比如环境隔离、灰度发布支持、回滚机制等等。
在本文中,我们将进行如下探索,并尝试勾勒出一款配置中心产品。
- 配置中心的必要性
- Spring、Spring Boot中配置的加载机制。
- 一个好的配置中心应该需要满足哪些功能。
由于本人负责了公司配置中心的建设,对配置中心的建设有了一些思考,所以想要通过文章进行系统的整理,希望以后可以产出一款开源的配置中心产品。
一、为什么需要配置中心
我们先来看一个标准的Spring Boot工程,如下所示:
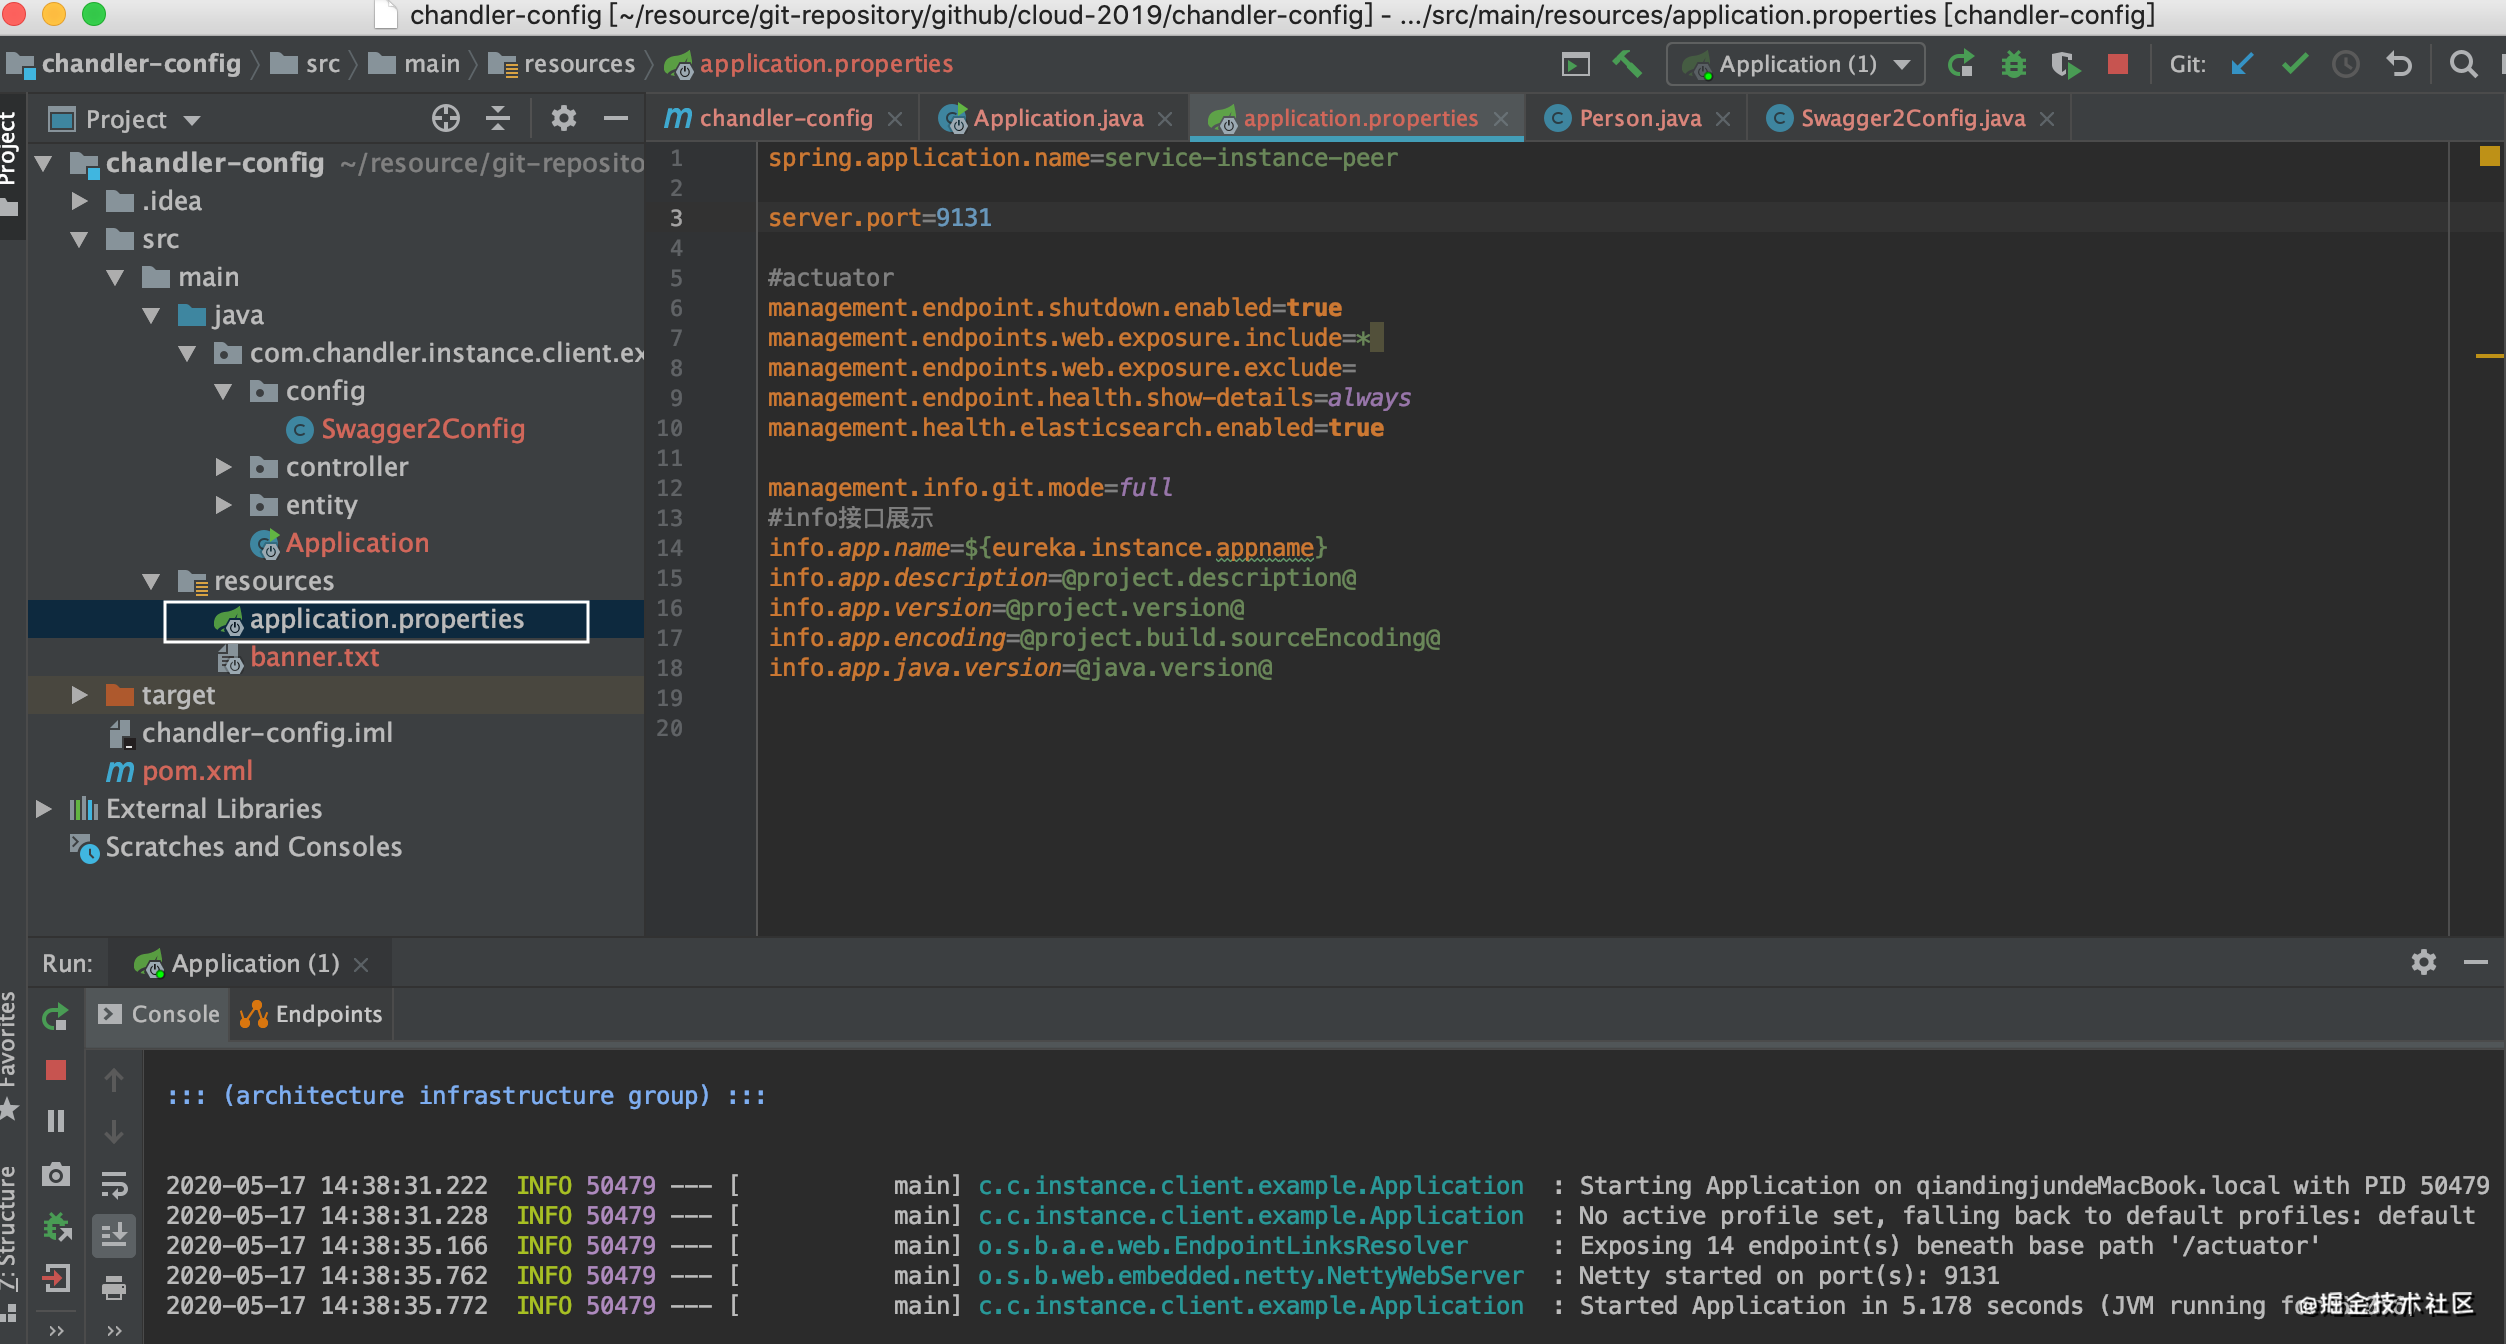
Spring Boot工程会默认从rescource目录下加载application.properties文件,如果有application-dev,application-sit,application-prod等文件,会根据环境选择加载目标文件,一个工程一般会有4个配置文件。
为了SLA,我们需要将services们进行集群,假定一个service需要部署在3个节点上。对于一个service而言,会有12个文件分布在不同节点(虚拟服务器、真实服务器、容器pod等)中,当我们需要修改一个配置时,我们需要在3个节点中进行同样的修改,目前的情况对于系统运维和程序员来说还比较好维护。
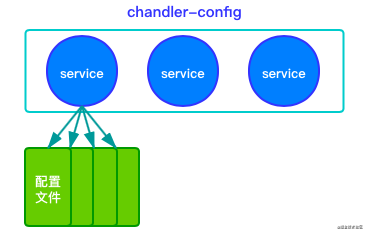
随着业务的发展、系统架构的升级,从传统的单体应用架构逐步进行业务拆分往微服务架构发展,配置文件也随之迅速膨胀并散落在各个service pod中,变得越来越多难以管理和维护。所以在微服务系统中,我们需要一个集中式的配置中心,需要其将散落在系统各个角落的配置集中起来,并进行可视化的管理和维护。
二、Spring、Spring Boot与配置中心
由于Spring优秀的产品特性,大部分Java项目的开发都离不开Spring,很难将两种分隔开来。了解了Spring加载properties的机制,也就了解了配置中心客户端组件如何实现配置加载。(spring版本:5.2.3.RELEASE)
2.1 Java与Property
Java中有个比较重要的Properties(Java.util.Properties),主要用于读取Java的配置文件。在Java中,其配置文件常为.properties文件,文件的内容格式为“key=value”的格式,文本注释使用“#”。
2.1.1 Properties
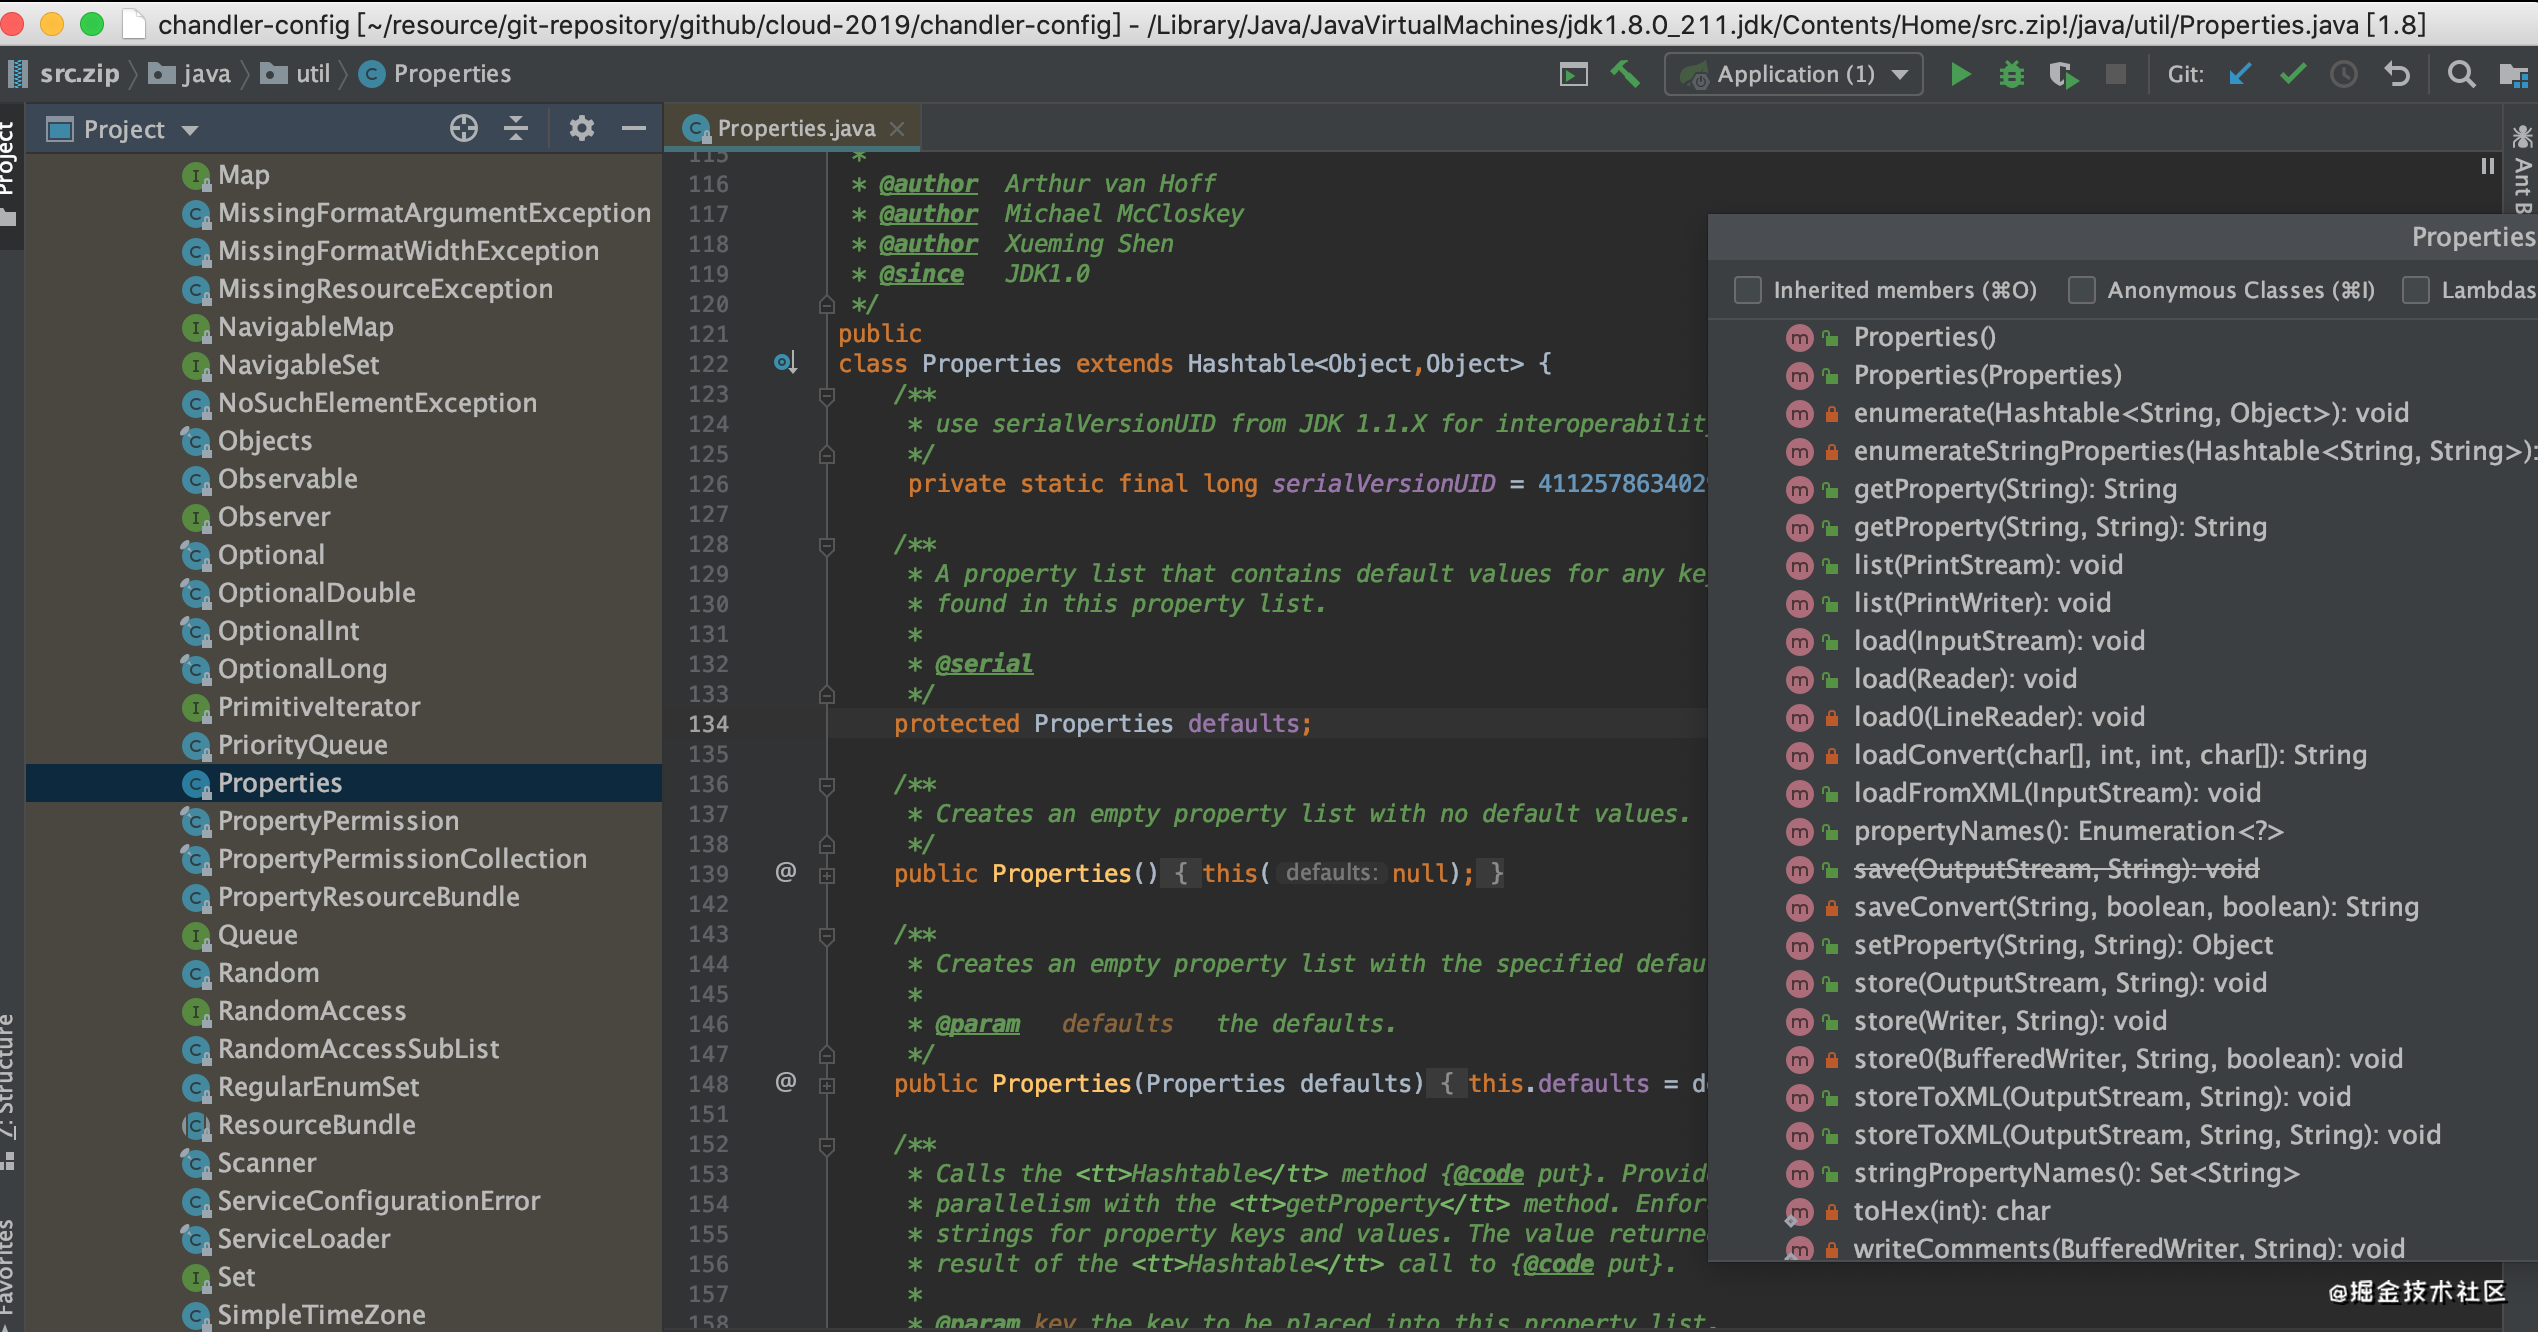
它提供了几个主要的方法:
- getProperty (String key):用指定的键在此属性列表中搜索属性。也就是通过参数 key ,得到 key 所对应的 value。
- load (InputStream inStream):从输入流中读取属性列表(键和元素对)。通过对指定的文件(比如说上面的 test.properties 文件)进行装载来获取该文件中的所有键 - 值对。以供 getProperty ( String key) 来搜索。
- setProperty ( String key, String value) ,调用 Hashtable 的方法 put 。他通过调用基类的put方法来设置 键 - 值对。
- store (OutputStream out, String comments):以适合使用 load 方法加载到 Properties 表中的格式,将此 Properties 表中的属性列表(键和元素对)写入输出流。与 load 方法相反,该方法将键 - 值对写入到指定的文件中去。
- clear ():清除所有装载的 键 - 值对。该方法在基类中提供。
2.1.2 action
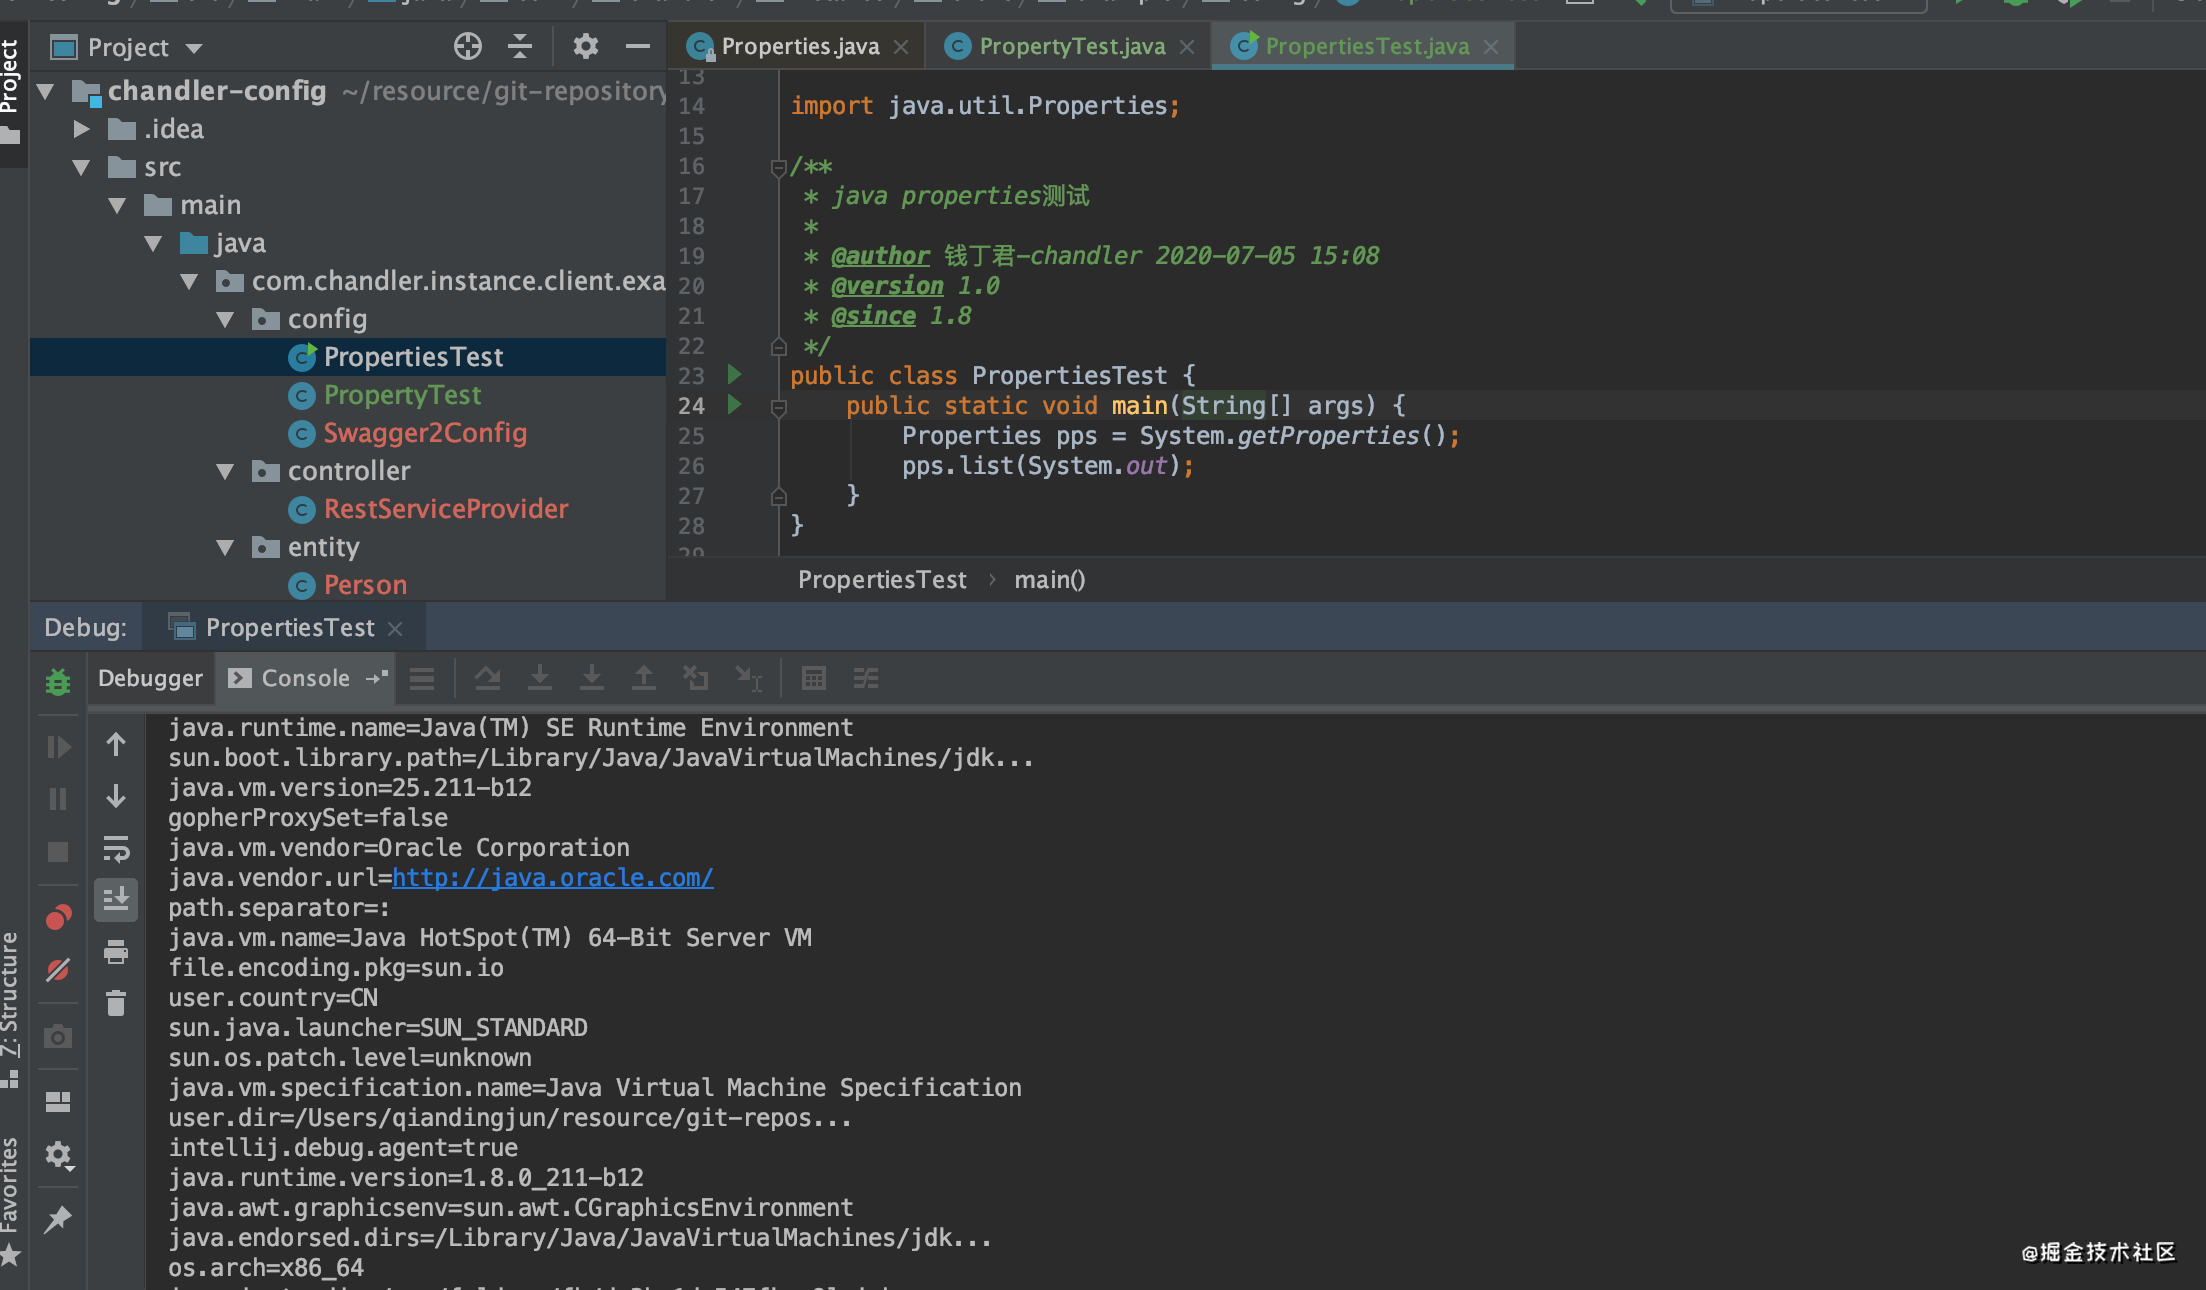
1、获取JVM系统属性信息
JVM都有自己的系统配置文件(system.properties),将其输出,如下所示:
/**
 * java properties测试
 *
 * @author 钱丁君-chandler 2020-07-05 15:08
 * @version 1.0
 * @since 1.8
 */
public class PropertiesTest {
    public static void main(String[] args) {
        Properties pps = System.getProperties();
        pps.list(System.out);
    }
}
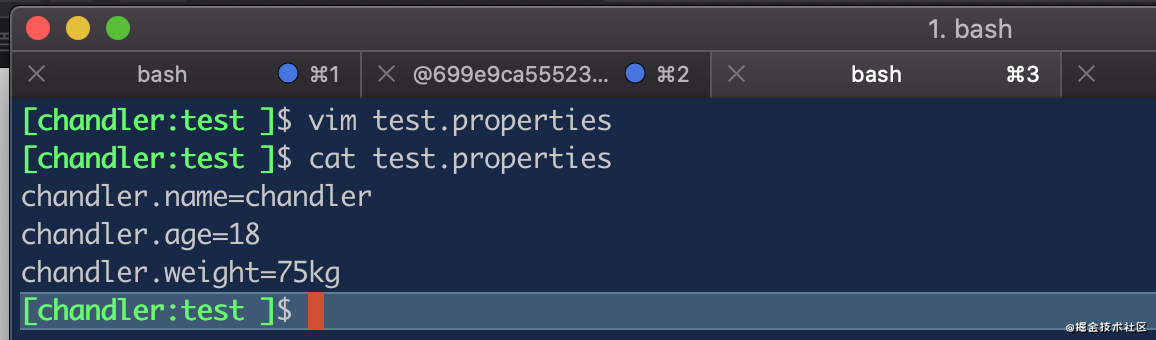
2、读取test.properties
新增一个test.properties文件,如下所示
vim test.properties
chandler.name=chandler
chandler.age=18
chandler.weight=75kg

使用Properties将配置项在Java中进行输出,如下所示:
/**
 * java properties测试
 *
 * @author 钱丁君-chandler 2020-07-05 15:08
 * @version 1.0
 * @since 1.8
 */
public class PropertiesTest {
    public static void main(String[] args) throws IOException {
        Properties pps = new Properties();
        pps.load(new FileInputStream("/Users/qiandingjun/resource/git-repository/test/test.properties"));
        pps.list(System.out);
    }
}
2.2 Spring与Property
Spring是一个非常优秀的Java框架,在property方面也做了自己的增强处理。
2.2.1 PropertyPlaceholderConfigurer
我们首先来看一下配置加载核心类PropertyPlaceholderConfigurer,作用是加载指定文件中的配置信息。源代码如下所示:
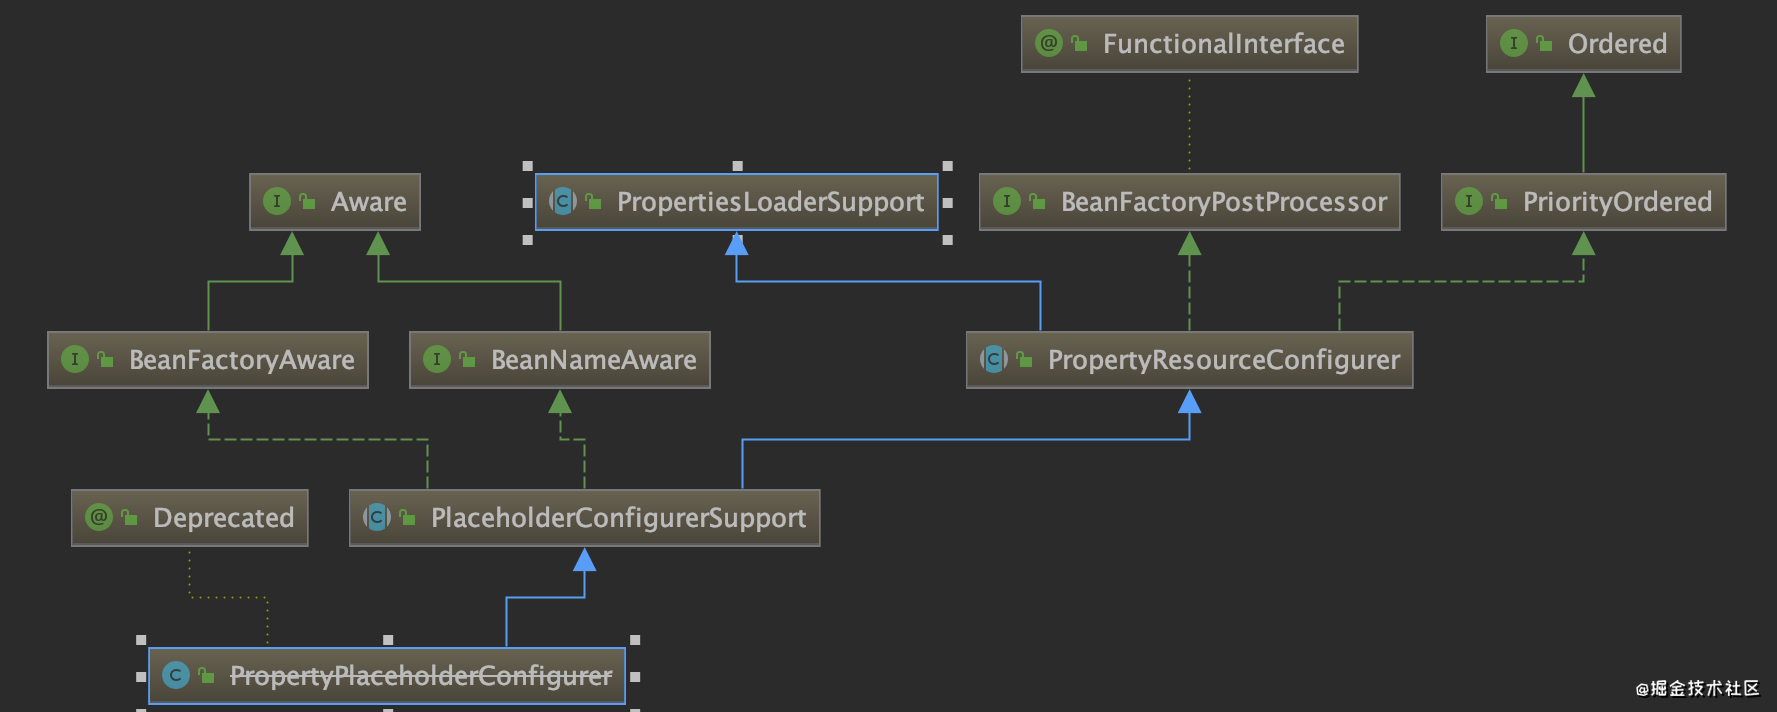
public class PropertyPlaceholderConfigurer extends PlaceholderConfigurerSupport {
    、、、
    /**
	 * Visit each bean definition in the given bean factory and attempt to replace ${...} property
	 * placeholders with values from the given properties.
	 */
	@Override
	protected void processProperties(ConfigurableListableBeanFactory beanFactoryToProcess, Properties props)
			throws BeansException {

		StringValueResolver valueResolver = new PlaceholderResolvingStringValueResolver(props);
		doProcessProperties(beanFactoryToProcess, valueResolver);
	}
	、、、
}
在Spring中,使用PropertyPlaceholderConfigurer可以在XML配置文件中加入外部属性文件,当然也可以指定外部文件的编码。PropertyPlaceholderConfigurer可以将上下文(配置文 件)中的属性值放在另一个单独的标准java Properties文件中去。在XML文件中用${key}替换指定的properties文件中的值。在MVC工程中,我们可以进行如下配置加载额外的配置文件::
<bean id="propertyConfigurer" class="org.springframework.beans.factory.config.PropertyPlaceholderConfigurer">
    <property name="order" value="1">
    <property name="localOverride" value="true">
    <property name="ignoreResourceNotFound" value="true">
	<property name="locations">
		 <list>
			<value>classpath:jdbc.properties</value>
			<value>classpath:config/*.properties</value>
		 	<value>classpath:chandler.properties</value>
		 </list>
	</property>
</bean>
- localOverride:加载的数据是否覆盖spring之前加载的同名属性
- locations:配置properties文件路径,例如"classpath:xxxx";“file:xxxx”
- ignoreResourceNotFound:加载多个properties文件,是否忽略不存在的文件。
PropertyPlaceholderConfigurer在Spring 5.2之后被设置为过期,以后将会被PropertySourcesPlaceholderConfigurer代替。
2.2.2 PropertySourcesPlaceholderConfigurer
public class PropertySourcesPlaceholderConfigurer extends PlaceholderConfigurerSupport implements EnvironmentAware {
    、、、
    @Nullable
    //初始化配置源对象,存储properties信息的List集合,
	private MutablePropertySources propertySources;

	@Nullable
	//加工之后的配置源对象
	private PropertySources appliedPropertySources;

	@Nullable
	private Environment environment;
	、、、

	@Override
	//加载所有propertySources
	public void postProcessBeanFactory(ConfigurableListableBeanFactory beanFactory) throws BeansException {
		if (this.propertySources == null) {
			this.propertySources = new MutablePropertySources();
			if (this.environment != null) {
				this.propertySources.addLast(
					new PropertySource<Environment>(ENVIRONMENT_PROPERTIES_PROPERTY_SOURCE_NAME, this.environment) {
						@Override
						@Nullable
						public String getProperty(String key) {
							return this.source.getProperty(key);
						}
					}
				);
			}
			try {
				PropertySource<?> localPropertySource =
						new PropertiesPropertySource(LOCAL_PROPERTIES_PROPERTY_SOURCE_NAME, mergeProperties());
				if (this.localOverride) {
					this.propertySources.addFirst(localPropertySource);
				}
				else {
					this.propertySources.addLast(localPropertySource);
				}
			}
			catch (IOException ex) {
				throw new BeanInitializationException("Could not load properties", ex);
			}
		}

		processProperties(beanFactory, new PropertySourcesPropertyResolver(this.propertySources));
		this.appliedPropertySources = this.propertySources;
	}

	、、、

	/**
	 * Visit each bean definition in the given bean factory and attempt to replace ${...} property
	 * placeholders with values from the given properties.
	 */
	 //加配置中${...}进行替换
	protected void processProperties(ConfigurableListableBeanFactory beanFactoryToProcess,
			final ConfigurablePropertyResolver propertyResolver) throws BeansException {

		propertyResolver.setPlaceholderPrefix(this.placeholderPrefix);
		propertyResolver.setPlaceholderSuffix(this.placeholderSuffix);
		propertyResolver.setValueSeparator(this.valueSeparator);
        //StringValueResolver的实现,使用propertyResolver进行赋值
		StringValueResolver valueResolver = strVal -> {
			String resolved = (this.ignoreUnresolvablePlaceholders ?
					propertyResolver.resolvePlaceholders(strVal) :
					propertyResolver.resolveRequiredPlaceholders(strVal));
			if (this.trimValues) {
				resolved = resolved.trim();
			}
			return (resolved.equals(this.nullValue) ? null : resolved);
		};

        //将StringValueResolver的实现添加到beanfactory
		doProcessProperties(beanFactoryToProcess, valueResolver);
	}
}
仔细理解PropertySourcesPlaceholderConfigurer中的代码,从中我们可以窥见Spring配置模块的全局。关键要素如下所示:
- propertySources:MutablePropertySources,存储初始化配置源对象,存储properties信息的CopyOnWriteArrayList集合。
- appliedPropertySources:存储加工之后的配置源对象,首先将配置中${…}进行替换,然后将beanFactory中所有bean中被@Value修饰或被@ConfigurationProperties作用的属性将会被配置赋值。
- environment:Spring所加载的Environment,包含System.getenv()和System.getProperties(),然后加载到propertySources中。

2.2.3 @Value
Spring Boot启动过程中,有两个比较重要的过程,如下:
- 扫描、解析容器中的bean注册到beanFactory上去,就像是信息登记一样。
- 实例化、初始化这些扫描到的bean。
@Value的解析就是发生在第二阶段,BeanPostProcessor定义了bean初始化前后用户可以对bean进行操作的接口方法,它的一个重要实现类AutowiredAnnotationBeanPostProcessor,为bean中的@Autowired和@Value注解的注入功能提供支持。
@Value解析过程中的主要调用链,如下时序图表示:
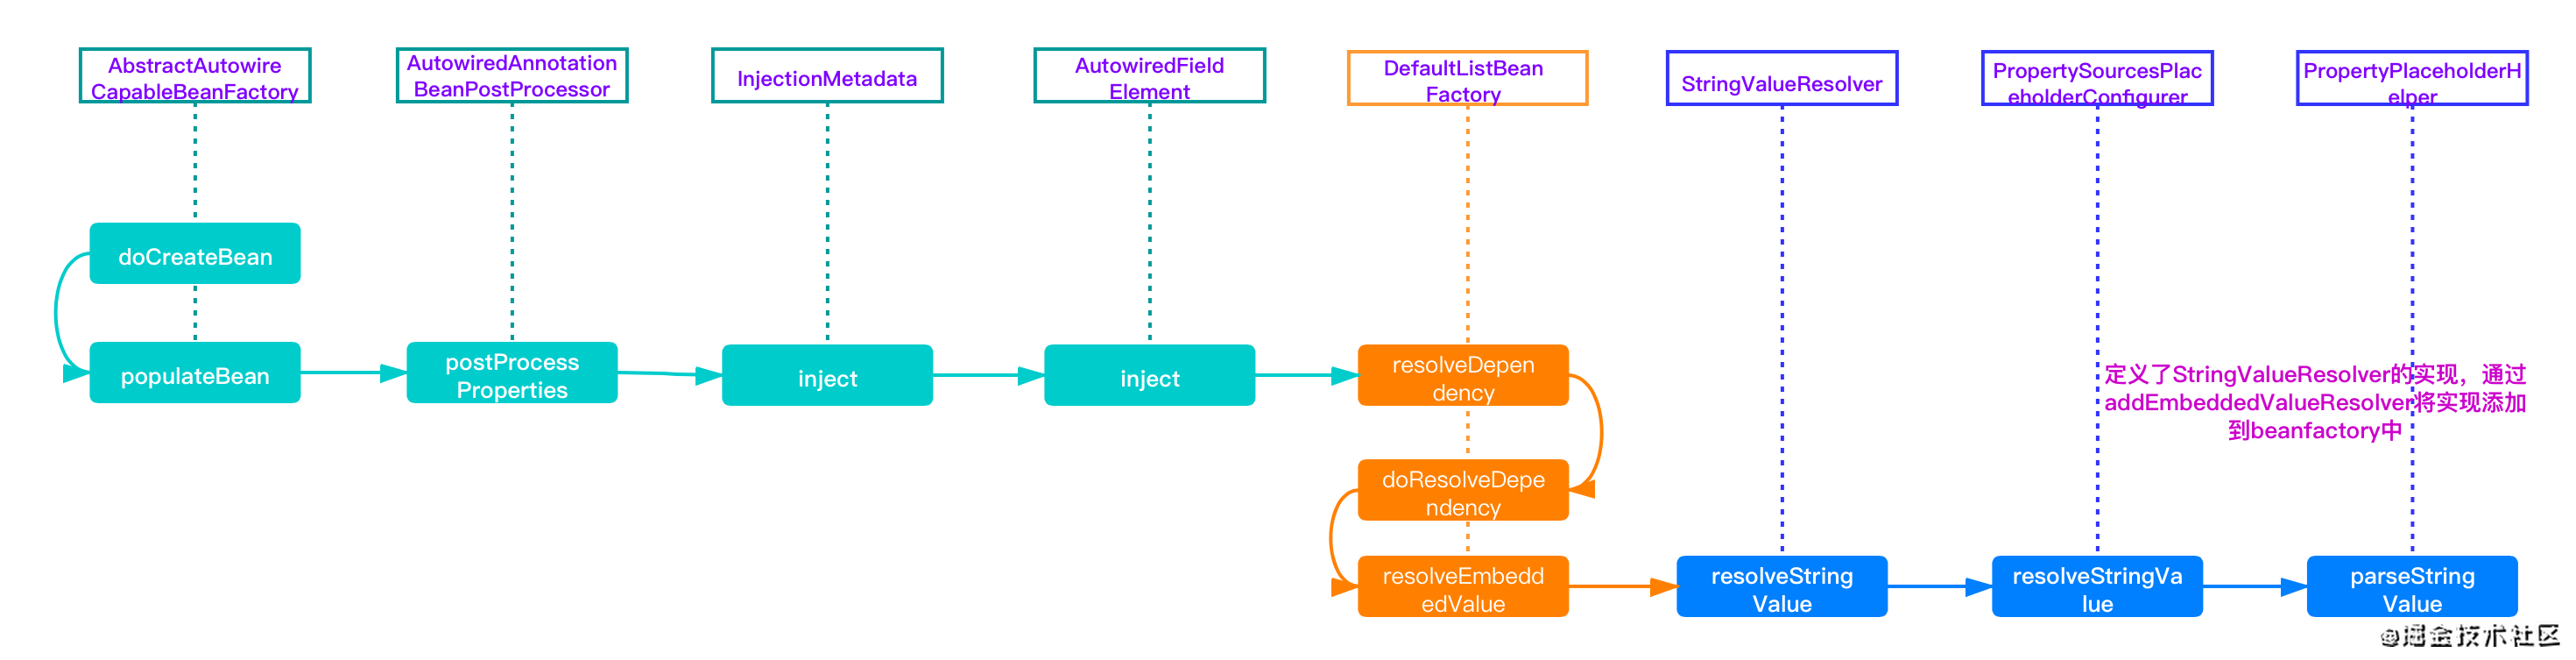
这里先简单介绍一下图中几个类的作用:
- AbstractAutowireCapableBeanFactory:提供bean创建、属性填充、自动装配、初始化。支持自动装配构造函数,属性按名称和类型装配,实现了AutowiredCapableBeanFactory接口定义的createBean方法。
- AutowiredAnnotationBeanPostProcessor:装配bean中使用注解标注的成员变量,setter方法、任意的配置方法。比较典型的是@Autowired注解和@Value注解。
- InjectionMetadata:类的注入元数据,可能是类的方法或属性等,在AutowiedAnnotationBeanPostProcessor类中被使用。
- AutowiredFieldElement:是AutowiredAnnotationBeanPostProcesso的一个私有内部类,继承InjectionMetadata.InjectedElement,描述注解的字段。
- DefaultListBeanFactory:实现接口ConfigurablelistableBeanFactory、BeanDefinitionRegistry
(bean定义的注册接口),并继承AbstractAutowireCapableBeanFactory,实现全部类管理的功能。- resolveDependency函数:处理bean中属性的依赖,包含bean依赖和property依赖
- StringValueResolver:一个定义了处置字符串的接口,只有一个接口方法resolveStringValue,可以用来解决占位符字符串。本文中的主要实现类在PropertySourcePlaceholderConfigure#processProperties方法中通过lambda表达式定义的。供ConfigurableBeanFactory类使用。
- PropertySourcesPlaceholderConfigurer:PropertySources核心管理类,负责加载所有的PropertySource,并在processProperties中实现了StringValueResolver的resolveStringValue,通过beanFactory的addEmbeddedValueResolver添加进去。
- PropertyPlaceholderHelper:工具类,在AbstractPropertyResolver的doResolvePlaceholders中使用,用来将value注解中${…}替换为目标property的value。
AbstractAutowireCapableBeanFactory#populateBean方法用于填充bean属性,这些属性需要被@Value和@Autowired修饰。
- @Autowired修饰:从listBean根据类型或beanName获取bean,进行属性填充。
- @Value修饰:从Property中通过key获取value,并进行输出填充。
protected void populateBean(String beanName, RootBeanDefinition mbd, @Nullable BeanWrapper bw) {
    、、、
    PropertyValues pvs = (mbd.hasPropertyValues() ? mbd.getPropertyValues() : null);

    if (mbd.getResolvedAutowireMode() == AUTOWIRE_BY_NAME || mbd.getResolvedAutowireMode() == AUTOWIRE_BY_TYPE) {
       MutablePropertyValues newPvs = new MutablePropertyValues(pvs);
       // Add property values based on autowire by name if applicable.根据名称从beanfactory中查找并填充到属性中
       if (mbd.getResolvedAutowireMode() == AUTOWIRE_BY_NAME) {
          autowireByName(beanName, mbd, bw, newPvs);
       }
       // Add property values based on autowire by type if applicable.根据类型从beanfactory中查找并填充到属性中
       if (mbd.getResolvedAutowireMode() == AUTOWIRE_BY_TYPE) {
          autowireByType(beanName, mbd, bw, newPvs);
       }
       pvs = newPvs;
    }

    boolean hasInstAwareBpps = hasInstantiationAwareBeanPostProcessors();
    boolean needsDepCheck = (mbd.getDependencyCheck() != AbstractBeanDefinition.DEPENDENCY_CHECK_NONE);

    if (hasInstAwareBpps || needsDepCheck) {
       if (pvs == null) {
          pvs = mbd.getPropertyValues();
       }
       PropertyDescriptor[] filteredPds = filterPropertyDescriptorsForDependencyCheck(bw, mbd.allowCaching);
       if (hasInstAwareBpps) {
           //遍历所有前置处理器BeanPostProcessor
          for (BeanPostProcessor bp : getBeanPostProcessors()) {
             if (bp instanceof InstantiationAwareBeanPostProcessor) {
                    InstantiationAwareBeanPostProcessor ibp = (InstantiationAwareBeanPostProcessor) bp;
                pvs = ibp.postProcessPropertyValues(pvs, filteredPds, bw.getWrappedInstance(), beanName);
                if (pvs == null) {
                   return;
                }
             }
          }
       }
       if (needsDepCheck) {
          checkDependencies(beanName, mbd, filteredPds, pvs);
       }
    }

    if (pvs != null) {
       applyPropertyValues(beanName, mbd, bw, pvs);
    }
}
InjectionMetadata#inject逐个装配bean的配置属性。
public void inject(Object target, @Nullable String beanName, @Nullable PropertyValues pvs) throws Throwable {
   Collection<InjectedElement> checkedElements = this.checkedElements;
   Collection<InjectedElement> elementsToIterate =
         (checkedElements != null ? checkedElements : this.injectedElements);
   if (!elementsToIterate.isEmpty()) {
      for (InjectedElement element : elementsToIterate) {
         if (logger.isDebugEnabled()) {
            logger.debug("Processing injected element of bean '" + beanName + "': " + element);
         }
         element.inject(target, beanName, pvs);
      }
   }
}
PropertyPlaceholderHelper#parseStringValue解析属性值,从propertySource中获取property,并返回value结果。
protected String parseStringValue(
      String value, PlaceholderResolver placeholderResolver, Set<String> visitedPlaceholders) {

   StringBuilder result = new StringBuilder(value);

   int startIndex = value.indexOf(this.placeholderPrefix);
   while (startIndex != -1) {
      int endIndex = findPlaceholderEndIndex(result, startIndex);
      if (endIndex != -1) {
         String placeholder = result.substring(startIndex + this.placeholderPrefix.length(), endIndex);
         String originalPlaceholder = placeholder;
         if (!visitedPlaceholders.add(originalPlaceholder)) {
            throw new IllegalArgumentException(
                  "Circular placeholder reference '" + originalPlaceholder + "' in property definitions");
         }
         // Recursive invocation, parsing placeholders contained in the placeholder key.
         placeholder = parseStringValue(placeholder, placeholderResolver, visitedPlaceholders);
         // 从propertySource中获取property
         String propVal = placeholderResolver.resolvePlaceholder(placeholder);
         if (propVal == null && this.valueSeparator != null) {
            int separatorIndex = placeholder.indexOf(this.valueSeparator);
            if (separatorIndex != -1) {
               String actualPlaceholder = placeholder.substring(0, separatorIndex);
               String defaultValue = placeholder.substring(separatorIndex + this.valueSeparator.length());
               propVal = placeholderResolver.resolvePlaceholder(actualPlaceholder);
               if (propVal == null) {
                  propVal = defaultValue;
               }
            }
         }
         if (propVal != null) {
            // Recursive invocation, parsing placeholders contained in the
            // previously resolved placeholder value.
            propVal = parseStringValue(propVal, placeholderResolver, visitedPlaceholders);
            result.replace(startIndex, endIndex + this.placeholderSuffix.length(), propVal);
            if (logger.isTraceEnabled()) {
               logger.trace("Resolved placeholder '" + placeholder + "'");
            }
            startIndex = result.indexOf(this.placeholderPrefix, startIndex + propVal.length());
         }
         else if (this.ignoreUnresolvablePlaceholders) {
            // Proceed with unprocessed value.
            startIndex = result.indexOf(this.placeholderPrefix, endIndex + this.placeholderSuffix.length());
         }
         else {
            throw new IllegalArgumentException("Could not resolve placeholder '" +
                  placeholder + "'" + " in value \"" + value + "\"");
         }
         visitedPlaceholders.remove(originalPlaceholder);
      }
      else {
         startIndex = -1;
      }
   }

   return result.toString();
}
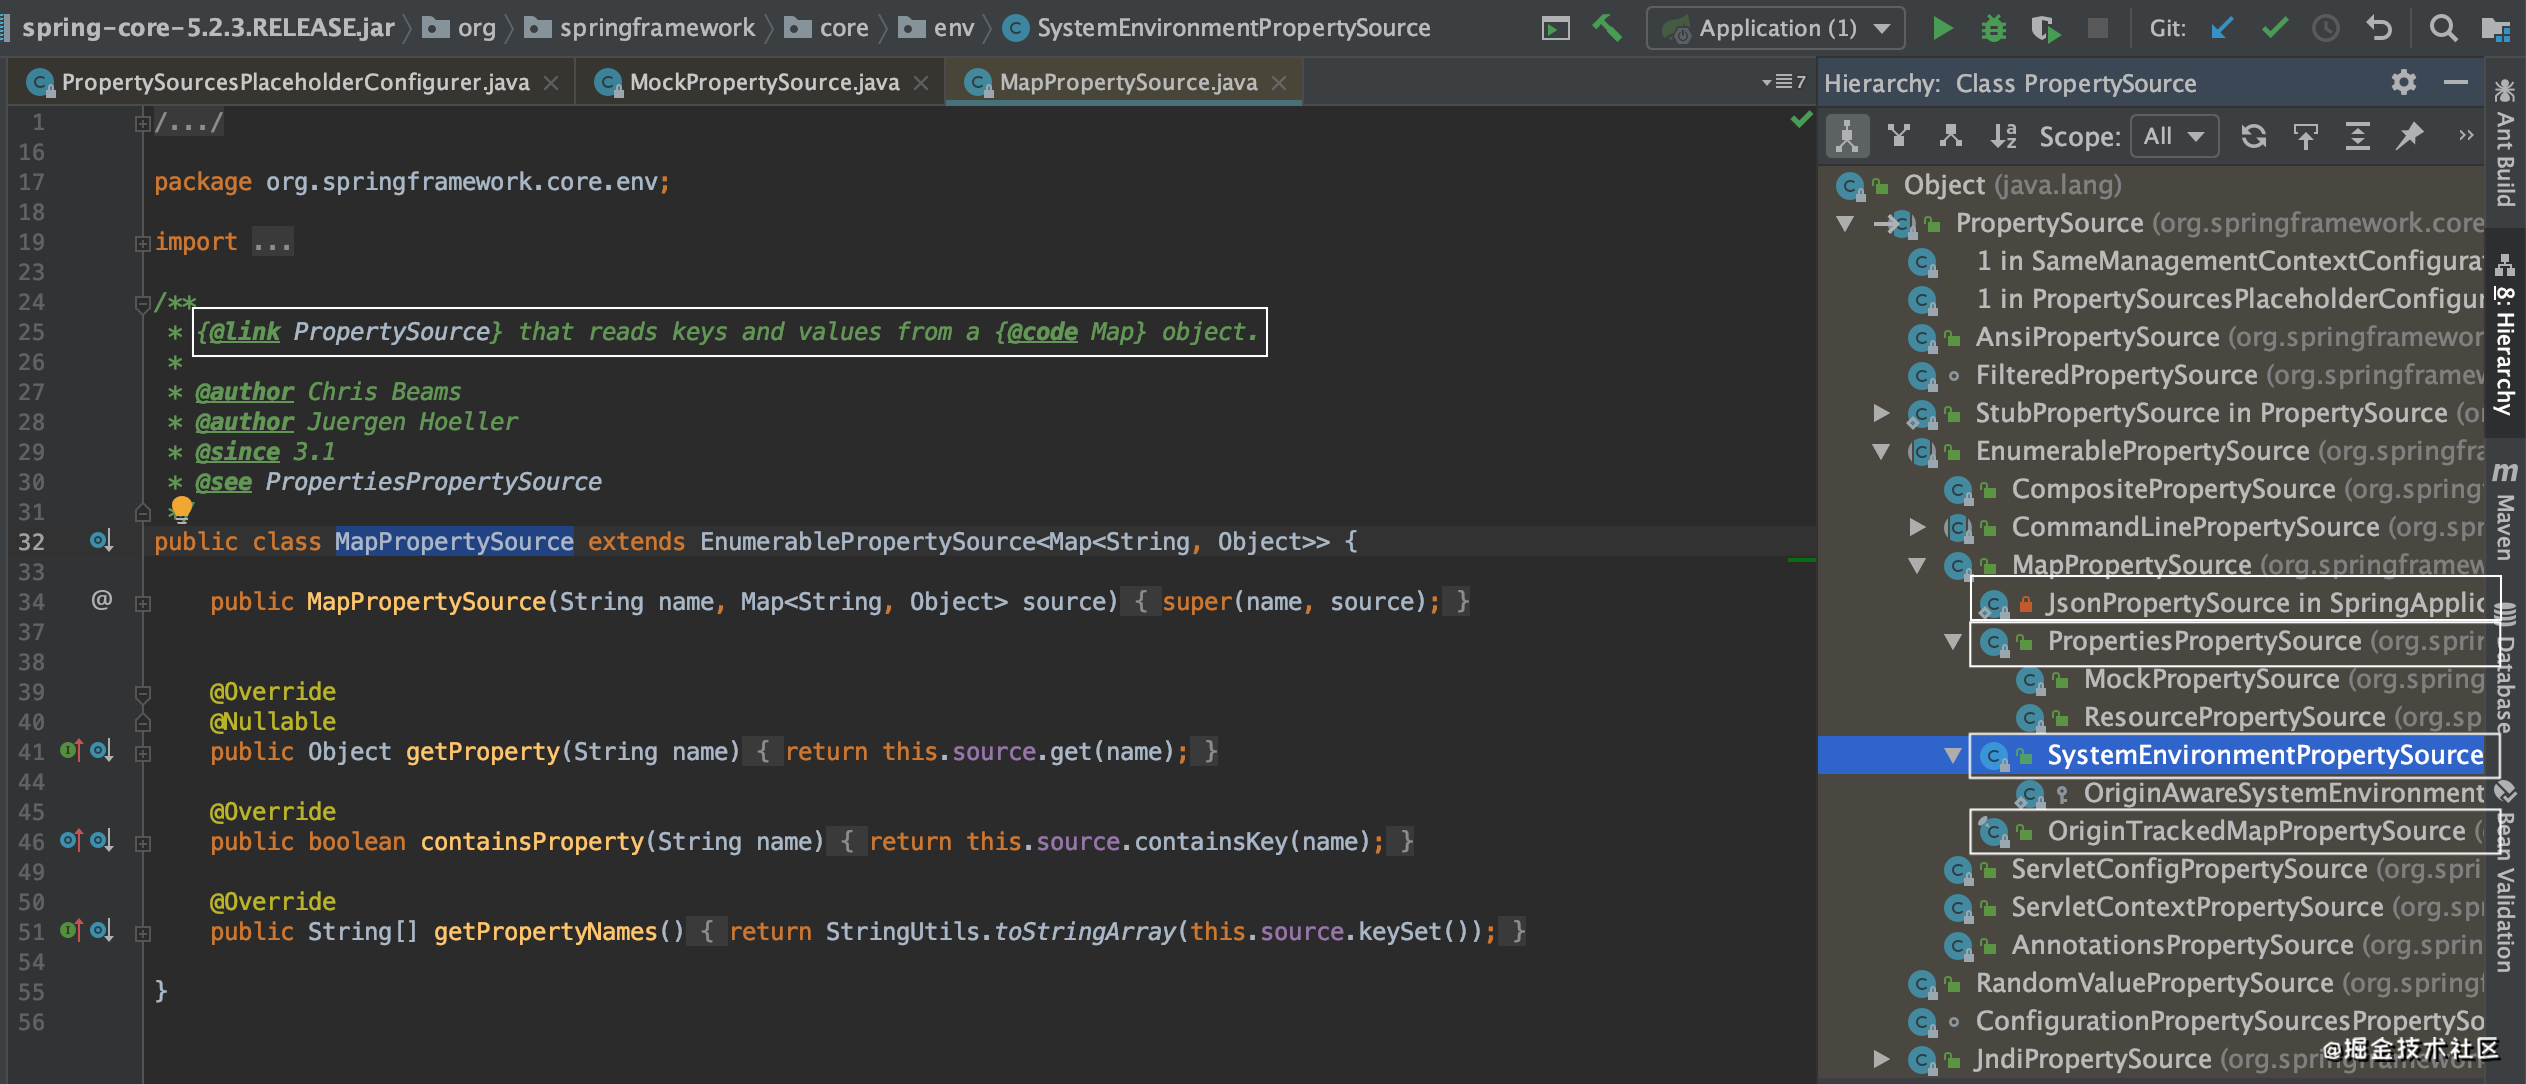
2.2.4 PropertySource
PropertySource的作用是通过key,value的形式存储property,如下所示:

如上所示,可以展示出PropertySource的使用场景,需要注意如下:
- PropertySourcesPlaceholderConfigurer初始化PropertySource,将会将所有的PropertySource汇总并加载在一起,方便使用。
- 不同场景加载不同PropertySource,比如SystemEnvironmentPropertySource、RandomValuePropertySource、ServletConfigPropertySource。
- MapPropertySource作用是加载工程中的各种配置和环境变量,其子类的实现也是针对不同场景。
2.3 Spring Boot与Property
Spring Boot工程相比较于MVC工程,多了很多“自动化配置”,其中就包括了配置的自动化加载,那它是怎么做的呢?(boot版本:2.2.3.RELEASE)
2.3.1 PropertySourcesPlaceholderConfigurer实例化
很简单,直接查询PropertySourcesPlaceholderConfigurer在那里被使用到,然后找到其中实例化的部分。如下所示:
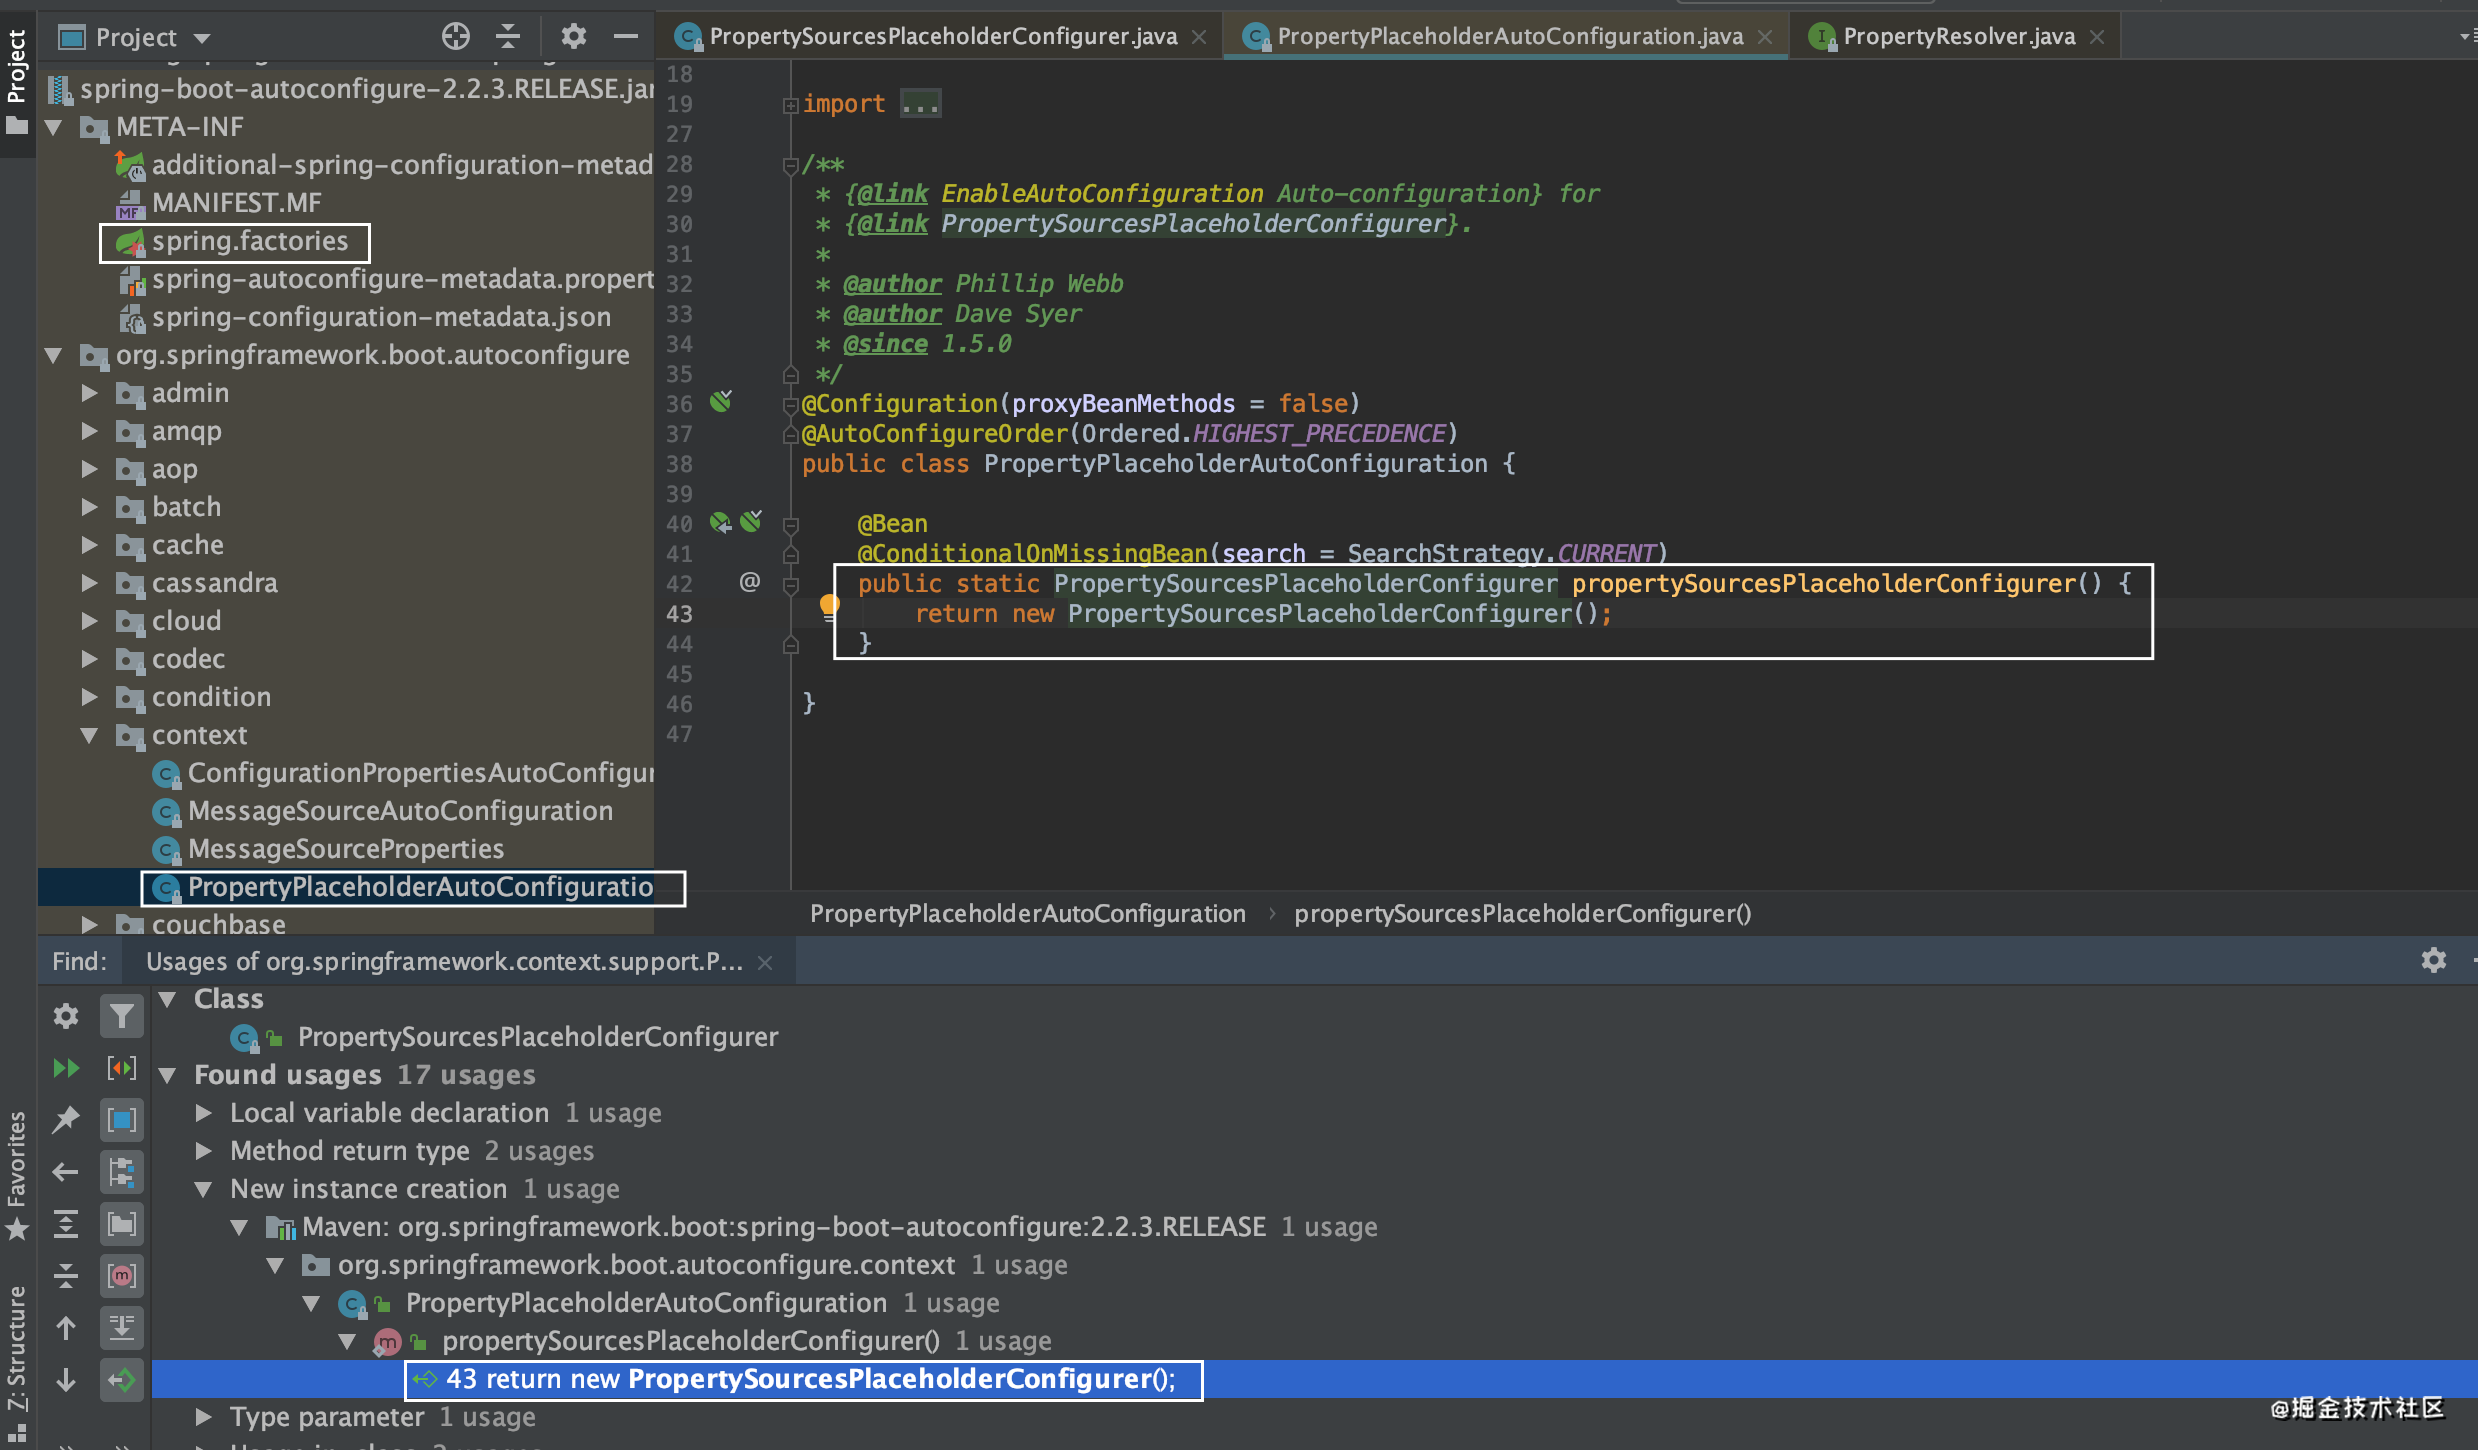
- @AutoConfigureOrder(Ordered.HIGHEST_PRECEDENCE):说明其加载时的优先级比较高,这样有利于在其他bean使用配置之前,加载好配置。
- @Configuration(proxyBeanMethods = false):Java Configuration方式初始化Spring bean,不过想让PropertySourcesPlaceholderConfigurer注册到Spring容器,还需要配合spring.factories。
2.3.2 PropertySources
Spring Boot在启动时,默认加载classpath下所有.properties文件和.yml文件,Boot是如何实现的呢?
再次查看spring.factories,查询PropertySource如下所示:
# PropertySource Loaders
org.springframework.boot.env.PropertySourceLoader=\
org.springframework.boot.env.PropertiesPropertySourceLoader,\
org.springframework.boot.env.YamlPropertySourceLoader
PropertiesPropertySourceLoader
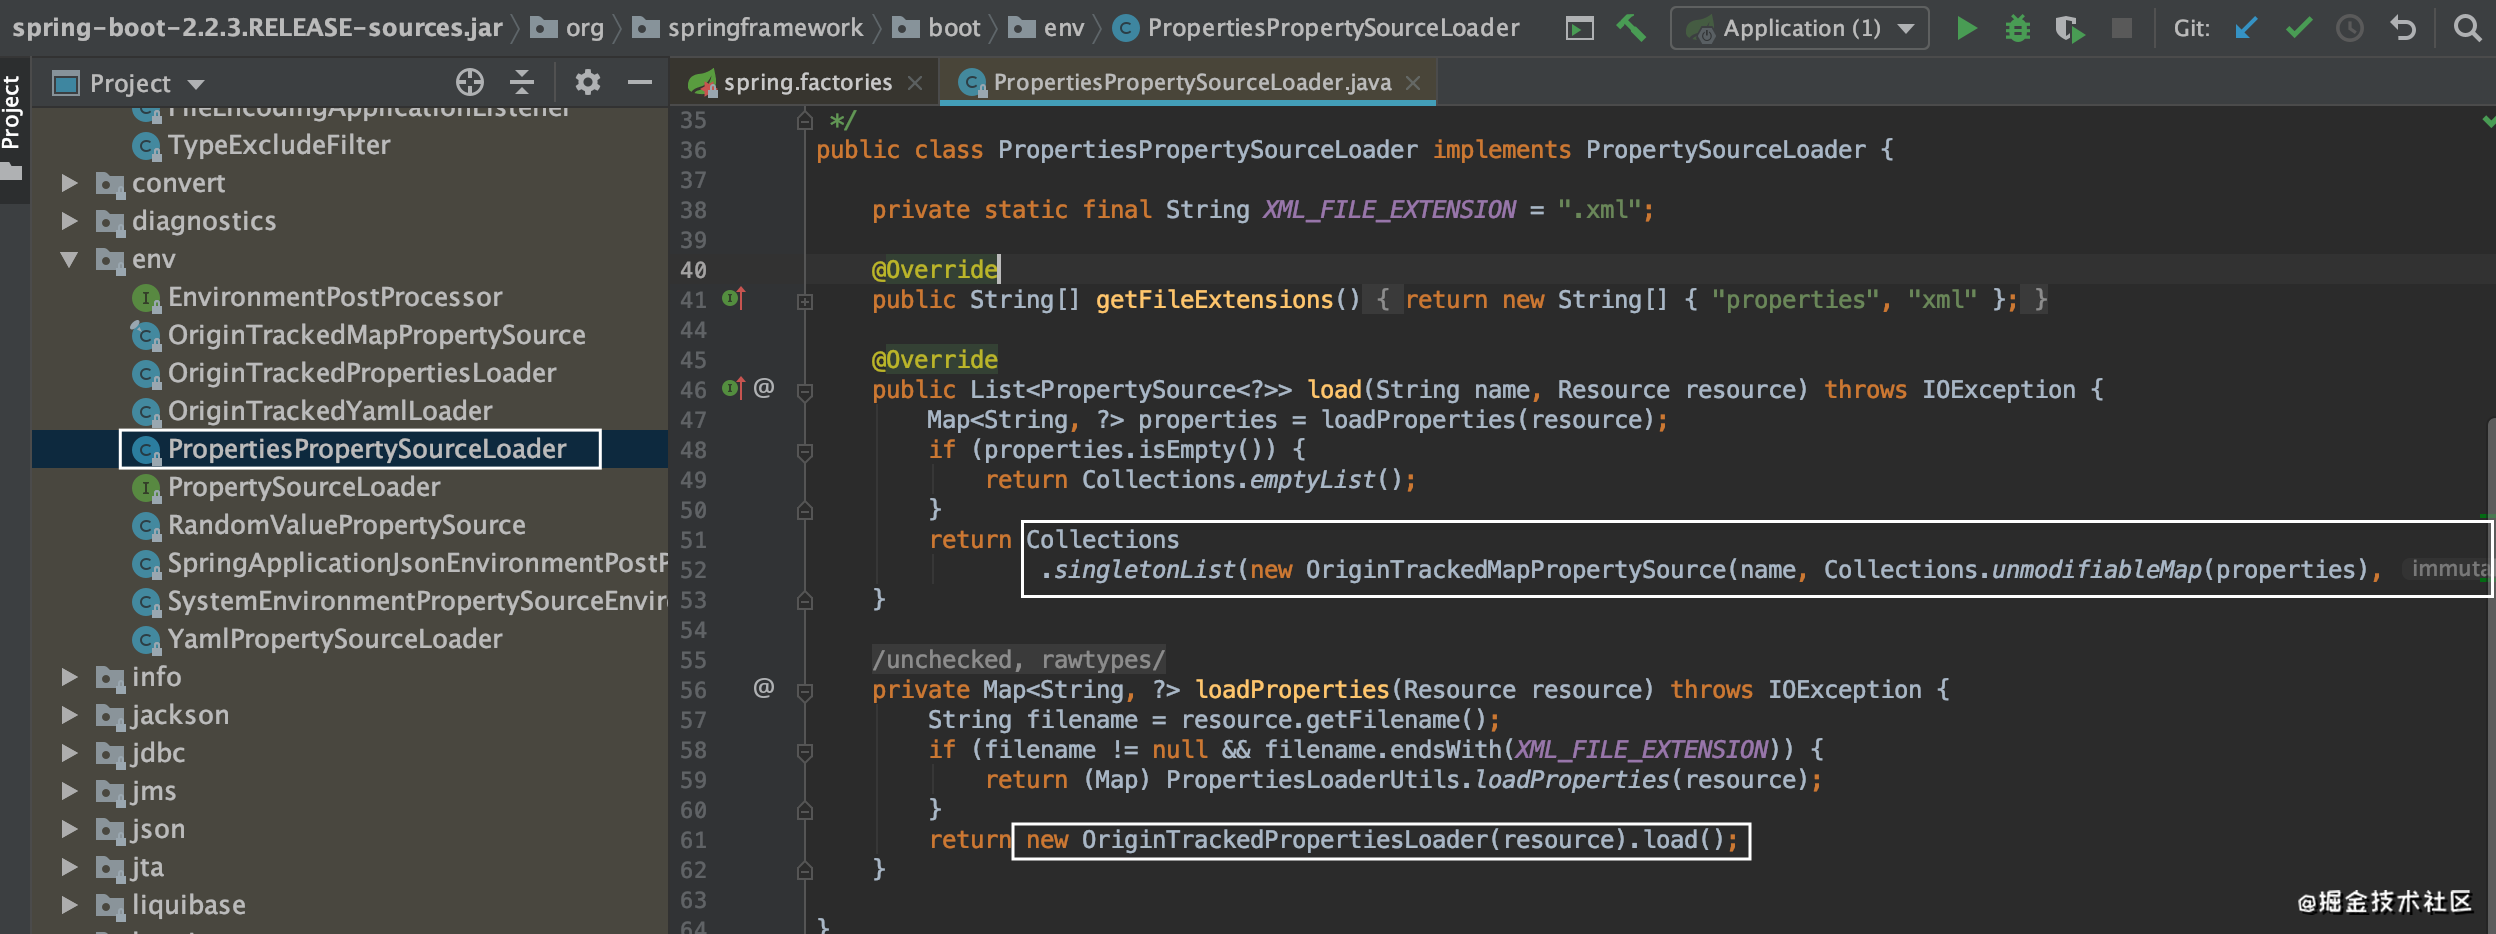
这个类的作用是加载classpath下的properties和xml类型的配置文件的,它实现了PropertySourceLoader这个接口。
YamlPropertySourceLoader
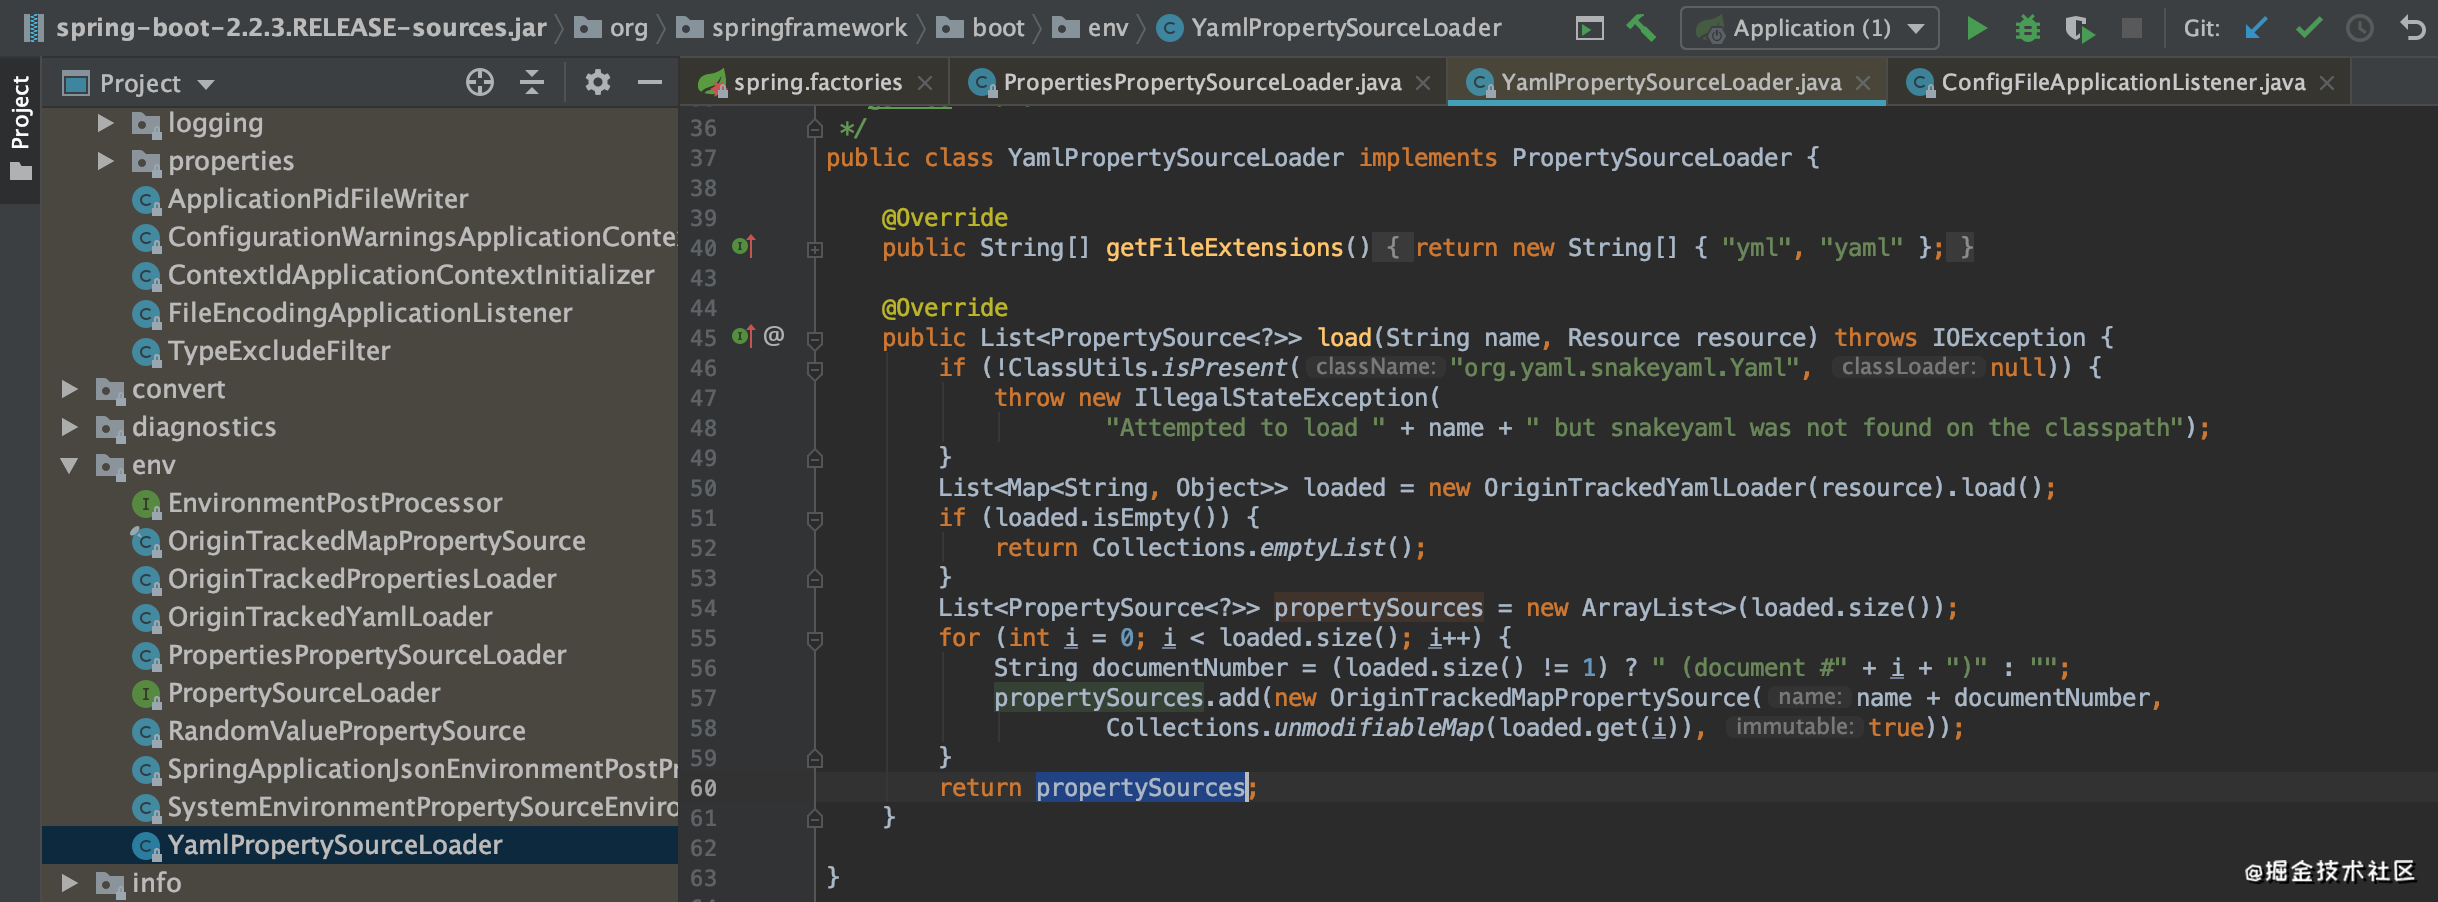
这个类的作用是加载classpath下yml和yaml类型的配置文件,它实现了PropertySourceLoader这个接口。
PropertySourceLoader
public interface PropertySourceLoader {
    String[] getFileExtensions();
    List<PropertySource<?>> load(String name, Resource resource) throws IOException;
}
- getFileExtensions:加载的文件类型扩展。
- load:加载配置文件,返回List<PropertySource<?>>。
如果我们需要扩展新的配置文件类型,比如JSON;我们可以定义一个CsutomPropertySourceLoader实现PropertySourceLoader即可。
2.3.3 Environment
Environment的源码如下所示:
public interface Environment extends PropertyResolver {
    String[] getActiveProfiles();
    String[] getDefaultProfiles();
    boolean acceptsProfiles(Profiles profiles);
}
Environment接口的方法是获取当前激活的Profiles和默认的Profiles,得知当前激活的切面。由于继承了PropertyResolver,具备获取来自spring管理的properties的能力。Environment的实现类如下所示:
[外链图片转存失败,源站可能有防盗链机制,建议将图片保存下来直接上传(img-m85j7Jz2-1622030904028)(http://note.youdao.com/yws/res/242252/WEBRESOURCE27263fc23a4f6b61f497de9bd25b9b6e)]
boot中有3个实现类,如下所示:
- StandardEnvironment:适用于非WEB项目,加载来自SYSTEM的properties和environment。
- StandardServletEnvironment:继承StandardEnvironment,适用于WEB项目,还加载了来自SERVLET初始化参数和JNDI 配置。
- StandardReactiveWebEnvironment:继承StandardServletEnvironment,目前没有做额外的动作。
Spring Boot会根据项目的使用场景,选择性地加载对应的Environment,如下所示:
[外链图片转存失败,源站可能有防盗链机制,建议将图片保存下来直接上传(img-wlvjcRBy-1622030904029)(http://note.youdao.com/yws/res/243937/WEBRESOURCE6a748fa54245d1d7522921ccc4ed26ab)]
StandardServletEnvironment
StandardServletEnvironment适用于WEB项目,源码如下:
public class StandardServletEnvironment extends StandardEnvironment implements ConfigurableWebEnvironment {
    /** Servlet context init parameters property source name: {@value}. */
	public static final String SERVLET_CONTEXT_PROPERTY_SOURCE_NAME = "servletContextInitParams";

	/** Servlet config init parameters property source name: {@value}. */
	public static final String SERVLET_CONFIG_PROPERTY_SOURCE_NAME = "servletConfigInitParams";

	/** JNDI property source name: {@value}. */
	public static final String JNDI_PROPERTY_SOURCE_NAME = "jndiProperties";

	@Override
	protected void customizePropertySources(MutablePropertySources propertySources) {
		propertySources.addLast(new StubPropertySource(SERVLET_CONFIG_PROPERTY_SOURCE_NAME));
		propertySources.addLast(new StubPropertySource(SERVLET_CONTEXT_PROPERTY_SOURCE_NAME));
		if (JndiLocatorDelegate.isDefaultJndiEnvironmentAvailable()) {
			propertySources.addLast(new JndiPropertySource(JNDI_PROPERTY_SOURCE_NAME));
		}
		super.customizePropertySources(propertySources);
	}

	@Override
	public void initPropertySources(@Nullable ServletContext servletContext, @Nullable ServletConfig servletConfig) {
		WebApplicationContextUtils.initServletPropertySources(getPropertySources(), servletContext, servletConfig);
	}
}
如上所示,在Environment初始化时,其所需的PropertySources都会进行一一加载。
如果想要扩展更多Property,可以通过自定义Environment方式来根据需要加载PropertySources;
2.3.4 SpringBoot#run
我们回归到Spring Boot启动之初,先来观察一下run方法:
public ConfigurableApplicationContext run(String... args) {
	StopWatch stopWatch = new StopWatch();
	stopWatch.start();
	ConfigurableApplicationContext context = null;
	Collection<SpringBootExceptionReporter> exceptionReporters = new ArrayList<>();
	configureHeadlessProperty();
	//第一步获取并启动监听器Listener
	SpringApplicationRunListeners listeners = getRunListeners(args);
	listeners.starting();
	try {
		ApplicationArguments applicationArguments = new DefaultApplicationArguments(args);
		//第二步构建应用环境Environment与属性源PropertySource
		ConfigurableEnvironment environment = prepareEnvironment(listeners, applicationArguments);
		configureIgnoreBeanInfo(environment);
		//输出Banner
		Banner printedBanner = printBanner(environment);
		//第三步初始化上下文Context
		context = createApplicationContext();
		exceptionReporters = getSpringFactoriesInstances(SpringBootExceptionReporter.class,
				new Class[] { ConfigurableApplicationContext.class }, context);
		prepareContext(context, environment, listeners, applicationArguments, printedBanner);
		refreshContext(context);
		afterRefresh(context, applicationArguments);
		stopWatch.stop();
		if (this.logStartupInfo) {
			new StartupInfoLogger(this.mainApplicationClass).logStarted(getApplicationLog(), stopWatch);
		}
		listeners.started(context);
		callRunners(context, applicationArguments);
	}

	、、、

	return context;
}
- 第一步获取并启动监听器Listeners
- 第二步构建应用环境Environment与属性源PropertySources
- 第三步初始化上下文Context
配置的加载在上下文初始化之前,这也是合理的。配置中心客户端组件需要在应用初始化加载来自服务端的配置,这就要求我们对属性源PropertySource加载进行扩展。
CustomPropertySourceListener
/**
 * 自定义配置中心客户端组件加载监听器
 *
 * @author 钱丁君-chandler 2020-07-05 18:11
 * @version 1.0
 * @since 1.8
 */
@Slf4j
public class CustomPropertySourceListener implements ApplicationListener<ApplicationEnvironmentPreparedEvent> {
    @Override
    public void onApplicationEvent(ApplicationEnvironmentPreparedEvent event) {
        log.info("Start read Custom property!");
        ConfigurableEnvironment configurableEnvironment = event.getEnvironment();
        Properties prop = null;//初始化Properties,如果配置来源于服务端,通过请求获取转化成Properties
        configurableEnvironment.getPropertySources().addFirst(new PropertiesPropertySource("chandlerProperty", prop));
        log.info("End read Custom property!");
    }
}
如上所示,我们获取通过接口调用,从配置中心获取所有的配置信息,然后将其添加到ConfigurableEnvironment中,这样意味着我们的property被加载到spring管理的property源中。如果想要使用,可以通过@Value注解非常便利。
spring.factories
在classp下新建spring.factories文件,添加如下内容:
org.springframework.context.ApplicationListener=\
com.chandler.instance.client.example.config.CustomPropertySourceListener
这样就可以在spring boot启动时,被加载并启动生效。
三、我们需要什么样的配置中心
3.1 什么是配置
Property:n,性质
Property英文原意表达的很好,一个事物的性质,同一个事物在不同环境Environment中,会有不一样的表现。如下图所示:

3.2 配置与环境
如此,同一个程序体可以根据Environment不同转化成不同的性质的程序体。Environment不同需要改变的property数量是不定的,如下所示:
propertiesTotal = Environment_1[property_1+...+property_n]+...+Environment_n[property_1+...+property_n]
而且由于程序体数量是不定的,property数量会是一个笛卡尔积的结果,如下所示:
propertiesTotal = programs \times environments \times properties
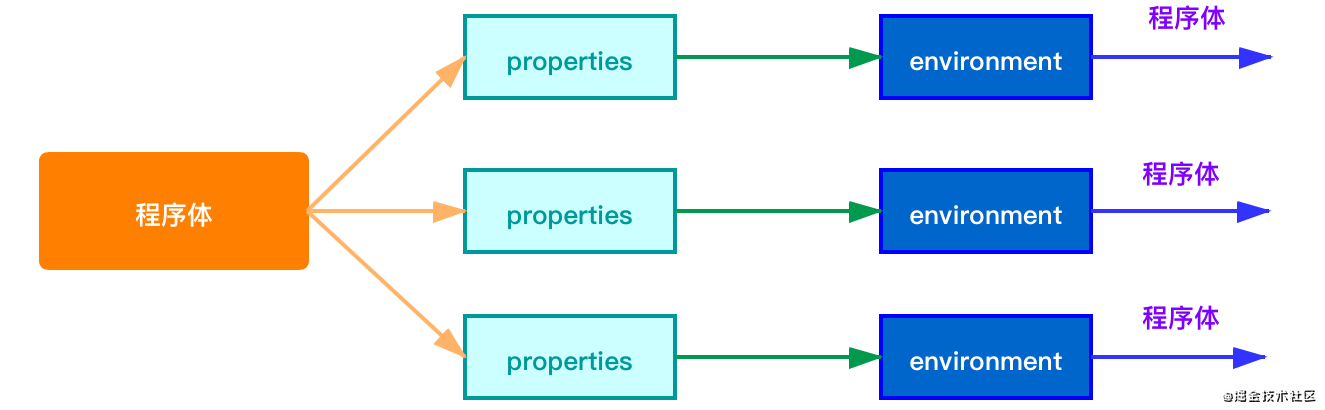
如上图所示,可以让一个程序体变更自身的性质在不同环境中表现出符合预期的能力,这些能力可以是不同环境相同表现,也可以是不同环境不同表现。
3.2 配置中心
首先我们先了解一下市面上有哪些优秀的配置中心,如下所示:
- spring-cloud-config:spring出品,与spring cloud无缝对接,是我接触的第一个开源配置中心框架。
- disconf:百度的一个分布式配置中心。
- Apollo:携程框架部门研发的开源配置管理中心,具备规范的权限、流程治理等特性,业界使用广泛。
3.2.1 配置中心框架比对
功能特性
| 功能点 | 优先级 | config | disconf | apollo | 备注 |
|---|---|---|---|---|---|
| 静态配置加载 | 高 | 支持 | 支持 | 支持 | |
| 配置热更新 | 高 | 支持 | 支持 | 支持 | |
| 统一管理界面 | 高 | 无 | 支持 | 支持 | |
| 多环境支持 | 中 | 无 | 支持 | 支持 | |
| 多集群支持 | 中 | 无 | 支持 | ||
| 灰度发布 | 中 | 无 | 支持 | 无 | |
| 本地配置缓存 | 中 | 无 | 支持 | 支持 | |
| 配置生效时间 | 中 | 刷新生效 | 实时 | 实时 | |
| 用户权限管理 | 高 | 无 | 支持 | 支持 | |
| 授权、审核、审批 | 高 | 无 | 无 | 无 | |
| 配置版本管理 | 高 | Git做版本管理 | 提供发布历史和回滚按钮 | 操作记录有落数据库,但无查询接口 | |
| 资源监控 | 中 | 无 | 支持 | 支持 | |
| 告警通知 | 中 | 无 | 支持,邮件方式告警 | 支持,邮件方式告警 | |
| 依赖关系 | 高 | 无 | 无 | 无 |
技术路线兼容性
配置中心需要考虑与现有系统的兼容性,,以及是否引入额外的第三方组件。
| 功能点 | 优先级 | config | apollo | disconf | 备注 |
|---|---|---|---|---|---|
| SpringBoot | 高 | 原生支持 | 支持 | 与spring boot无相关 | |
| SpringCloud | 高 | 原生支持 | 支持 | 与spring cloud无相关 | |
| 客户端支持 | 低 | JAVA | JAVA、.Net | JAVA | |
| 业务系统侵入性 | 高 | 弱 | 弱 | 弱,支持注解及xml方式 | |
| 依赖组件 | 高 | Eureka | Eureka | zookeeper |
可用性与易用性
| 功能点 | 优先级 | config | disconf | apollo | 备注 |
|---|---|---|---|---|---|
| 单点故障 | 高 | 支持HA部署 | 支持HA部署 | 支持HA部署,高可用由zookeeper保证 | |
| 多数据中心部署 | 高 | 支持 | 支持 | 支持 | |
| 配置界面 | 高 | 无 | 统一界面 | 统一界面 |
3.2.2 配置中心应用场景
1、将配置进行集中管理
一般而言,配置中心需要满足的第一个场景,将分散的配置信息集中。由于应用数理越来越多,配置文件成本增长,特别是一个微服务多节点部署时,每次变更都需要修改多个节点,配置维护成本成本增长。
集中管理是配置中心的最基本的场景需求,能力包含配置数据存储和配置数据变更操作,可视化界面的友好性也是很重要的。配置管理的实现并不复杂,配置的数据结构很重要,需要支持多版本、集群、微环境等功能。
2、配置项运行时变更
动态变更配置值也是很重要的一个场景需求,可以避免应用重启,降低配置变更的成本。
配置项运行时变更,需要考虑如下几点:
- 配置数据更新
- 定时线程定时从配置中心服务端获取配置。
- 长轮询监测配置变更,再从配置中心服务端拉取配置。
- 配置数据存储
- 将配置数据加载到spring管理的PropertySource中
- 将配置数据在本地缓存、更新、使用。
3、业务场景
大多数的配置中心都只是保存与业务无关的配置,业务模块中也需要配置数据,由于没有配置中心支持,一般是将业务配置数据保存在服务本地的数据中。
业务配置的需求是大量存在的,比如,表单结构是配置,运营策略也是配置,优惠方案也是配置。
为什么没有业务配置中心呢?
- 业务配置中心是存在的。存在于数据库中,存在于系统配置中心中。一些公司也会开发业务配置中心,一般与业务耦合度高。
- 业务配置是复杂的,特殊化的;支持业务配置会给配置中心会带来复杂性。
四、小结
如果需要給我修改意见的发送邮箱:erghjmncq6643981@163.com
转发博客,请注明,谢谢。


 1245
1245


 被折叠的 条评论
为什么被折叠?
被折叠的 条评论
为什么被折叠?
 到【灌水乐园】发言


