


文章目录
https://www.cnblogs.com/keerya/p/7987886.html
1,ansible简介
ansible是新出现的自动化运维工具,基于Python开发,集合了众多运维工具(puppet、cfengine、chef、func、fabric)的优点,实现了批量系统配置、批量程序部署、批量运行命令等功能。
ansible是基于模块工作的,本身没有批量部署的能力。真正具有批量部署的是ansible所运行的模块,ansible只是提供一种框架。主要包括:
(1)、连接插件connection plugins:负责和被监控端实现通信;
(2)、host inventory:指定操作的主机,是一个配置文件里面定义监控的主机;
(3)、各种模块核心模块、command模块、自定义模块;
(4)、借助于插件完成记录日志邮件等功能;
(5)、playbook:剧本执行多个任务时,非必需可以让节点一次性运行多个任务。
特点
- 没有客户端,轻量级
- 通过ssh连接,无需agent
- 可实现大规模部署,效率高
(1)命令运行方式及常用参数
- ansible的两种命令运行方式:
- Ad-Hoc %利用ansible命令直接完成管理,主要用于临时命令使用场景
- playbook %ansible编辑脚本,主要用于大型项目场景
命令运行格式及参数
-
ansible-doc [参数] [模块…]
ansible-doc -l %列出可用模块
ansible-doc -s %显示指定模块的playbook片段## -
ansible 清单 -m 模块 -a 模块参数
| 参数 | 含义 |
|---|---|
| –version | 显示版本 |
| -m module | 指定模块,默认为command模块 |
| -v | 详细过程 -vv -vvv更详细过程 |
| –list | 显示主机列表,也可以用–list-hosts |
| -k | 提示输入ssh连接密码,默认key认证 |
| -C | 预执行检测 |
| -T | 执行命令的超时时间,默认10s |
| -u | 指定远程执行的用户 |
| -b | 执行sudo切换身份操作 |
| -become-user=USERNAME | 指定sudo的用户 |
| -K | 提示输入sudo密码 |
(2)运行结果颜色含义
- 绿色 : 执行成功但未对远程主机做任何改变
- 黄色 : 执行成功并对远程主机做改变
- 红色 : 执行失败
2 常用模块
1.主机连通性测试
经常使用ansible all -m ping命令来进行主机连通性测试,效果如下:
[root@server ~]# ansible web -m ping
192.168.37.122 | SUCCESS => {
    "changed": false,
    "ping": "pong"
}
192.168.37.133 | SUCCESS => {
    "changed": false,
    "ping": "pong"
}
2.command
功能: 在远程主机执行命令,并将结果返回本主机。
| 常用参数 | 含义 |
|---|---|
| chdir | %执行命令前先进入到指定目录 |
| cmd | %运行命令指定 |
| creates | %创建,如果文件存在将不运行,可以用来做判断 |
| removes | %移除,如果文件存在在将运行 |
| free_form | %要执行的Linux指令,一般使用Ansible的-a参数代替。 |
| executable | 切换shell来执行命令,需要使用命令的绝对路径 |
| chdir | 在执行命令之前,先切换到该目录 |
实例:
ansible all -m command -a "useradd lee" -u root -k
ansible all -m command -a "userdel -r lee" -u root -k
ansible all -m command -a "chdir=/etc cat passwd " -u root -k
ansible all -m command -a "chdir=/etc creates=/etc/passwd cat passwd " -u root -k
ansible all -m command -a "chdir=/etc removes=/etc/passwd cat passwd " -u root -k
注意:
Linux中的很多通配符在command模块中不支持
2.copy
功能:
从ansible主机复制文件到受控主机
| 常用参数 | 含义 |
|---|---|
| src | %源文件 |
| dest | %目的地文件 |
| owner | %指定目的地文件所有人 |
| group | %指定目的地文件所有组 |
| mode | %指定目的地文件权限 |
| backup=yes | %当受控主机中存在文件时备份原文件 |
| content | %指定文本内容直接在受控主机中生成文件 |
实例:
ansible all -m copy -a "src=/root/westos dest=/mnt/westos  owner=lee mode=777 backup=yes"
ansible all -m copy -a "content='hello westos\nhello linux\n' dest=/mnt/westosfile1 owner=lee mode=600"
3.dnf
作用:
管理系统中的dnf仓库及管理软件
| 常用参数 | 含义 |
|---|---|
| name | %指定包 |
| state | %指定动作:present安装、latest更新、 absent删除 |
| list | %列出指定信息:httpd 、installed、all、available |
| disable_gpg_check | %禁用gpgkey检测 |
| enablerepo | %指定安装包来源 |
| disablerepo | %禁用安装包来源 |
实例:
ansible all -m dnf -a "name=httpd state=latest"
ansible all -m dnf -a 'name="httpd,mariadb-server" state=present'
ansible all -m dnf -a 'name=httpd state=absent'
ansible all -m dnf -a 'name=httpd state=absent autoremove=no'
ansible all -m dnf -a 'name=httpd state=present enablerepo=AppStream'
ansible all -m dnf -a 'name="*" state=latest'
ansible all -m dnf -a 'name=http://172.25.254.250/software/wps-office-xxx.rpm state=present'
ansible all -m dnf -a 'name="@Virtual Tools" state=present'
4.service
作用:
管理系统服务状态
| 常用参数 | 含义 |
|---|---|
| name | %指定服务名称 |
| state | %指定对服务的动作、started、stoped、reseted、reloaded |
| enabled | %设定服务开机是否启动、yes开启启动、no开机不启动 |
实例:
ansible all -m service -a “name=httpd state=started enabled=yes” -k
ansible all -m service -a “name=httpd state=restarted enabled=yes” -k
5.user
作用:
模块可以帮助我们管理远程主机上的用户,比如创建用户、修改用户、删除用户、为用户创建密钥对等操作
| 常用参数 | 含义 |
|---|---|
| name | %必须参数,用于指定要操作的用户名称。 |
| group | %指定用户所在的基本组。 |
| gourps | %指定用户所在的附加组。 |
| append | %指定添加附加组默认值为no |
| shell | %指定用户的默认 shell。 |
| uid | %指定用户的 uid 号。 |
| comment | %指定用户的注释信息。 |
| state | %用于指定用户是否存在于远程主机、present 建立、absent删除 |
| remove | %当删除用户是删除用户家目录,默认值为no |
| password | %此参数用于指定用户的密码。但密码为明文,可以用openssl password -6 '密码’生成加密字符 |
| generate_ssh_key | %生成sshkey |
实例:
ansible all -m user -a 'name=lee'
ansible all -m user -a 'name=lee state=absent'
ansible all -m user -a 'name=lee remove=yes state=absent'
ansible all -m user -a 'name=lee remove=yes group=888'
ansible all -m user -a 'name=lee  group=888 groups="user1,user2"'
ansible all -m user -a 'name=lee groups="user3"'
ansible all -m user -a 'name=lee groups="user1,user2" append=yes'
openssl passwd -6 'westos'
ansible all -m user -a 'name=lee password="$6$F4OBwqoXAigDV.dn$I2OgEPB3kfyl8CPmdh3Y8vKDqewZKrVMIDPPIt8GKnhs/DW4gZHfxrZX5ziQN7rVjISX7l14KwDQHEd.uprlV/"'
ansible all -m user -a 'name=lee generate_ssh_key=yes'
3,Ansible的安装
网页搜阿里云,开发者->景象展->epel
%虚拟机server1

yum install -y https://mirrors.aliyun.com/epel/epel-release-latest-8.noarch.rpm
sed -i 's|^#baseurl=https://download.fedoraproject.org/pub|baseurl=https://mirrors.aliyun.com|' /etc/yum.repos.d/epel*
sed -i 's|^metalink|#metalink|' /etc/yum.repos.d/epel*
dnf install ansible
4,ansible配置
3.1 inventory文件配置及常用模块
文件常用参数
ansible 的配置文件为/etc/ansible/ansible.cfg,ansible 有许多参数,下面我们列出一些常见的参数:
inventory = /etc/ansible/hosts		%这个参数表示资源清单inventory文件的位置
library = /usr/share/ansible		%指向存放Ansible模块的目录,支持多个目录方式,只要用冒号(:)隔开就可以
forks = 5		                    %并发连接数,默认为5
sudo_user = root		            %设置默认执行命令的用户
remote_port = 22		            %指定连接被管节点的管理端口,默认为22端口,建议修改,能够更加安全
host_key_checking = False		    %设置是否检查SSH主机的密钥,值为True/False。关闭后第一次连接不会提示配置实例
timeout = 60		                %设置SSH连接的超时时间,单位为秒
log_path = /var/log/ansible.log		%指定一个存储ansible日志的文件(默认不记录日志)
%先读目录,再读用户,全局
%server1,2,3都建立用户devops,该密码westos
su - devop
mkdir ansible
cd ansible
全在ansible目录下作:
[devops@server1 ansible]$ vim hosts
[test]
172.25.3.2
[prod]
172.25.3.3
[devops@server1 ansible]$ cat ansible.cfg
[defaults]

inventory= ./hosts
3.2 做免密
[devops@server1 ansible]$ ssh-keygen  #全部回车
[devops@server1 ansible]$ ssh-copy-id 172.25.3.2
[devops@server1 ansible]$ ssh-copy-id 172.25.3.3
或
[root@ansible1 .ssh]# ssh-keygen
[root@ansible1 .ssh]# ssh-copy-id -i id_rsa.pub root@172.25.1.1
[root@ansible1 .ssh]# ssh-copy-id -i id_rsa.pub root@172.25.1.2
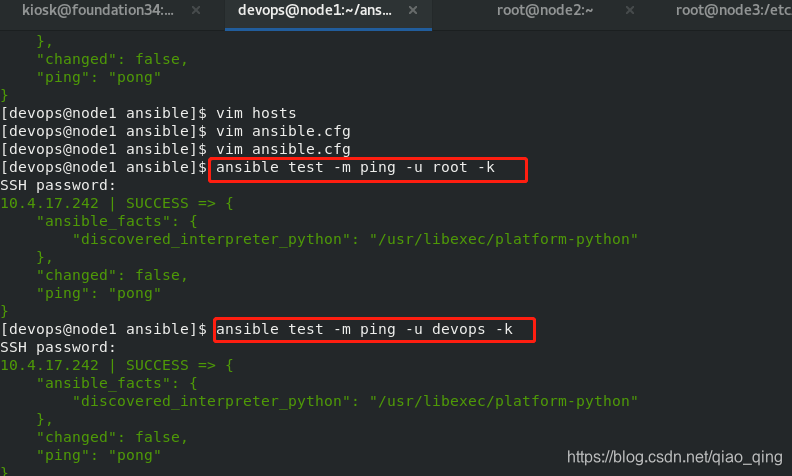
3.3 测试
[devops@server1 ansible]$ ansible all -m ping #检查解析是否做好
[devops@server1 ansible]$ ansible test -m ping -u root -k
[devops@server1 ansible]$ ansible test -m ping -u devops -k#可以指定用户登陆

5、模拟生产环境及模块应用
创建普通用户,做免密和sudo
%超户登陆
%server1里
[devops@server1 ansible]$ ansible test -m ping -b #可以访问超级用户
%做visudo后, ansible test -m ping可以直接登陆超户
[devops@server1 ansible]$ ls
ansible.cfg hosts
[devops@server1 ansible]$ cat ansible.cfg
[defaults]
inventory= ./hosts #读当前目录下的配置文件
[privilege_escalation]
become=True
become_method=sudo
become_user=root
become_ask_pass=False
%server2和server3里都写
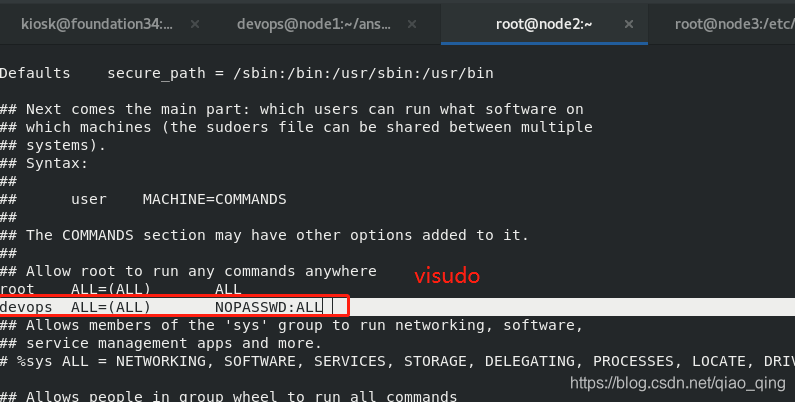
[root@server2 ~]# visudo
devops ALL=(ALL) NOPASSWD: ALL
[devops@server1 ansible]$ ansible test -m ping #做完visudo就能直接进入超级用户
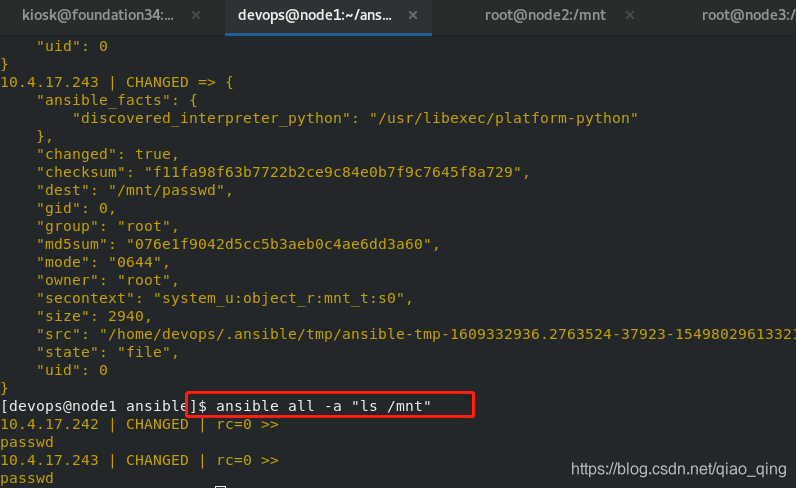
[devops@server1 ansible]$ ansible all -m copy -a "src=/etc/passwd dest=/mnt" #server2和3的ls -ld /mnt的权限只有root能写
ansible all -m copy -a "ls /mnt"
ansible all -a "ls /mnt"
ansible test -m ping -u devops -k
[devops@server1 ansible]$ ansible all -a "rm -fr /mnt/passwd" #删除
[devops@server1 ansible]$ ansible all -a "ls /mnt" #查看,已被删除
172.25.3.3 | CHANGED | rc=0 >>
172.25.3.2 | CHANGED | rc=0 >>
[root@server1 ansible]# ansible -i hosts all -m ping #-i指定当前目录下的hosts文件
[root@server1 ansible]# vim hosts
[root@server1 ansible]# ansible "*" -m ping #读取当前目录下的所有hosts文件李的用户
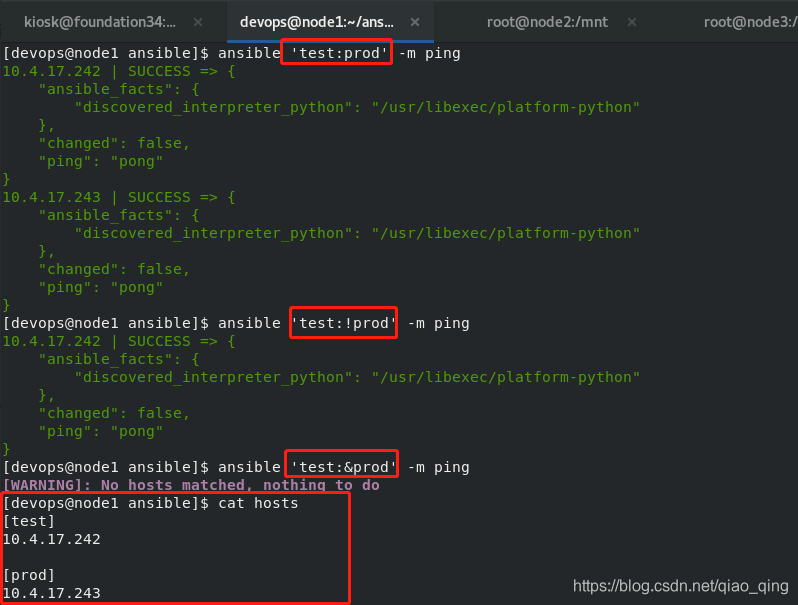
[root@server1 ansible]# cat hosts
[test]
172.25.3.2
[prod]
172.25.3.3
172.25.3.2
[webserver:children]
test
prod
[root@server1 ansible]# ansible 'test:prod' -m ping
[root@server1 ansible]# ansible 'test:!prod' -m ping
[WARNING]: No hosts matched, nothing to do
[root@server1 ansible]# ansible 'test:&prod' -m ping
[root@server1 ansible]# ansible-doc dnf #查看用法
[root@server1 ansible]# ansible test -m dnf -a "name=httpd state=present"
[root@server1 ansible]# ansible test -a "rpm -q httpd"
[WARNING]: Consider using the yum, dnf or zypper module rather than running 'rpm'. If you need
to use command because yum, dnf or zypper is insufficient you can add 'warn: false' to this
command task or set 'command_warnings=False' in ansible.cfg to get rid of this message.
172.25.3.2 | CHANGED | rc=0 >>
httpd-2.4.37-21.module+el8.2.0+5008+cca404a3.x86_64
[root@server1 ansible]# ansible test -m dnf -a "name=httpd state=present"
[root@server1 ansible]# ansible test -m dnf -a "name=firewalld state=present"
[root@server1 ansible]# ansible test -m firewalld -a "service=http permanent=yes immediate=yes state=enabled"
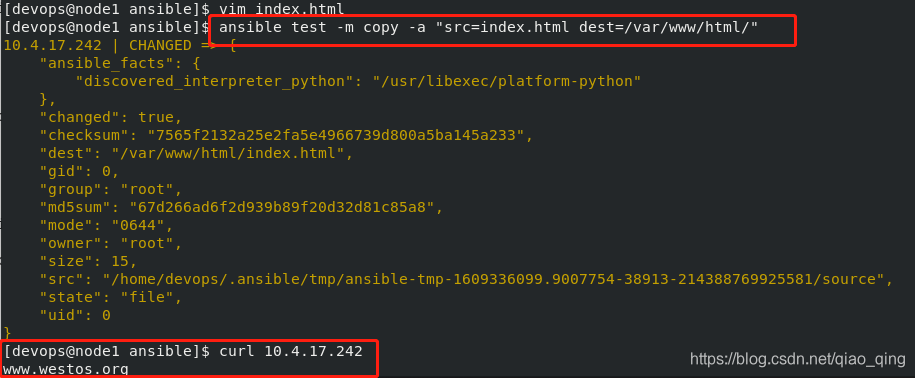
[root@server1 ansible]# vim index.html
www.westos.org
[root@server1 ansible]# ansible test -m copy -a "src=index.html dest=/var/www/html/"
[root@server1 ansible]# curl 172.25.3.2
www.westos.org
[root@server1 ansible]# ansible test -m file -a "dest=/mnt/passwd owner=root group=root"
[devops@server1 ansible]$ ansible all -m copy -a "src=/etc/passwd dest=/tmp"
[devops@server1 ansible]$ ansible test -m file -a "dest=/tmp/passwd owner=root group=root"
[devops@server1 ansible]$ ansible test -m file -a "dest=/tmp/passwd mode=600"
%test,是server2。在server2中查看文件属性
[root@server2 ~]# ls -l /tmp/passwd
-rw-r--r--. 1 root root 1251 Dec 27 08:52 /tmp/passwd
[root@server2 ~]# ls -l /tmp/passwd
-rw-------. 1 root root 1251 Dec 27 08:52 /tmp/passwd
[devops@server1 ansible]$ ansible test -m user -a "name=wxh"
[devops@server1 ansible]$ ansible test -m user -a "name=wxh state=absent"


 2691
2691


 被折叠的 条评论
为什么被折叠?
被折叠的 条评论
为什么被折叠?
 到【灌水乐园】发言


