


Spring AOP
一、 面向切面编程AOP 和 面向对象OOP
AOP(Aspect Oriented Programming),即面向切面编程,就是将分散在各个业务逻辑代码中相同的代码通过横向切割的方式抽取到一个独立的模块中,各部分之间低耦合。
OOP(Object Oriented Programming),即面向对象编程,针对业务处理过程的实体及其属性和行为进行抽象封装,是一种纵向的编程思想.
二、AOP底层原理回顾(代理模式)
1.静态代理
中介代理房东出租房屋:
public interface Rent {
    void rent();
}
public class Host implements Rent{

    @Override
    public void rent() {
        System.out.println("房东出租房屋...");
    }
}
public class Proxy implements Rent {

    private Host host;

    public void setHost(Host host) {
        this.host = host;
    }

    @Override
    public void rent() {
        //对房东业务进行增强
        doSometing();
        host.rent();
    }

    //代理添加额外的业务
    public void doSometing(){
    	System.out.println("doSometing...");
    }
}
测试:
@Test
public void test(){
    //房东
    Host host = new Host();

    //代理对象
    Proxy proxy = new Proxy();
    proxy.setHost(host);

    //代理房东出租房屋
    proxy.rent(); //房东出租房屋...
}
好处:
代理类可以代理真实对象职责,并添加额外的业务,使得真实对象职责更加纯粹,实现业务的分工
缺点:
代理类和真实角色实现同一个接口,当接口发生改变时,需要更改两遍代码,代理类能够完成真实角色的所有职责(不能进行权限控制)
2.动态代理(Java动态代理[代理接口])
歌星和经纪人
public interface StarDuty {

    void sing();

    void donate();
}
public class Star implements StarDuty{

    @Override
    public void sing() {
        System.out.println("歌星唱歌...");
    }

    @Override
    public void donate() {
        System.out.println("歌星募捐...");
    }
}
public class Agent {

    public void prepare()
    {
        System.out.println("经纪人为演唱会筹备...");
    }

    public void post(){
        System.out.println("经纪人为演唱会善后...");
    }
}
/**
 * 为真实角色动态代理
 */
public class MyInvocationHandler implements InvocationHandler {

    //真实角色
    private Star star;

    private Agent agent;

    public MyInvocationHandler(Star star, Agent agent) {
        this.star = star;
        this.agent = agent;
    }

    //返回代理对象
    public Object getProxyInstance(){
        return Proxy.newProxyInstance(this.getClass().getClassLoader(), star.getClass().getInterfaces(),this);
    }

    @Override
    public Object invoke(Object proxy, Method method, Object[] args) throws Throwable {

        //经纪人业务
        agent.prepare();

        //反射执行真实角色的方法
        Object invoke = method.invoke(star, args);

        //经纪人业务
        agent.post();

        return invoke;
    }
}
测试:
@Test
public void test(){

    //创建真实角色歌星和经纪人
    Star star = new Star();
    Agent agent = new Agent();

    //生成动态代理对象
    MyInvocationHandler invocationHandler = new MyInvocationHandler(star, agent);
    StarDuty proxy = (StarDuty) invocationHandler.getProxyInstance();

    //执行歌星职责
    //proxy.donate();
    proxy.sing();

    /*经纪人为演唱会筹备...
	 歌星唱歌...
	 经纪人为演唱会善后...
	*/
}
好处:
真实角色单独实现一个接口,代理类直接编写相关业务方法,然后调用处理程序InvocationHandler接口,及使用Proxy类中的newProxyInstance方法动态的创建代理类,通过该对象 调用实现接口的方法即可。
三、AOP相关概念

1.横切关注点
跨越应用程序多个模块的方法或功能,辅助性的功能,如安全、缓存、事务等等
2.切面(aspect)
横切关注点具体的类
3.通知或增强(advice)
切面完成的工作,即切面类中的方法
4.目标(target)
被通知(增强)对象
5.代理
向目标对象应用通知(增强)之后创建的对象
6.切入点
切面类方法执行的地方的定义
7.连接点
与切入点匹配的执行点
四、XML方式实现AOP五种通知(增强)
自定义一个切面类
import org.aspectj.lang.JoinPoint;
import org.aspectj.lang.ProceedingJoinPoint;

public class MyAspect {

    public void beforeAdvice(JoinPoint joinPoint) {
        System.out.println("1.前置通知方法:如安全检查、开启事务...");
    }

    public void afterReturningAdvice(JoinPoint joinPoint) {
        System.out.println("5.后置通知方法:如提交事务...");
    }

    public void afterThrowingAdvice(JoinPoint joinPoint) {
        System.out.println("5.异常通知方法:目标方法产生异常触发该方法,与后置通知互斥...");
    }

    public void afterAdvice(JoinPoint joinPoint) {
        System.out.println("6.最终通知方法...");
    }

    public Object aroundAdvice(ProceedingJoinPoint joinPoint) throws Throwable {
        System.out.println("2.环绕通知方法前执行部分...");

        //决定目标方法是否执行,如果目标方法有返回值可以得到该返回值进行后续处理
        Object proceed = joinPoint.proceed();

        System.out.println("result = " + proceed);

        System.out.println("4.环绕通知方法后执行部分...");

        return proceed;
    }
}
目标和目标方法
public class UserServiceImpl {

    public UserServiceImpl() {

    }

    public int add(){
        //int i = 1 / 0;
        System.out.println("3.目标方法:增加用户...");
        return 1;
    }

    public void delete(){
        System.out.println("3.目标方法:删除用户...");
    }

    public void select(){
        System.out.println("3.目标方法:查找用户...");
    }

    public void update(){
        System.out.println("3.目标方法:修改用户...");
    }
}
XML配置
<?xml version="1.0" encoding="UTF-8" ?>
<beans xmlns="http://www.springframework.org/schema/beans"
       xmlns:aop="http://www.springframework.org/schema/aop"
       xmlns:xsi="http://www.w3.org/2001/XMLSchema-instance"
       xsi:schemaLocation="http://www.springframework.org/schema/beans
           http://www.springframework.org/schema/beans/spring-beans-3.0.xsd
           http://www.springframework.org/schema/aop
           http://www.springframework.org/schema/aop/spring-aop-3.0.xsd">

    <bean id="userService" class="com.qingsongxyz.aop.UserServiceImpl"/>

    <bean id="myAspect" class="com.qingsongxyz.aop.MyAspect"/>

    <aop:config>
        <aop:pointcut id="pointCut" expression="execution(* com.qingsongxyz.aop.UserServiceImpl.*(..))"/>
        <aop:aspect ref="myAspect">
            <!--前置通知和环绕通知前一部分的执行顺序由配置顺序决定,但还是会在目标方法之前执行-->
            <aop:before method="beforeAdvice" pointcut-ref="pointCut"/>

            <aop:around method="aroundAdvice" pointcut-ref="pointCut"/>

            <!--最终通知和后置通知的执行顺序由配置顺序决定-->

            <aop:after-returning method="afterReturningAdvice" pointcut-ref="pointCut"/>

            <aop:after-throwing method="afterThrowingAdvice" pointcut-ref="pointCut"/>

            <aop:after method="afterAdvice" pointcut-ref="pointCut"/>

        </aop:aspect>
    </aop:config>
</beans>
测试:
@Test
public void test(){
    ApplicationContext context = new ClassPathXmlApplicationContext("applicationContext.xml");
    UserServiceImpl userService = context.getBean("userService", UserServiceImpl.class);
    userService.add();

    /*
        1.前置通知方法:如安全检查、开启事务...
        2.环绕通知方法前执行部分...
        3.目标方法:增加用户...
        result = 1
        4.环绕通知方法后执行部分...
        5.后置通知方法:如关闭事务...
        6.最终通知方法...
    */
}
总结:
1.切入点表达式
execution(* . . * . * (. .))
访问修饰符 | 返回值 | 包名 | 类名 | 方法名 ( 参数列表 )
eg.execution(* com.qingsongxyz.aop.UserServiceImpl.*(…))
访问修饰符和返回值可用一个 * 表示
2.五种通知(增强)
before(前置通知)
在目标方法之前执行,如:安全检查、开启事务等
after-returning(后置通知)
在目标方法之后执行,如:提交事务。但与异常通知只能执行一个,如果目标方法中产生异常时不会执行
after-throwing(异常通知)
当目标方法中产生异常时执行
around(环绕通知)
在目标方法前后执行
after(最终通知)
最后执行,无论目标方法是否产生异常都会执行
3.执行顺序
before(前置通知)在目标方法之前执行,但和环绕方法前一部分的执行顺序由配置顺序决定
after-returning(后置通知)和after(最终通知)的执行顺序由配置顺序决定
五、注解实现AOP
@Service
public class UserServiceImpl {

    public UserServiceImpl() {

    }

    public int add() {
        //int i = 1 / 0;
        System.out.println("目标方法:增加用户...");
        return 1;
    }

    public void delete() {
        System.out.println("目标方法:删除用户...");
    }

    public void select() {
        System.out.println("目标方法:查找用户...");
    }

    public void update() {
        System.out.println("目标方法:修改用户...");
    }
}
@Component
@Aspect
public class MyAspect {

    @Pointcut(value = "execution(* com.qingsongxyz.aop.UserServiceImpl.*(..))")
    public void pointCut(){}

    //@Before(value = "com.qingsongxyz.aop.MyAspect.pointCut()")
    @Before(value = "pointCut()")
    public void beforeAdvice() {
        System.out.println("前置通知方法:如安全检查、开启事务...");
    }

    @AfterReturning(value = "pointCut()", returning = "result")
    public void afterReturningAdvice(Object result) {
        System.out.println("从环绕通知传递的返回值result=" + result);
        System.out.println("后置通知方法:如关闭事务...");
    }

    @AfterThrowing(value = "pointCut()")
    public void afterThrowingAdvice() {
        System.out.println("异常通知方法:目标方法产生异常触发该方法,与后置通知互斥...");
    }

    @After(value = "pointCut()")
    public void afterAdvice(JoinPoint joinPoint) {
        System.out.println("最终通知方法...");
    }

    @Around(value = "pointCut()")
    public Object aroundAdvice(ProceedingJoinPoint joinPoint) throws Throwable {
        System.out.println("环绕通知方法前执行部分...");

        //决定目标方法是否执行,可以得到目标方法的返回值
        Object proceed = joinPoint.proceed();

        System.out.println("目标方法的返回值result=" + proceed);

        System.out.println("环绕通知方法后执行部分...");

        return proceed;
    }
}
XML配置
<!--扫描包-->
<content:component-scan base-package="com.qingsongxyz.aop"/>

<!--开启aop注解-->
<aop:aspectj-autoproxy/>
测试:
@Test
public void test(){
    ApplicationContext context = new ClassPathXmlApplicationContext("applicationContext.xml");
    UserServiceImpl userServiceImpl = context.getBean("userServiceImpl", UserServiceImpl.class);
    userServiceImpl.add();
    /*
        环绕通知方法前执行部分...
        前置通知方法:如安全检查、开启事务...
        目标方法:增加用户...
        从环绕通知传递的返回值result=1
        后置通知方法:如关闭事务...
        最终通知方法...
        目标方法的返回值result=1
        环绕通知方法后执行部分...
    */
}
总结:
1.AOP相关注解
@Aspect标记该类为切面类
@Pointcut标记一个方法体的方法使该方法为切入点表达式(写在value属性之中)
@Before标记该方法为前置通知,value属性指向切入点表达式
@AfterReturning标记该方法为后置通知,value属性指向切入点表达式
@AfterThrowing标记该方法为异常通知,value属性指向切入点表达式
@After标记该方法为最终通知,value属性指向切入点表达式
@Around标记该方法为环绕通知,value属性指向切入点表达式
注意:
1.通知中的value属性标记切入点时需要使用方法名加括号(),eg. value = “pointCut()”
2.@Pointcut声明的切入点表达式如果不在本类之中时,通知注解中value属性需要使用全限定名
eg.@Before(value = “com.qingsongxyz.aop.MyAspect.pointCut()”)
2.通知的执行顺序异常无法调整
3.目标方法返回值、异常传递处理
当目标方法产生异常时,Spring会把该异常作为参数传递给异常通知
//将参数名ex传入throwing属性
@AfterThrowing(value = "pointCut()", throwing = "ex")
public void afterThrowingAdvice(Exception ex) {
    //获取异常信息进行后续处理
    System.out.println("目标方法产生的异常信息: " + ex.getMessage());
    System.out.println("异常通知方法:目标方法产生异常触发该方法,与后置通知互斥...");
}
当目标方法有返回值时,Spring会把该返回值作为参数传递给环回通知
@Around(value = "pointCut()")
public Object aroundAdvice(ProceedingJoinPoint joinPoint) throws Throwable {
    System.out.println("环绕通知方法前执行部分...");

    //决定目标方法是否执行,可以得到目标方法的返回值
    Object proceed = joinPoint.proceed();

    System.out.println("目标方法的返回值result=" + proceed);

    System.out.println("环绕通知方法后执行部分...");

    return proceed;
}
环回通知可以将该返回值传递给后续的通知(后置通知、最终通知)
//用Object类型接受环回通知传递的返回值,并将result传入returning属性
@AfterReturning(value = "pointCut()", returning = "result")
public void afterReturningAdvice(Object result) {
    System.out.println("从环绕通知传递的返回值result=" + result);
    System.out.println("后置通知方法:如关闭事务...");
}
每种通知都可以传入一个JoinPoint类的参数,通过改参数可以得到目标方法相关信息,而ProceedingJoinPoint是给环回通知使用的,它也是JoinPoint的子类
@After(value = "pointCut()")
public void afterAdvice(JoinPoint joinPoint) {
    //获取目标类
    System.out.println(joinPoint.getTarget());
    //获取目标方法
    System.out.println(joinPoint.getSignature());
    //获取切入点表达式
    System.out.println(joinPoint.getStaticPart());
    System.out.println("最终通知方法...");
    /*
        com.qingsongxyz.aop.UserServiceImpl@2794eab6
        int com.qingsongxyz.aop.UserServiceImpl.add()
        execution(int com.qingsongxyz.aop.UserServiceImpl.add())
        最终通知方法...
    */
}
4.多个切面类织入同一个目标类执行顺序
日志切面类
@Component
@Aspect
public class LogAspect {

    @Pointcut(value = "execution(* com.qingsongxyz.aop.UserServiceImpl.*(..))")
    public void pointCut(){}

    @Before(value = "pointCut()")
    public void beforeAdvice() {
        System.out.println("日志输出...");
    }
}
安全切面类
@Component
@Aspect
public class SafetyAspect {
    @Pointcut(value = "execution(* com.qingsongxyz.aop.UserServiceImpl.*(..))")
    public void pointCut(){}

    @Before(value = "pointCut()")
    public void beforeAdvice() {
        System.out.println("安全检查...");
    }

}
目标类
@Component
@Aspect
public class MyAspect {

    @Pointcut(value = "execution(* com.qingsongxyz.aop.UserServiceImpl.*(..))")
    public void pointCut(){}

    //@Before(value = "com.qingsongxyz.aop.MyAspect.pointCut()")
    @Before(value = "pointCut()")
    public void beforeAdvice() {
        System.out.println("前置通知方法:如安全检查、开启事务...");
    }
}
测试:
@Test
public void test(){
    ApplicationContext context = new ClassPathXmlApplicationContext("applicationContext.xml");
    UserServiceImpl userServiceImpl = context.getBean("userServiceImpl", UserServiceImpl.class);
    userServiceImpl.add();
    /*
        日志输出...
        安全检查...
        目标方法:增加用户...
    */
}
总结:
1.多个切面类织入同一个目标类时,执行顺序由切面类类名字母顺序决定
2.可使用@Order注解控制切面类执行顺序,其中的value属性(int)值越小优先级越高
六、声明式事务
事务:一系列对数据库的操作要么都成功,要么都失败,是不可分割的单位.
1.事务的ACID特性
- 原子性(Atomicity)
事务包括的操作要么都做,要么都不做
- 一致性(Consistency)
保证事务前后数据的完整性
- 隔离性(Isolation)
事务与事务之间相互隔离,一个事务不能被另一个事务干扰
- 持续性(Durability)
事务一旦提交,对数据库中数据的改变就是永久性的
2.事务的隔离级别
-
脏读
一个事务读取了另外一个事务未提交的数据
-
不可重复读
在一个事务内读取表中的某一行数据,由于其他事务提交数据,多次读取结果不同
-
幻读
一个事务内读取到了别的事务插入的数据,导致前后读取数量总量不一致
数据库:
set transaction isolation level 设置事务隔离级别
select @@tx_isolation 查询当前事务隔离级别
| 设置 | 脏读 | 不可重复读 | 幻读 | 加锁 |
|---|---|---|---|---|
| Read uncommitted(读未提交) | x | x | x | 不加锁 |
| Read committed(读已提交) | √ | x | x | 不加锁 |
| Repeatable read(可重复读) | √ | √ | x | 不加锁 |
| Serializable(串行化) | √ | √ | √ | 加锁 |
( √ 表示解决该问题,x 表示未解决)
InnoDB存储引擎默认事务隔离级别是可重复读,使用Next-Key Lock的锁算法,因此解决了幻读问题
3.Mysql常见存储引擎(show ENGINES;)
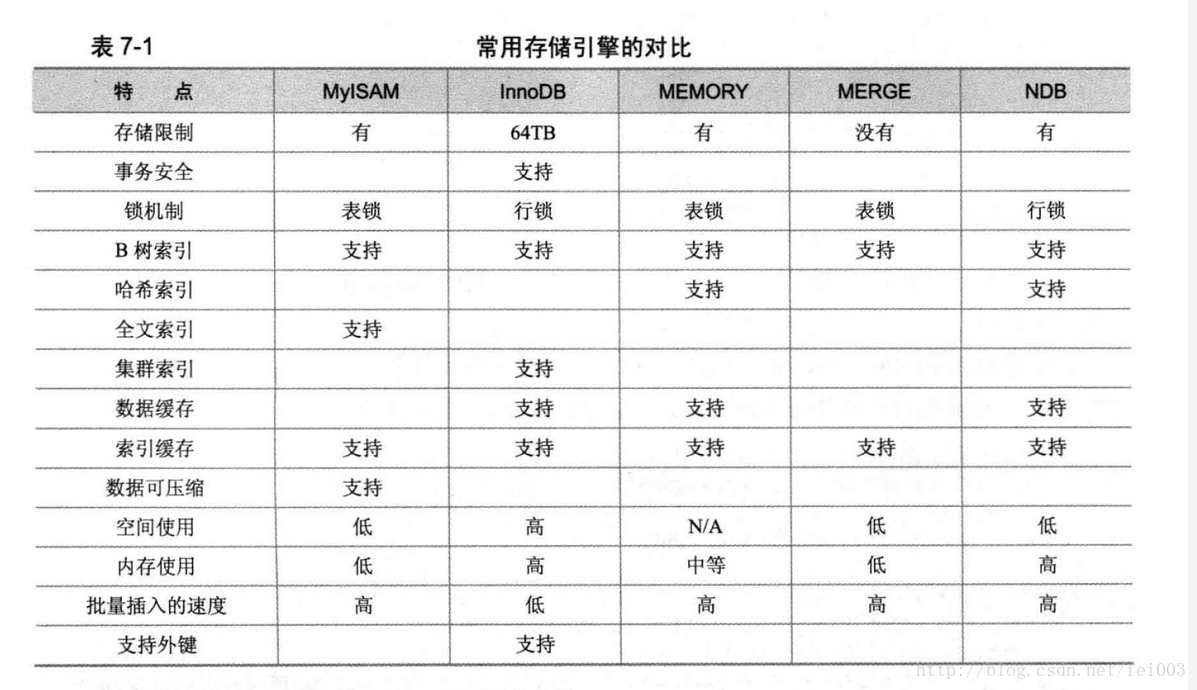
(只用Mysql默认存储引擎innoDB存储引擎支持事务和外键)
4.XMl方式实现声明式事务
<bean id="dataSource" class="org.springframework.jdbc.datasource.DriverManagerDataSource">
    <property name="driverClassName" value="com.mysql.cj.jdbc.Driver"/>
    <property name="url" value="jdbc:mysql://localhost:3306/jdbc"/>
    <property name="username" value="****"/>
    <property name="password" value="****"/>
</bean>

<!--spring事务管理器-->
<bean id="transactionManager" class="org.springframework.jdbc.datasource.DataSourceTransactionManager">
    <property name="dataSource" ref="dataSource"/>
</bean>

<tx:advice id="txAdvice" transaction-manager="transactionManager">
    <tx:attributes>
        <!--配置目标方法事务-->
        <tx:method name="*" isolation="DEFAULT" propagation="REQUIRED"/>
    </tx:attributes>
</tx:advice>

<!--aop编织事务-->
<aop:config>
    <aop:pointcut id="txPointCut" expression="execution(* com.hubu.mybatis.mapper.user.*.*(..))"/>
    <aop:advisor advice-ref="txAdvice" pointcut-ref="txPointCut"/>
</aop:config>
Spring七种事务传播特性:
1.REQUIRED(默认):支持当前事务,如果当前没有事务,就新建一个事务
2.SUPPORTS:支持当前事务,如果当前没有事务,就以非事务方式执行。
3.MANDATORY:支持当前事务,如果当前没有事务,就抛出异常。
4.REQUIRES_NEW:新建事务,如果当前存在事务,把当前事务挂起。
5.NOT_SUPPORTED:不支持事务,如果当前存在事务,就把当前事务挂起。
6.NEVER:不支持事务,如果当前存在事务,则抛出异常。
7.NESTED:支持当前事务,如果当前事务存在,则执行当前事务,如果当前没有事务,就新建一个事务。
isolation属性设置事务的隔离级别:
1.DEFAULT:默认,对于Oracle数据库为READ_COMMITTED,对于Mysql数据库为REPEATABLE_READ
2.READ_UNCOMMITTED:读未提交
3.READ_COMMITTED:读已提交
4.REPEATABLE_READ:可重复读
5.SERIALIZABLE:串行化
5.注解方式实现声明式事务
<bean id="dataSource" class="org.springframework.jdbc.datasource.DriverManagerDataSource">
    <property name="driverClassName" value="com.mysql.cj.jdbc.Driver"/>
    <property name="url" value="jdbc:mysql://localhost:3306/jdbc"/>
    <property name="username" value="****"/>
    <property name="password" value="****"/>
</bean>

<!--spring事务管理器-->
<bean id="transactionManager" class="org.springframework.jdbc.datasource.DataSourceTransactionManager">
    <property name="dataSource" ref="dataSource"/>
</bean>

<!--开启事务注解支持-->
//然后再需要事务的类或方法上加上@Transactional注解
@Transactional(propagation = Propagation.REQUIRED, isolation = Isolation.DEFAULT)


 2328
2328


 被折叠的 条评论
为什么被折叠?
被折叠的 条评论
为什么被折叠?
 到【灌水乐园】发言


