


 本文探讨了Android应用中数据加载的问题,特别是如何在Fragment中正确地使用ContentProvider和CursorLoader来更新UI,并解决了初次加载数据失败的问题。
(1)勉强加上了ContentProvider,发现一个问题就是自己的第一次进入没有把数据刷出来,然后各种调试,最后发现
我在碎片onCreate方法中调用了更新数据的函数
updateWeather
这个时候,异步任务执行返回
@Override
protected void onPostExecute(String[] result) {
    if (result != null && mForecastAdapter != null) {
        mForecastAdapter.clear();
        mForecastAdapter.addAll(result);
        // New data is back from the server.  Hooray!
    }
}
由于mForcastAdapter是在碎片的onCreateView中创建的,所以这个时候这个mForecastAdapter是null,
和项目代码比较,发现,人家在
onStart方法中调用updateWeather,这样就ok了,我我们看看碎片的生命周期啊
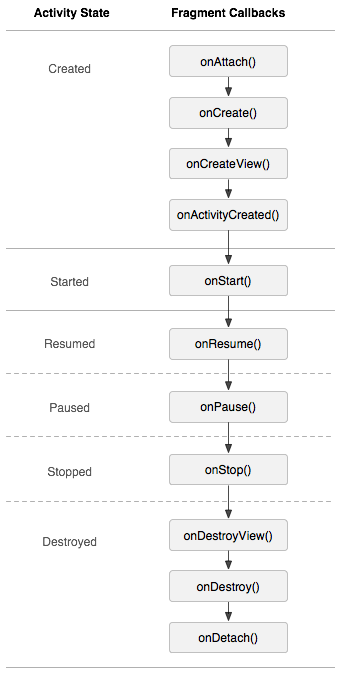
onCreateView在onCreate之后调用,所以之前自己在ONCreate调用,会导致adapter没有在onCreateVIew初始化,所以刷新不出来啊,
总算搞明白了,哈哈哈。
2.另外ContentResolver连接我们数据和应用的接口,所有访问都用它,不要在用数据库查询了,封装的多好。
比如下面这个方法,自己一开始就是使用数据库,先得到database,然后在操作,直接使用ContentResolver就好了,query和insert都简单,
有一点就是插入从返回的Uri重提取id,
locationId = ContentUris.parseId(insertedUri);
对于数据库,插入就是直接返回rowID,但是ContentResolver返回的是一个URi,不过我们可以直接使用ContentUris的方法帮我们解析id,多好啊。
long addLocation(String locationSetting, String cityName, double lat, double lon) {
    // Students: First, check if the location with this city name exists in the db
    // If it exists, return the current ID
    long locationId;
    Cursor cursor = mContext.getContentResolver().query(WeatherContract.LocationEntry.CONTENT_URI,
            new String[]{WeatherContract.LocationEntry._ID},
            WeatherContract.LocationEntry.COLUMN_LOCATION_SETTING + "= ? ",
            new String[]{locationSetting},
            null
    );
    if(cursor.moveToFirst()){
        int index  = cursor.getColumnIndex(WeatherContract.LocationEntry._ID);
        locationId = cursor.getLong(index);
    }else {
        ContentValues contentValues = new ContentValues();
        contentValues.put(WeatherContract.LocationEntry.COLUMN_CITY_NAME, cityName);
        contentValues.put(WeatherContract.LocationEntry.COLUMN_LOCATION_SETTING, locationSetting);
        contentValues.put(WeatherContract.LocationEntry.COLUMN_COORD_LAT, lat);
        contentValues.put(WeatherContract.LocationEntry.COLUMN_COORD_LONG, lon);

        // Finally, insert location data into the database.
        Uri insertedUri = mContext.getContentResolver().insert(
                                   WeatherContract.LocationEntry.CONTENT_URI,
                contentValues );
                          // The resulting URI contains the ID for the row.  Extract the locationId from the Uri.
        locationId = ContentUris.parseId(insertedUri);
    }
   cursor.close();
    return  locationId;
}
3.现在还有的问题是
先查询数据库,然后在从网络获取。
同时还希望从网络查询数据,避免在UI Thread执行查询操作,这回导致安卓不能足够快的绘制帧,会导致帧速率抖动,为此安卓提供了
加载器模式,是不是就是CursorLoader 了。
4.接着昨天,今天学习CursorLoader,定义了一个ForecastAdapter,一般有simplerCursorAdapter吧,不知道为什么这么定义,好了,既然定义了,
那么以后再学习,关键是创建loader的时候,有个问题,
在onActivityCreate方法中,不需要进行UI更新操作,而自己做了,和官方文档一样做的。实际sunshine使用的是,
在OnCreateVIew传入的cursors null,那么这个适配器的数据是怎么和CursorLoader挂上的呢,真是不理解。
有下面这句,这就是把adapter和我们的Cursor关联上了,虽然一开始的null,但是后来变了,所以就一起变了,哈哈哈,是吧
@Override
public void onLoadFinished(android.support.v4.content.Loader<Cursor> loader, Cursor data) {
    adapter.swapCursor(data);
}
| @Override | |
| public View onCreateView(LayoutInflaterinflater,ViewGroupcontainer, | |
| Bundle savedInstanceState) { | |
| // The CursorAdapter will take data from our cursor and populate the ListView. | |
| mForecastAdapter = new ForecastAdapter(getActivity(), null, 0); | |
| View rootView = inflater.inflate(R.layout.fragment_main, container,false); | |
| // Get a reference to the ListView, and attach this adapter to it. | |
| ListView listView = (ListView) rootView.findViewById(R.id.listview_forecast); | |
| listView.setAdapter(mForecastAdapter); | |
| return rootView; | |
| } | |
| @Override | |
| public void onActivityCreated(BundlesavedInstanceState) { | |
| getLoaderManager().initLoader(FORECAST_LOADER,null,this); | |
| super.onActivityCreated(savedInstanceState); | |
| } |
| @Override | |
| public Loader<Cursor> onCreateLoader(int i, Bundle bundle) { | |
| String locationSetting = Utility.getPreferredLocation(getActivity()); | |
| // Sort order: Ascending, by date. | |
| String sortOrder = WeatherContract.WeatherEntry.COLUMN_DATE+" ASC"; | |
| Uri weatherForLocationUri = WeatherContract.WeatherEntry.buildWeatherLocationWithStartDate( | |
| locationSetting, System.currentTimeMillis()); | |
| return new CursorLoader(getActivity(), | |
| weatherForLocationUri, | |
| null, | |
| null, | |
| null, | |
| sortOrder); | |
| } |
5.直接在onLoadFinished修改对吗,这是在UI线程的吗,为什么,然后直接使用CurSor,如果不先使用
if (!data.moveToFirst()) { return; }
就是要先moveToFirst,然后在调用get方法才行,这是为什么?
报错,这是为什么?
android.database.CursorIndexOutOfBoundsException: Index -1 requested, with a size of 1
public void onLoadFinished(Loader<Cursor> loader, Cursor data) {
    if (!data.moveToFirst()) { return; }
    String desc = data.getString(COL_WEATHER_DESC);
    TextView detailTextView = (TextView)getView().findViewById(R.id.day_info);
    detailTextView.setText(desc);
6.Fragment的menu会汇总到所在Activity的menu中,就如Sunshine的MainActivity中的menu和包含的碎片的menu就合在一起了
main的menu
<menu xmlns:android="http://schemas.android.com/apk/res/android"
    xmlns:app="http://schemas.android.com/apk/res-auto"
    xmlns:tools="http://schemas.android.com/tools" tools:context=".MainActivity">
    <item android:id="@+id/action_settings"
        android:title="@string/action_settings"
        android:orderInCategory="100"
        app:showAsAction="never" />
    <item android:id="@+id/action_map"
        android:title="@string/action_map"
        app:showAsAction="never" />
</menu>
碎片的:
<?xml version="1.0" encoding="utf-8"?>
<menu xmlns:android="http://schemas.android.com/apk/res/android"
    xmlns:syapp="http://schemas.android.com/apk/res-auto">
 <item android:id="@+id/action_fresh"
     android:title="@string/fresh"
     syapp:showAsAction="never"
    ></item>
</menu>
最后显示的是这两个之和,一共三个按钮啊
7、字符串格式化,里面的id是什么意思,还是要看文档继续学习
<resources xmlns:xliff="http://schemas.android.com/apk/res-auto">
<string name="format_full_friendly_date"><xliff:g id="day">%1$s</xliff:g>, <xliff:g id="date">%2$s</xliff:g></string>

<string name="format_temperature"><xliff:g id="temp1">%1.0f</xliff:g>\u00B0</string>
8、在OnCreateView方法中,把一个个的view作为成员变量保存,不用每次都加载??
@Override
public View onCreateView(LayoutInflater inflater, ViewGroup container,
                         Bundle savedInstanceState) {
    View rootView = inflater.inflate(R.layout.fragment_detail, container, false);
    mIconView = (ImageView) rootView.findViewById(R.id.detail_icon);
    mDateView = (TextView) rootView.findViewById(R.id.detail_date_textview);
    mFriendlyDateView = (TextView) rootView.findViewById(R.id.detail_day_textview);
    mDescriptionView = (TextView) rootView.findViewById(R.id.detail_forecast_textview);
    mHighTempView = (TextView) rootView.findViewById(R.id.detail_high_textview);
    mLowTempView = (TextView) rootView.findViewById(R.id.detail_low_textview);
    mHumidityView = (TextView) rootView.findViewById(R.id.detail_humidity_textview);
    mWindView = (TextView) rootView.findViewById(R.id.detail_wind_textview);
    mPressureView = (TextView) rootView.findViewById(R.id.detail_pressure_textview);
    return rootView;
}


 被折叠的 条评论
为什么被折叠?
被折叠的 条评论
为什么被折叠?
 到【灌水乐园】发言


