


登录功能简介
用户输入手机号,
后端使用正则表达式验证手机号是否符合规则
正则表达式例如:re := “^1[3-9]{1}\d{9}”
发送验证码,使用容联云进行测试发送验证码
验证成功 判断是否存在数据库中如果数据库没有则是新用户进行注册
如果手机号存在则生成token正常登录
第三方微博登录,使用微博链接 唯一标识进行第三方登录
回调地址进行三方登录的记录
容联云发送验证码
安装
go get -u github.com/cloopen/go-sms-sdk/cloopen
封装
在utils文件夹里创建sms.go文件进行容联云的封装
package utils
import (
	"github.com/cloopen/go-sms-sdk/cloopen"
	"log"
)
func SmsCode(mobile, code string) int {
	cfg := cloopen.DefaultConfig().
		// 开发者主账号,登陆云通讯网站后,可在控制台首页看到开发者主账号ACCOUNT SID和主账号令牌AUTH TOKEN
		WithAPIAccount("8aaf07088185853************").
		// 主账号令牌 TOKEN,登陆云通讯网站后,可在控制台首页看到开发者主账号ACCOUNT SID和主账号令牌AUTH TOKEN
		WithAPIToken("8ac934ad5ddf44a4a1b************")
	sms := cloopen.NewJsonClient(cfg).SMS()
	// 下发包体参数
	input := &cloopen.SendRequest{
		// 应用的APPID
		AppId: "8aaf07088185853e018************",
		// 手机号码
		To: mobile,
		// 模版ID
		TemplateId: "1",
		// 模版变量内容 非必填
		Datas: []string{"您的验证码是" + code},
	}
	// 下发
	resp, err := sms.Send(input)
	if err != nil {
		log.Fatal(err)
		return 0
	}
	log.Printf("Response MsgId: %s \n", resp.TemplateSMS.SmsMessageSid)
	return 1
}
封装生成随机数方法 用于生成验证码使用
在utils文件夹中创建comm.go文件进行封装
 package utils
import "math/rand"
// 生成随机数
func RandInt(min, max int) int {
	if min >= max || min == 0 || max == 0 {
		return max
	}
	return rand.Intn(max-min+1) + min
}
接口
在controller文件夹里的user_controller.go文件夹里编写发送验证码接口
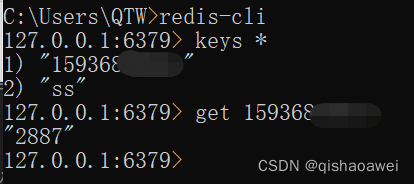
其中要用到redis验证码存入redis中设置60秒有限期,redis在上个博客中已封装
判断验证码(key即输入手机号)是否已经存在redis,如果存在则要等到过期才能继续发送
package controller
import (
"fmt"
"github.com/gin-gonic/gin"
"myproject/utils"
"regexp"
"strconv"
)
func User(userGrp *gin.RouterGroup) {
userGrp.Use().GET("/sms", Sms) //发送验证码路由
userGrp.Use().GET("/token", Token)
}
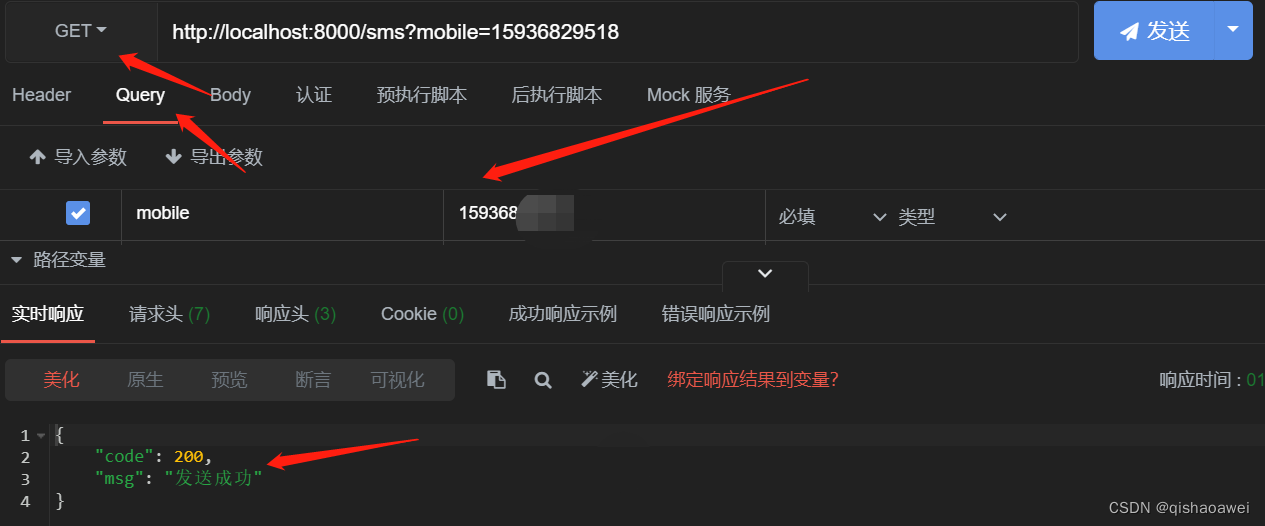
//发送验证码
func Sms(c *gin.Context) {
//接受get方法query传递过来的手机号
mobile := c.Query("mobile")
fmt.Println(mobile)
//审核和手机号
re := "^1[3-9]\\d{9}"
res := regexp.MustCompile(re).MatchString(mobile)
if !res {
c.JSON(400, gin.H{"code": 400, "msg": "输入正确的手机号"})
return
}
//判断验证码是否存在
r := utils.GetRedis()
value := r.Get(mobile)
if value != "" {
c.JSON(400, gin.H{"code": 400, "msg": "不能重复发送验证码"})
return
}
//生成验证码
code := strconv.Itoa(utils.RandInt(1000, 9999))
//发送验证码
utils.SmsCode(mobile, code)
//存放到redis里
r.Setex(mobile, 60, code)
c.JSON(200, gin.H{
"code": 200,
"msg": "发送成功",
})
}
登录接口
封装
在schemas文件夹中创建users.go文件用来存放结构体
package schemas
type User struct {
	Id int
}
type UserAdd struct {
	Name     string
	Mobile   string
	Password string
}
type UserNews struct {
	Userid int
	Newsid int
}
type UserLogin struct {
	Mobile string
	Code   string
}
在创建好的tool文件夹内创建user_utils.go文件
封装获取用户信息 and添加用户接口使代码更简洁,也可以不封装直接编写。
package tool
import (
	"fmt"
	"myproject/model"
	"myproject/schemas"
)
// 获取用户信息
func UserInfo(mobile string) schemas.User {
	user_info := schemas.User{}
	sql := "select * from users where mobile=?"
	model.GetDb().Raw(sql, mobile).Scan(&user_info)
	return user_info
}
// 添加用户
func UserAdd(mobile string) int {
	var name = "游客" + mobile[len(mobile)-4:]
	fmt.Println(name)
	user := &model.User{
		Name:     name,
		Mobile:   mobile,
		Password: "111", //为求密码默认111 也可以接受参数自行编写
	}
	db := model.GetDb()
	db.Create(user)
	return 1
}
接口
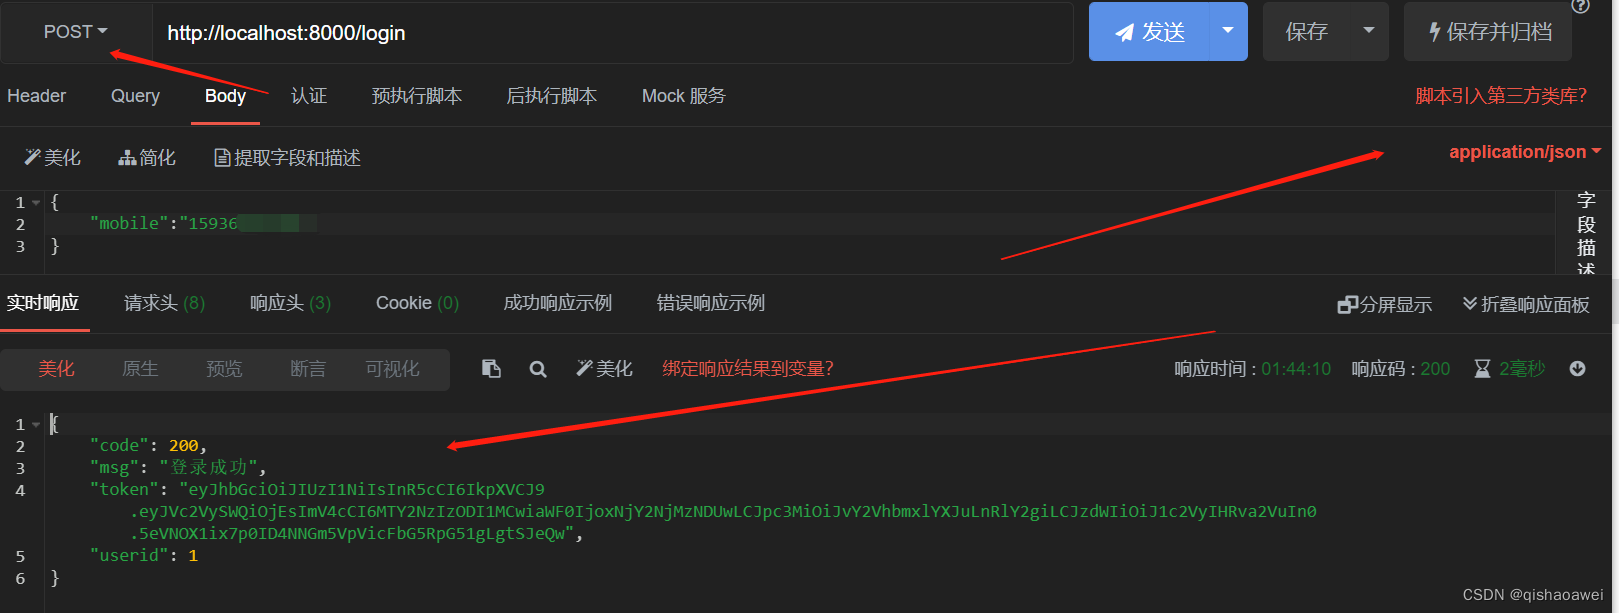
在controller文件夹里的user_controller.go文件夹里编写登录接口
用户输入手机号和验证码 如果手机号正确 验证码也正确
查看用户是否是新用户 如果是新用户就进行注册
正常登录生成并携带token登录成功
package controller
import (
	"fmt"
	"github.com/gin-gonic/gin"
	"myproject/schemas"
	"myproject/tool"
	"myproject/utils"
	"regexp"
	"strconv"
)
func User(userGrp *gin.RouterGroup) {
	userGrp.Use().GET("/sms", Sms)     //发送验证码路由
	userGrp.Use().GET("/login", Login) //登录路由
	userGrp.Use().GET("/token", Token)
}
// 登录
func Login(c *gin.Context) {
	user := &schemas.UserLogin{}
	// 绑定参数
	_ = c.Bind(user)
	fmt.Println(">>>", user)
	// 验证手机号
	er := "^1[3-9]{1}\\d{9}$"
	res := regexp.MustCompile(er).MatchString(user.Mobile)
	if !res {
		c.JSON(400, gin.H{"code": 400, "msg": "请输入正确的手机号"})
		return
	}
	//判断验证码是否正确
	code2 := utils.GetRedis().Get(user.Mobile)
	fmt.Println("code:", code2)
	if code2 != user.Code {
		c.JSON(400, gin.H{"code": 400, "msg": "验证码不正确"})
		return
	}
	// 验证手机号是否存在
	user_info := tool.UserInfo(user.Mobile)
	fmt.Println(user_info)
	if user_info.Id == 0 {
		// 如果不存在进行注册
		_ = tool.UserAdd(user.Mobile)
	}
	user_info2 := tool.UserInfo(user.Mobile)
	// 生成token
	token, _ := utils.ReleaseToken(user_info2.Id)
	c.JSON(200, gin.H{"code": 200, "msg": "登录成功", "token": token, "userid": user_info2.Id})
}
三方登录
接口实现第三方微博登录
在controller文件夹里的user_controller.go文件夹里编写第三方登录接口
调用三方登录接口 携带微博唯一标识 调用回调接口
微博登录地址 携带微博唯一标识和回调地址进入页面进行三方登录
第三方登陆成功后 前端打开回调接口网址 window.open(url)
打开回调接口 会生成三方登录token 及 uid 查询三方登录表
如果存在 则携带token和uid通过重定向进入前端主页面
c.Redirect(http.StatusMovedPermanently, “http://localhost:8080/?token=”+token+“&userid=”+fmt.Sprint(slogin.Uid))
否则调用三方登录手机号绑定接口 接受传递的token和uid 自行输入手机号
先查询手机号是否存在 如果存在的话写入生成token
不存在先写进用户表 再获取其id写入token
最后生成token 携带token uid等参数登录成功
package controller

import (
	"encoding/json"
	"fmt"
	"github.com/gin-gonic/gin"
	"io/ioutil"
	"myproject/model"
	"myproject/schemas"
	"myproject/tool"
	"myproject/utils"
	"net/http"
	"net/url"
	"regexp"
	"strconv"
)

func User(userGrp *gin.RouterGroup) {
	userGrp.Use().GET("/sms", Sms)                  //发送验证码路由
	userGrp.Use().POST("/login", Login)             //登录路由
	userGrp.Use().GET("/get_weibo", get_weibo)      // 获取微博地址接口
	userGrp.Use().GET("/user/weiboCallback", weibo) // 回调接口
	userGrp.Use().POST("/bindMobile", bindMobile)
	userGrp.Use().GET("/token", Token)
}
// 三方登录
func get_weibo(c *gin.Context) {
	// 微博唯一标识
	clientid := "3674019597"
	// 回调地址
	url := "http://127.0.0.1:8000/user/weiboCallback/"

	reUrl := "https://api.weibo.com/oauth2/authorize?client_id=" + clientid + "&redirect_uri=" + url + "&response_type=code"
	c.JSON(200, gin.H{"url": reUrl})
}

// 回调接口
func weibo(c *gin.Context) {
	//获取code
	code := c.Query("code")
	//组装数据post请求验证
	// data = {"client_id":'3674019597',"client_secret":"7ae99bc0d54ead29fc8d1b9fabd78587",
	// "grant_type":"authorization_code",
	// 'redirect_uri':'http://127.0.0.1:8000/user/weiboCallback/','code':code}
	geturl := "https://api.weibo.com/oauth2/access_token"
	data := url.Values{}
	data.Add("client_id", "3674019597")
	data.Add("client_secret", "7ae99bc0d54ead29fc8d1b9fabd78587")
	data.Add("grant_type", "authorization_code")
	data.Add("redirect_uri", "http://127.0.0.1:8000/user/weiboCallback/")
	data.Add("code", code)
	res, _ := http.PostForm(geturl, data)

	//成功 uid ,token
	body, _ := ioutil.ReadAll(res.Body)

	var v interface{}
	json.Unmarshal([]byte(string(body)), &v)
	resultmes := v.(map[string]interface{})
	actoken, flag := resultmes["access_token"]
	if flag {
		fmt.Println("actoken:", actoken)
	}
	uid, uflag := resultmes["uid"]
	if uflag {
		fmt.Println("uid:", uid)
	}

	//通过 uid去三方登录表中查询是否存在
	db := model.GetDb()
	var slogin model.SfLogin
	db.First(&slogin, "Userid=?", uid)
	fmt.Println(">>>三方登录查询的id:", slogin.Uid)
	//如果存在用userid生成token,redirect到vue页面
	if slogin.Uid != 0 {
		// 生成token
		token, _ := utils.ReleaseToken(slogin.Uid)
		c.Redirect(http.StatusMovedPermanently, "http://localhost:8080/?token="+token+"&userid="+fmt.Sprint(slogin.Uid))
	} else {
		c.Redirect(http.StatusMovedPermanently, "http://localhost:8080/bindMobile?token="+fmt.Sprint(actoken)+"&uid="+fmt.Sprint(uid))
	}
}

func bindMobile(c *gin.Context) {
	var data = make(map[string]interface{})
	_ = c.ShouldBind(&data)

	var token string = fmt.Sprint(data["token"])
	var uid string = fmt.Sprint(data["uid"])
	var mobile string = fmt.Sprint(data["mobile"])

	// 查看用户表中手机号是否存在
	var user model.User
	conn := model.GetDb()
	conn.First(&user, "mobile=?", mobile)
	// 已存在找出userid,写入三方登录表
	userid_token := 0
	if user.ID != 0 {
		// 生成token返回
		userid_token = int(user.ID)
	} else {
		// 不存在先写用户表,生成一个userid,在写三方登录表
		create_user := &model.User{Mobile: mobile}
		conn.Create(create_user)
		userid_token = int(create_user.ID)
	}
	// 生成token返回
	user_token, _ := utils.ReleaseToken(userid_token)

	// 写入三方登录表
	sflogin := &model.SfLogin{
		Uid:      userid_token,
		Token:    token,
		PlatForm: "weibo",
		Userid:   uid,
	}
	conn.Create(sflogin)
	c.JSON(200, gin.H{"code": 200, "token": user_token, "userid": userid_token, "msg": "登录成功"})
}
效果图展示
手机号登录
三方登录
如果是第一次登录会进行手机号绑定 写入第三方登陆表中
如果在微博官网上登陆账号保存的话点击第三方登录不需要扫码直接进入主页

前端vue测试参考代码
先安装element-ui vant axios
在main.js里进行配置
白名单 如果登录没有携带token的话登录失败
var white = [‘/login’, ‘/bindMobile’, ‘/is’] 这三个接口不用携带token
拦截器 每次请求前headers里都会携带token
import Vue from 'vue'
import App from './App.vue'
import router from './router'
import store from './store'

import Vant from 'vant'
import 'vant/lib/index.css'
Vue.use(Vant)

import axios from 'axios'
axios.defaults.baseURL = ''
Vue.prototype.axios = axios

import ElementUi from 'element-ui'
import 'element-ui/lib/theme-chalk/index.css'
Vue.use(ElementUi)

Vue.config.productionTip = false


// 白名单
// router.beforeEach((to, from, next) =>{
//   var white = ['/login', '/bindMobile', '/is']
//   if (white.indexOf(to.path) >= 0){
//     next()
//   } else {
//     var token = localStorage.token
//     if (token) {
//       next()
//     } else {
//       router.push('/login')
//     }
//   }
// })

// 拦截器
axios.interceptors.request.use(config =>{
  console.log('请求前的拦截器:', config)
  var token = localStorage.token
  if (token){
    config.headers['token'] = token
  }
  return config
})

new Vue({
  router,
  store,
  render: h => h(App)
}).$mount('#app')
route路由
import Vue from 'vue'
import VueRouter from 'vue-router'
import HomeView from '../views/HomeView.vue'
import Login from '../views/Login.vue'
import Myuser from '../views/Myuser.vue'

Vue.use(VueRouter)

const routes = [
  {
    path: '/',
    name: 'home',
    component: HomeView
  },
  {
    path: '/bindMobile',
    name: 'BindMobile',
    component: BindMobile
  },
  {
    path: '/exit',
    name: 'Exit',
    component: Exit
  },
  {
    path: '/login',
    name: 'Login',
    component: Login
  },
  {
    path: '/user',
    name: 'Myuser',
    component: Myuser
  },
  {
    path: '/about',
    name: 'about',
    // route level code-splitting
    // this generates a separate chunk (about.[hash].js) for this route
    // which is lazy-loaded when the route is visited.
    component: () => import(/* webpackChunkName: "about" */ '../views/AboutView.vue')
  }
]
const router = new VueRouter({
  mode: 'history',
  base: process.env.BASE_URL,
  routes
})
export default router
登录
<template>
  <div>
    <br />
    <div class="top111">
      <br /><br />
      <div class="indexs">
        手机号:<input v-model="mobile" type="text" /><br /><br />
        验证码:<input v-model="code" type="text" /><br />
        <button @click="smsCode" :disabled="status">{{ msg }}</button>
      </div>
      <br /><br /><br />
      <div class="indexs">
        <van-button class="top2" type="primary" @click="login">登录</van-button>
      </div>
    </div>
    <!--  -->
    <div @click="weiboLogin" class="weibo_index" align="center">
      <img
        width="80px"
        src="https://pic1.zhimg.com/v2-0dcca87e954e8f7cebf9818d4d665878_1200x500.jpg"
        alt=""
      />
      <h3>微博登录</h3>
    </div>
    <!--  -->
  </div>
</template>

<script>
export default {
  name: "",
  data() {
    return {
      mobile: "17559511998",
      code: "",
      msg: "获取验证码",
      status: false,
      time: 60,
    };
  },
  props: {},

  components: {},

  created() {},

  mounted() {},

  methods: {
    login() {
      if (!this.mobile) {
        this.$message({
          type: "warning",
          message: "数据不能为空",
        });
        return;
      }
      this.axios
        .post("http://localhost:8000/login", { Code: this.code, Mobile: this.mobile })
        .then((res) => {
          console.log("登录的响应:", res);
          if (res.data.code == 200) {
            this.$message({
              type: "success",
              message: res.data.msg,
            });
            localStorage.setItem("token", res.data.token);
            localStorage.setItem("userid", res.data.userid);
            this.$router.push("/");
          } else {
            this.$message({
              type: "error",
              message: res.data.msg,
            });
          }
        })
        .catch((err) => {
          console.log("登录报错的响应:", err);
        });
    },
    // 发送验证码
    smsCode() {
      this.axios
        .get("http://localhost:8000/sms", { params: { mobile: this.mobile } })
        .then((res) => {
          console.log("发送验证码的响应:", res);
          this.$message({
            type: "success",
            message: res.data.msg,
          });
        });
      this.codeMsgTime();
    },
    // 计时器
    codeMsgTime() {
      var t = setInterval(() => {
        if (this.time == 0) {
          this.msg = "发送验证码";
          this.status = false;
          this.time = 60;
          clearInterval(t);
        } else {
          this.msg = this.time + "秒";
          this.time--;
          this.status = true;
        }
      }, 1000);
    },
    // 微博登录
    weiboLogin() {
      this.axios.get("http://localhost:8000/get_weibo").then((res) => {
        console.log("微博登录的响应:", res);
        var url = res.data.url;
        console.log(">>>", url);
        window.open(url)
      });
    },
  },
};
</script>
<style scoped>
* {
  margin: 0;
}
.top111 {
  border: 2px #000 solid;
  width: 60%;
  height: 300px;
  margin: 0 auto;
  /* line-height: 300px; */
}
.top2 {
  width: 80%;
}
.indexs {
  margin-left: 20px;
}
</style>
主页
<template>
  <div>
    <div v-if="!actives">
      <Mynews></Mynews>
    </div>
    <div v-if="actives == 2">
      <Exit></Exit>
    </div>
    <div v-if="actives == 3">
      <Myuser></Myuser>
    </div>
    <div>
      <van-tabbar v-model="actives" @change="onChange">
        <van-tabbar-item icon="home-o">主页</van-tabbar-item>
        <van-tabbar-item icon="search">标签 2</van-tabbar-item>
        <van-tabbar-item icon="setting-o">标签 4</van-tabbar-item>
        <van-tabbar-item icon="friends-o">信息</van-tabbar-item>
      </van-tabbar>
    </div>
  </div>
</template>

<script>
import Mynews from "./Mynews.vue";
import Myuser from "./Myuser.vue";
import Exit from "./Exit.vue";
export default {
  name: "",
  data() {
    return {
      active: 0,
      actives: this.$route.query.status,
    };
  },
  components: {
    Mynews,
    Myuser,
    Exit,
  },
  mounted() {
    this.index();
  },

  methods: {
    index() {
      var token = this.$route.query.token;
      if (token) {
        localStorage.setItem("token", token);
        localStorage.setItem('userid', this.$route.query.userid)
      }
      // this.actives = 0
      this.showNews();
    },
    showNews() {
      console.log(">>>", this.active);
    },
    onChange(res) {
      console.log(">>>>", res);
      this.actives = res;
      // if (res == 0){
      //   this.$router.push('/')
      // } else if (res == 2){
      //   this.$router.push('/user')
      // }
    },
  },
};
</script>
<style scoped>
* {
  margin: 0;
}
</style>


 1205
1205


 被折叠的 条评论
为什么被折叠?
被折叠的 条评论
为什么被折叠?
 到【灌水乐园】发言


