


vue之使用Cropper进行图片剪裁上传
在项目中,对上传的图片按照比例和尺寸进行裁剪,以便于应用到不同的场景和平台上。这里采用cropper插件裁剪图片
一、cropper的使用
使用教程:https://github.com/fengyuanchen/cropper#options
二、用例:
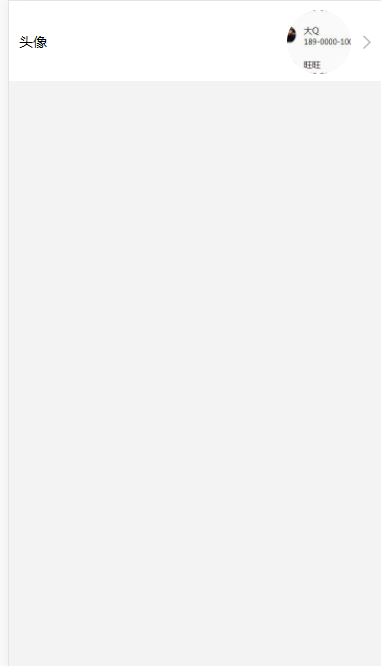
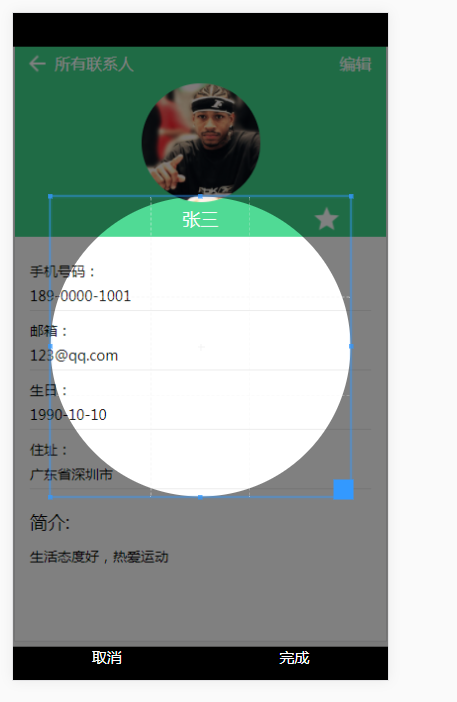
点击头像上传图片→对图片进行裁剪
源码
<template>
    <div class="index_seting">
        <ul class="set_center">
            <li class="set_head_img">
                <a class="set_item">
                    <label class="head_lab" for="change">
                        <h3>头像</h3>
                        <span class="head_img">
                            <img :src="set_head">
                        </span>
                    </label>
                    <input type="file" id="change" class="none" @change="change" accept="image/png, image/jpeg, image/gif, image/jpg" multiple>
                </a>
            </li>
        </ul>
        <div class="img-view" v-show="img_cro_model" >
            <img id="image" :src="url" alt="Picture">
            <div class="gif_loading" v-show="update_img">
                <p>头像上传中...</p>
                <span></span>
            </div>
            <div class="img_btn">
                <span @click="hideImageCro">取消</span>
                <span @click="doCrop">完成</span>
            </div>
        </div>
    </div>
</template>

<script>
import Cropper from 'cropperjs'
export default {
  data () {
    return {
        set_head:'',                //头像图片临时缓存url
        update_img:false,           //头像上传中gif
        picValue:'',                //图片参数
        cropper:'',
        croppable:false,            //是否初始化裁剪框
        img_cro_model:false,        //是否显示底部头像裁剪模块
        url:'',                     //每次替换图片要重新得到新的url
        base64:''                   //裁剪并压缩后的图片
    }
  },
  mounted:function(){
    //初始化裁剪框
    var self = this;
    var image = document.getElementById('image');
    this.cropper = new Cropper(image, {
        aspectRatio: 1,
        viewMode: 1,
        background:false,
        zoomable:false,
        ready: function () {
            self.croppable = true;
        }
    });
  },
  methods:{
    hideImageCro(){
        this.img_cro_model = false;
    },
    //让浏览器执行createObjectURL方法,实现本地图片预览
    getObjectURL (file) {
        var url = null ;
        if (window.createObjectURL!=undefined) {    // basic
            url = window.createObjectURL(file);
        } else if (window.URL!=undefined) {         // firefox
            url = window.URL.createObjectURL(file);
        } else if (window.webkitURL!=undefined) {   // chrome
            url = window.webkitURL.createObjectURL(file);
        }
        return url;
    },
    change (e) {
        let files = e.target.files || e.dataTransfer.files;
        if (!files.length) return;
        this.picValue = files[0];
        this.url = this.getObjectURL(this.picValue);
        //每次替换图片要重新得到新的url
        if(this.cropper){
            this.cropper.replace(this.url);
        }
        this.img_cro_model = true;
    },
    //强制让crop函数在弹窗后执行
    doCrop(){
        let that = this;
        this.update_img = true;
        setTimeout(function(){
            that.crop();
        },10);
    },
    crop () {
        var croppedCanvas;
        var roundedCanvas;
        if (!this.croppable) {
          return;
        }
        //裁剪
        croppedCanvas = this.cropper.getCroppedCanvas();
        //圆
        roundedCanvas = this.getRoundedCanvas(croppedCanvas);
        //将裁剪后的base64图片做压缩处理
        this.compressImg(roundedCanvas.toDataURL());
    },
    getRoundedCanvas (sourceCanvas) {
        var canvas = document.createElement('canvas');
        var context = canvas.getContext('2d');
        var width = sourceCanvas.width;
        var height = sourceCanvas.height;
        canvas.width = width;
        canvas.height = height;
        context.imageSmoothingEnabled = true;
        context.drawImage(sourceCanvas, 0, 0, width, height);
        context.globalCompositeOperation = 'destination-in';
        context.beginPath();
        //取消输出图片的圆形截取效果
        // context.arc(width / 2, height / 2, Math.min(width, height) / 2, 0, 2 * Math.PI, true);
        context.fill();
        return canvas;
    },
    compressImg(img_base64){
        let that = this,
            Img = new Image();
        Img.src = img_base64;
        Img.onload = function(){
            let w = this.naturalWidth,
                h = this.naturalHeight,
                resizeW = 0,
                resizeH = 0;
            //压缩设置
            let maxSize = {
                width:320,
                height:320,
                level:0.6      //图片保存质量
            };
            //计算压缩比例
            if(w > maxSize.width || h > maxSize.height){
                let multiple = Math.max(w / maxSize.width , h / maxSize.height);
                resizeW = w / multiple;
                resizeH = h / multiple;
            }else{
                resizeW = w;
                resizeH = h;
            }
            let canvas = document.createElement("canvas"),
                ctx = canvas.getContext('2d');
            //ios手机拍照会旋转90度,这里做处理
            if(window.navigator.userAgent.indexOf('iphone') > 0){
                canvas.width = resizeH;
                canvas.height = resizeW;
                ctx.retate(90 * Math.PI / 180);
                ctx.drawImage(Img,0,-resizeH,resizeW,resizeH);
            }else{
                canvas.width = resizeW;
                canvas.height = resizeH;
                ctx.drawImage(Img,0,0,resizeW,resizeH);
            }
            that.base64 = canvas.toDataURL('image/jpeg',maxSize.level);
            that.$http.post('/hnwfx/setDaoGouInfo',{file:that.base64},{'headers':{'Content-Type':'application/json'}}).then(function(res){
                that.update_img = false;
                that.img_cro_model = false;
                that.set_head = that.base64;
            });
        }
    }
  }
}
</script>

<style scoped src="./seting.css"></style>
@charset "utf-8";

.index_seting .set_center{
	width:100%;
	background-color: #fff;
}
.index_seting .set_center li{
	position: relative;
}
.set_center li .set_item{
	display: block;
	margin: 0 0.426667rem;
	overflow: hidden;
	background: url(./arrow.png) right center no-repeat transparent;
	background-size: 4% auto;
}
.set_center li .set_item .head_lab{
	width:100%;
	height: 100%;
	display: block;
	overflow: hidden;
}
.set_center li .set_item span{
	position: absolute;
	right:1.408rem;
	font-size: 0.554667rem;
	color:#666;
	display: inline-block;
}
.set_center li .set_item .head_img{
	width:2.730667rem;
	height: 2.730667rem;
	display: inline-block;
	margin:0.362667rem 0;
    border-radius: 50%;
    overflow: hidden;
}
.set_center li .set_item .head_img img{
	width:100%;
	height: 100%;
}
.index_seting .set_center li h3{
	float:left;
	font-size: 0.597333rem;
	font-weight: normal;
	color:#000;
}
.index_seting .set_center li:after{
    position:absolute;
    bottom:-1px;
    left:0px;
    content:'';
    width:100%;
    height:1px;
	border-top:1px solid #e4e4e4;
    -webkit-transform:scaleY(0.5);
}
.set_center .set_head_img{
	line-height: 3.456rem;
}
.img-view{
	width:100%;
	height: 100%;
	position: fixed;
	bottom:0;
	background: rgba(0, 0, 0, 1);
	z-index: 1000;
}
.gif_loading{
	width:6.4rem;
	height: 4.266667rem;
	position: fixed;
	top:50%;
	left:50%;
	margin-top: -2.133333rem;
	margin-left: -3.2rem;
	background-color: #fff;
	border-radius: 10px;
	text-align: center;
	box-shadow: 0px 0px 1px 1px #e6e6e6;
}
.gif_loading p{
	margin-top:1.066667rem;
	font-size: 0.64rem;
}
.gif_loading span{
	display: inline-block;
	width:66px;
	height: 6px;
	background:url(./seting01.gif) center center no-repeat;
	background-size: 100% auto;
}
.img_btn{
	width:100%;
	line-height: 2rem;
	font-size: 0.64rem;
	color:#fff;
	position: fixed;
	bottom: 0;
	z-index:1000;
}
.img_btn span{
	float:left;
	width:50%;
	text-align: center;
}


 2077
2077

 被折叠的 条评论
为什么被折叠?
被折叠的 条评论
为什么被折叠?
 到【灌水乐园】发言


