


一、Python操作MySQL
1.1功能模块
python2:python-mysqldb
python3:pymysql
模块的使用
# 导入模块
import pymysql
1.2pymysql用法
链接MySQL
方法:pymysql.connect(host="", user="", passwd="", charset="", port="", db="")
参数:
host="" 指定主机名/地址
user="" 指定用户名
passwd="" 指定密码
 charset="" 指定字符集,如果省略,则字典集成系统的字符集
 port="" 指定端口号,如果省略,则用默认的3306端口
db="" 指定数据库,如果省略,则默认不选择数据库
链接成功的返回值
链接成功,返回一个链接对象
对于链接的MySQL可以进行操作
close(): 关闭打开的mysql
commit(): 提交事务
用python操作mysql,默认都是启动了事务的,也就是说必须手动进行提交,你的操作才会生
效
rollback():回滚事务
cursor():用于生成cursor对象,有了cursor对象以后,才能执行sql语句
用cursor对象获取数据的方法
execute():用于执行sql语句
返回结果是影响的记录数
fetchone():获取执行结果中的一条记录
fetchall():获取执行结果中的全部记录
close():关闭cursor对象
1.3应用举例
案例1:用Python在MySQL中创建一个数据库tdb09
# coding=utf-8
# 第一步:导入模块 import pymysql
# 第二步:链接mysql conn = pymysql.connect(host="localhost", user="root", passwd="111111", charset="utf8")
# 第三步:创建cursor对象 cur = conn.cursor()
# 第四步:执行execute执行sql语句 cur.execute("create database tdb09")
# 第五步:关闭cursor cur.close()
案例2:在hellodb库中的coc表中插入一条记录
【需要向classid和courseid两个字段写入数据,数据类型是整数】
# coding=utf-8
# 第一步:导入模块
import pymysql
# 第二步:链接mysql
conn = pymysql.connect(host="localhost", user="root", passwd="111111", charset="utf8", db="hellodb")
# 第三步:创建cursor对象
cur = conn.cursor()
 # 第四步:执行execute执行sql语句
affect_nus = cur.execute("insert into coc(classid,courseid) values(139,139)")
# 第五步:关闭cursor
cur.close()
 # 第六步:关闭mysql
conn.close() if affect_nus == 1: print("数据插入成功")
 else:
print("数据插入失败")
案例3:查看hellodb库的students表中 年龄大于20的学生的姓名和年龄 而且按照年龄排序
# coding=utf-8
# 第一步:导入模块
import pymysql
# 第二步:链接mysql
conn = pymysql.connect(host="localhost", user="root", passwd="111111", charset="utf8", db="hellodb")
# 第三步:创建cursor对象
cur = conn.cursor()
# 第四步:执行execute执行sql语句
# affect_nus中保存是执行的结果中,有多少行
affect_nus = cur.execute("select name,age from students where age>%s order by age" ,(20))
# 第五步:将select查询结果从cursor对象中取出来
# res_one= cur.fetchone()
# 从查询结果中取出一条记录
res_all= cur.fetchall()
# 从查询结果中取出全部记录
# 第六步:关闭cursor cur.close()
# 第七步:关闭mysql conn.close()
# 查询结果保存在res_all中,结果是以元组类型保存下来的
for item in res_all:
name = item[0]
age = item[1]
print("%s 的年龄是 %d"%(name,age))
1.4实现用户注册和登录
注册功能
让用户输入姓名和密码,可以完成注册
注册后的账号密码是保存到数据库中的
而且要求密码是加密存储的
登录功能
让用户输入账号和密码,通过检查数据库的记录,判断是否登陆成功
数据加密的模块
md5
hashlib
特点:定长输出
注册功能
import hashlib
import pymysql
name = input("请输入姓名:")
passwd = input("请输入密码:")
epasswd = hashlib.sha256(passwd.encode()).hexdigest()
conn = pymysql.connect(host="localhost",user="root",passwd="111111",charset="utf8",db=" userinfo")
cur = conn.cursor()
affect_nums = cur.execute("insert into register(username,userpwd)
values(%s,%s)",(name,epasswd))
conn.commit()
cur.close()
conn.close()
if affect_nums == 1:
print("注册成功")
else:
print("注册失败")
登录功能
import hashlib
import pymysql
name = input("请输入姓名:")
passwd = input("请输入密码:")
epasswd = hashlib.sha256(passwd.encode()).hexdigest()
conn = pymysql.connect(host="localhost",user="root",passwd="111111",charset="utf8",db=" userinfo")
cur = conn.cursor()
cur.execute("select username,userpwd from register")
res_all = cur.fetchall()
cur.close()
conn.close()
for item in res_all:
db_name = item[0]
db_pwd = item[1]
if db_name == name and db_pwd == epasswd:
print("登陆成功")
break
else:
print("登陆失败")
二、fask部署Python服务器
2.1web服务器
常规作为web服务器的软件
Nginx
Apache
Python的web服务器环境
flask
三、HTML向Python传递数据
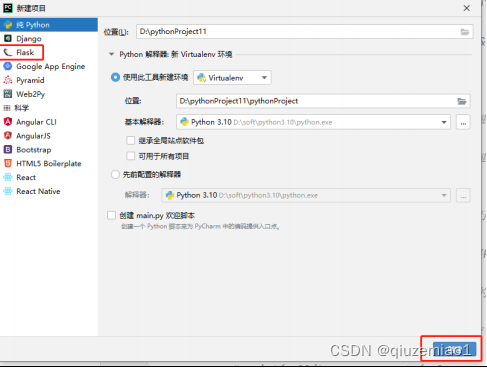
3.1创建flask项目
3.2创建前端页面
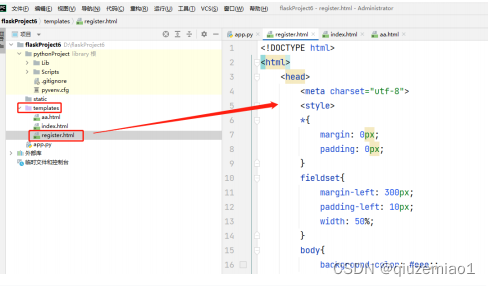
3.3创建Py文件

3.4运行项目

访问前端页面


 20万+
20万+


 被折叠的 条评论
为什么被折叠?
被折叠的 条评论
为什么被折叠?
 到【灌水乐园】发言


