


 本文介绍了如何使用Idea集成yapi,避免代码侵入,重点讲解了ideayapi的安装步骤和配置,以及如何利用javadoc注释同步接口信息到yapi平台。同时提供了EasyApi的安装和配置指南作为对比。
1、前言
yapi是一个很好的接口文档维护工具,其swagger功能,可将接口信息同步到yapi平台上,但是swagger的编写,大量入侵代码,也加大了开发工作量,目前调研了idea集成yapi同步工具,无需嵌入式编写入侵代码,根据javadoc备注即可将接口信息同步到yapi同台上
2、idea同步yapi平台工具
Idea支持将接口文档同步到yapi目前找到三个,easyapi、YapiUpload、idea yapi
- easyapi:同步接口信息到postman以及yapi平台上,但是同步yapi的不支持多模块同步;
- YapiUpload:同步yapi的配置需要写配置文件,不利于维护;
- idea yapi:是基于YapiUpload的二次开发,将原有xml配置方式改为 Setting 中配置,并配置持久化,将原本上传的数据类型做了优化,上传后数据类型为js的数据类型。
综上优缺点,可采用idea yapi,如果有特殊需求可安装easyapi同步到postman进行接口调试
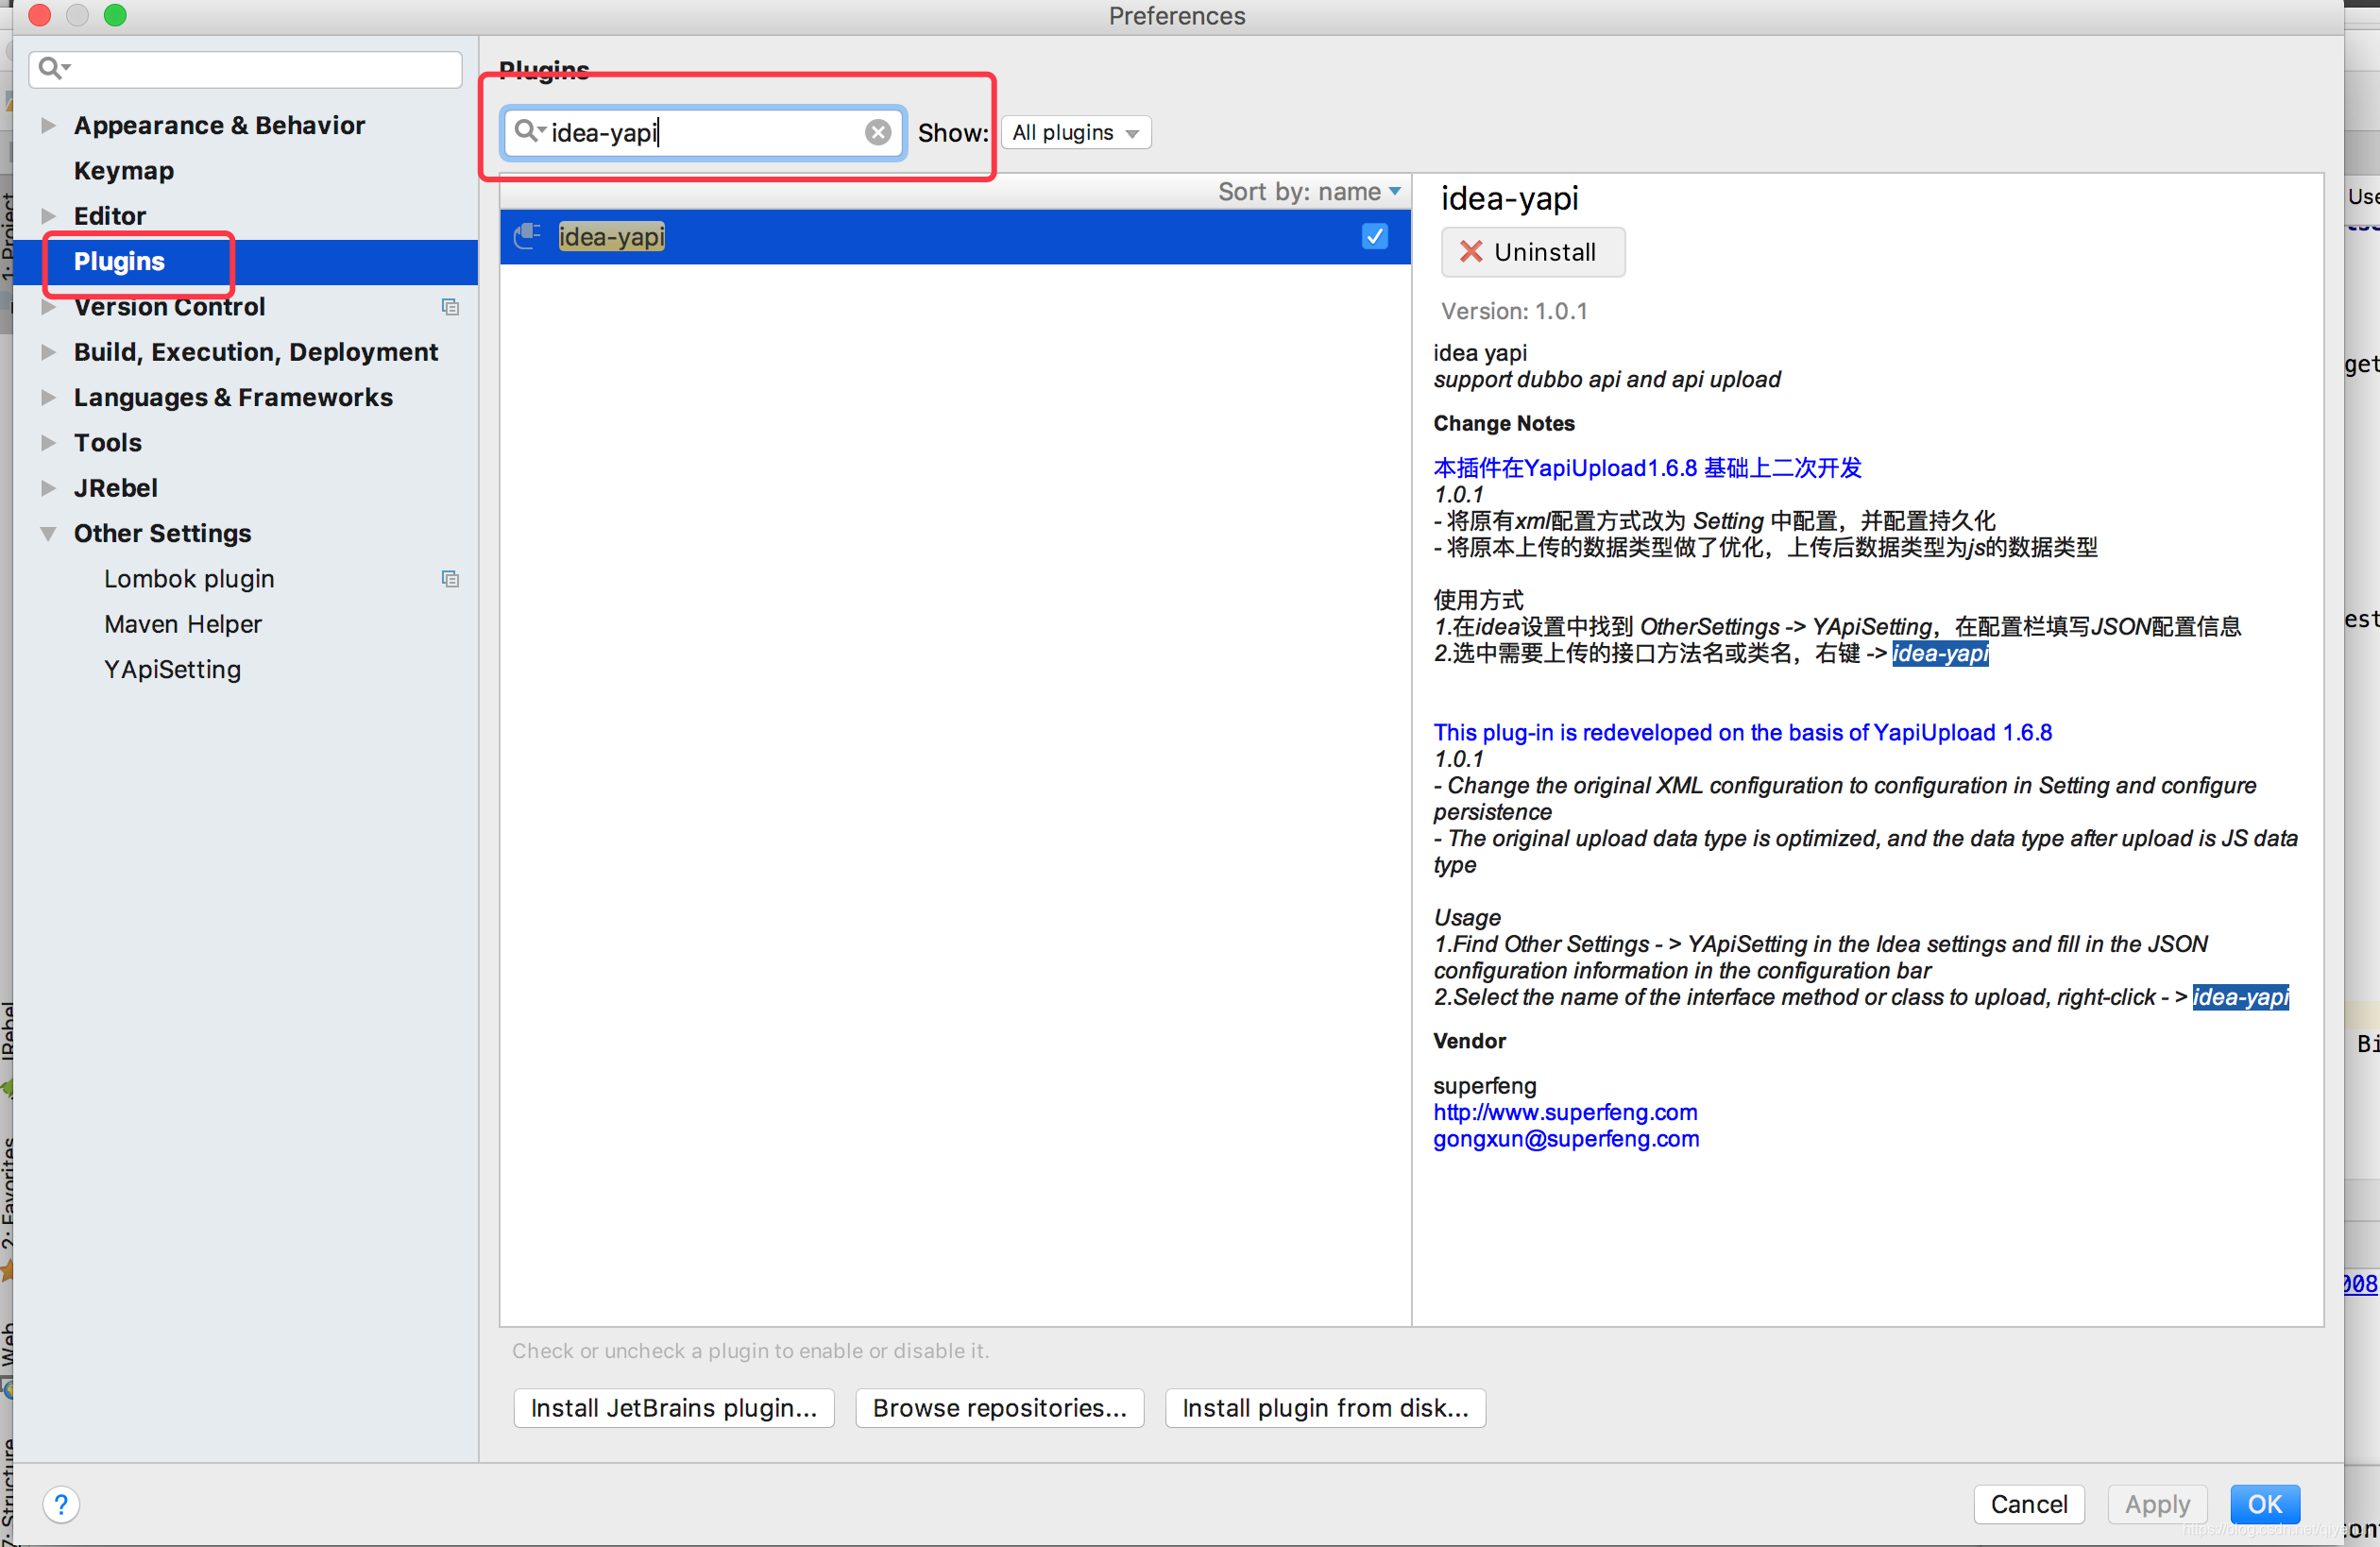
3、idea-yapi安装步骤
3.1、安装idea-yapi
在idea-Preferences-Plugins中搜索idea-yapi,安装,并重启idea
3.2、配置idea-yapi
在idea-Preferences-Other Setting中找到YapiSetting
配置说明如下: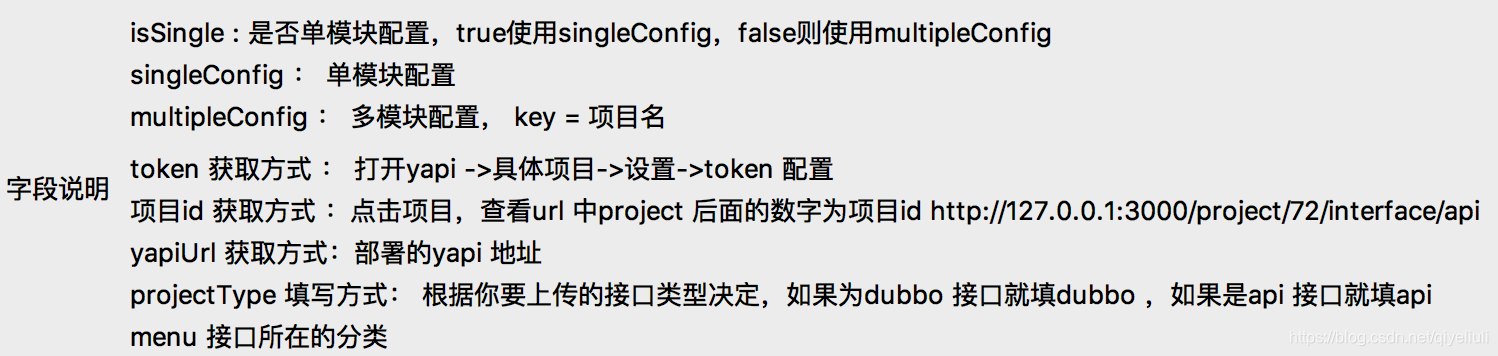
如果你是项目只是同步dubbo/api,采用如下配置
{
  "isSingle": true,
  "singleConfig": {
    "projectToken": "yapi平台的项目token地址",
    "projectId": "yapi平台的项目id",
    "yApiUrl": "yapi平台平台地址",
    "menu": "同步到的接口的目录",
    "projectType": "你的接口类型或者dubbo"
  },
  "multipleConfig": {
    "api": {
      "projectToken": "",
      "projectId": "",
      "yApiUrl": "",
      "menu": "",
      "projectType": ""
    },
    "api": {
      "projectToken": "",
      "projectId": "",
      "yApiUrl": "",
      "menu": "",
      "projectType": ""
    }
  }
}
如果你是项目即同步dubbo又有api,采用如下配置
{
  "isSingle": false,
  "singleConfig": {
    "projectToken": "",
    "projectId": "",
    "yApiUrl": "",
    "menu": "",
    "projectType": ""
  },
  "multipleConfig": {
    "接口所在包名称: {
       "projectToken": "yapi平台的项目token地址",
       "projectId": "yapi平台的项目id",
       "yApiUrl": "yapi平台平台地址",
       "menu": "api接口文档",
        "projectType": "api"
    },
    "dubbo所在包名称": {
      "projectToken": "yapi平台的项目token地址",
       "projectId": "yapi平台的项目id",
       "yApiUrl": "yapi平台平台地址",
       "menu": "dubbo文档",
        "projectType": "dubbo"
    }
  }
}
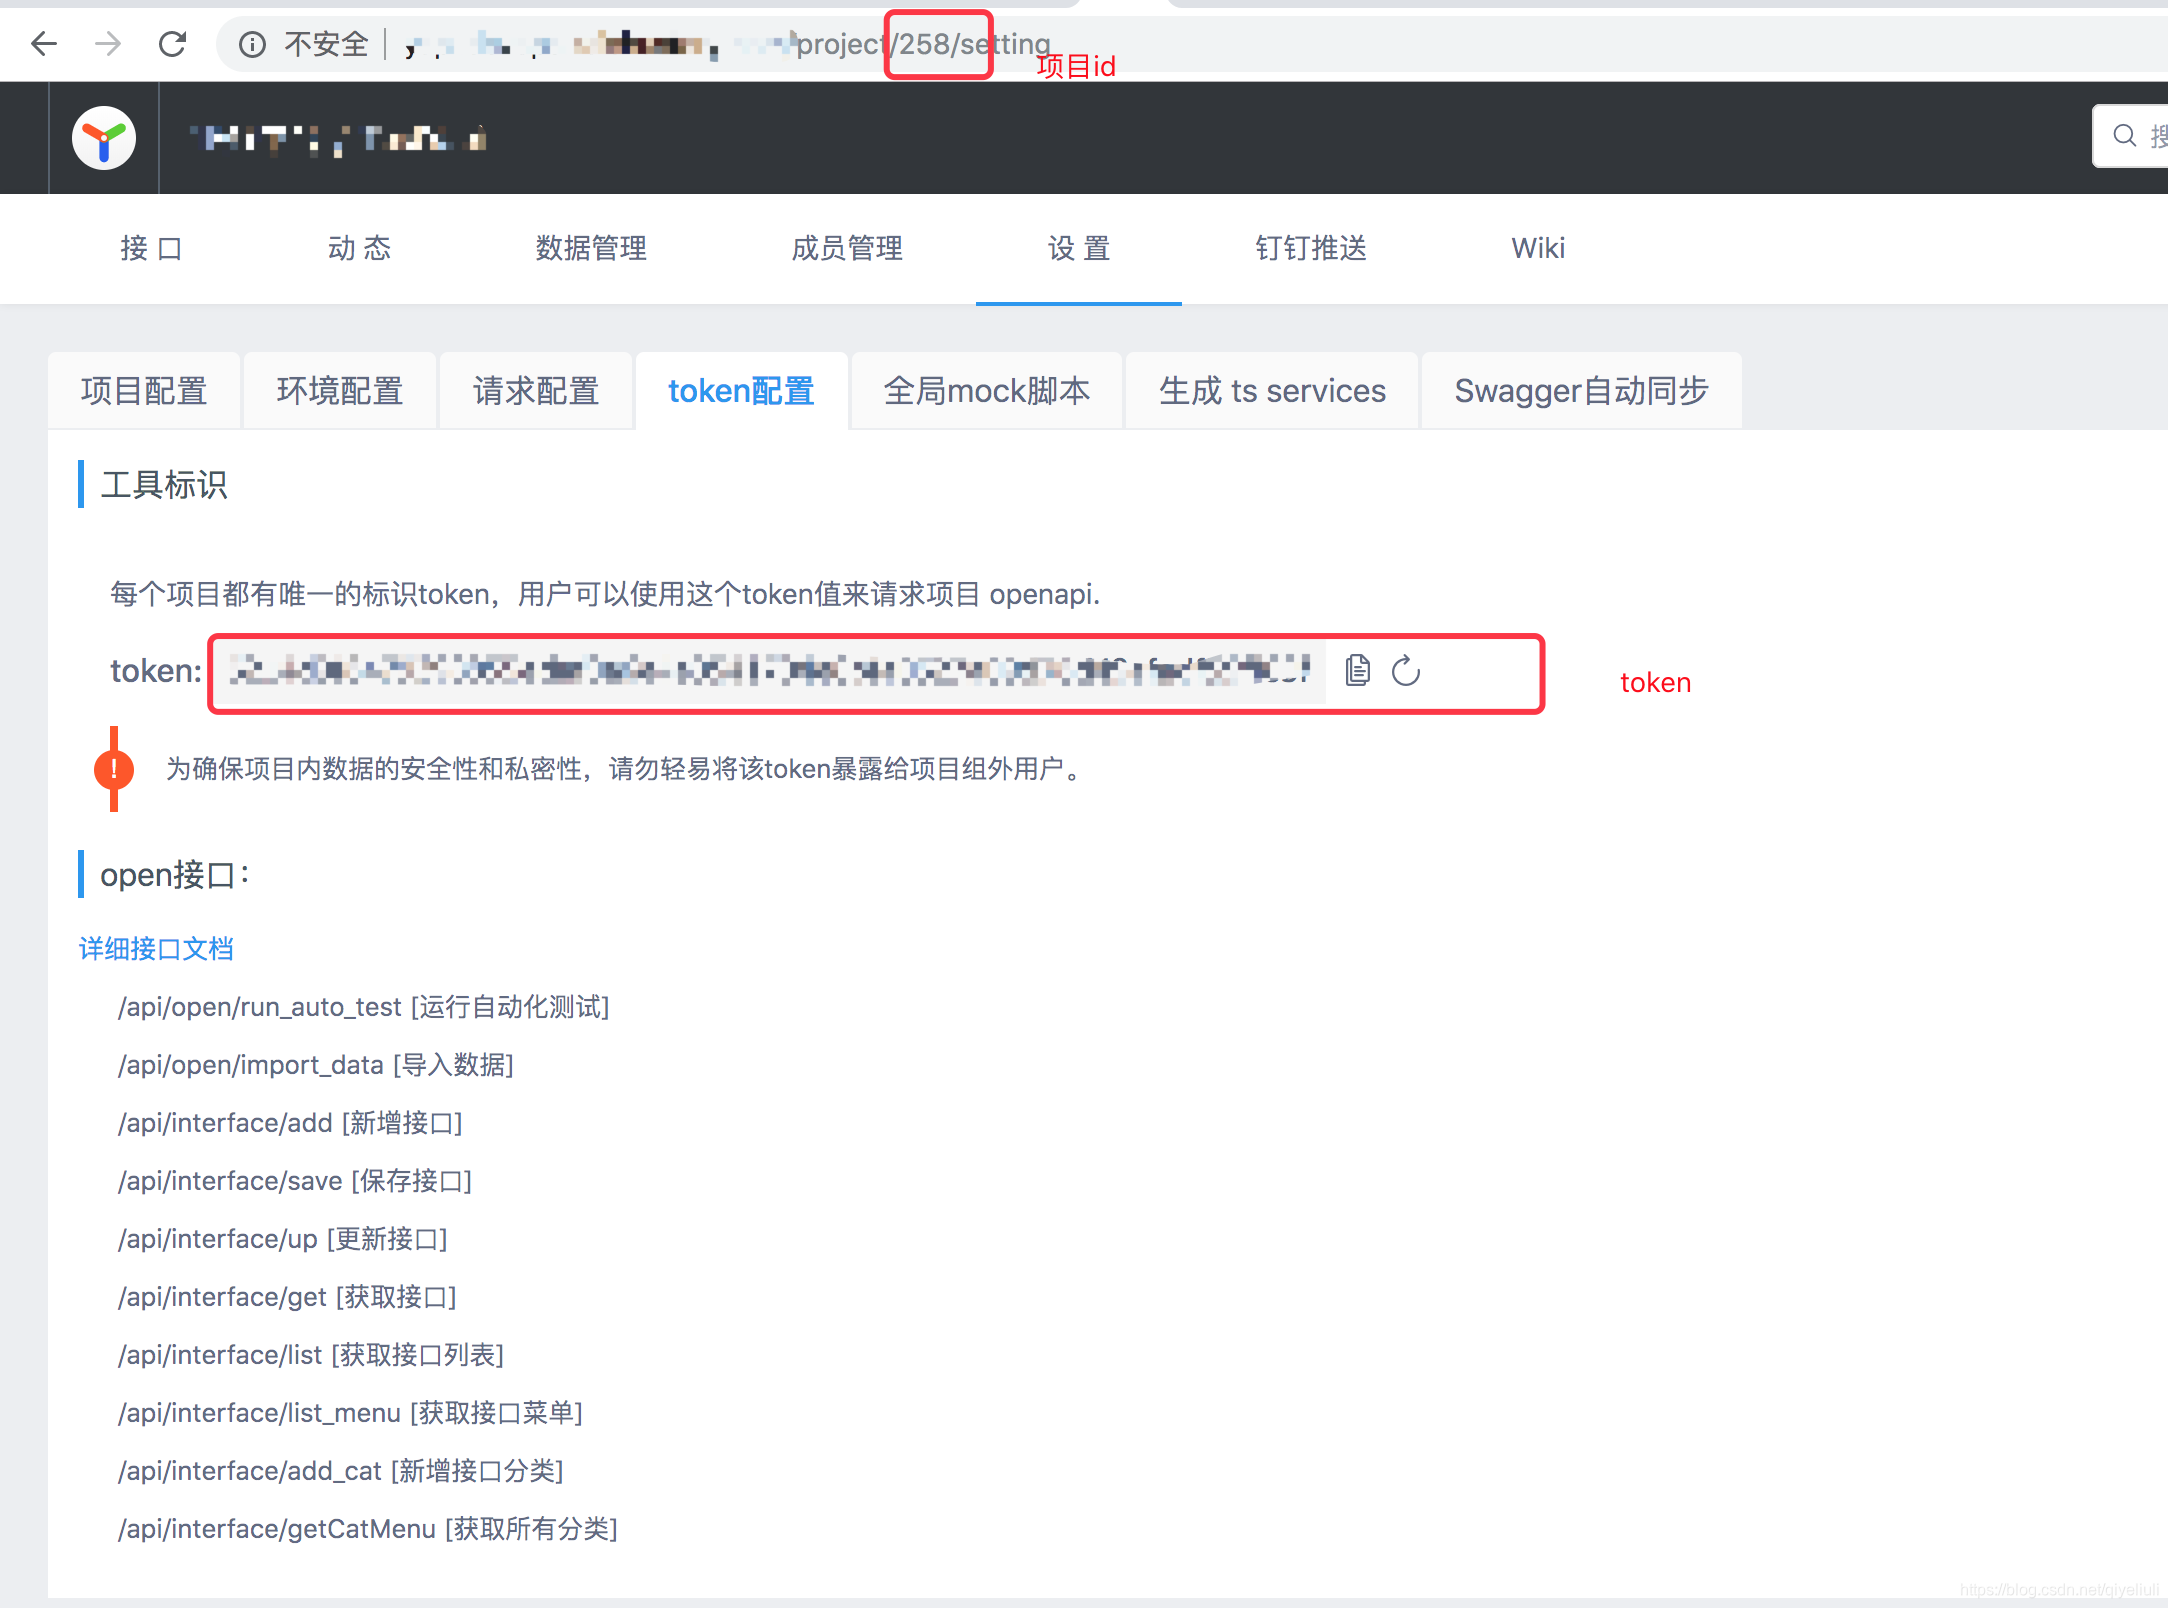
备注:查找token以及项目id的目录
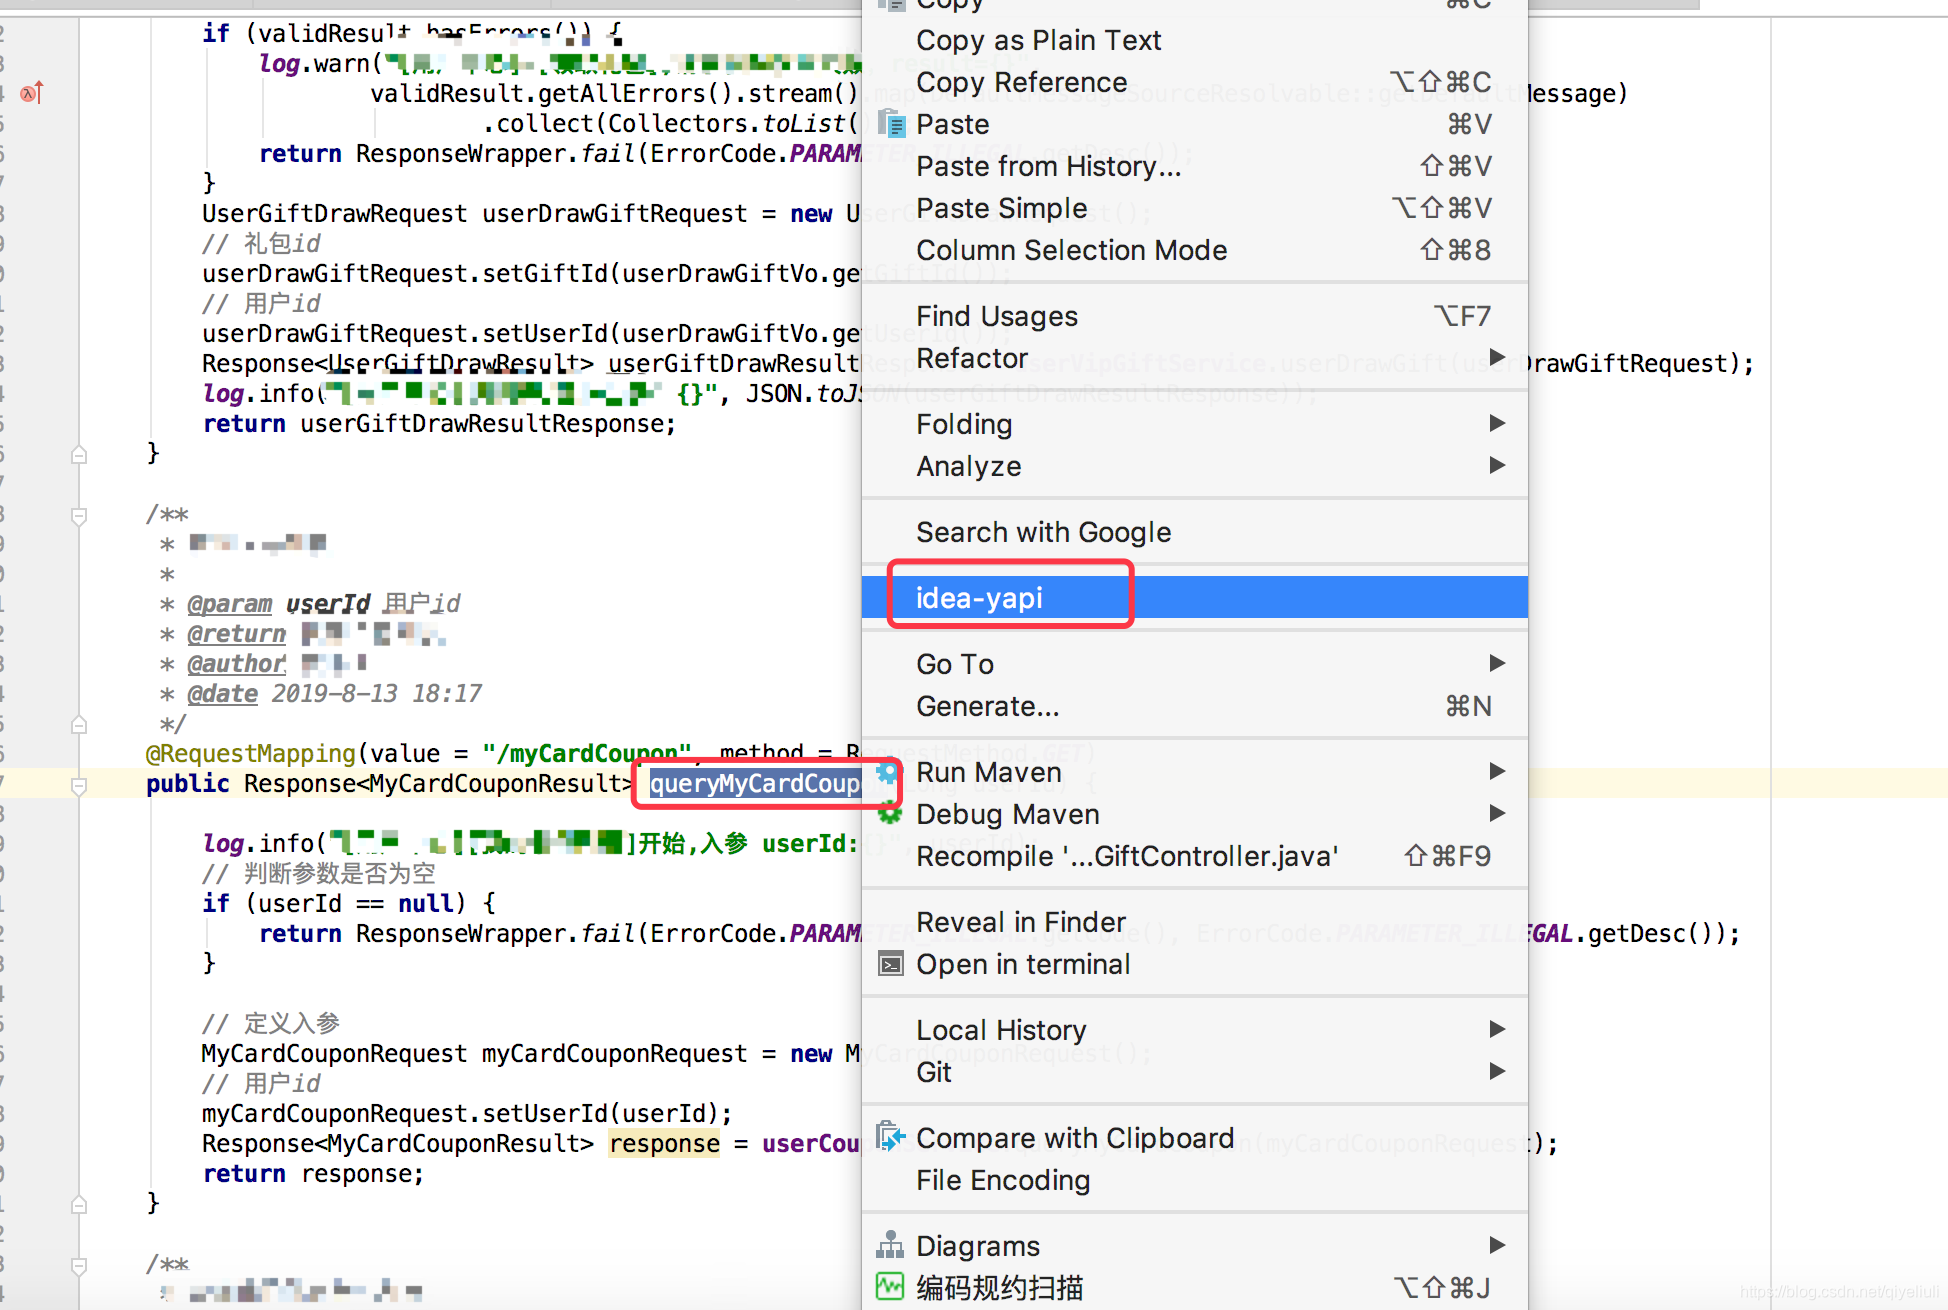
3.3、同步接口或者dubbo
找到对应的接口所在的方法入口或者dubbbo的定义方法,即可
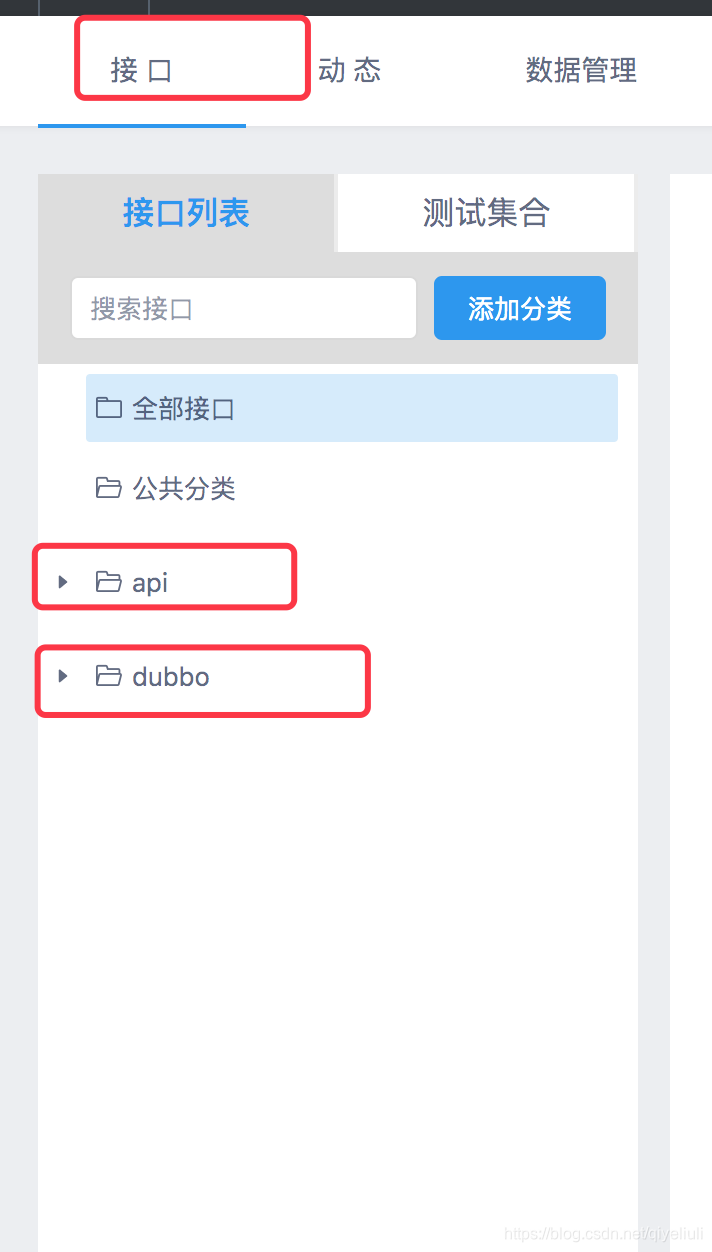
比如:同步下面的接口
效果如下:
4、idea-yapi支持规则配置以及实例
4.1、规则配置
1:插件如何生成属性备注 ,通过获得字段备注中的注释
/**
* 年龄
*/
private Integer age;
2:插件如何生成接口名称,通过接口上的注释,或者引用上的 注释
/**
     * 添加或更新课程数据
     *
     * @param courseOpt
     * @return {@link CommonRes}
     */
    @RequestMapping(value = "/test", method = RequestMethod.POST)
    public Course addOrUpdateCourse(@RequestBody CourseParam courseParam){

    }


    /**
     * @description: 添加或更新课程数据  (@Description 也可)
     * @param: [CourseParam]
     * @return: Course
     * @date: 2018/3/15
     */
     @RequestMapping(value = "/test", method = RequestMethod.POST)
     public Course addOrUpdateCourse(@RequestBody CourseParam courseParam){

    }


     @RequestMapping(value = ICourse.ADD_OR_UPDATA_COURSE, method = RequestMethod.POST)
     public Course addOrUpdateCourse(@RequestBody CourseParam courseParam){

     }

     public interface  ICourse{
       /**
        * @description: 添加或更新课程数据  (@Description 也可)
        * @param: [CourseParam]
       */
       ADD_OR_UPDATA_COURSE="test";
     }
3:@link 参数定义展示在字段备注中
第一种@link 方式
/**
* 状态 {@link com.xxx.constant.StatusConstant}
*/
private Integer status;
第二种@link 方式
import com.xxx.constant.StatusConstant;

/**
* 状态 {@link StatusConstant}
*/
private Integer status;
不支持方式
import com.xxx.constant.*;

/**
* 状态 {@link StatusConstant}
*/
private Integer status;
4:实现自定义分类
通过在方法或类注释中加 @menu 注释实现,优先级 方法>类>package 下面或者上面的@menu,如果没有自定义 默认为tool-tmp,支持多级分类(多级分类只能是crazy 分支的yapi)
package com.project.demo;
/**
 * @menu 这里填写类分类名称
 */
import com......
/**
 *@description: 用户控制器
 *@menu 这里填写类分类名称
 */
@RestController
public class UserController {

    /**
     * @description: 新增用户
     * @param: [User]
     * @menu: 这里填写方法级别分类名称(比如 多级目录/menu/menu1/menu2)
     * @return: Response<UserDTO>
     * @date: 2018/3/15
     */
     @RequestMapping(value = "/addUser", method = RequestMethod.POST)
     public Response<UserDTO> addUser(@RequestBody User user){

    }
}
5:支持注解
  String RequestMapping="org.springframework.web.bind.annotation.RequestMapping";

    String GetMapping="org.springframework.web.bind.annotation.GetMapping";

    String PostMapping="org.springframework.web.bind.annotation.PostMapping";

    String PutMapping="org.springframework.web.bind.annotation.PutMapping";

    String DeleteMapping="org.springframework.web.bind.annotation.PutMapping.DeleteMapping";

    String PatchMapping="org.springframework.web.bind.annotation.PutMapping.PatchMapping";

    String RequestBody="org.springframework.web.bind.annotation.RequestBody";

    String RequestParam="org.springframework.web.bind.annotation.RequestParam";

    String RequestHeader="org.springframework.web.bind.annotation.RequestHeader";

    String RequestAttribute="org.springframework.web.bind.annotation.RequestAttribute";

    String PathVariable="org.springframework.web.bind.annotation.PathVariable";

    String NotNull="javax.validation.constraints.NotNull";

    String NotEmpty="javax.validation.constraints.NotEmpty";

    String NotBlank="javax.validation.constraints.NotBlank";
支持Request Param 注解
生成的 uid 和bid 备注为 用户id(Integer),baby id(Integer) 如果没有备注,则只有(Integer)
   /**
     * 测试RequestHeader desc 规范的多个
     * @param uid 用户id
     * @param bid baby id
     * @param request
     * @param response
     */
    @RequestMapping(value = "/testRequestDesc4")
    public void testRequestDesc4(@RequestHeader(name = "uid")Integer uid, @RequestParam(name = "bid")Integer bid, HttpServletRequest request, HttpServletResponse response){

    }
支持@status注解
支持已发布(done),设计中(design),开发中(undone),已提测(testing),已过时(deprecated),暂停开发(stoping),支持中英文 (crazy 分支),新增接口默认 开发中,更新时如果没有写status情况下默认使用当前状态
   /**
     * 测试RequestHeader desc 规范的多个
     * @param uid 用户id
     * @status 开发中 (或者 undone)
     * @param request
     * @param response
     */
    @RequestMapping(value = "/testRequestDesc4")
    public void testRequestDesc4(@RequestHeader(name = "uid")Integer uid, @RequestParam(name = "bid")Integer bid, HttpServletRequest request, HttpServletResponse response){

    }
6:项目中通过fitler或拦截器或注解等 实现全局统一响应对象 返回如何处理
在misc.xml 中配置 returnClass ,值为全局统一响应对象全路径。比如下面代码如果配置了returnClass 为GlobalResponse ,那么他生成的yapi 响应对象为,GlobalResponse
   /**
     * 测试RequestHeader desc 规范的多个
     * @param uid 用户id
     * @status 开发中 (或者 undone)
     * @param request
     * @param response
     */
    @RequestMapping(value = "/testRequestDesc4")
    public Integer testRequestDesc4(@RequestHeader(name = "uid")Integer uid, @RequestParam(name = "bid")Integer bid, HttpServletRequest request, HttpServletResponse response){

    }


public class GlobalResponse<T> {

    private String status;

    private String code;

    private T data;

  ......
}
7:swagger 支持
目前1.7.7以上支持以下注解
  String API_OPERATION = "io.swagger.annotations.ApiOperation";

  String API_MODEL_PROPERTY = "io.swagger.annotations.ApiModelProperty";

  String API_PARAM = "io.swagger.annotations.ApiParam";
4.2、实例
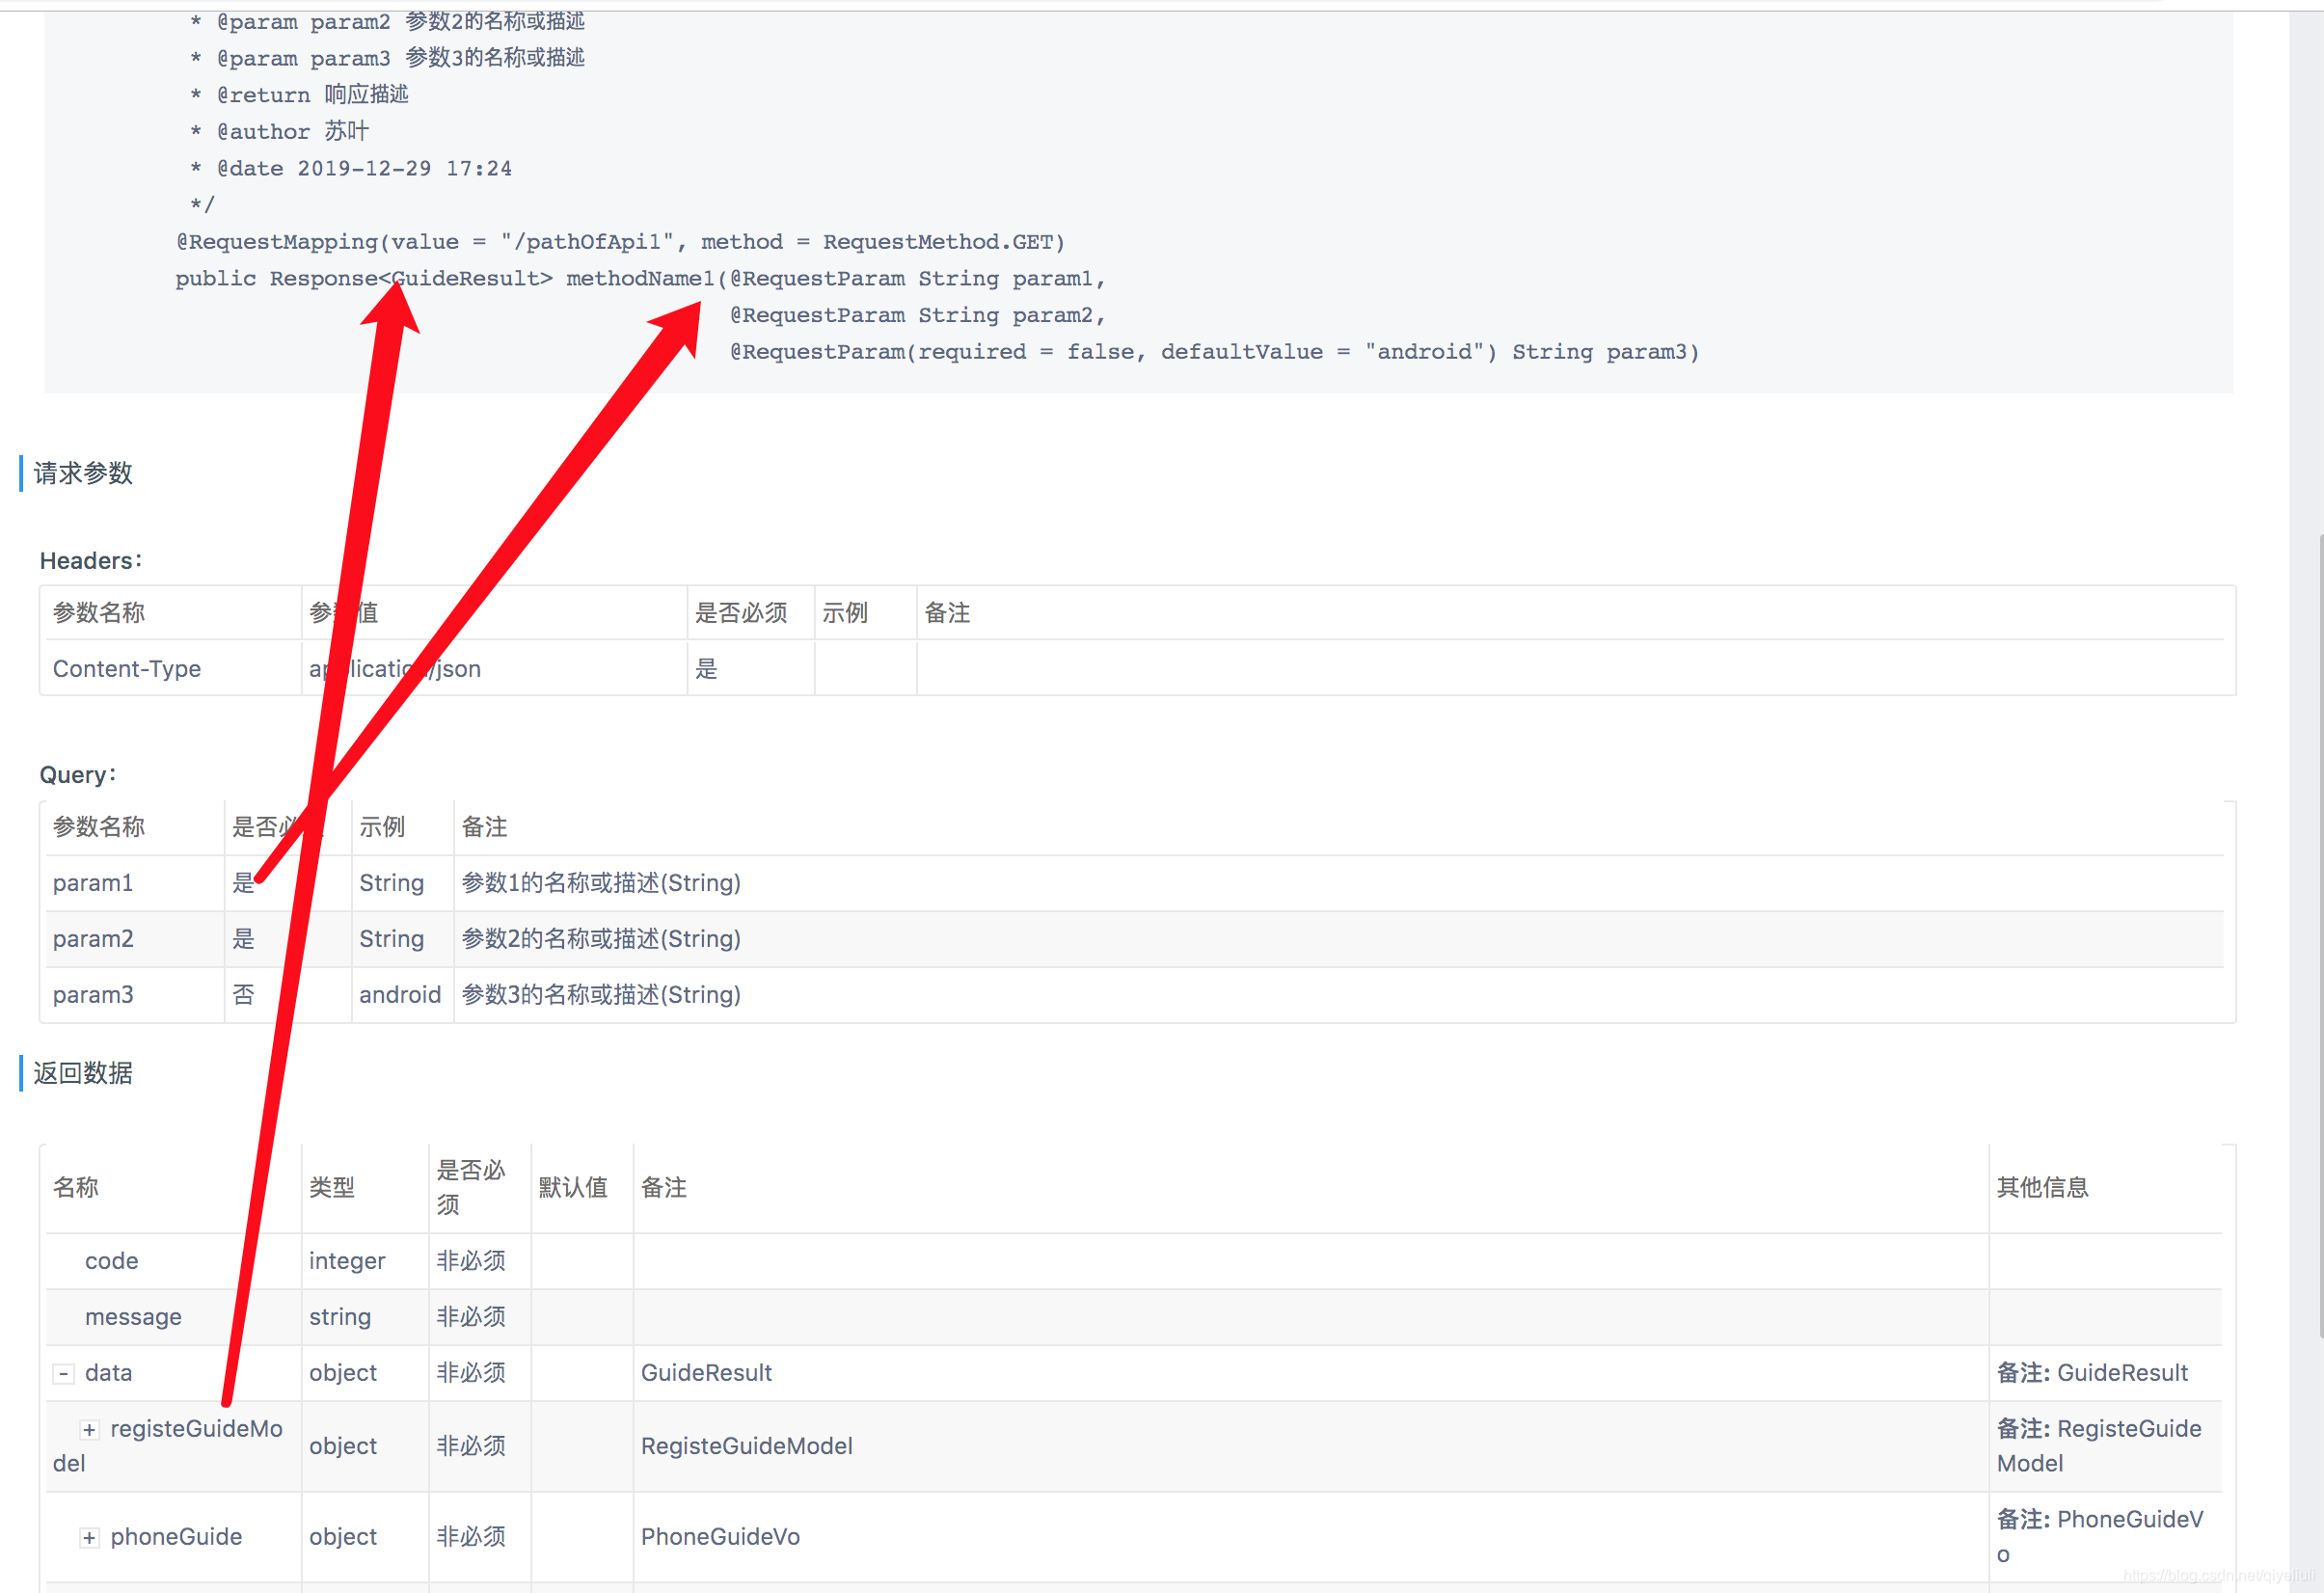
4.2.1、get方式
        /**
         * get方式
         *
         * @param param1 参数1的名称或描述
         * @param param2 参数2的名称或描述
         * @param param3 参数3的名称或描述
         * @return 响应描述
         * @author 苏叶
         * @date 2019-12-29 17:24
         */
        @RequestMapping(value = "/pathOfApi1", method = RequestMethod.GET)
        public Response<GuideResult> methodName1(@RequestParam String param1,
                                                 @RequestParam String param2,
                                                 @RequestParam(required = false, defaultValue = "android") String param3) {
            return new Response<GuideResult>();
        }
效果
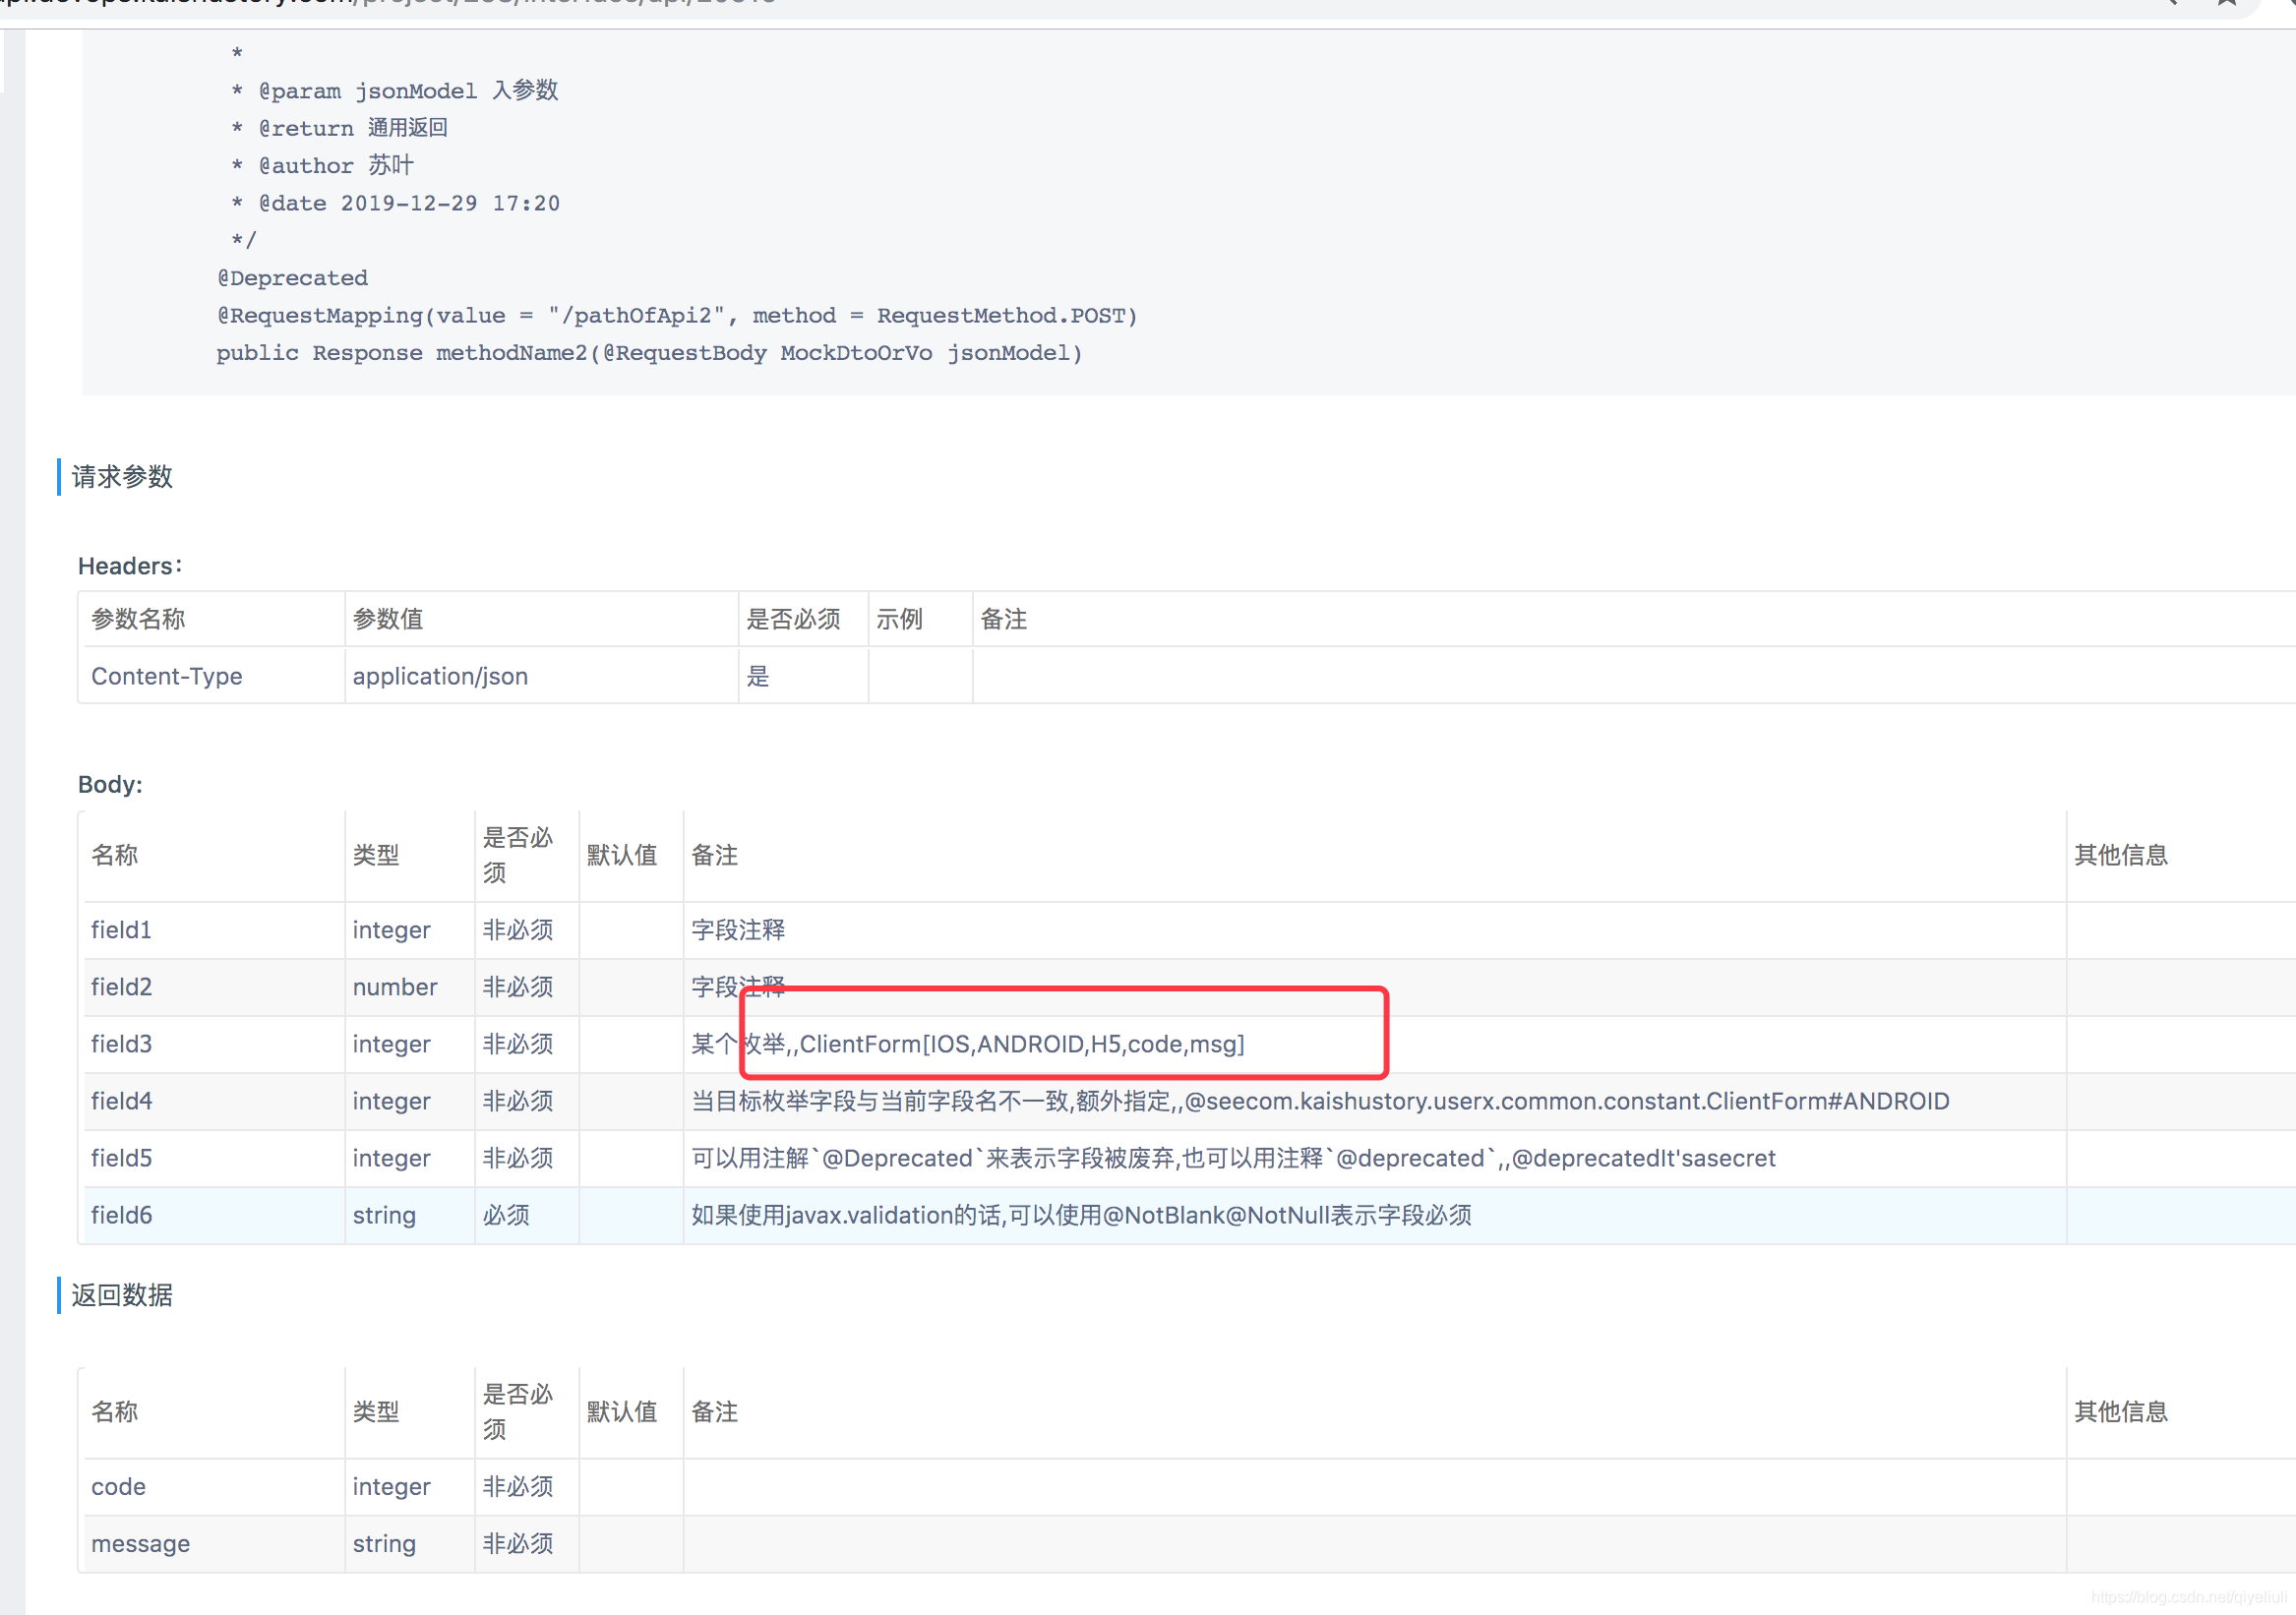
4.2.2、Post方式
       /**
         * post方式
         *
         * @param jsonModel 入参数
         * @return 通用返回
         * @author 苏叶
         * @date 2019-12-29 17:20
         */
        @Deprecated
        @RequestMapping(value = "/pathOfApi2", method = RequestMethod.POST)
        public Response methodName2(@RequestBody MockDtoOrVo jsonModel) {
            return new Response();
        }
MockDtoOrVo 入参
/**
 * moke说明
 *
 * @author 苏叶
 * @version 1.0
 * @date 2019-12-29 16:58
 */
@Data
@ToString
public class MockDtoOrVo {

    /**
     * 字段注释
     */
    private Long field1;

    /**
     * 字段注释
     */
    private Double field2;

    /**
     * 某个枚举
     * {@link com.kaishustory.userx.common.constant.ClientForm}
     */
    private int field3;

    /**
     * 当目标枚举字段与当前字段名不一致,额外指定
     *
     * @see com.kaishustory.userx.common.constant.ClientForm#ANDROID
     */
    private int field4;

    /**
     * 可以用注解`@Deprecated`来表示字段被废弃
     * 也可以用注释`@deprecated`
     *
     * @deprecated It's a secret
     */
    @Deprecated
    private int field5;

    /**
     * 如果使用javax.validation的话
     * 可以使用@NotBlank/@NotNull表示字段必须
     */
    @NotBlank
    @NotNull
    private String field6;

}
效果
5、EasyApi安装步骤
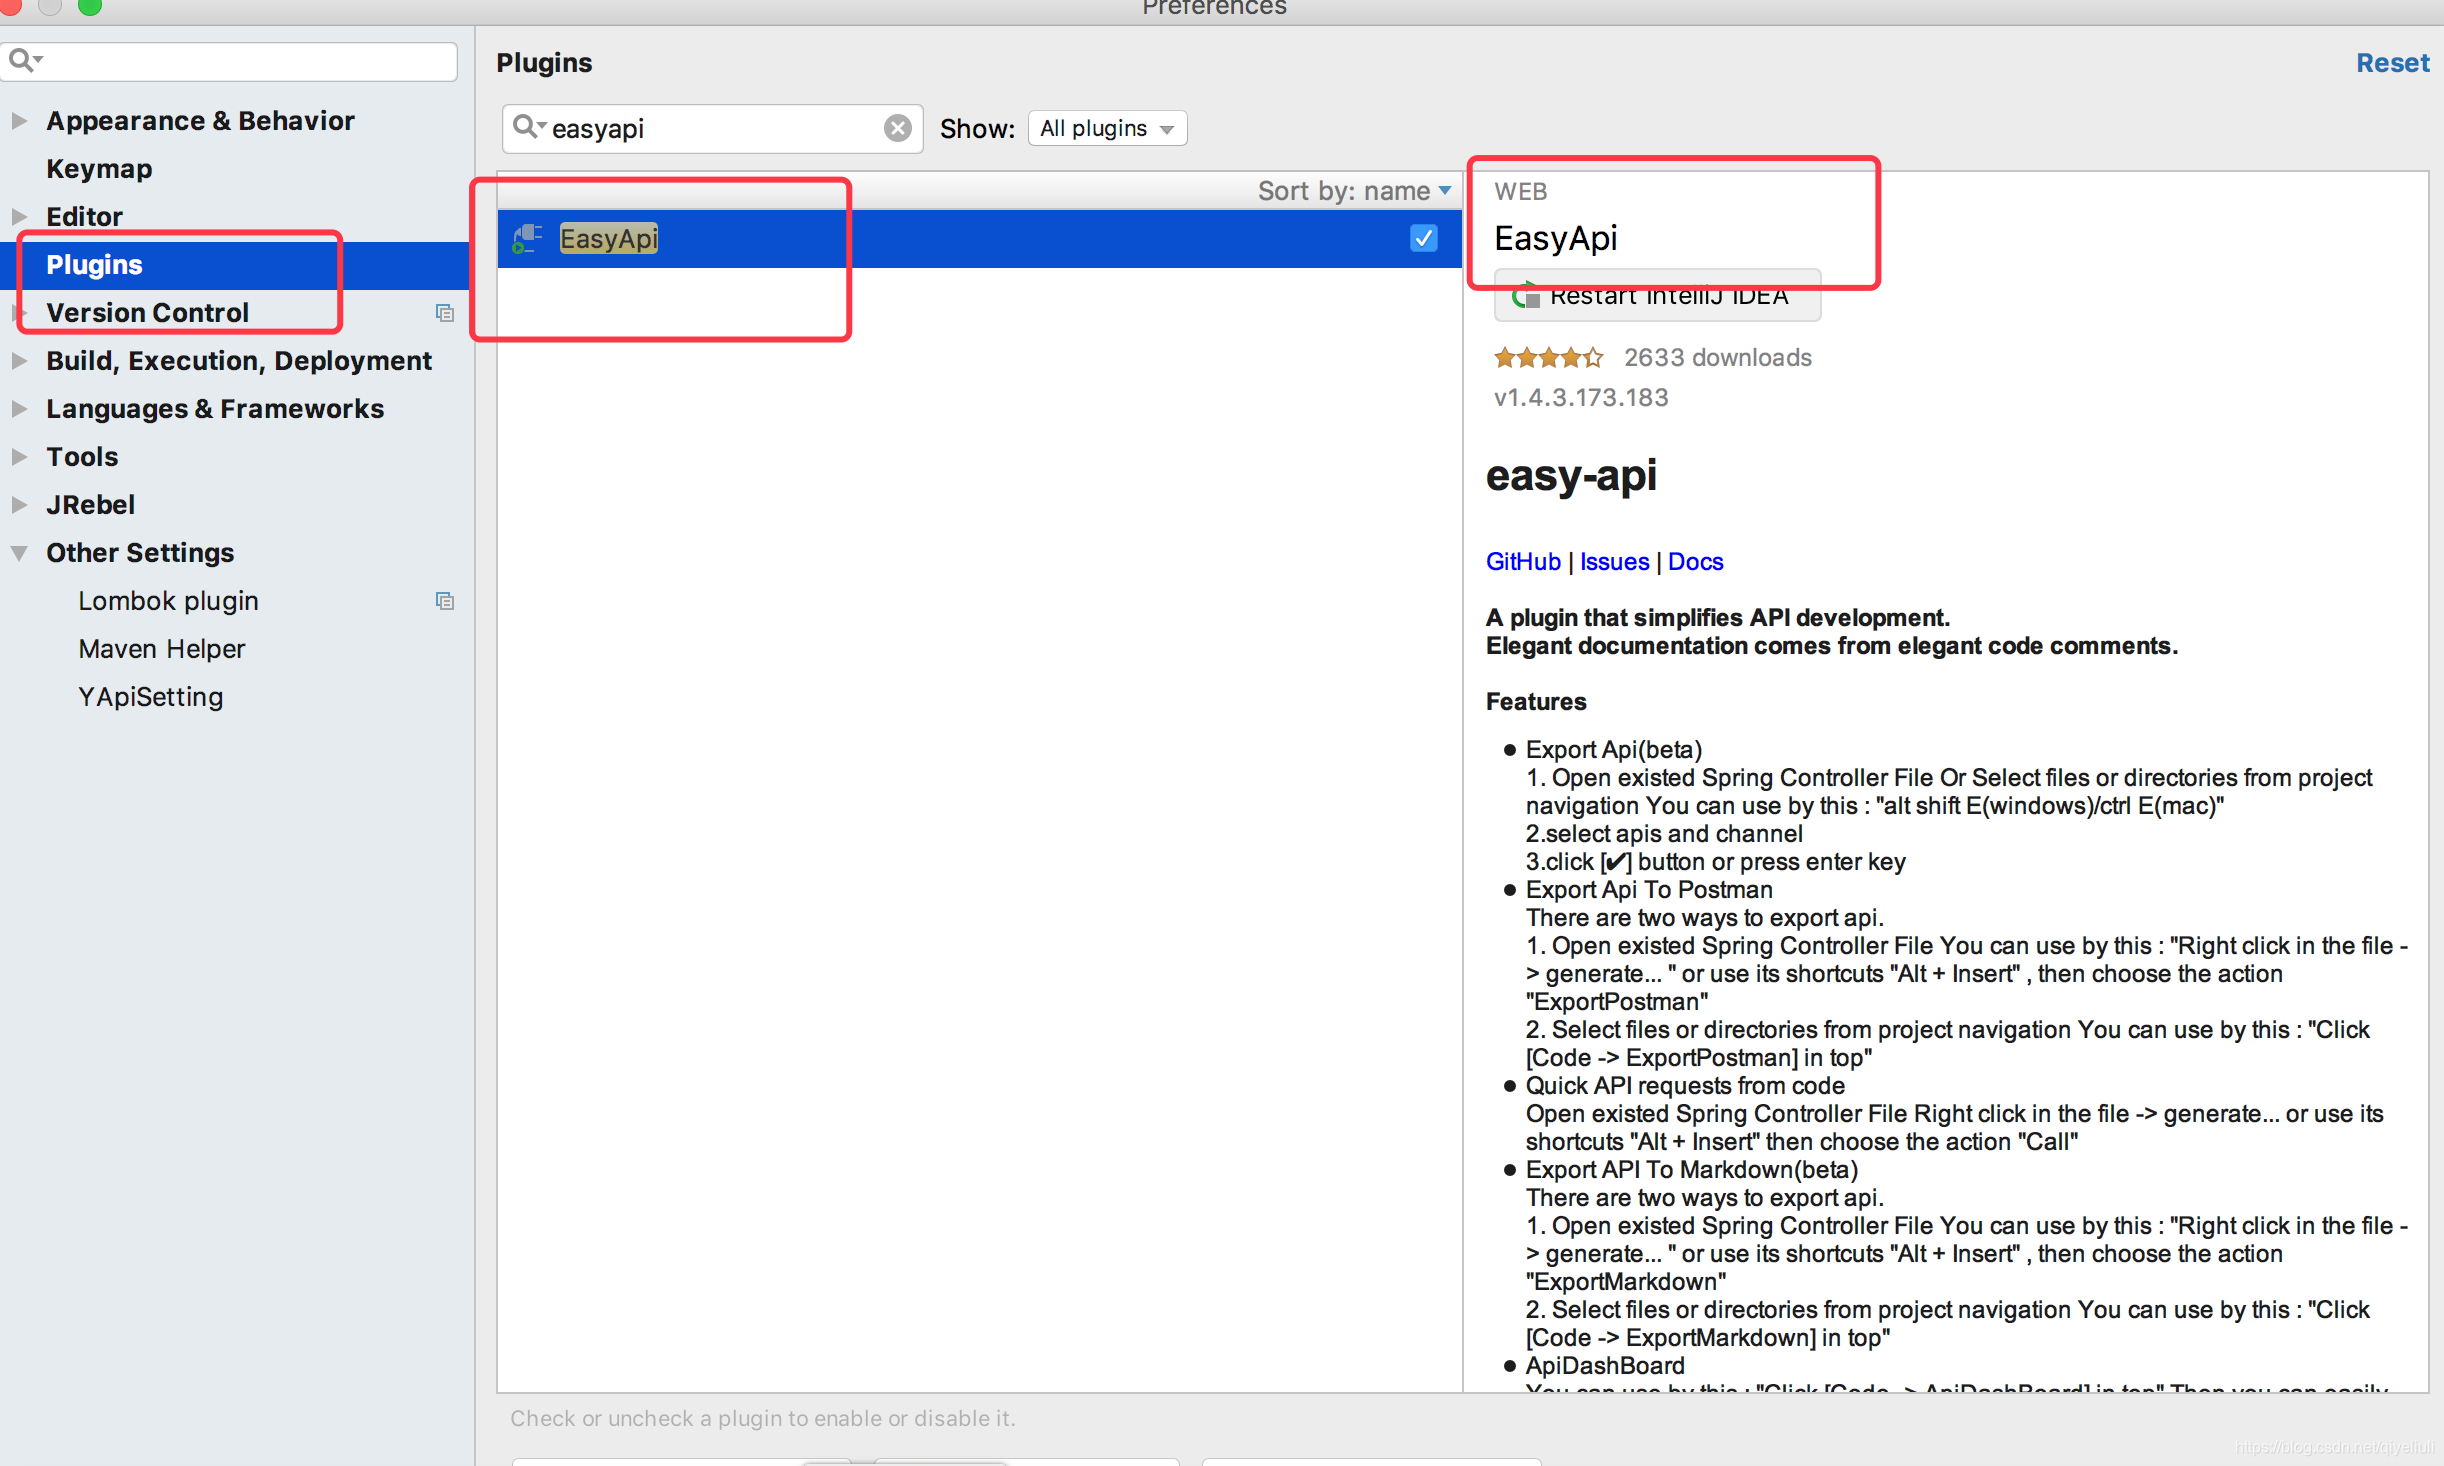
5.1、安装EasyApi
在idea-Preferences-Plugins中搜索easyapi,安装,并重启idea
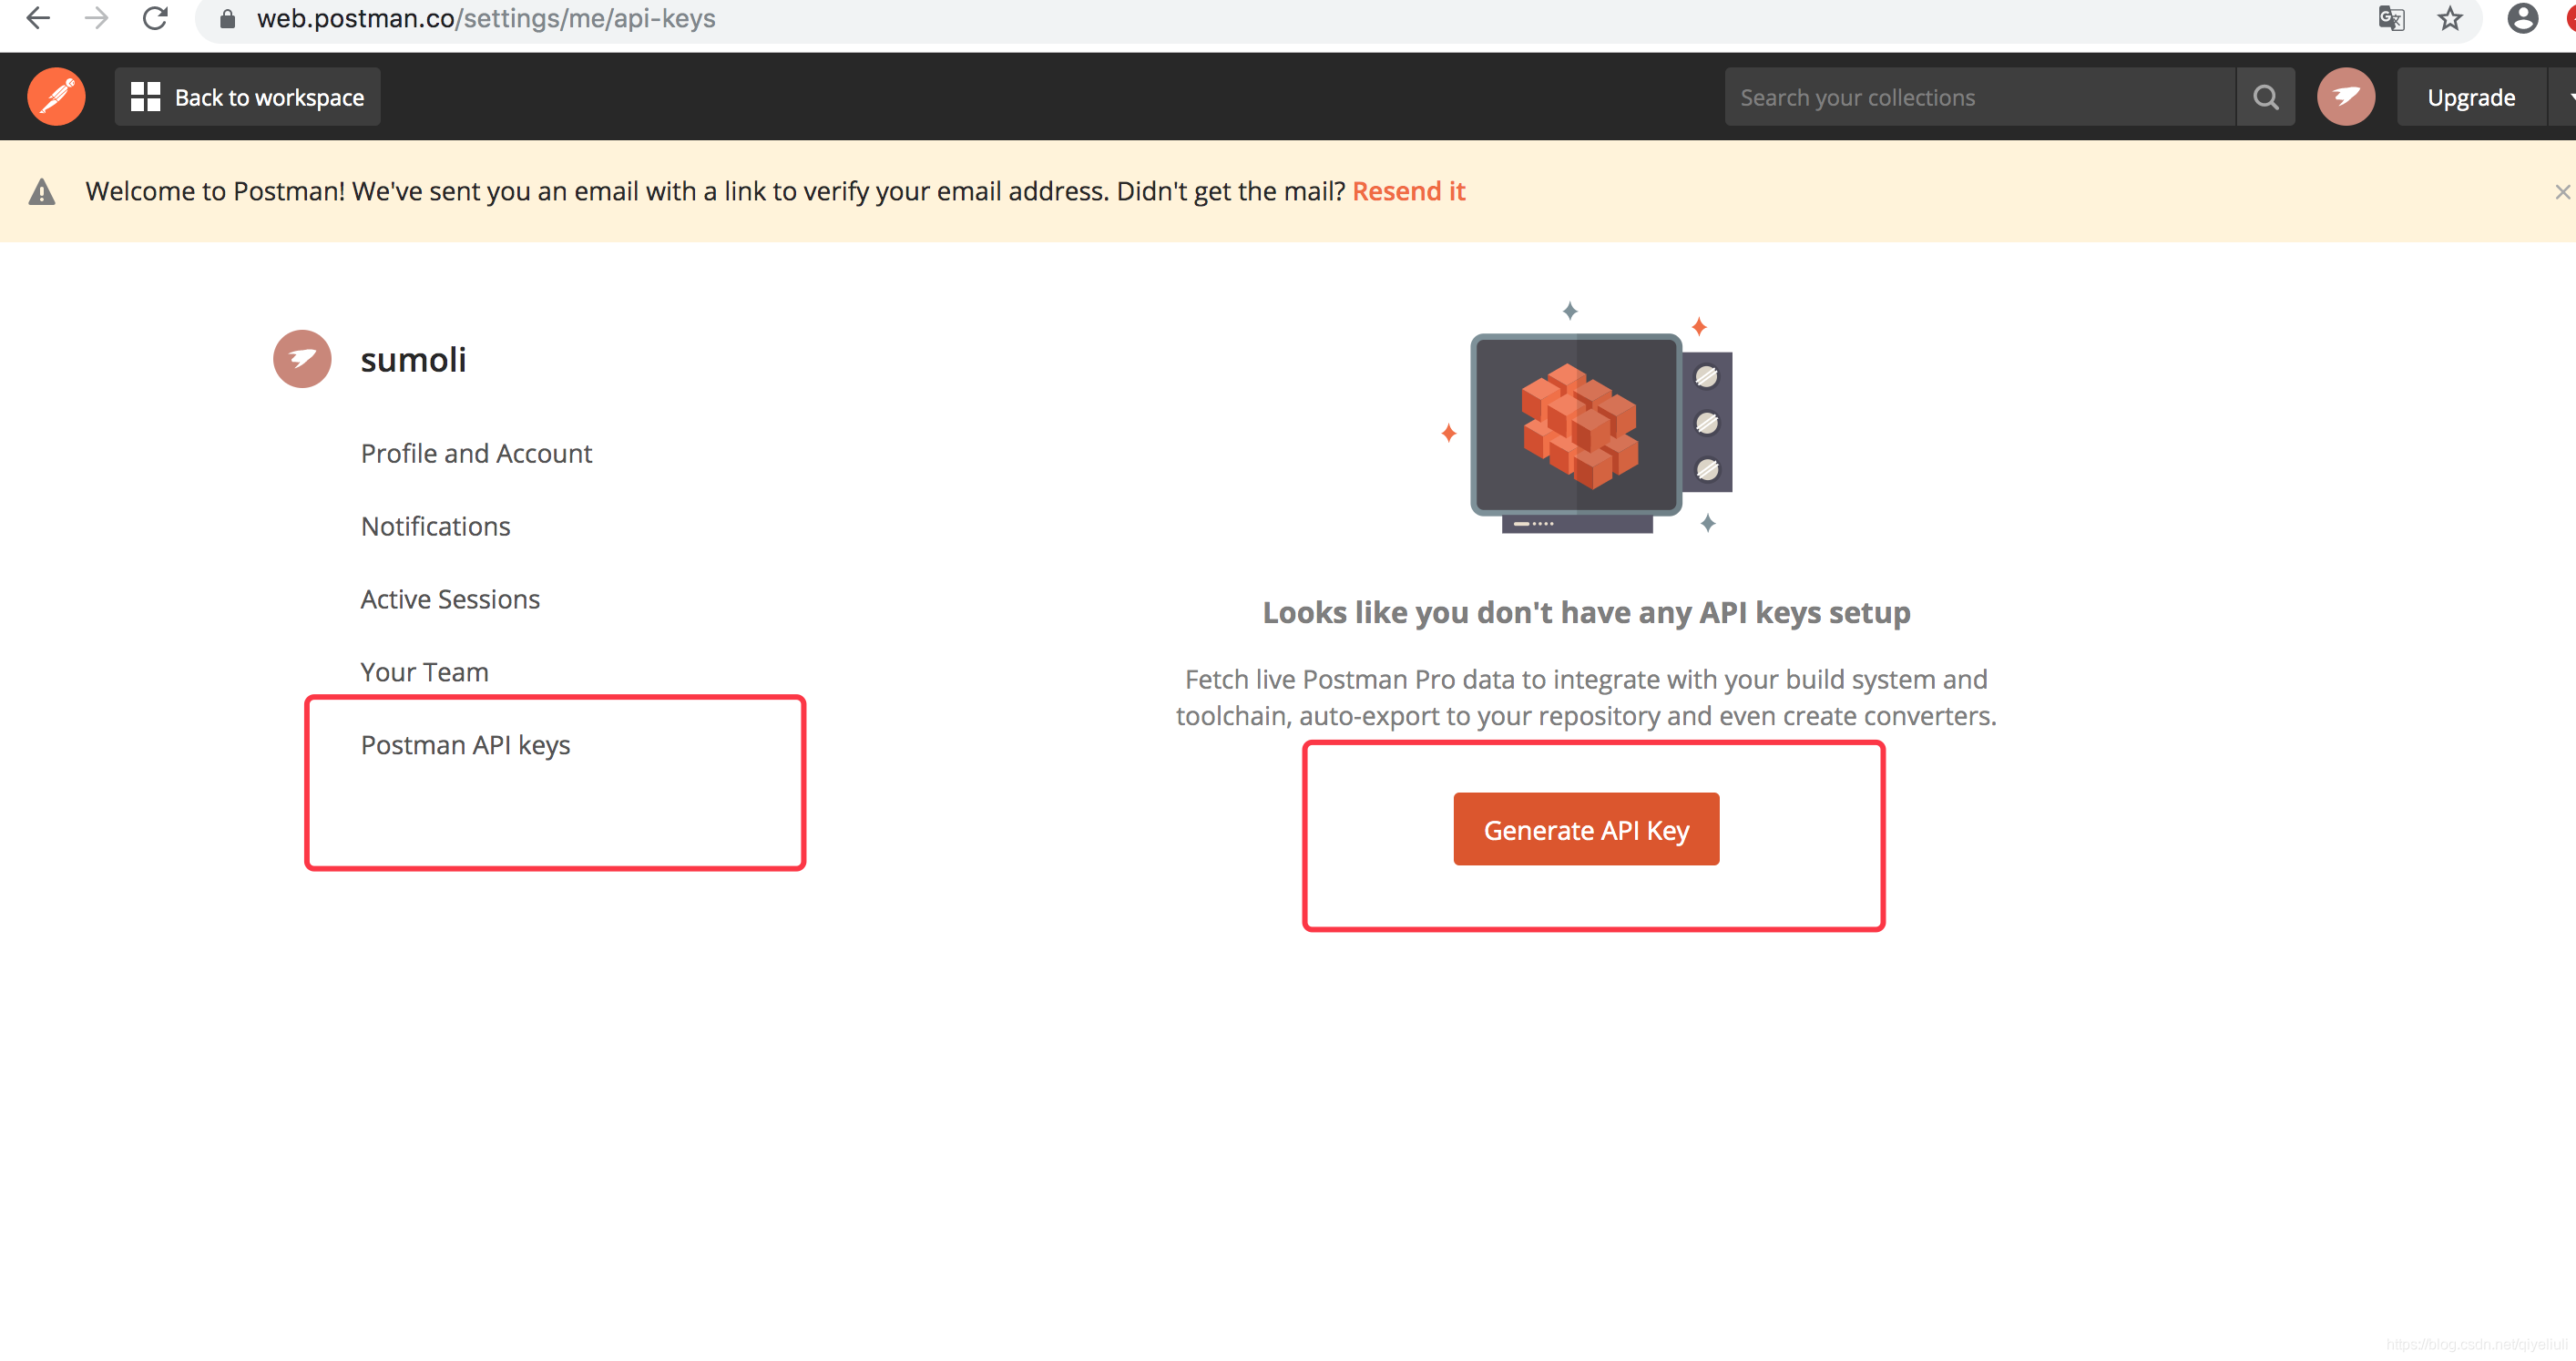
5.2、创建postmantoken获取token
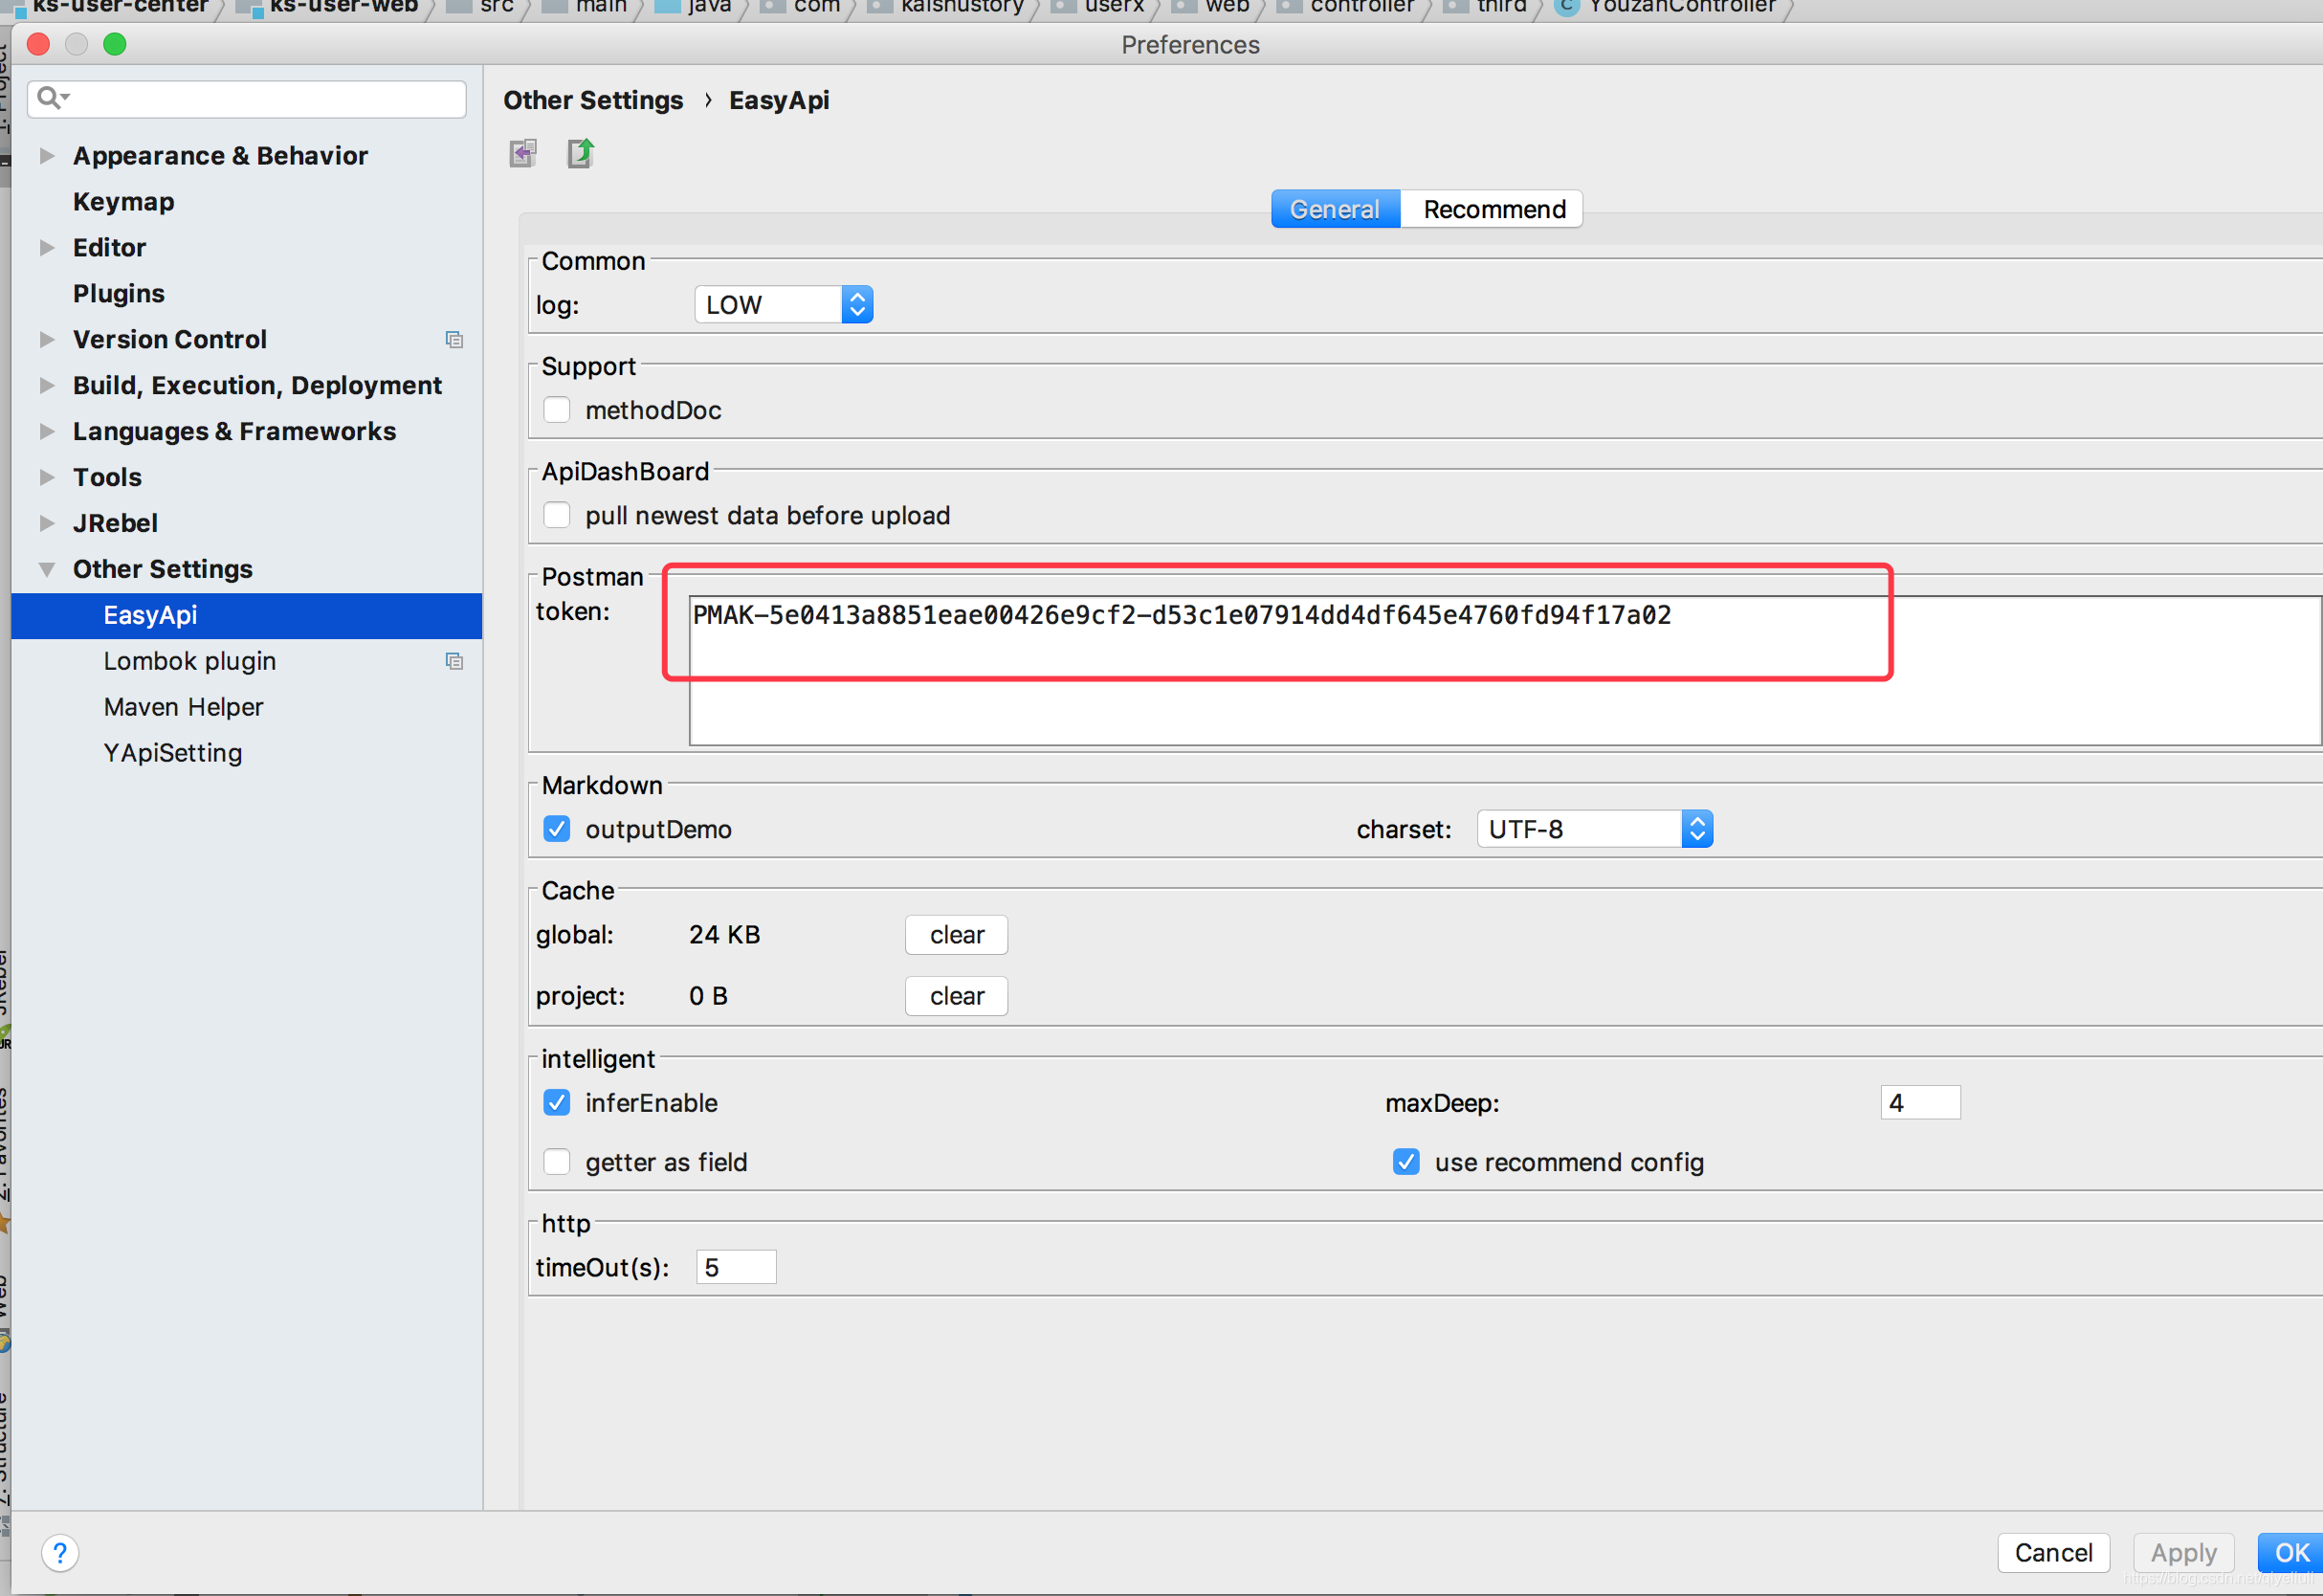
5.3、配置easyapi导出postman
5.4、项目配置
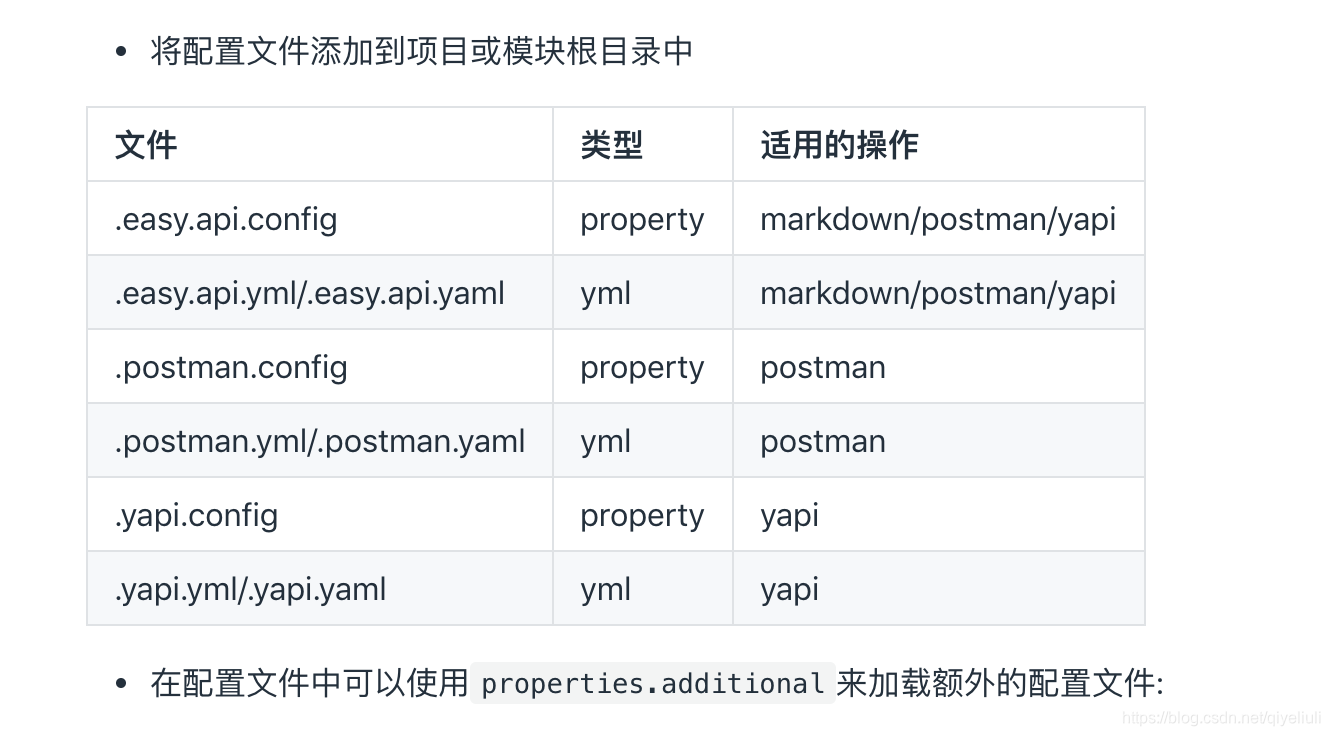
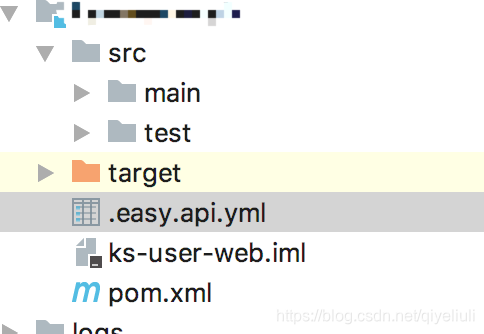
实例在moudle下面配置如下
在对应的controller文件右键-genernate - export postman,即可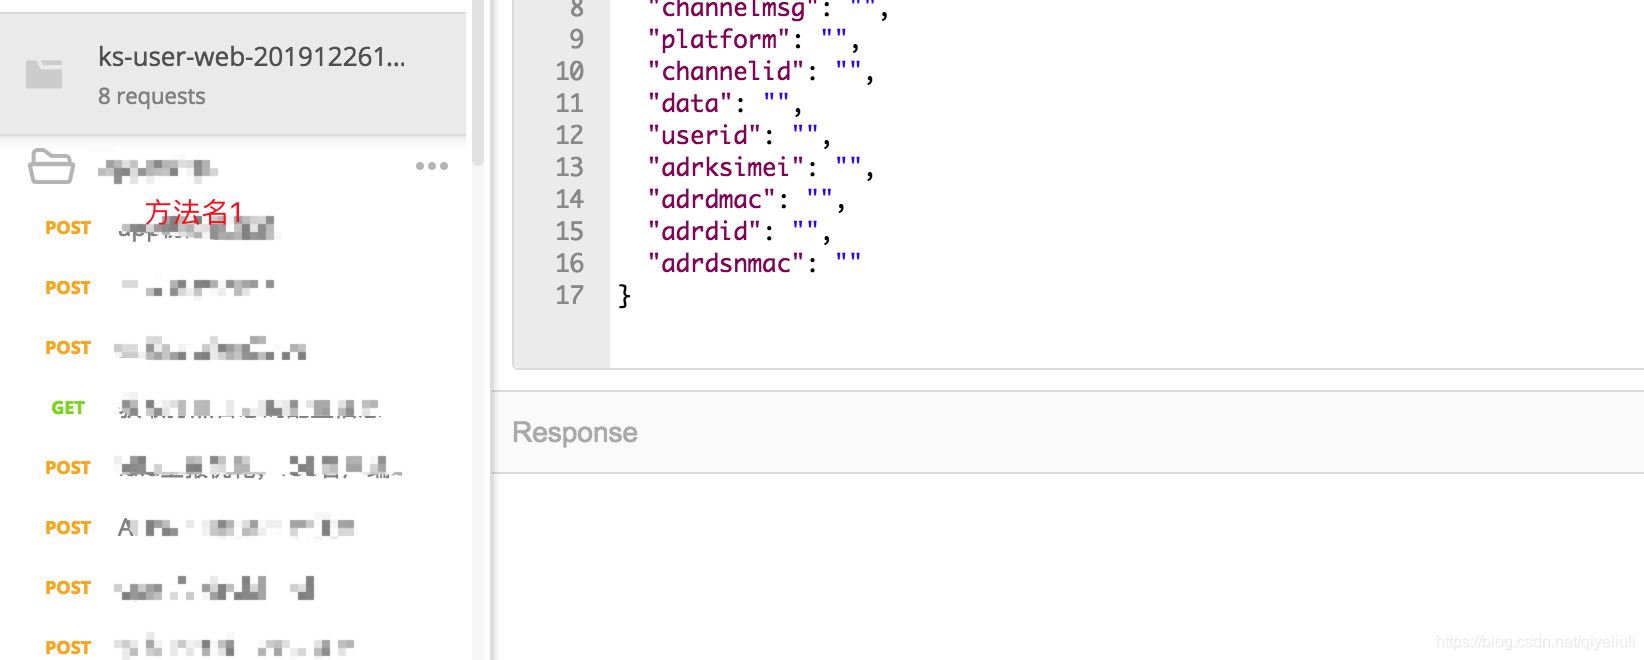 生成对应目录的请求配置
具体的方法注释:
https://github.com/diwand/YapiIdeaUploadPlugin/wiki/%E5%BF%AB%E9%80%9F%E4%BD%BF%E7%94%A8


 5851
5851


 被折叠的 条评论
为什么被折叠?
被折叠的 条评论
为什么被折叠?
 到【灌水乐园】发言


