


1、建立本地数据库数据与solr索引文件的关系,然后将数据导入solr
2、查询solr
3、数据库数据新增、更新、删除的时候更新或删除solr对应的数据.
***********************************************************************************
后期弄了一遍总结:
注意事项:版本一定要匹配(tomcat7.0.57 solr4) ;分词部分忽略(直接复制原有即可)
1、下载的solr war包复制到tomcat
2、 下载的solr example文件夹solr文件夹复制tomcat
3、solr下的索引配置文件修改,直接复制原有(已经成功过的索引)的core.properties data-config.xml schema.xml solrconfig.xml
4、spring注入配置的事例
<bean id="solrServer" class="cn.com.cyberfarms.tuliu.util.SolrServerUtil">
<property name="provideUrl" value="http://10.215.200.121:8170/solr/tuliu_provide"/>
<property name="requireUrl" value="http://10.215.200.121:8170/solr/tuliu_require"/>
<property name="openSolr" value="true"/>
</bean>
5、调用事例
@RequestMapping(value="/searchResult")
public String searchResult(Model model,String searchValue,Integer searchValueType,Integer pageNum){
if(solrServer.isOpenSolr()){
SolrQuery query = new SolrQuery();
query.setQuery("title:*"+searchValue+"* OR detail:*"+searchValue+"*");
query.addSort(new SortClause("lastModifiedDate", ORDER.desc));
query.setHighlight(true).setHighlightSnippets(1); // 开启高亮组件
query.addHighlightField("title");// 高亮字段
query.addHighlightField("detail");// 高亮字段
query.setHighlightSimplePre("<font style='background-color:yellow'>");// 标记
query.setHighlightSimplePost("</font>");
try {
QueryResponse qresponse = null;
if(searchValueType==1){
qresponse = solrServer.getProvideCore().query(query);
}else if(searchValueType==2){
qresponse = solrServer.getRequireCore().query(query);
}
Map<String, Map<String, List<String>>> map=qresponse.getHighlighting();
List<Provide> list=qresponse.getBeans(Provide.class);
for(Provide pro : list){
Map<String, List<String>> hl=map.get(String.valueOf(pro.getId()));
if(hl!=null){
List<String> hlTitle=hl.get("title");
if(hlTitle!=null&&hlTitle.size()>0){
pro.setTitle(hlTitle.get(0));
}
List<String> hlDetail=hl.get("detail");
if(hlDetail!=null&&hlDetail.size()>0){
pro.setDetail(hlDetail.get(0));
}
}
}
Pageable pageable = new PageRequest(pageNum==null?0:pageNum, 10,new Sort(Direction.DESC,"id"));
Page<Provide> page=new PageImpl<Provide>(list,pageable,list.size());
model.addAttribute("page", page);
model.addAttribute("searchValue", searchValue);
model.addAttribute("searchValueType", searchValueType);
} catch (SolrServerException e) {
e.printStackTrace();
}
}
return "/front/searchResult";
}
************************************************************************************************************************************************************************************
************************************************************************************************************************************************************************************
************************************************************************************************************************************************************************************
1、 solr定时增量问题
一、重要文件路径
文件dataimport.properties,路径D:\tools\apache-tomcat-8.5.6\bin\solrhome\conf
#################################################
# #
# dataimportscheduler properties #
# #
#################################################
# to sync or notto sync
# 1 - active;anything else - inactive
syncEnabled=1
# which cores toschedule
# in a multi-coreenvironment you can decide which cores you want syncronized
# leave empty orcomment it out if using single-core deployment
syncCores=mycore
# solr server nameor IP address
# [defaults tolocalhost if empty]
server=localhost
# solr server port
# [defaults to 80if empty]
port=9090
# applicationname/context
# [defaults tocurrent ServletContextListener's context (app) name]
webapp=solr
# URL params[mandatory]
# remainder of URL
#entity注意这个参数
#增量
params=/dataimport?command=delta-import&clean=false&commit=true&optimize=false&wt=json&indent=true&entity=car&verbose=false&debug=false
# scheduleinterval
# number ofminutes between two runs
# [defaults to 30if empty]
interval=1
# 重做索引的时间间隔,单位分钟,默认7200,即1天;
# 为空,为0,或者注释掉:表示永不重做索引
reBuildIndexInterval=1
#entity注意这个参数
# 重做索引的参数
reBuildIndexParams=/dataimport?command=full-import&clean=true&commit=true&wt=json&indent=true&entity=car&verbose=false&optimize=false&debug=false&id=1
# 重做索引时间间隔的计时开始时间,第一次真正执行的时间=reBuildIndexBeginTime+reBuildIndexInterval*60*1000;
# 两种格式:2012-04-1103:10:00 或者 03:10:00,后一种会自动补全日期部分为服务启动时的日期
reBuildIndexBeginTime=2016-10-31 15:37:00
文件web.xml,路径D:\tools\apache-tomcat-8.5.6\webapps\solr\WEB-INF,重要内容如下:

二、包问题
很多包不适合新版本,其中圆圈圈中的最难找

2、 指定IP问题
修改D:\Program Files\apache-tomcat-6.0.37\conf文件夹下的Server.xml文件,主要修改
<Hostname="localhost" appBase="webapps"
unpackWARs="true"autoDeploy="true">
<!-- SingleSignOn valve, shareauthentication between web applications
Documentation at:/docs/config/valve.html -->
<!--
<ValveclassName="org.apache.catalina.authenticator.SingleSignOn" />
-->
<!-- Access log processes allexample.
Documentation at:/docs/config/valve.html
Note: The pattern used isequivalent to using pattern="common" -->
<!-- <ValveclassName="org.apache.catalina.valves.AccessLogValve"directory="logs"
prefix="localhost_access_log" suffix=".txt"
pattern="%h %l %u %t"%r" %s %b" />-->
<!-- <ValveclassName="org.apache.catalina.valves.RemoteAddrValve"allow="10.216.33.29||10.215.21.5"/>-->
<ValveclassName="org.apache.catalina.valves.RemoteAddrValve"allow="127.0.0.1||10.216.33.29||10.215.21.5" deny=""/>
</Host>
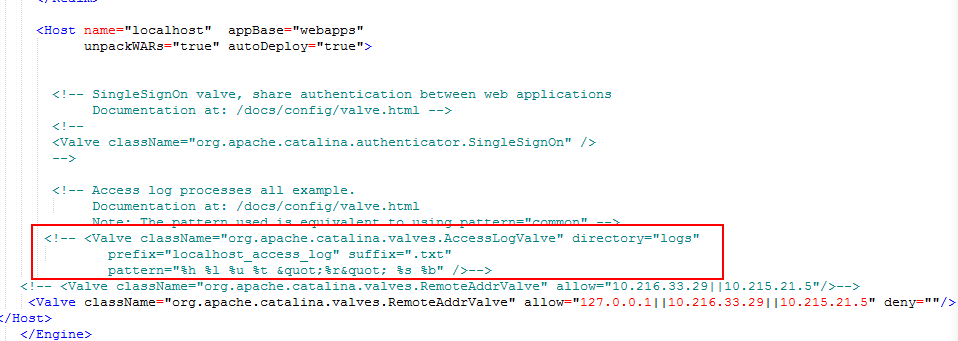
开始红框部分要注销,增加<Valve className="org.apache.catalina.valves.RemoteAddrValve"allow="127.0.0.1||10.216.33.29||10.215.21.5" deny=""/>
代表只有这3个IP才能访问


 171
171


 被折叠的 条评论
为什么被折叠?
被折叠的 条评论
为什么被折叠?
 到【灌水乐园】发言


