


转载:http://blog.csdn.net/333sunshine/article/details/2914779
安装MAVEN2
Maven 下载地址 : http://maven.apache.org/download.html
解压 Maven 至 D:/apache-maven-2.0.9
设置环境变量 : MAVEN_HOME = D:/apache-maven-2.0.9
添加 Path : %MAVEN_HOME%/bin
测试安装 :
C:/Documents and Settings/Administrator>mvn -version
Maven version: 2.0.9
Java version: 1.5.0_10
生成项目myapp
C:/Documents and Settings/Administrator> mvn archetype:create -DarchetypeGroupId=org.apache.tapestry-DarchetypeArtifactId=quickstart -DgroupId=org.example -DartifactId=myapp -DpackageName=org.example.myapp -Dversion=1.0.0-SNAPSHOT
C:/Documents and Settings/Administrator>cd myapp
C:/Documents and Settings/Administrator/myapp>mvn mvn -Djetty.port=8087 jetty:run

Jetty运行起来后,访问http://localhost:8087/myapp 显示示例。
看完示例,关闭cmd窗口 。 进入eclipse配置开发环境。
Eclipse 配置
安装 Eclipse Maven2 插件 : http://m2eclipse.sonatype.org/update/
安装 JETTY 插件 : http://www.webtide.com/eclipse
安装 JETTY-RUN 插件 : http://run-jetty-run.googlecode.com/svn/trunk/updatesite
安装方法:eclipse -> help -> software updates -> Find and Installs -> search for new features install -> new remote site
导入MVN 生成的 myapp到eclipse中 : eclipse -> file -> import... -> Existing projects to workspace -> select root directory
在中eclipse调试myapp: eclipse -> run -> open run dialog... -> 双击 Jetty webapp -> 配置myapp的jetty如下图

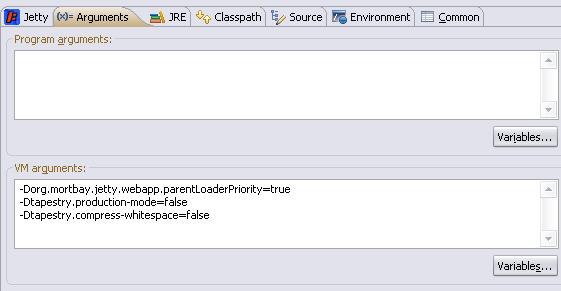
进入Arguments配置框 ,在VM里面加入如下代码:
-Dorg.mortbay.jetty.webapp.parentLoaderPriority=true
-Dtapestry.production-mode=false
-Dtapestry.compress-whitespace=false
如图:
进入classpath 配置框,添加 servlet api, 下图的servlet-api-2.5-6.1.12.rc2.jar是下载的jetty-6.1.12.rc2的类库中的,jetty-6.1.12.rc2可以到 http://dist.codehaus.org/jetty/jetty-6.1.12/ 下载

开始运行

进入 http://localhost:8080/ 成功访问。
现在整个调试环境成功建完。


 158
158

 被折叠的 条评论
为什么被折叠?
被折叠的 条评论
为什么被折叠?
 到【灌水乐园】发言


